How to use an Xbox One controller to your PC
Wired or wireless, here's how to get gaming

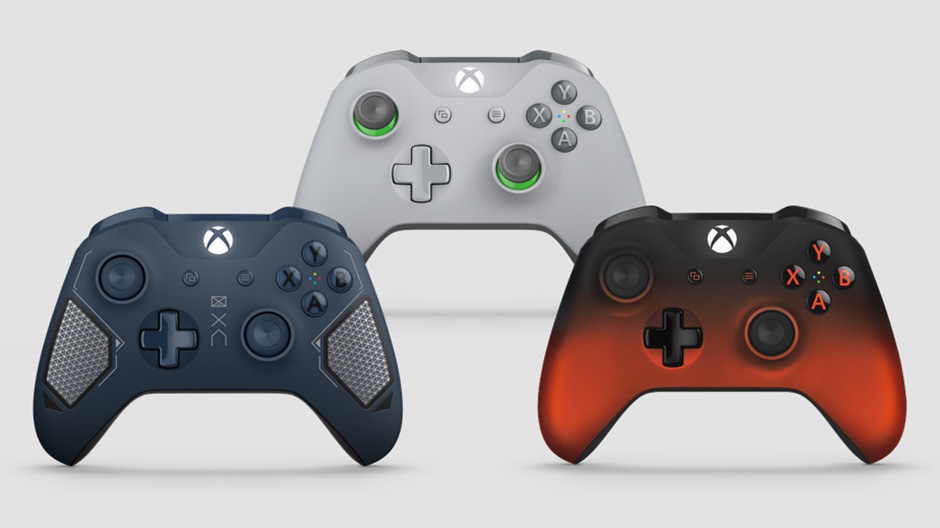
If you're trying to game on PC and prefer a controller over mouse and keyboard, you have the option to use an Xbox One controller. And, since Windows 10 natively supports the Xbox One controller, setup is incredibly easy.
However, the way you connect your controller to your PC may vary a little bit depending on which type of Xbox One controller you have and what method you want to connect.
We'll provide instructions for connecting using USB, Bluetooth and Microsoft's wireless dongle. When it comes to Bluetooth, we'll also help you figure out whether your controller supports it, as many Xbox One controllers don't.
How to connect any Xbox One controller to PC via USB
If you don’t mind a wired connection, using a USB cable is by far the easiest way to set up any type of Xbox One controller with a PC. This method works for Xbox One, Xbox One S, and Xbox One Elite controllers.
All versions of the Xbox One controller have a Micro USB connector on them. This allows you to connect them directly to a PC using a Micro USB-to-USB Type-A cable. And, since Windows can automatically recognize connected Xbox One controllers, there’s nothing more to it.
- Step one: Connect your USB cable to your powered-on Windows computer
- Step two: Connect the Micro USB end to your Xbox One controller.
- Step three: Press the Xbox logo on your controller to turn it on. (If the logo briefly flashes and then turns off, your battery may be low, or the cable your using may only be for charging and not for data. If you know your controller is charged, try using a different Micro USB cable.)
- Step four: Enjoy your games. Once connected, Windows 10 should automatically detect the Xbox One controller, and you’ll be able to use it with games that support controller input.
How to connect Xbox One S controllers to PC via Bluetooth
While the original Xbox One controller did not support Bluetooth, some versions of the Xbox One controller do. You can see instructions on how to identify a Bluetooth-capable controller here. To connect, you’ll also need to have your PC running the Windows 10 Anniversary Update or later
When you’re ready, follow these steps (there’s a little room for variance in the order, but if you’re not used to pairing Bluetooth devices in Windows, try to follow our order):
Sign up for breaking news, reviews, opinion, top tech deals, and more.
- Step one: power on the Xbox One controller by holding the Xbox logo.

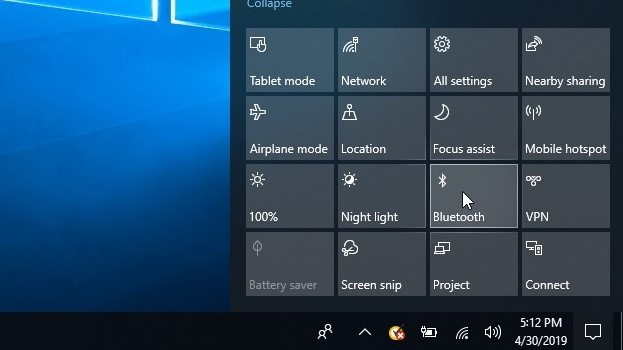
- Step two: Turn on Bluetooth on your PC, either by toggling it from the Action Center or by switching it on in the Bluetooth settings menu that can be found in step three.
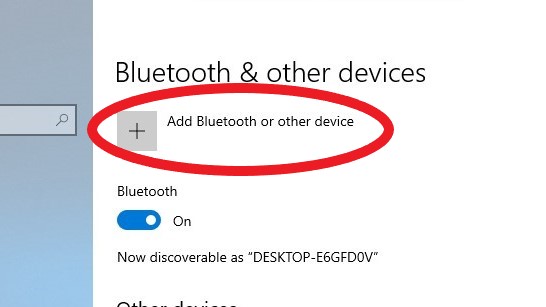
- Step three: With Bluetooth on, prepare for pairing by going to the “Bluetooth & other devices” menu. You can get there by going to Settings > Devices > Bluetooth, or typing “Bluetooth” into the Windows 10 search bar.
- Step four: Press and hold the Connect button on your Xbox controller for three seconds. You can find it on the front of the controller near the USB port next to a symbol that looks like this: "((("
- Step five: Your PC may automatically discover the Xbox Wireless controller and prompt you to pair the devices. If this happens, select “Pair” from the prompt in the Bluetooth settings menu. If not, continue below.

- Step six: In the “Bluetooth & other devices” menu, press the + sign to “Add Bluetooth or other device.”
- Step seven: In the new “Add a device” window, select “Bluetooth” (For computers with an Xbox Wireless adapter built in, you can select the “Everything else” to connect Xbox controllers, just note that option is not for Bluetooth). This will begin a search for available devices.
- Step eight: Select your Xbox control from the list of available devices.
How to connect Xbox One controllers to PC using the Xbox Wireless Adapter
Windows 10 is all set and ready to work with the Xbox Wireless Adapter. Drivers will automatically install when the device is connected, so the process is largely simplified
(Note: If you have an Xbox Wireless adapter built into your computer, follow the steps for Bluetooth pairing – but, at Step seven, choose the “Everything else" option).
- Step one: Connect the Xbox Wireless Adapter to your Windows PC and allow the drivers to automatically install.
Try to ensure where the adapter is connected to your PC provides line of sight to the controller for the best connectivity.
- Step two: Power up your Xbox One controller by pressing the Xbox logo in the center of the controller.
- Step three: Locate and press the button on the Xbox Wireless Adapter
- Step four: Press the connect button on your Xbox One controller. It can be found on the front of the device near the micro USB port. It’s marked by a symbol that looks like this: "((("
- Step five: Ensure the Xbox logo on your controller is blinking. This indicates it is connecting. When the logo and LED on the USB adapter both go solid, the connection is complete.
- These are the best PC games to play with your newly connected controller

Over the last several years, Mark has been tasked as a writer, an editor, and a manager, interacting with published content from all angles. He is intimately familiar with the editorial process from the inception of an article idea, through the iterative process, past publishing, and down the road into performance analysis.