Make music on iOS: create amazing tracks with your iPhone or iPad
The ultimate guide to the apps and hardware you need
If you already own a microphone, there are interfaces available that allow you to hook it up to an iOS device and use it with audio-processing apps. The Alesis iO Dock is one, while the Tascam iXZ is a cheaper alternative offering just guitar and mic inputs (great for a singer-songwriter).
If you just want to record audio and aren't interested in MIDI or instrument connections, IK Multimedia's iRig Pre will hook you up at a budget price. (All of these three provide preamps and phantom power.)
If you don't own a mic, check out an iOS-specific solution such as IK iRig Mic or Apogee Mic. The iRig Mic is an affordable condenser unit that plugs straight into the headphone jack. Reports on its sound quality are varied, so if you want top-dollar recordings, play it safe and go for the rather more expensive Apogee Mic. This bad boy plugs straight into the actual dock connector rather than the audio jack, and is a great portable solution for making samples on the move.
Now you've got your mic and connection sorted, onto some quick tips for a great recording. First, make sure you're in as quiet a place as possible: so shut any windows, turn off any extraneous hum-emitting equipment, get out of the wind, and tell your other half what you're up to so they don't burst in.
If you're recording vocals, place a pop shield in front of the mic to stop bursts of exhaled breath making annoying 'pops' on your recording. You can buy one for around £15, or if you're strapped for cash, indulge in a bit of cheeky bit of DIY by stretching a pair of tights over a coat hanger (seriously).
Ensure your singer or other sound source stays in the same place throughout the recording - if they move about, the tone will change.
Finally, make sure the input gain in your DAW or app is set to an appropriate level. You should never see the input levels light up red, because this means that the audio is 'clipping' and will sound distorted on playback. Test the levels by running through the loudest part of the material you're recording, and lower the input gain if necessary. Once recorded, adjust the start and end points of the audio clip on your iOS device as needed.
Sign up for breaking news, reviews, opinion, top tech deals, and more.
But you don't have to stop there - why not transform the material into something else entirely? Powerful sample-editing app SampleWiz is a creative way to take audio clips and free them from their natural form. You could pitch your clip down an octave, drag its final notes out for an eternity and mess with its grain size - then resample your sonic Frankenstein and mess about with it a bit more.
The advantage of using SampleWiz over a traditional sampler is its unique touch-based editing interfaces, so professionals should definitely give it a whirl to see what atypical noises they can cook up.
Attaching a guitar

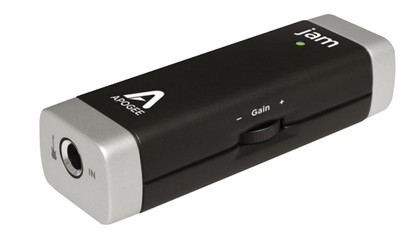
Want to rock out with your, er, iPad out? Your guitar won't plug straight into your iOS device, so you need either an interface with a ¼-inch input or a dedicated guitar box, examples being Apogee Jam (which hooks up through the dock connector for a digital signal) or IK Multimedia's iRig (which plugs in through the audio jack). This is made specifically to power IK's AmpliTube 2 app (which exists as a paid and free-with-IAP version), which offers an astonishing number of amps, cabs and effect pedal emulations, all of an extremely high quality.

Apogee's Jam, on the other hand, will work with pretty much all guitar amp sims, including those found in GarageBand. These apps are great because guitar hardware normally costs a lot of money, so to have hundreds of options at your disposal without breaking your bank - or your back lugging them around - is quite the luxury.