80 handy iPhoto tips and tricks
iPhoto hints: organise, improve, manipulate and share
Tweak your images in iPhoto
21. Use the Enhance button
If you've got a problem photo, try iPhoto's Enhance button. The automatic enhancements are effective, optimising the Levels, adding saturation and tweaking the white balance to produce slightly 'warmer' colours. You can then open the Adjust panel to see what it's done, and tweak or remove the adjustments if they're not working.
22. Edit highlights with RAW files
An advantage of shooting RAW files is that you can extract extra highlight detail from your pictures. When you edit a RAW file in iPhoto, you'll see that a couple of the controls behave slightly differently. With JPEG images, the Highlights slider simply darkens the existing highlights in the picture; with RAW files, it recovers extra, 'hidden' highlight detail.
23. White balance and RAW files
When you edit JPEG images, the Temperature and Tint sliders are 'relative', so you can make the colours look warmer or cooler. But when you edit a RAW file, the Temperature and Tint values are 'absolute' – you have access to the full colour data recorded by the sensor and before any white balance has been applied.
24. Third-party RAW conversions
Sign up for breaking news, reviews, opinion, top tech deals, and more.
iPhoto can open and edit RAW files from many cameras, but while its RAW conversions are good, you might want to use a different program. If you send files to an external editor, the converted file won't be added back to your iPhoto library, so it's best to convert photos before you actually import them.
25. Retouching tips

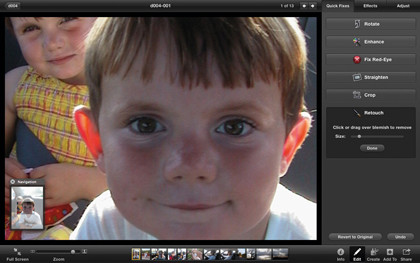
iPhoto's Retouch tool is basic but effective. First, choose a brush size a little larger than the blemish you want to remove. Second, 'dab' rather than 'brush' – a brushing action tends to smear the pixels. Third, if the repair doesn't work first time, hit undo, change the brush size or position slightly and try again.
26. Shadows and Highlights
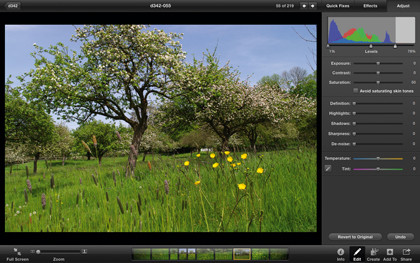
These sliders can be extremely handy for any 'problem' photos where ordinary Levels adjustments don't help. They work by separating out the darker and lighter parts of the picture for adjustment. The Highlights slider darkens over-bright areas, and the Shadows slider lightens dense shadows. Don't push them too far, though, or you'll start to see a 'glow' effect around objects where the adjustment is being blended in.
27. Edit duplicates
iPhoto's adjustments are non-destructive, so that you can revert to the original version of the picture at any time. However, you can't easily see which pictures have been adjusted and which haven't, or what the original looks like. But, if you like, you can duplicate the original before you start (Command+D). The duplicate will have 'Version 2' added to the title, and the original will still be there alongside it.
28. Prints and aspect ratios
When it comes to printing out your photos you'll often find that the picture's aspect ratio doesn't quite match the aspect ratio of the paper you're printing on. For example, most compact cameras shoot at a ratio of 4:3, but that's not the same as the 3:2 ratio of 6" x 4" prints. To control just how the picture is cropped to match the paper, check the Crop tool's 'Constrain' box and choose the correct aspect ratio from the list that comes up.
29. Levels adjustments

The Levels adjustments in iPhoto work slightly differently to most other photo-editing apps. Here, when you move the black point (left) and white point (right) sliders, the middle slider stays exactly where it is (in other programs, you'll find it will move proportionally). However, it's really easy to grasp and means the brightness doesn't change. To adjust the brightness, move the middle slider left (lighter) or right (darker).
30. Straighten before you crop
Some pictures need straightening, and some need cropping too. Make sure you straighten before you crop, though, because the straightening process removes thin wedges at the edges of the picture as you rotate it – if you crop first, you'll lose even more of the picture when you straighten it.
31. WB eyedropper tips
You can adjust the white balance in your pictures by using the eyedropper to click on a neutral tone in the picture. This is not always successful, though, because there's often nothing in your pictures that will provide a truly neutral tone. You may have to click on several different areas to find one that gives good results.
32. Edits apply everywhere!
Remember that when you adjust a photo, you're adjusting its appearance everywhere it appears. Let's say you want to create an album of antique-effect pictures – if those pictures appear in any other album, they're going to have that antique effect there, too. The way round this is to duplicate (Command+D) the photos before you start, and then apply the effect to the duplicates.
33. Using an external editor
If you'd rather use an image-editor such as Photoshop or Elements for your more ambitious projects, you can set this up in the Advanced tab of the iPhoto preferences. When you click the Edit button, iPhoto creates a duplicate and sends it to your external editor. When you save the file, it's returned to iPhoto, replacing the duplicate – but you have to stick to the same file format (JPEG).
34. 100% zoom
You can use the Zoom slider to check detail in your photos, but the magnifications aren't marked, which makes it difficult to judge the sharpness. If you want to see the image at 100% magnification, just hit the 1 key. The 0 key will fit the image to the screen again.
35. Black and white toning
You can convert a colour photo to black and white in iPhoto by reducing the saturation to zero in the Adjust panel, but you can do the same thing using the B&W Effect, and introduce some nice toning effects too. Add the Boost effect to create a rich sepia tone (much better than the standard Sepia effect) or the Fade effect to create a cool-toned cyanotype.
36. Exposure adjustments
Be careful when using the Exposure slider because it brightens all the tones in the image, shifting the whole histogram to the right (you can see it moving as you drag the slider), and this can clip detail in the highlights. To brighten an image without harming the highlights, drag the middle Levels slider to the left.
37. Before and after comparisons
There are two ways to compare your edited photo with the original as you work on it. One is to press and hold Shift, which displays the original image until you release it again. The other is to create a duplicate of the original, and then display both in the Edit mode so that you can see the difference as you work.
38. Copy and paste adjustments
You might find a set of adjustments and effects you like for one picture and decide you'd like to apply the same to another one. You can do this using the Edit > Copy Adjustments and Edit > Paste Adjustments commands, but you have to be in the Edit mode and you can only paste adjustments to one photo at a time.
39. Full-screen navigation

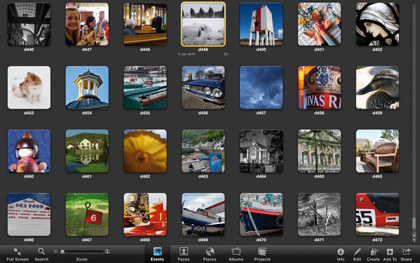
iPhoto 11's fullscreen mode is great for editing, but the navigation system is different. You use navigation buttons at the top-left to get back to a 'home' screen, where buttons let you choose whether to browse Events, Faces, Places or Projects.
40. Don't underestimate effects

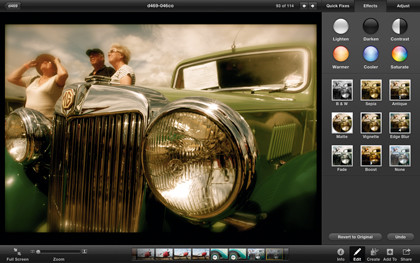
iPhoto's Effects are more than they seem. They're not like effects in Photoshop, say, which are applied on top of each other. Instead, they work in parallel; you can apply more than one effect, and you can use Effects and the Adjust tools in tandem.
Some of them come in different strengths, too, and you keep clicking to increase the effect. You can add or remove Effects at any time without affecting your other adjustments, and if you get in a mess you can click the None button in the Effects panel to remove them all and start again.
Current page: iPhoto tips 21-40: Tweak your images
Prev Page iPhoto tips 1-20: Take better photos Next Page iPhoto tips 41-60: Organise your photos
Rod is an independent photographer and photography journalist with more than 30 years' experience. He's previously worked as Head of Testing for Future’s photography magazines, including Digital Camera, N-Photo, PhotoPlus, Professional Photography, Photography Week and Practical Photoshop, and as Reviews Editor on Digital Camera World.