
 Become a TechRadar Insider


Controlling a camera – even the one on your phone – like the professionals is easier than you think. Cut through the crust of intimidating terms and you can start using your camera's manual mode to get a degree of control over your shots you might have thought you'd need a high-end DSLR for.
Give us just 10 minutes of your time and we can explain everything you need to know in order to sound, and shoot, like a pro.
We’ll be looking at these terms through the lens, so to speak, of a phone camera. However, this is all foundational knowledge that applies to any kind of camera, even up to something far more powerful like the Canon EOS R.
Shutter speed
This is the most useful control for manual shooting. Shutter speed is the duration for which the camera's shutter is open, enabling light to hit the sensor; although, unlike cameras, phones don't actually have physical shutters these days – instead the sensor is simply activated for the required length of time.
A shutter speed of, for example, 1/30 means the scene is recorded for one thirtieth of a second. Many phones let you stretch this out to an ultra-long 30 seconds, and cut it down to a fast 1/3200 of a second.
The pros and cons of different shutter speeds are fairly simple to grasp. A very fast speed lets you shoot fast-moving objects without motion blur, but unless the shooting environment is very bright the camera will need to use a higher ISO to compensate for the limited amount of light the sensor receives.
A very slow shutter speed means the sensor will receive more light – and on a bright day you’ll only be able to slow it down so much before the image will look too bright, or overexposed. This is where parts of the sensor are effectively 'maxed out' with light, turning the corresponding areas of the photo into blocks of white.

Slow shutter speed or long exposure photography is one of the best reasons to buy a phone tripod like the Gorillapod. Keep the phone still and you’ll be able to take very high-quality night images, or blur motion in a scene for creative effect – an exposure of several seconds turns cars into streaks of light, crowds into ghostly semi-transparent figures and moving water into a milky blur.
No tripod? You can still get great results if your phone has OIS. This is optical image stabilization, with a tiny motor in the camera moving the lens to compensate for the 'shake' that can occur when you hand-hold your phone.
Using OIS you can take exposures of up to half a second and still get sharp photos, as long as your hands aren't overly shaky.
Have a play with shutter speed to see how long you can make an exposure without causing blur, then take the phone out at night, and use this slowed-down exposure to see how much it improves your shots.
Don’t have OIS? Shutter speed control in your bare hands is much less useful, as slowing it down beyond 1/10 of a second will often cause blur.
Aperture
The aperture value is the size of the opening that lets light into a camera lens, and onto the sensor, and it's one of the most important shooting settings when you use a DSLR or compact system camera.
However, it doesn’t really come into play when you're taking photos with your phone, as all current phones bar some top Samsung models have fixed apertures, and the Galaxy S9, Galaxy S9 Plus and Galaxy Note 9 can only switch between two settings – f/1.5 and f/2.4.
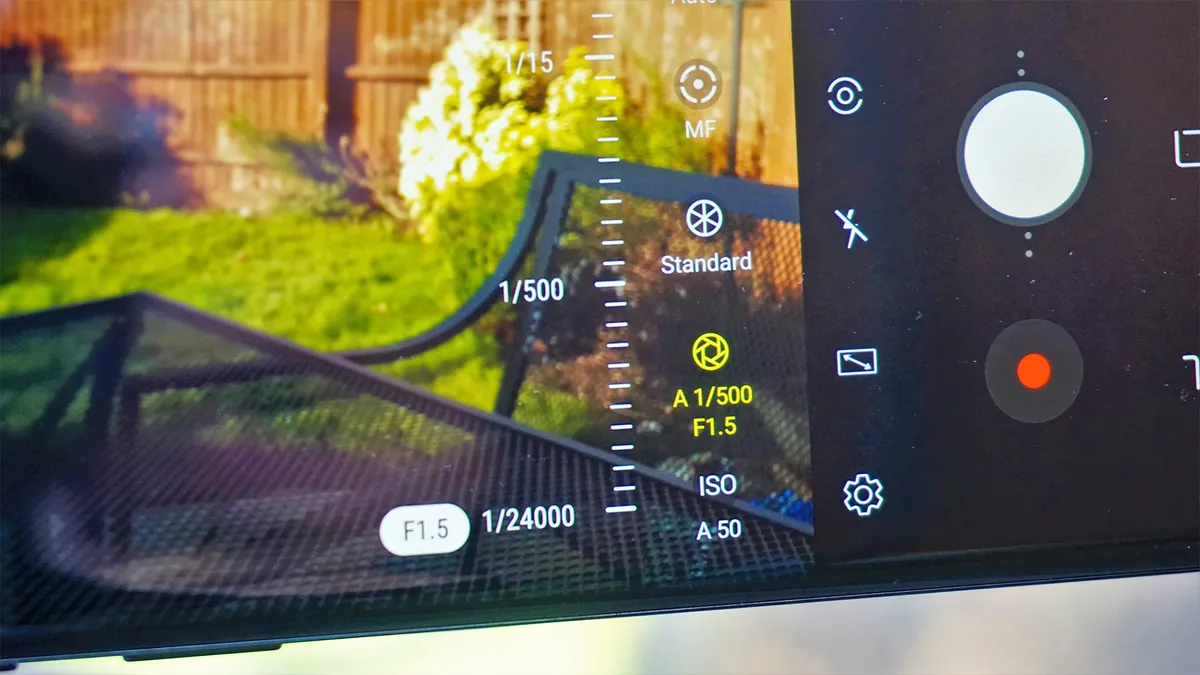
A value like the S9’s f/1.5 is the f-stop rating. Divide the focal length of the lens by the f-stop rating and you get the width in millimeters of the lens opening. As the actual focal length of the S9 camera is 4.3mm, we can calculate the width at f/1.5 as 2.86mm, and that drops to 1.79mm when using the f/2.4 mode.
So why, you may be wondering, is the Galaxy S9's lens described as 26mm? That's because its view of a scene is equivalent to that of a full-frame (or film) camera with a 26mm lens.
ISO
ISO is perhaps the most alien-sounding of all the basic camera settings. Fortunately, it's also often the one you have to worry about the least when taking photos.
It refers to the sensitivity of a camera's imaging sensor to light. The higher the ISO value, the less light the sensor needs to create a well-exposed image.
For photos that contain the least noise (that unsightly speckling you see in low-light shots) and the most detail, you want to keep the ISO as low as possible. Each camera has a 'base' ISO, which is the lowest sensitivity setting it can use. This is usually ISO50 or ISO100.
Some photographers deliberately use high ISO settings to get a grungy, grainy look, for example in documentary images. However, thanks to the amount of processing applied to images taken with phone cameras, doing the same with your phone rarely produces good-looking results.

However, manually increasing ISO gives you more scope to use very fast shutter speeds when capturing fast action, or in very low light. ISO800 and above are considered high settings, and phones generally let you push the ISO up to around 2000-3200.
Most of the time we recommend shooting with ISO set to Auto, as the correct setting to use is generally as low as possible, but high enough to render bright images at your chosen shutter speed.
The exception is if the phone’s auto mode isn’t actually clever or flexible enough to make that decision, which you can tell if the preview image looks too bright or dark when ISO is set to Auto.
White balance
Photography isn’t really about capturing images, but light instead. All light has a color 'temperature', which varies from cool blue hues to warm yellows, and this can manifest itself as a color 'cast', or tint, in your photos.
When you shoot in Auto mode, the camera compensates for color temperature by adjusting the white balance, which works on the principle that if the white tones in an image look truly white then the other colors will fall into line and look 'right'.

Auto settings don't always get it right though, and some phone manual modes enable you to select white balance presets for typical conditions, such as Cloudy, Daylight and so on.
On some cameras you'll see white balance represented by values on the Kelvin scale, a measure of temperature. Kelvin values such as 2700K are more warm, while those around 5000-7000K are cool, and look blue-ish.
Changing the white balance and color temperature can radically alter the character of a photo; however, by forcing the 'wrong' white balance you can come up with some interesting creative results.
Exposure compensation

Exposure compensation is such a useful control that many phones even pack it into their Auto modes. It’s expressed as an EV (exposure value), for example 0, -1 or +2, which is a measure of relative brightness.
Adjusting exposure compensation is very handy if you find the image preview looks too dark, or too light. A camera's exposure metering is often a compromise to take account of both light and dark areas, so if the camera’s judgement doesn’t match your own, you can intervene.
If an image is too bright you can add 'negative' exposure compensation (minus values); if an image looks too bright you can add 'positive' exposure compensation (plus values). The camera will adjust the aperture or shutter speed accordingly to let in more or less light.
- Brought to you in association with Nokia and Android One, helping you to make more of your smartphone. You can learn more about the new Nokia 7.1 here, and you'll find more great advice on getting the most from your phone here.
