How to delete, move and resize pagefile.sys
If storage space is running low, learning how to delete, move and resize pagefile.sys will allow the paging file to hold any data that your RAM can't
Learning how to delete, move and resize pagefile.sys can come in super handy if storage space is running low. There's no denying that Windows 10 can be super resource intensive and sometimes the capacity provided by your physical RAM (Random Access Memory) just isn't insufficient to hold every running program and process.
While it's not anywhere near as efficient as the best RAM, Microsoft's clever paging file (known as pagefile.sys.) is a handy workaround that will hold any data that your RAM can't and prevent your system from crashing when resources are running low.
Windows 10 is configured by default to automatically manage the paging file – so you if you have the best computer or the best Windows laptop, you may not have even noticed that it's there. And that's been done for good reason - to avoid tampering.
But while it may not be easily visible, if you need to free up some space on your drive or improve system efficiency even further, you can transfer pagefile.sys to one of the best external hard drives or set a size limit.
If you're working with programs that take up a lot of processing power and you're looking to lighten the load on the working memory, pagefile.sys. is well worth considering. It's worth noting though that accessing the page file is slow and if you're moving over large quantities of data there can be a significant drop in performance.
Still, knowing how to delete, move and resize pagefile.sys can be well worth it and we walk you through everything you need to know below. Before you begin, please take the time to read our advice on deleting the file (ie: don’t) and make sure to backup your PC before you make any changes.
Is pagefile.sys safe to delete?
When it comes to how to delete, move and resize pagefile.sys, there's an important consideration to address before proceeding. Because pagefile contains important information about your PC state and running programs, deleting it could have serious consequences and tank your system’s stability. Even if it takes up a large amount of space on your drive, pagefile is absolutely necessary for the smooth operation of your computer. This is exactly why pagefile.sys is hidden by default on Windows 10.
Sign up for breaking news, reviews, opinion, top tech deals, and more.
If you choose not to heed our warning and are determined to delete pagefile.sys, follow the steps to view protected system files in Windows 10.
How to delete pagefile.sys
If you believe your pagefile.sys has become corrupted or is causing other system problems, you can choose to delete it although it is not recommended.
Follow the steps below to locate and delete the file. We'll also show you how to run a backup of your Windows 10 system in case deleting causes further issues.
1. View hidden OS Files
In order to delete pagefile.sys you first need to be able to view it.
To get started you firstly need to be able view pagefile.sys. Open the file explorer and navigate to the C: Drive.
Press Control + F1 to enable the ribbon menu. Click on 'view' and then 'Options'. A drop down menu will appear.
Click 'Change folder and search options'. In the new window which appears, click the 'view' tab and then uncheck 'Hide protected system operating files (Recommended)'.
Next, check the radio button 'Show hidden files, folders, and drives', then click 'Apply'. Pagefile.sys will now be visible.
2. Backup your files
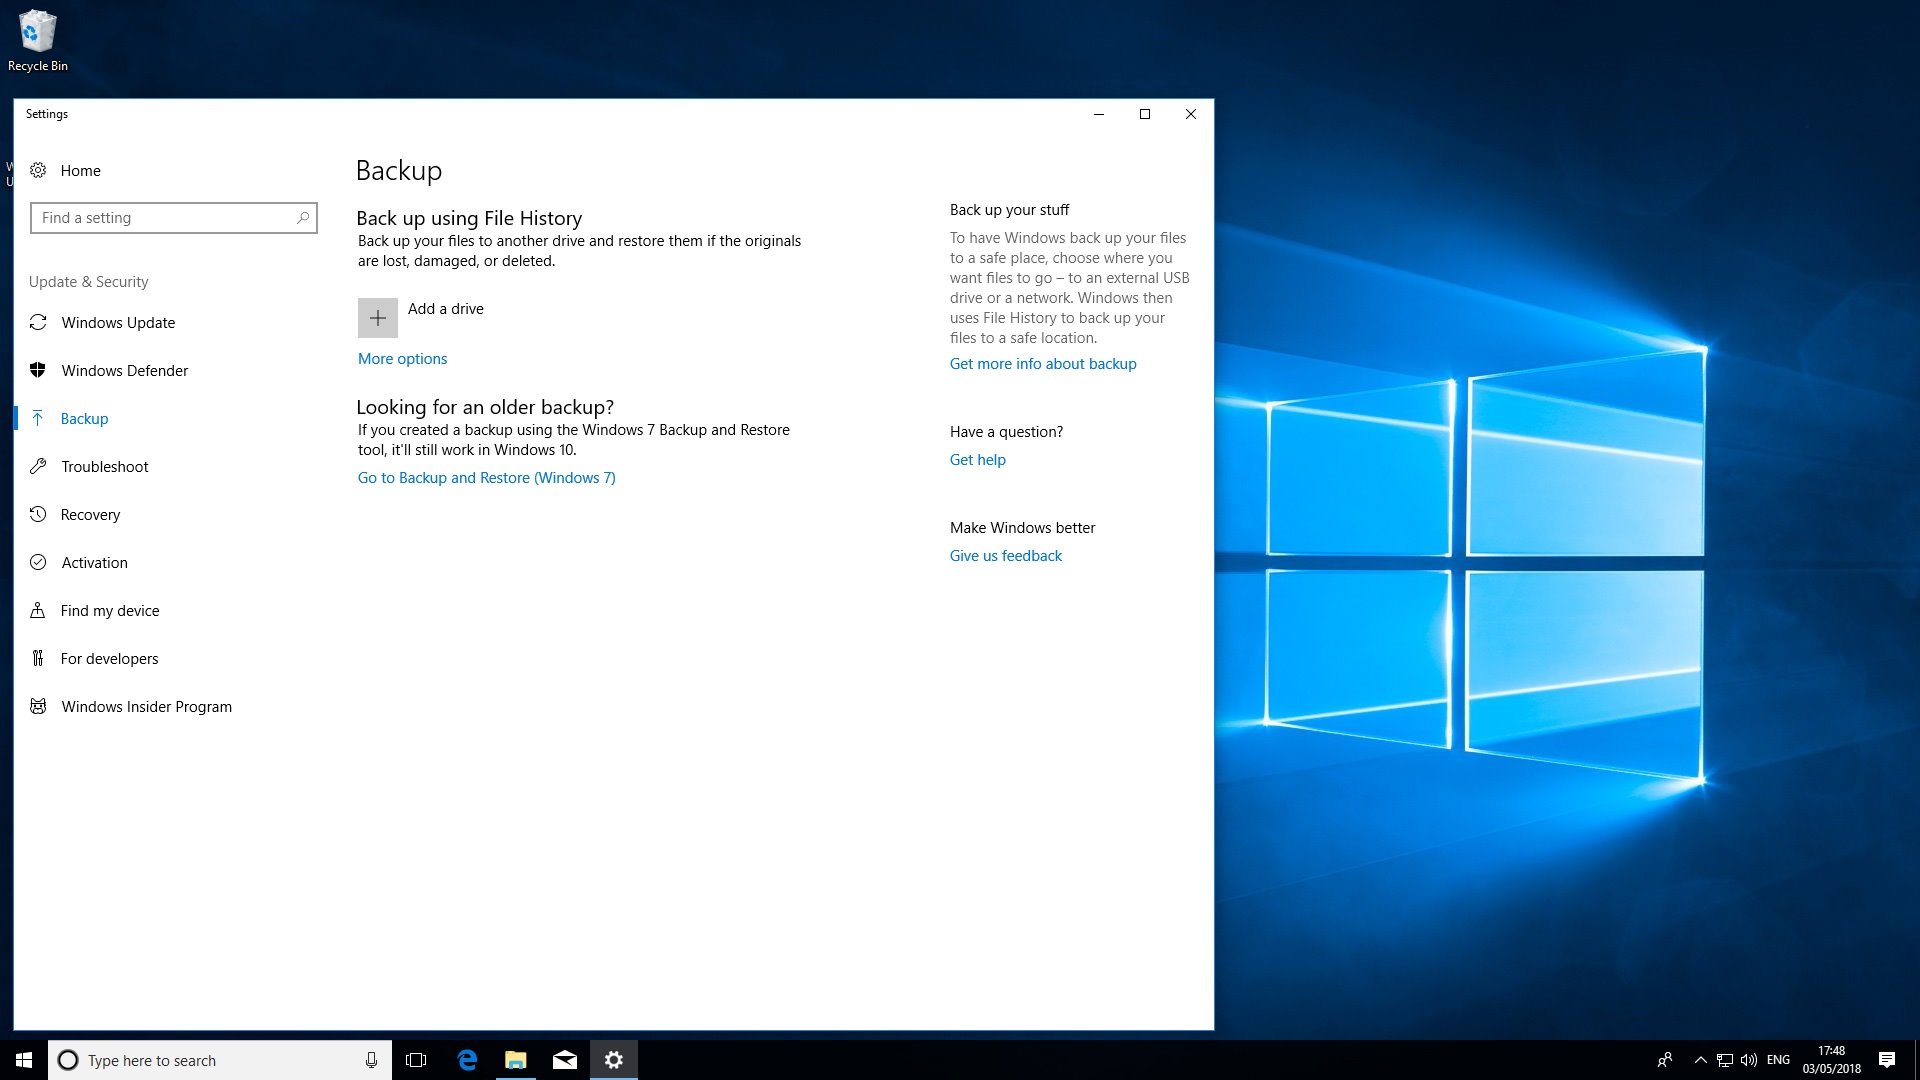
Close and save any files you have open. If you've never backed up your files before, you can do so using Windows 10 dedicated tool. You can find this under 'Settings' and >'Update and security'.
You'll need a dedicated external hard drive to store your backups. Make sure that it's capacity is at least as large as the drive inside your machine.
Once you are ready to proceed with your backups, follow the step on the Micorosoft website (https://support.microsoft.com/en-ie/help/17143/windows-10-back-up-your-files) to safeguard your data.
3. Delete pagefile.sys
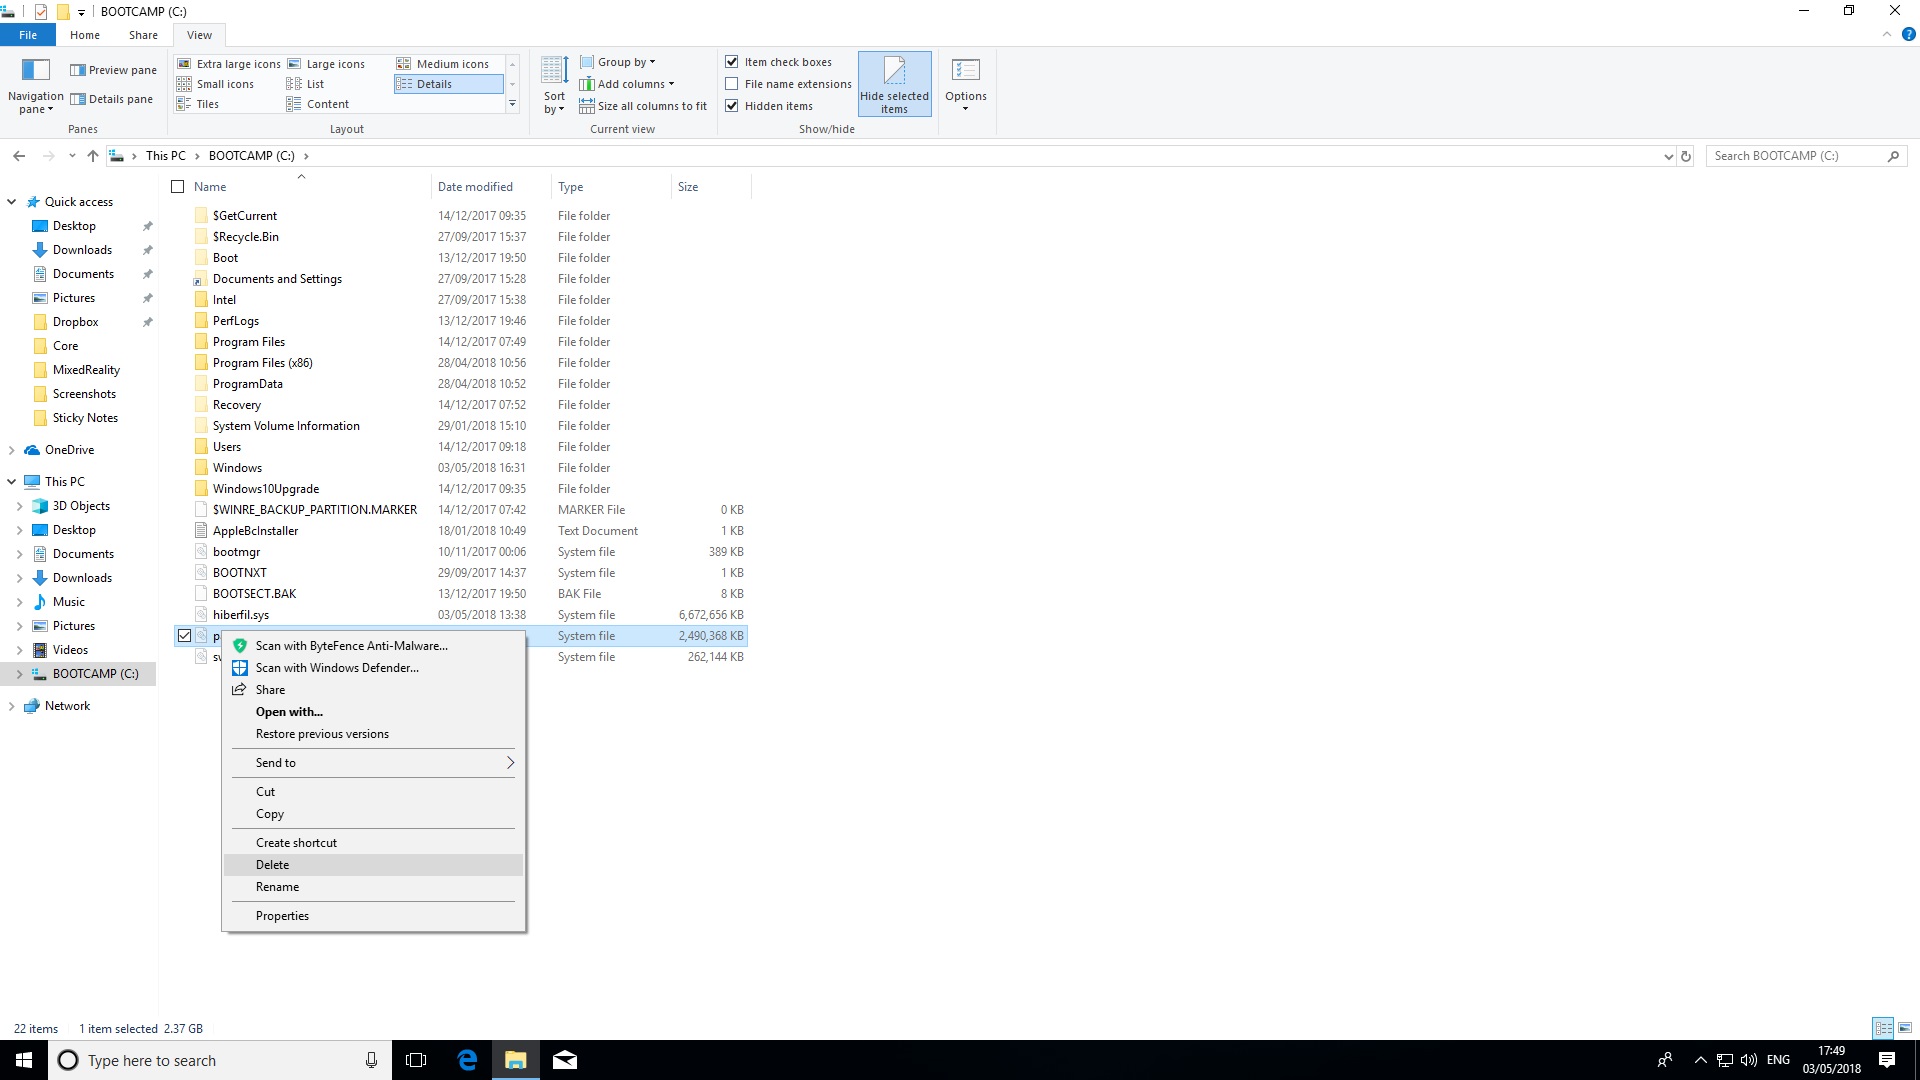
Right click on pagefile.sys and choose 'Delete'. If your pagefile is particularly large, the system may have to delete it immediately without sending it to the Recycle Bin. Once the file has been removed, restart your PC.
How to move pagefile.sys
We've walked you through the 'delete' portion of this how to delete, move and resize pagefile.sys guide, so now it's time to address the second part - moving it. By default. pagefile.sys is around 12GB in size. However, this will vary depending on how many resources your PC uses and the amount of physical RAM it has.
To save on precious hard drive space, you can move pagefile.sys to an external drive. This may increase your system speed depending on the type of disk e.g. an SSD and access speeds e.g. via USB 3.0. Whichever drive you use, make sure it is formatted to NTFS, which can handle larger file sizes.
1. Access Advanced settings
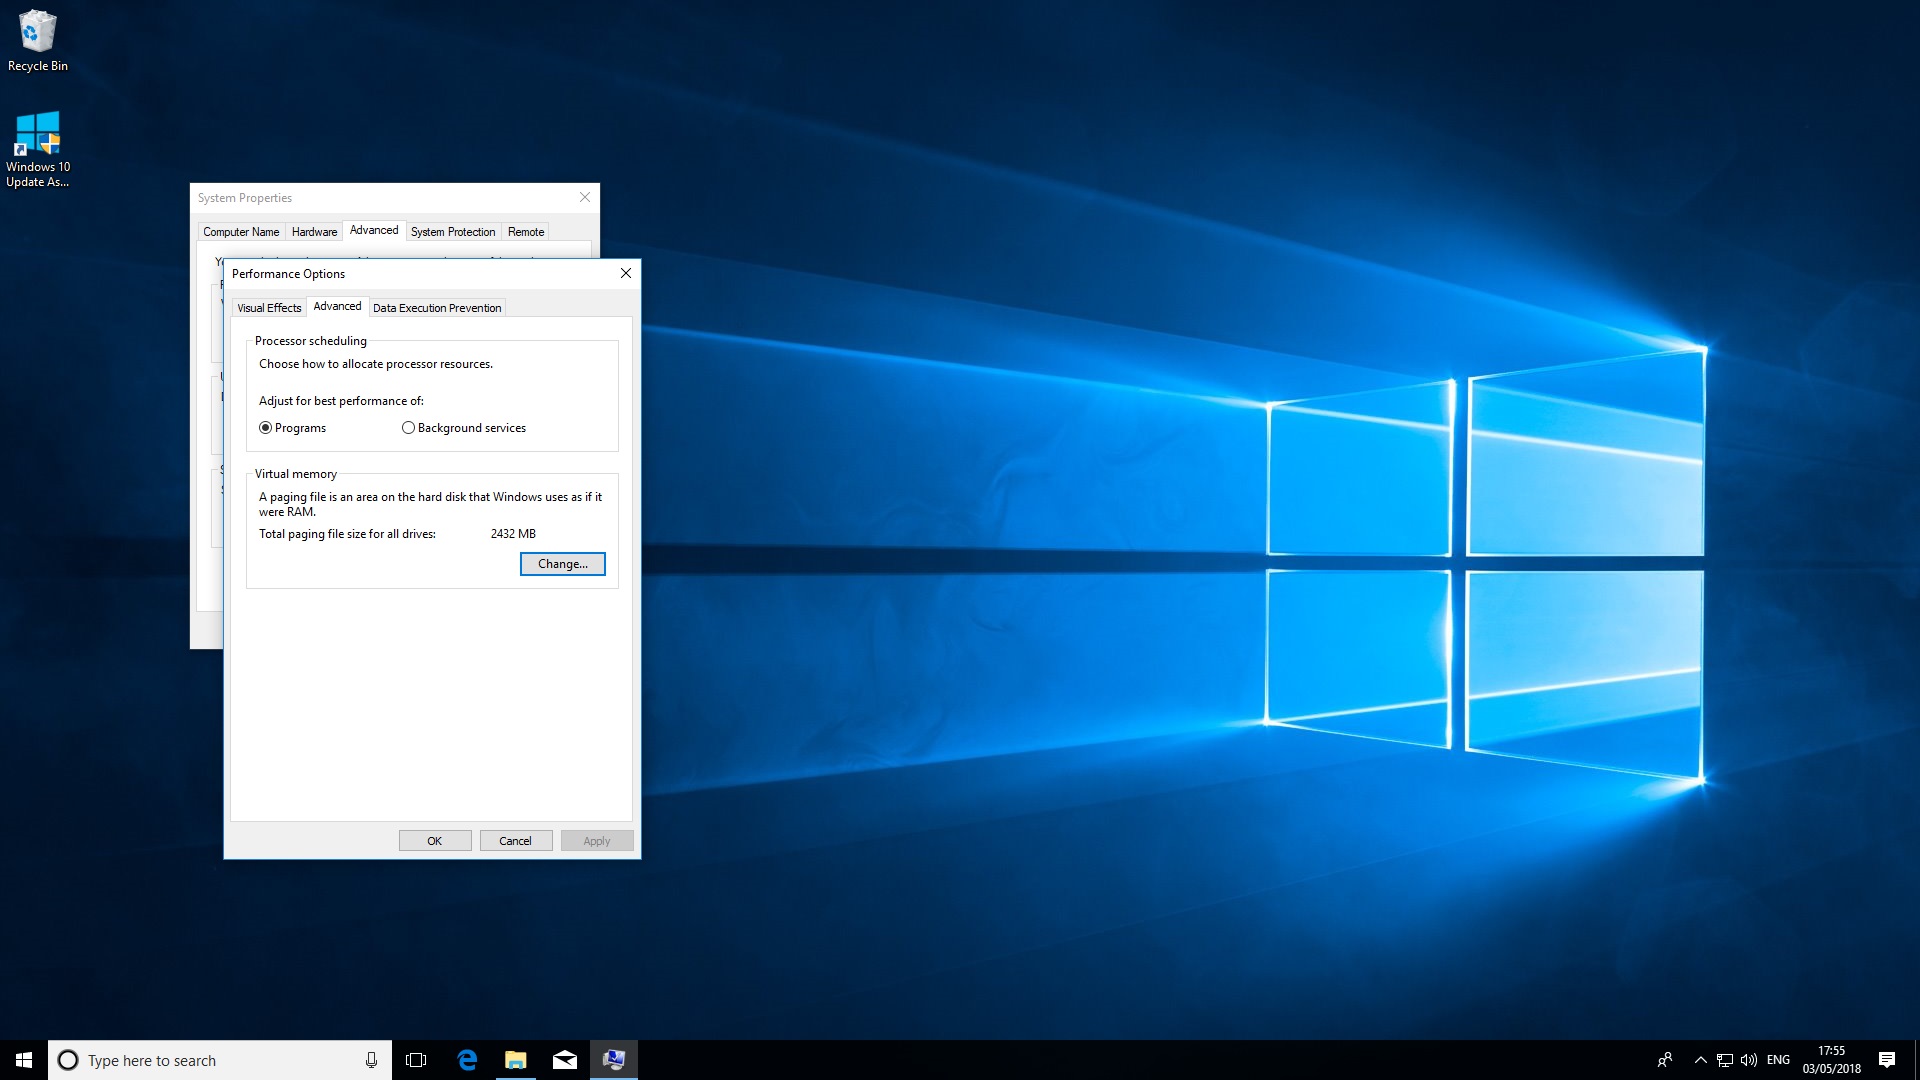
In Windows 10 open 'Control Panel'. Select the Windows icon at the bottom left of your desktop and enter the word "Advanced". Next, choose 'view advanced system settings'. In the 'Performance' section click 'Settings'.
In the new window which opens, click the 'Advanced' tab. Find the section named 'Virtual Memory' and click 'Change'.
2. Select your external drive
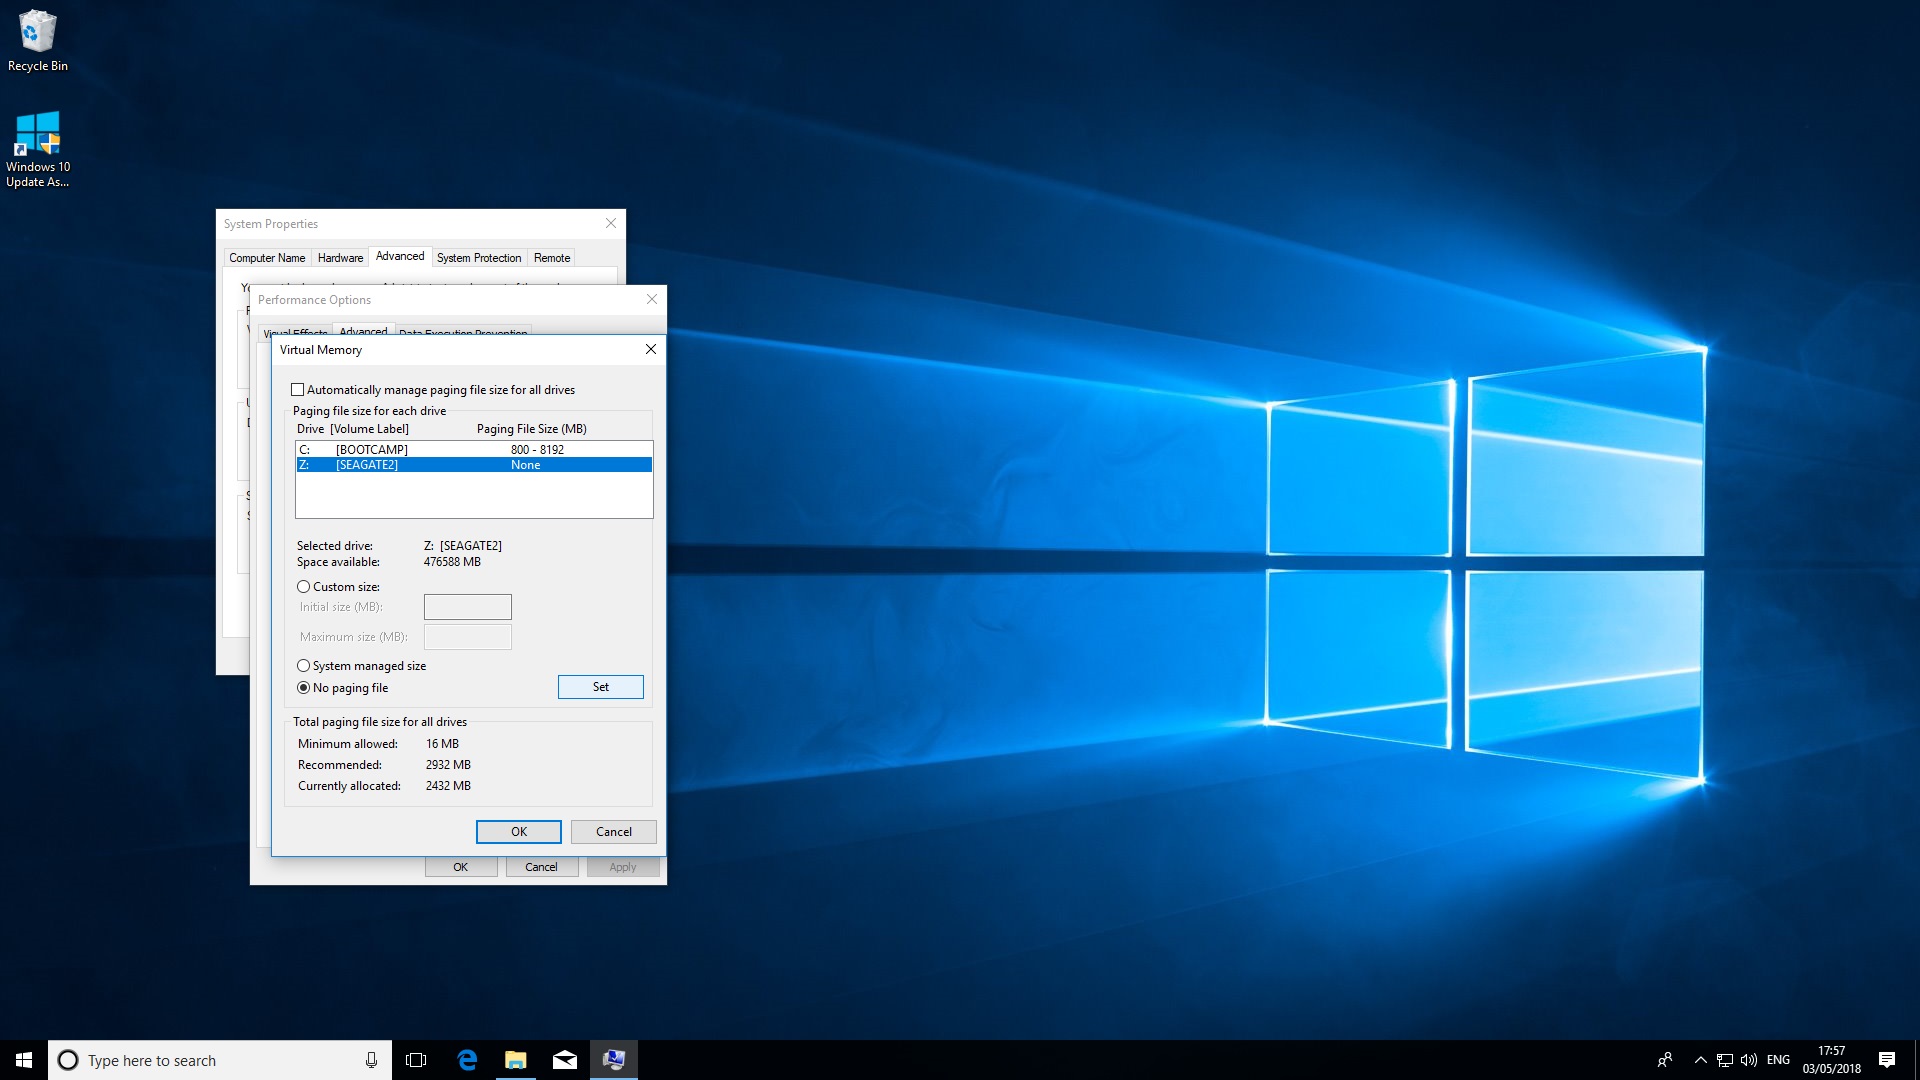
From the 'Virtual Memory' window, uncheck the option 'Automatically manage paging file size of each drive'.
Under 'System manage file' select 'No paging file'. Next, select the external drive that is showing under the C Drive.
Click the 'Set' button. Read through the warning message and then click 'Yes' if you want to proceed.
3. Restart your PC
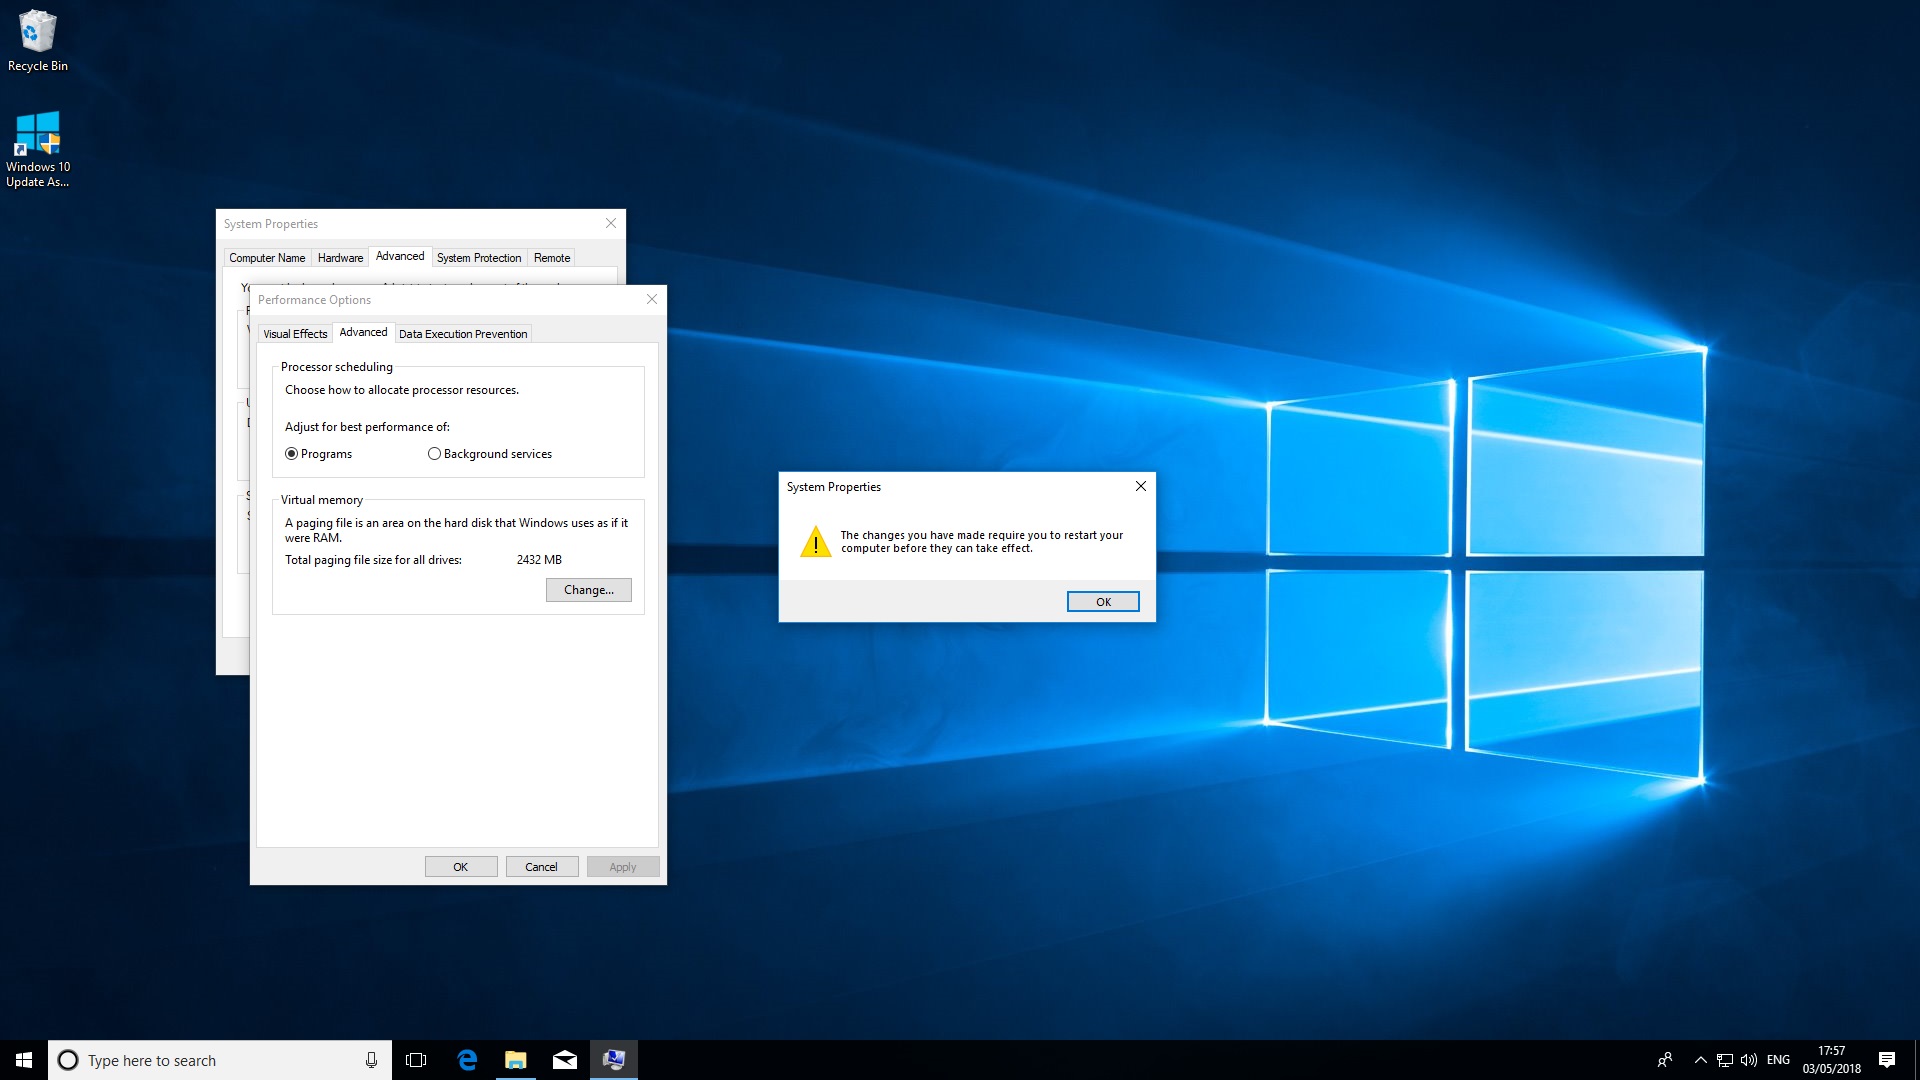
Your system will need to restart for these changes to take effect. Click 'Ok' to dismiss the pop-up message. Save and close any open files and then reboot your PC.
Windows 10 will automatically delete the old pagefile.sys and create a new one on the external drive.
How to resize pagefile.sys
Windows 10 automatically manages the size of pagefile.sys for you, but if hard drive space is at a premium, you can impose limits. Bear in mind that this could reduce system performance.
One way to have your cake and eat it is to install more RAM. This means your system relies less on the paging file making it smaller. For instance our Windows 10 testing machine has 32GB of RAM which resulted in a paging file of less than 2.5GB.
1. Check Memory usage
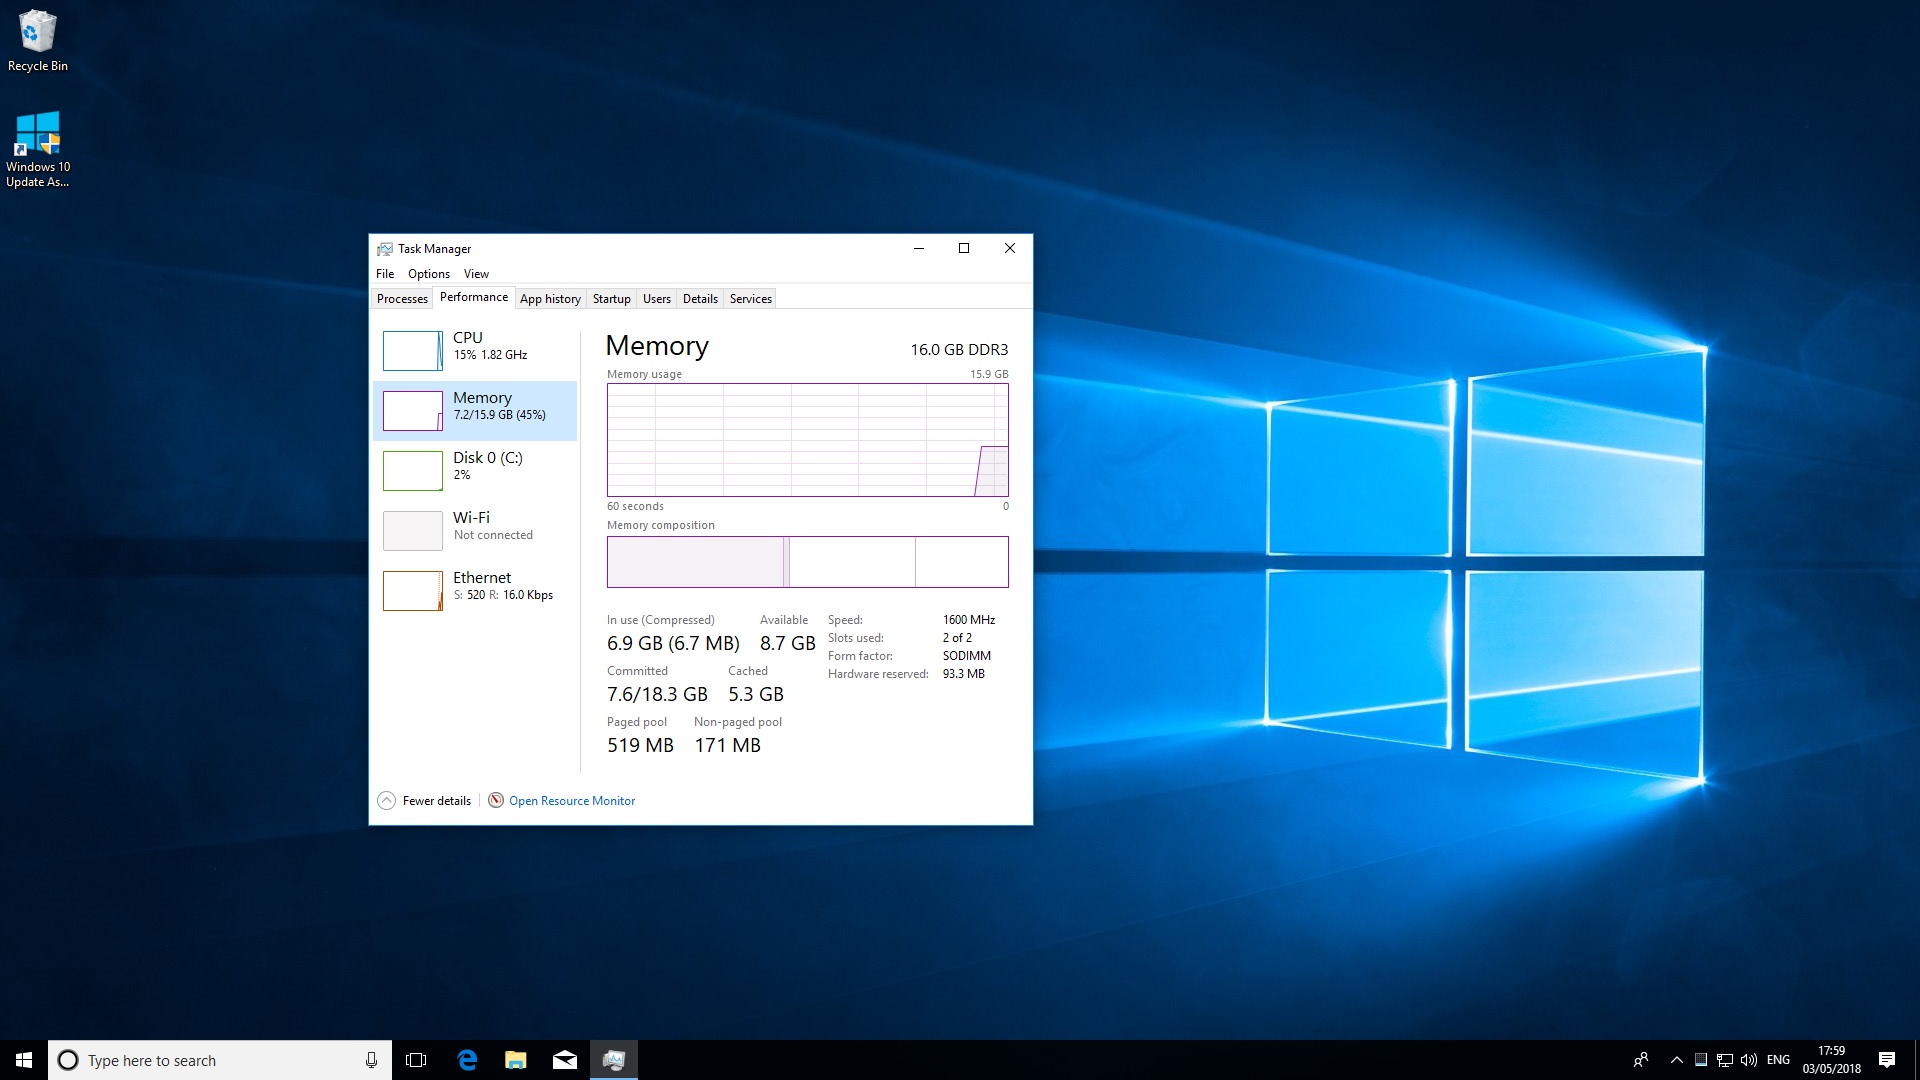
To determine how much virtual memory your system is using, press Ctrl + Alt + Del to access 'Task Manager'.
Click the 'Performance' tab and then choose 'Memory'. Pay close attention to the amount of memory (in use), as this will give you a rough idea of how large pagefile.sys needs to be.
You'll need to do this over several days to work out how much virtual memory you are using on average.
2. Access advanced settings
In Windows 10 open 'Control Panel'. Select the Windows icon at the bottom left of your desktop and enter the word "Advanced". Next, choose 'view advanced system settings'. In the 'Performance' section click 'Settings'.
In the new window which opens, click the 'Advanced' tab. Find the section named 'Virtual Memory' and click 'Change'.
3. Set size limits
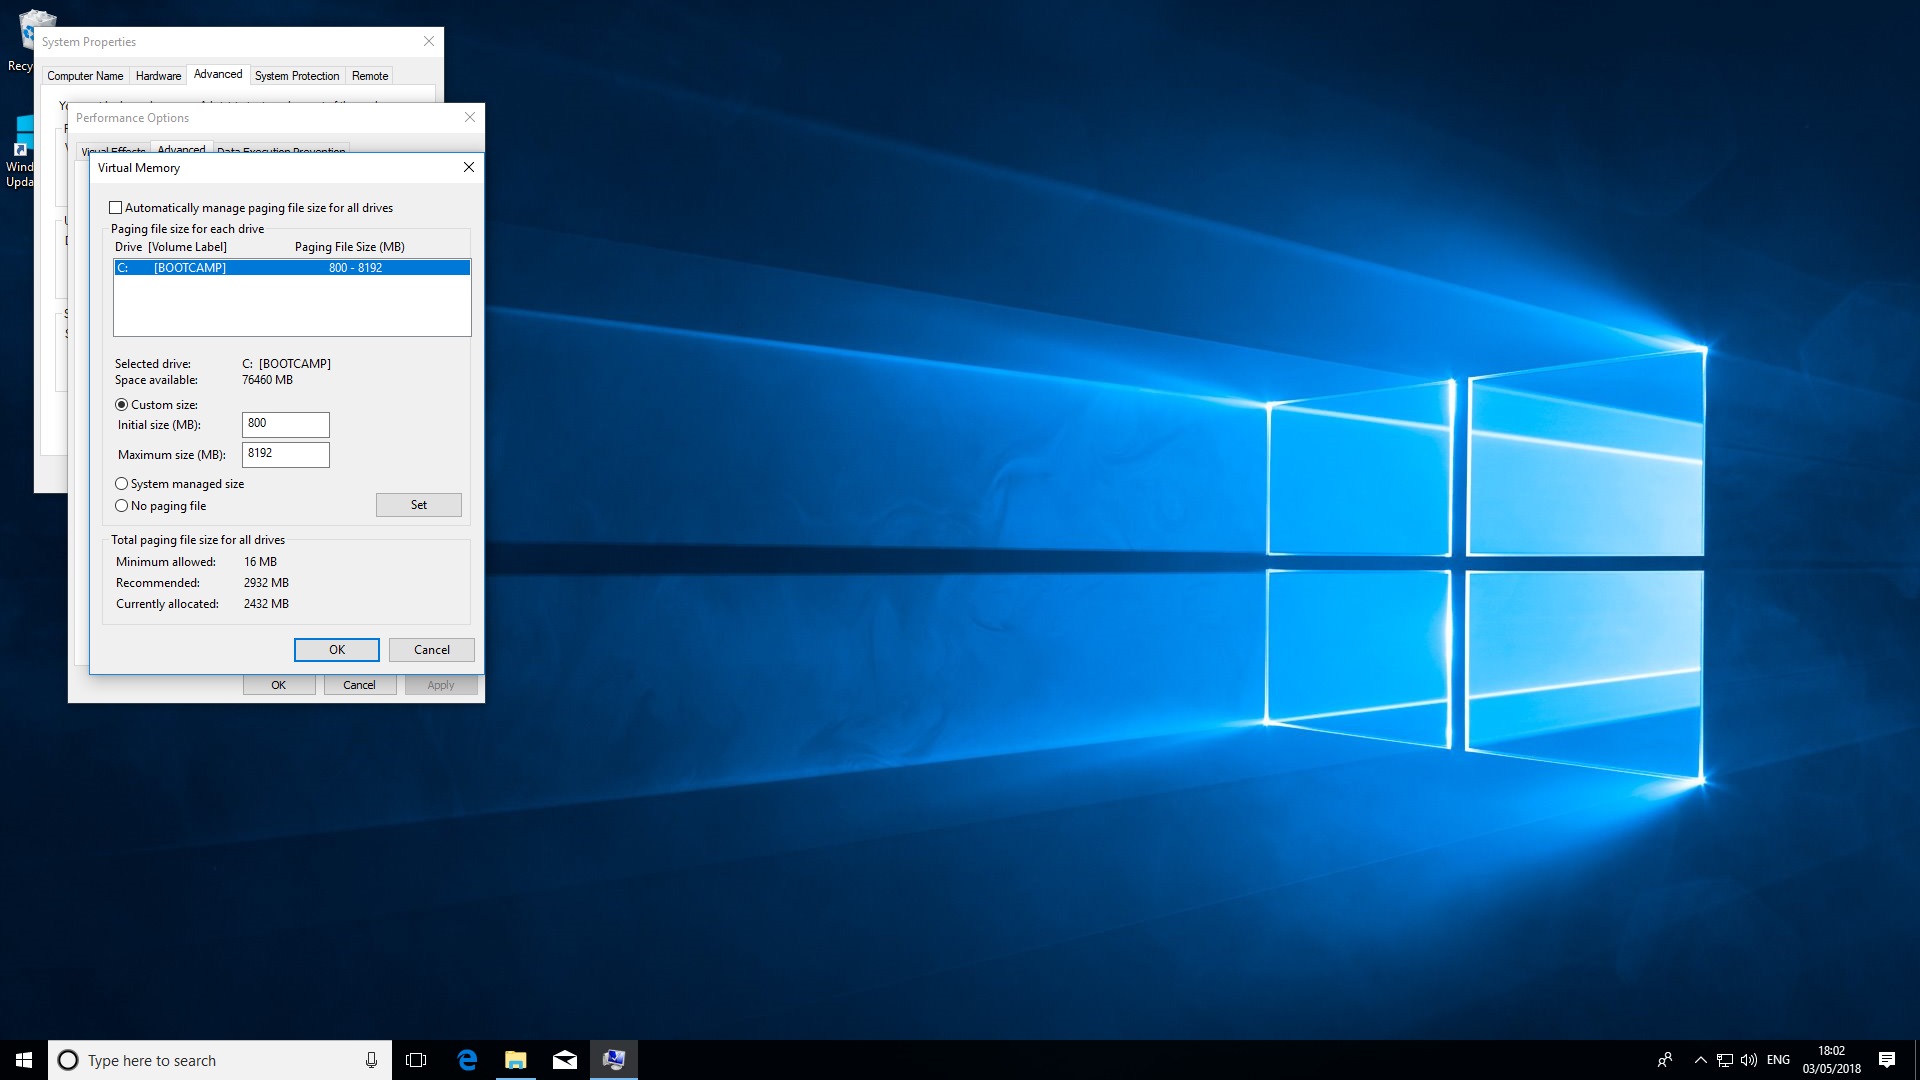
From the 'Virtual Memory' window, uncheck the option 'Automatically manage paging file size of each drive'. Choose the option 'Custom size'. Set file to at least 800MB under 'initial size'.
Under 'maximum size, enter your desired upper limit for the page file in MB. Remember 1GB = 1,024MB e.g. a maximum size of 8GB is 8,192MB. Click 'Set' to confirm your changes.
And there you have it - you now know everything you need to know to delete, move and resize pagefile.sys.
Nate Drake is a tech journalist specializing in cybersecurity and retro tech. He broke out from his cubicle at Apple 6 years ago and now spends his days sipping Earl Grey tea & writing elegant copy.