How to install Linux on an Android phone
Why not?
You can use the steps described above to download, set up, boot and use any of the supported distros on your device.
However, the app also offers some other options to further customise the distros and tweak your user experience. For starters, you may wish to change the settings of the distro you specified when you first booted into it.
To do so, select the distro you wish to customise from the drop-down list in the Launch section. In addition to the Start Linux button, you'll also see a Configure Linux button. Tap on it to bring up the settings page. Here you'll find checkboxes for enabling and disabling the start of the SSH and VNC servers.
You can also modify the resolution of the VNC screen by altering the values listed on this page. The page offers a couple of interesting options, including the Create 1GB SWAP File checkbox. As you can imagine, when this is toggled, the app will create a swap file for the distro to use.
Make sure you have adequate free space on your SD card before you enable this option. The app can also mount folders from the Android filesystem into the running Linux. Tap on the Configure Mounts button to launch the mount editor. Tap on Options in the top-right corner and then on the Add Mount option.
This pops up a page where you'll have to specify the location of the Android folder you wish to share manually (such as /storage/sdcard0/Downloads), followed by the path where you want to mount it (such as /home/ubuntu/Downloads).
You can add as many folders as you wish. When you're done tap on the Save Changes button and exit the mount editor. When you now boot into the distro, LinuxOnAndroid will mount the listed Android folders in the specified locations inside the distro.
Sign up for breaking news, reviews, opinion, top tech deals, and more.
Depending on how you use the distro, sooner or later you'll run out of space inside the image. In such a case you'll have to make a larger image and copy over all the files and folders from inside the existing image to the new one.
Start by firing up a terminal and creating a blank image of the size you want. For example, the command
dd if=/dev/zero of=ubuntuNEW.img bs=1M count=0 seek=4096
will create a 4GB image called ubuntuNEW.img. Then you'll need to format this new image and create a filesystem.
The command
mke2fs -F ubuntuNEW.img
should do the trick. Then copy the image file that you want to inflate from the device into your computer. Let's call it ubuntuOLD.img. Now create two folders on your desktop (ubuntuNEW and ubuntuOLD) to mount these images. The commands
sudo mount -o loop ubuntuOLD.img ubuntuOLD/
and
sudo mount -o loop ubuntuNEW.img ubuntuNEW
will mount the images into their respective folders. Once that's done, copy over all the files from the old image to the new image. The command
sudo cp -rp ubuntuOLD/* ubuntuNEW
will make sure the files and folders are copied along with their ownership permissions. Round up the process by simply unmounting the images with
sudo umount ubuntuOLD
and
sudo umount ubuntuNEW
You can now transfer the ubuntuNEW.img file to your phone, remove the existing image and make sure the distro's entry in the Launch screen points to the new image.

Run Linux without rooting your device
You can run Linux even on an unrooted Android device thanks to the GNURoot app. Despite its name, this app doesn't require a rooted phone. The one major difference between CompleteLinuxInstaller and GNURoot is that the latter only gives you access to the command line interface of the Linux distro.
To run Linux on your Android device via GNURoot, you'll need to grab it from the Google Play Store, as well as a companion app for the specific Linux distro. The app produces companion apps for popular distros, such as Debian, Gentoo, and Fedora.
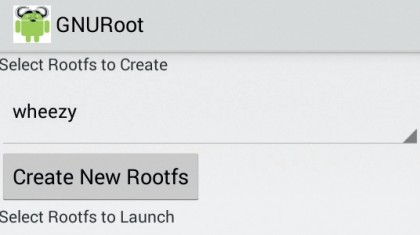
Remember that these apps are close to 100MB in size, unlike the GNURoot app, which is a just a few KB. Once you have them both installed, fire up GNURoot and use the drop-down menu at the top of the page to select the distro you wish to boot.
Make sure you have already downloaded its companion app. Then tap on the Create New Rootfs button to install the distro which will take some time depending on the resources on your device. When it's done, tap the Launch Rootfs button which will open a terminal and log you in the distro.
If you select the Launch as Fake Root checkbox before launching the distro, you'll be logged in with superuser privileges.
- Enjoyed this article? Expand your knowledge of Linux, get more from your code, and discover the latest open source developments inside Linux Format. Read our sampler today and take advantage of the offer inside.

With almost two decades of writing and reporting on Linux, Mayank Sharma would like everyone to think he’s TechRadar Pro’s expert on the topic. Of course, he’s just as interested in other computing topics, particularly cybersecurity, cloud, containers, and coding.