Retroarch on PC: the ultimate guide
All your games under one virtual roof
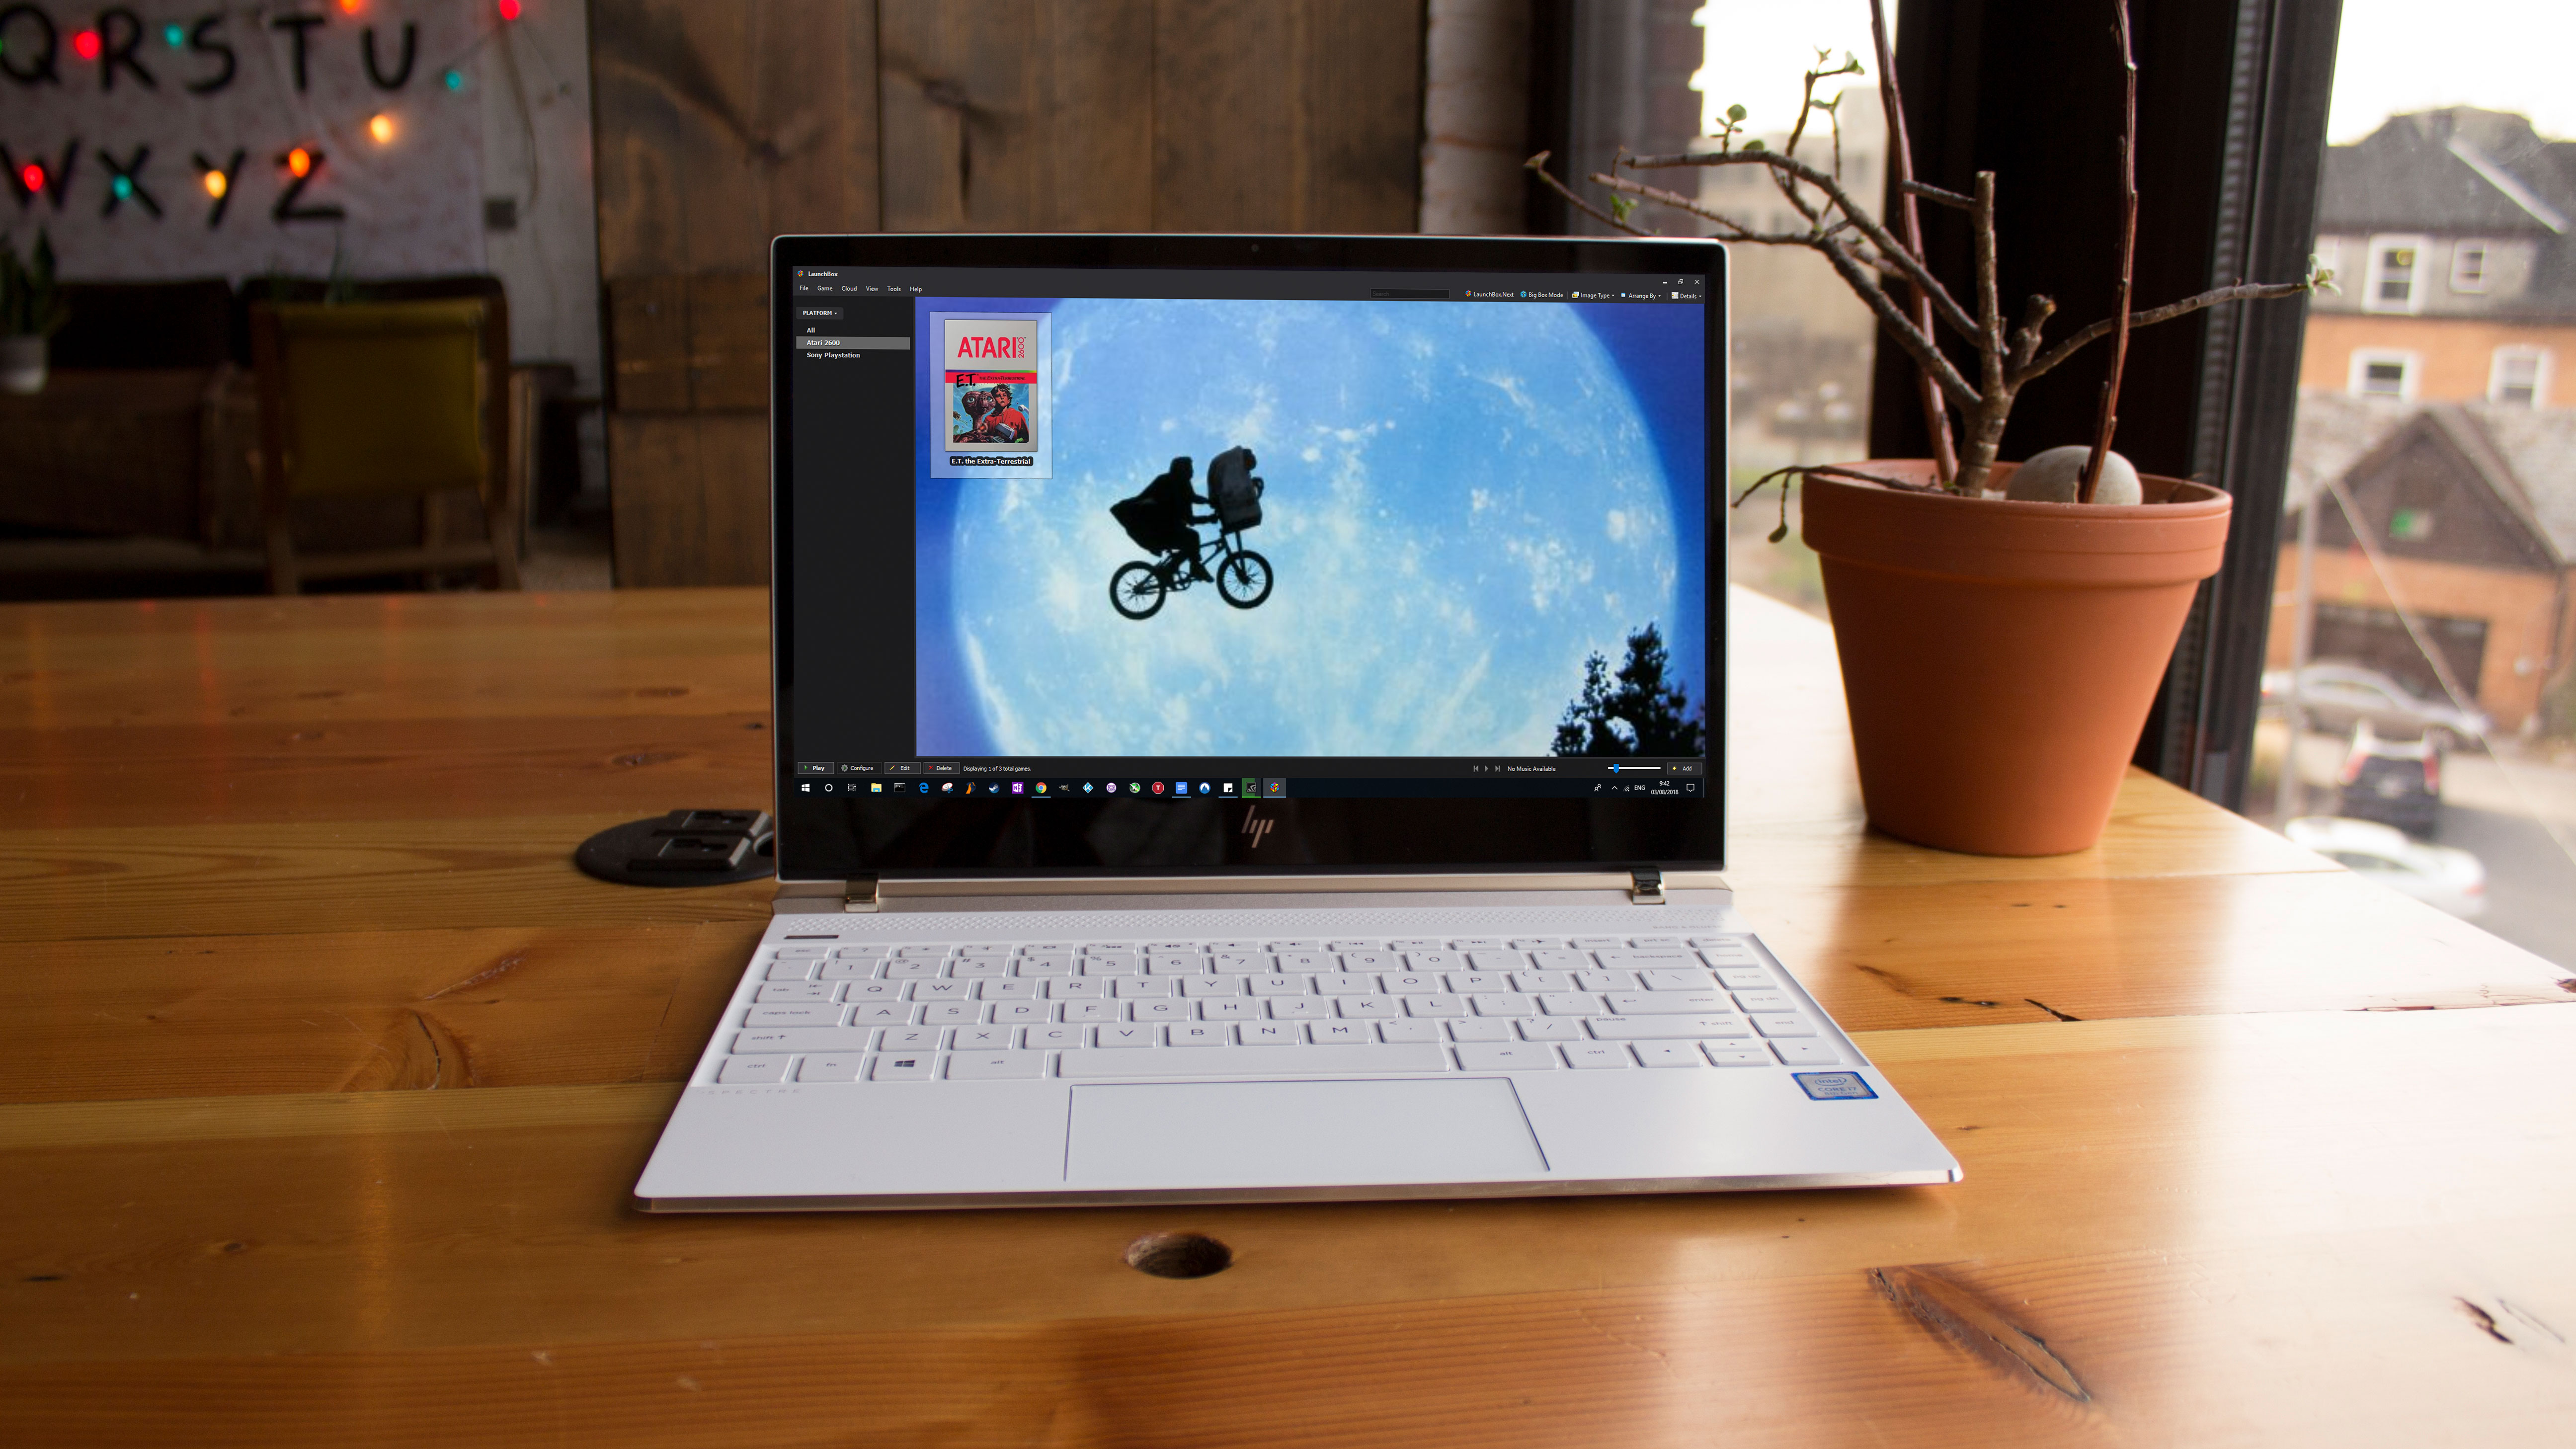
Retroarch is an all-in-one emulation frontend that removes the bugbear of faffing around in Windows to switch between your different emulators. By letting you directly download key emulators files (called ‘Cores’), Retroarch makes it possible to open most of your game console emulators from one place.
We’ll be showing you how to set up Retroarch, point you to the best cores, give you a little lesson on shaders, and replace the default UI with a snazzy new frontend (yes, we’re aware that that technically means you’ll be getting a new frontend for what’s already a frontend, but to that we say that you can never have enough frontend).
However, note that while emulators and frontends like Retroarch are legal, it is not legal to download roms or ISO image files for games that are still under copyright (i.e. most games). This varies by where you are in the world, but as a general rule you should only play roms of games that you already own, and which you’ve ripped from CD or cartridge yourself.
Basic setup
First up, download and install the latest version of Retroarch. Because it’s such a vast, complex piece of open-source software, Retroarch can be a bit unstable.
Don’t be surprised if it crashes every now and then. If you think it’s crashing too often however, you can either try an older version of Retroarch by clicking the ‘Older versions’ link here. Or you can go the other way and try out one of the latest nightly builds.
With Retroarch installed, the first things you’ll want to do are install some cores (emulators, effectively), set up your controls, and load some content (or games).
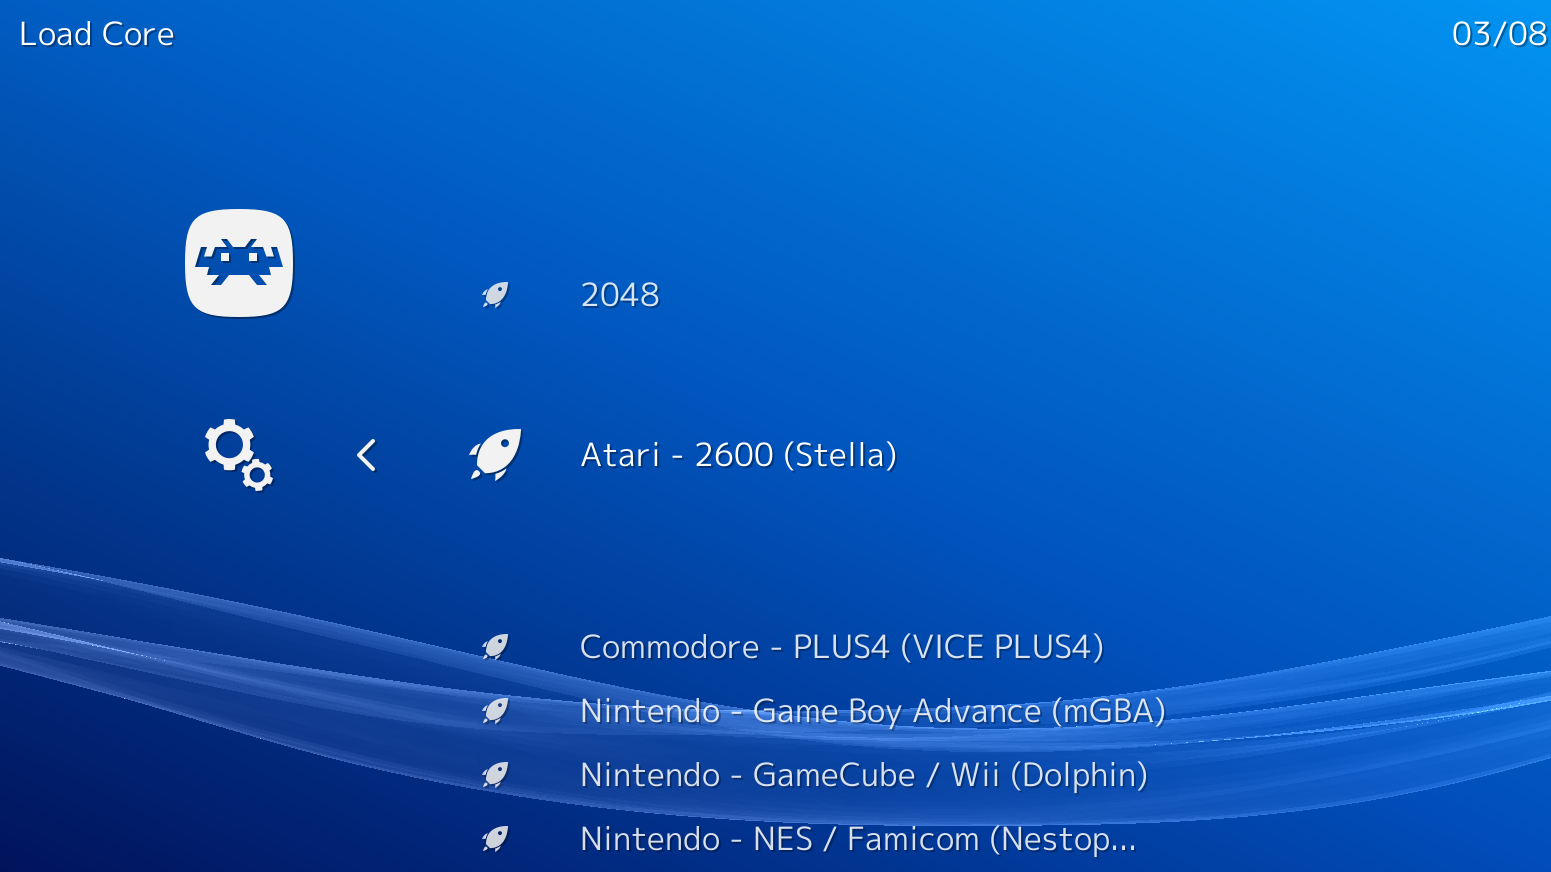
To download cores for your chosen platform - be it N64 or Commodore 64 - head over to the far left icon (Main Menu) in Retroarch, select Load Core > Download Core then select the ones you want.
Sign up for breaking news, reviews, opinion, top tech deals, and more.
For reference, here are the cores we think work best for each major platform, taking into account performance and accuracy (there are plenty of other platforms you can get cores for - these are just the biggies).
- NES: Nestopia
- SNES: Snes9X
- Sega Master System/Genesis/CD: Genesis Plus GX
- Game Boy Advance: mGBA
- Nintendo DS: Desume
- PS1: Beetle PSX HW
- N64: Mupen64 (performance), ParaLLEl (accuracy)
If you’re wondering where the cores for hit consoles like the Playstation 2 and GameCube are, the PS2 one is unavailable in Retroarch, while the GameCube one isn’t particularly stable. You’re better off finding standalone emulators for those consoles.
Retroarch control setup
If you have a gamepad set up with Windows (and you really should), Retroarch should detect it automatically. It tends to do a good job of mapping your gamepad’s controls up with specific cores too.
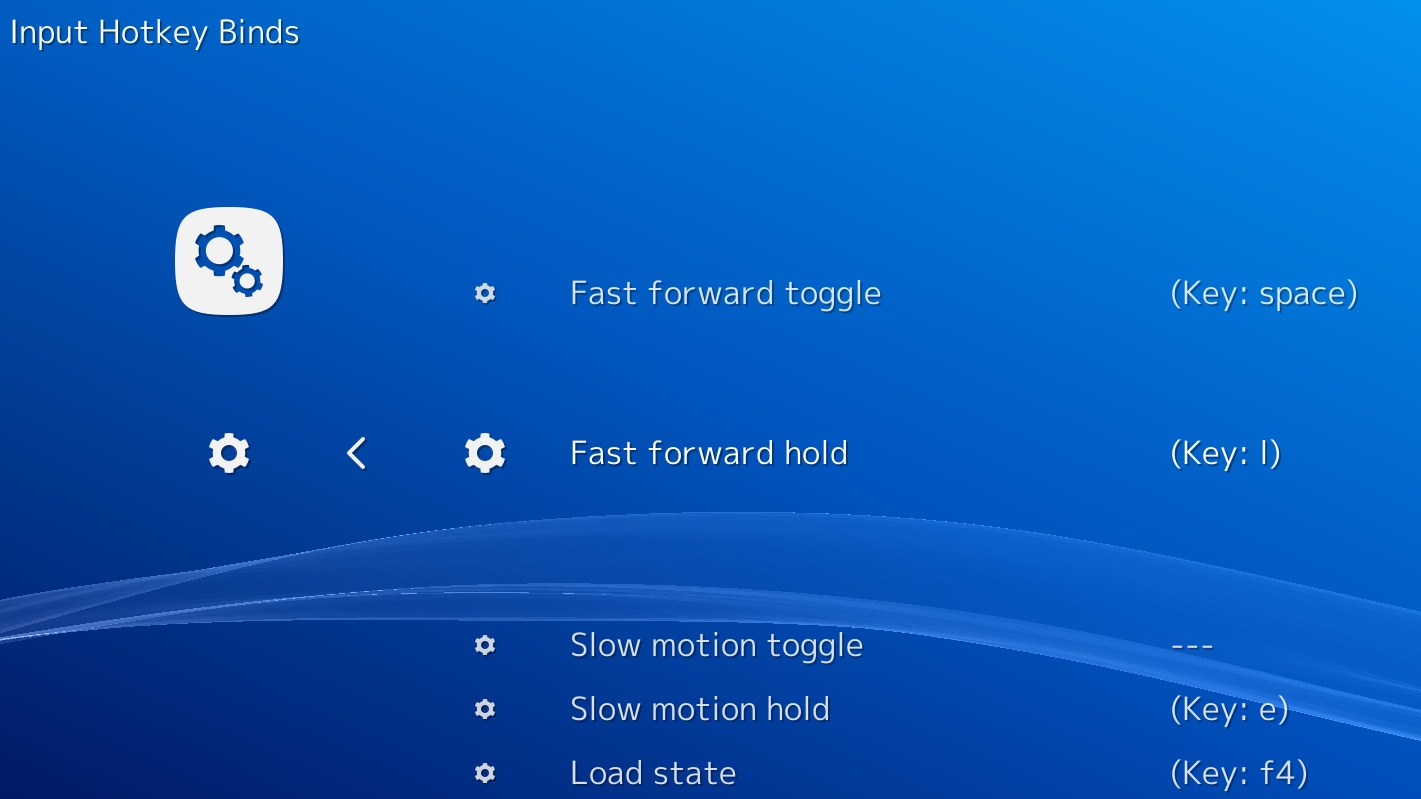
If you do want to change controls, you can. First, you should set up hot keys for Retroarch features like loading and saving states, fast-forwards, rewinds, and other flashy things.
Go to the cog icon (Settings), then select Input > Input Hotkey Binds to set up hotkey controls that suit you. These will apply universally, no matter what core you’re playing on.
To change controls for a specific core/console, load that core by going to the Main Menu icon > Load Core and selecting the core.
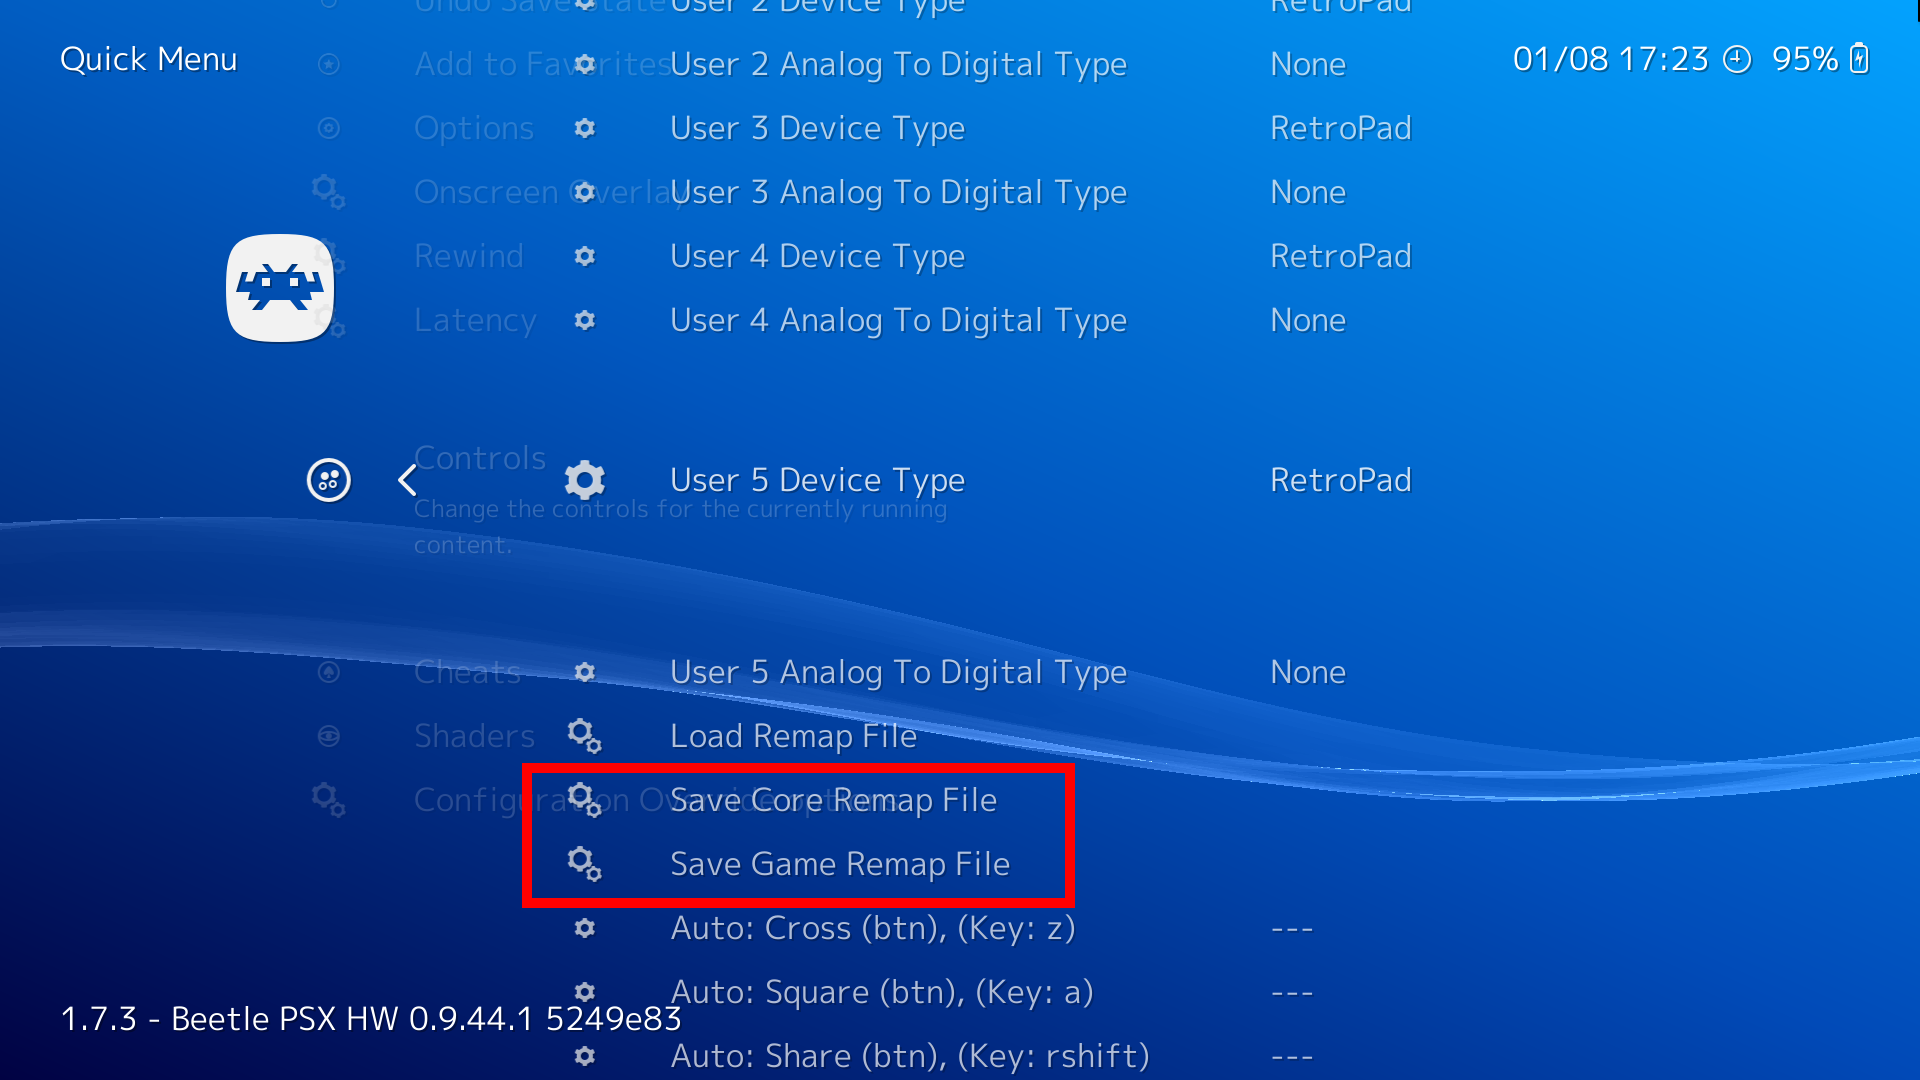
With the core loaded, select Quick Menu (above the Load Core option). Go down to Controls, make whatever changes you want, then go up and select either ‘Save Core Remap File’ or ‘Save Game Remap File’, depending on whether you want controls to apply across the whole core or just that game.
Loading games into Retroarch
The next step is to load your games into Retroarch as ‘Collections’, which means Retroarch will organise them by the console they run on.
Go to the Main Menu icon, select Load Content -> Collections -> Scan Directory then navigate to the directory where you keep your games. When you reach it, select ‘Scan this directory’, and Retroarch will add everything it finds to the homescreen.
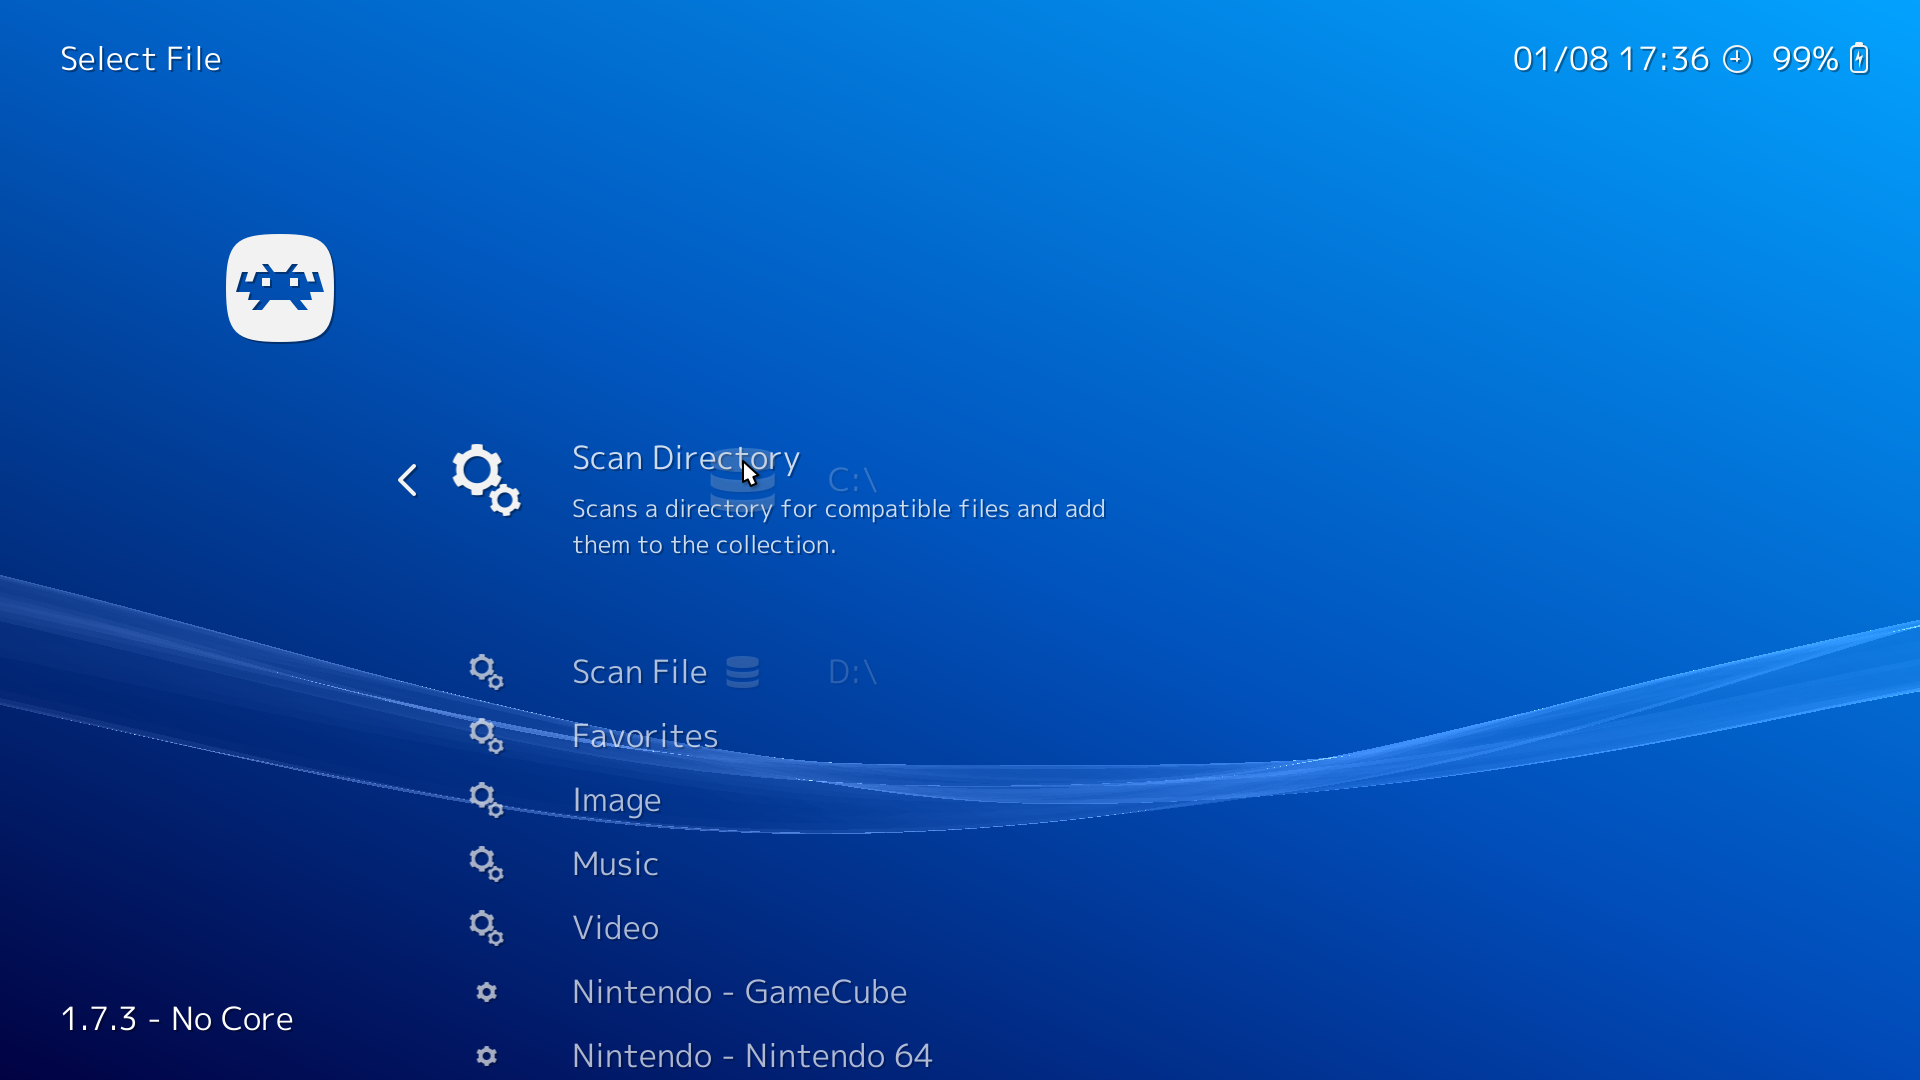
Once you’ve added your games, back on the Retroarch main menu you’ll see elegant little icons representing each console for which you’ve loaded content.
As you can see below, we’ve opted for E.T. on the Atari 2600 - a game that we can now confirm justifies its title of ‘Worst Game of All Time’.
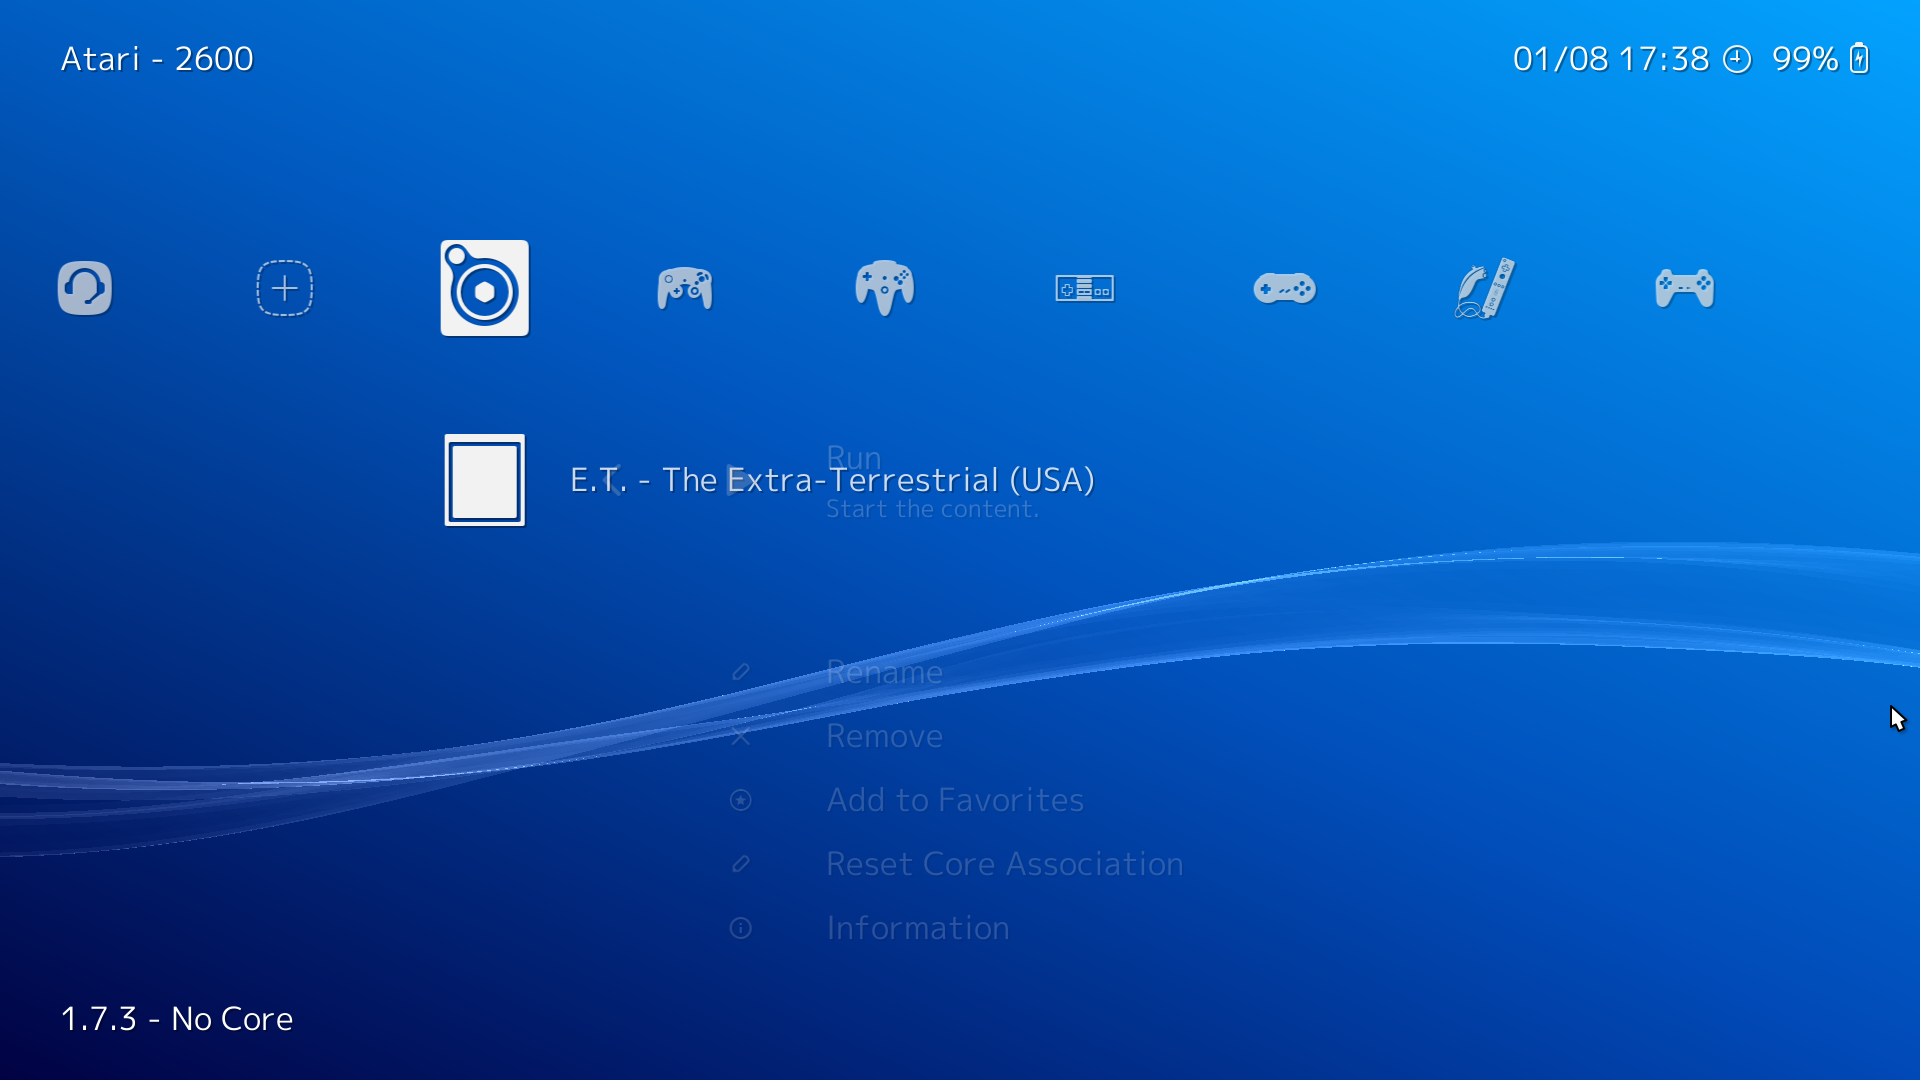
To play a game, just select it from this list, then select one of your downloaded cores to load it with.
Graphics, Plugins and other tweaks
Each core has its own set of graphics settings that you should play around with and tweak in accordance with how you like your games to look, and the power of your PC.
It’s important to distinguish between the universal Retroarch settings (found under the Settings icon on the Retroarch homescreen) and the core-specific settings you change under the Quick Menu.
Only the changes you make under Quick Menu can be saved as core or game overrides. Changes you make in the Settings menu need to be changed manually between cores (if you need to change them at all).
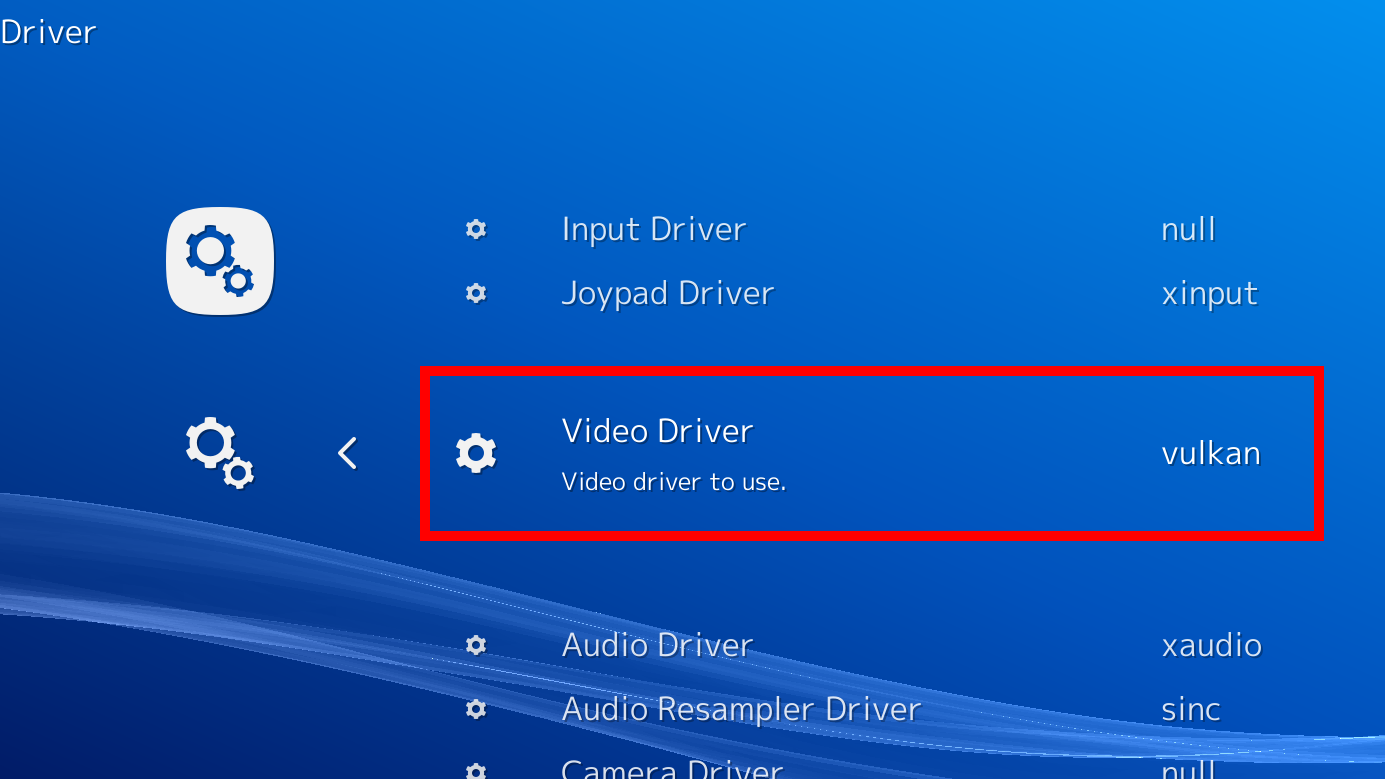
The most important setting you may need to change before selecting a core is the video driver (Settings > Video Driver). If a given core crashes on startup, you should consider switching between the openGL (gl) and Vulkan drivers to see if that helps.
Vulkan is the more recent and advanced API of the two, and really shines when used with powerful cores like Beetle PSX HW, but other cores - like Mupen64 - rely on GL drivers.
The ParaLLEl N64 core meanwhile, can use Vulkan, but you’ll first need to open a game using the ‘gl’ driver, change the GFX and RSP plugins (under Quick Menu > Options) to ‘angrylion’ and ‘cxd4’ respectively, then change the driver to Vulkan and restart Retroarch.
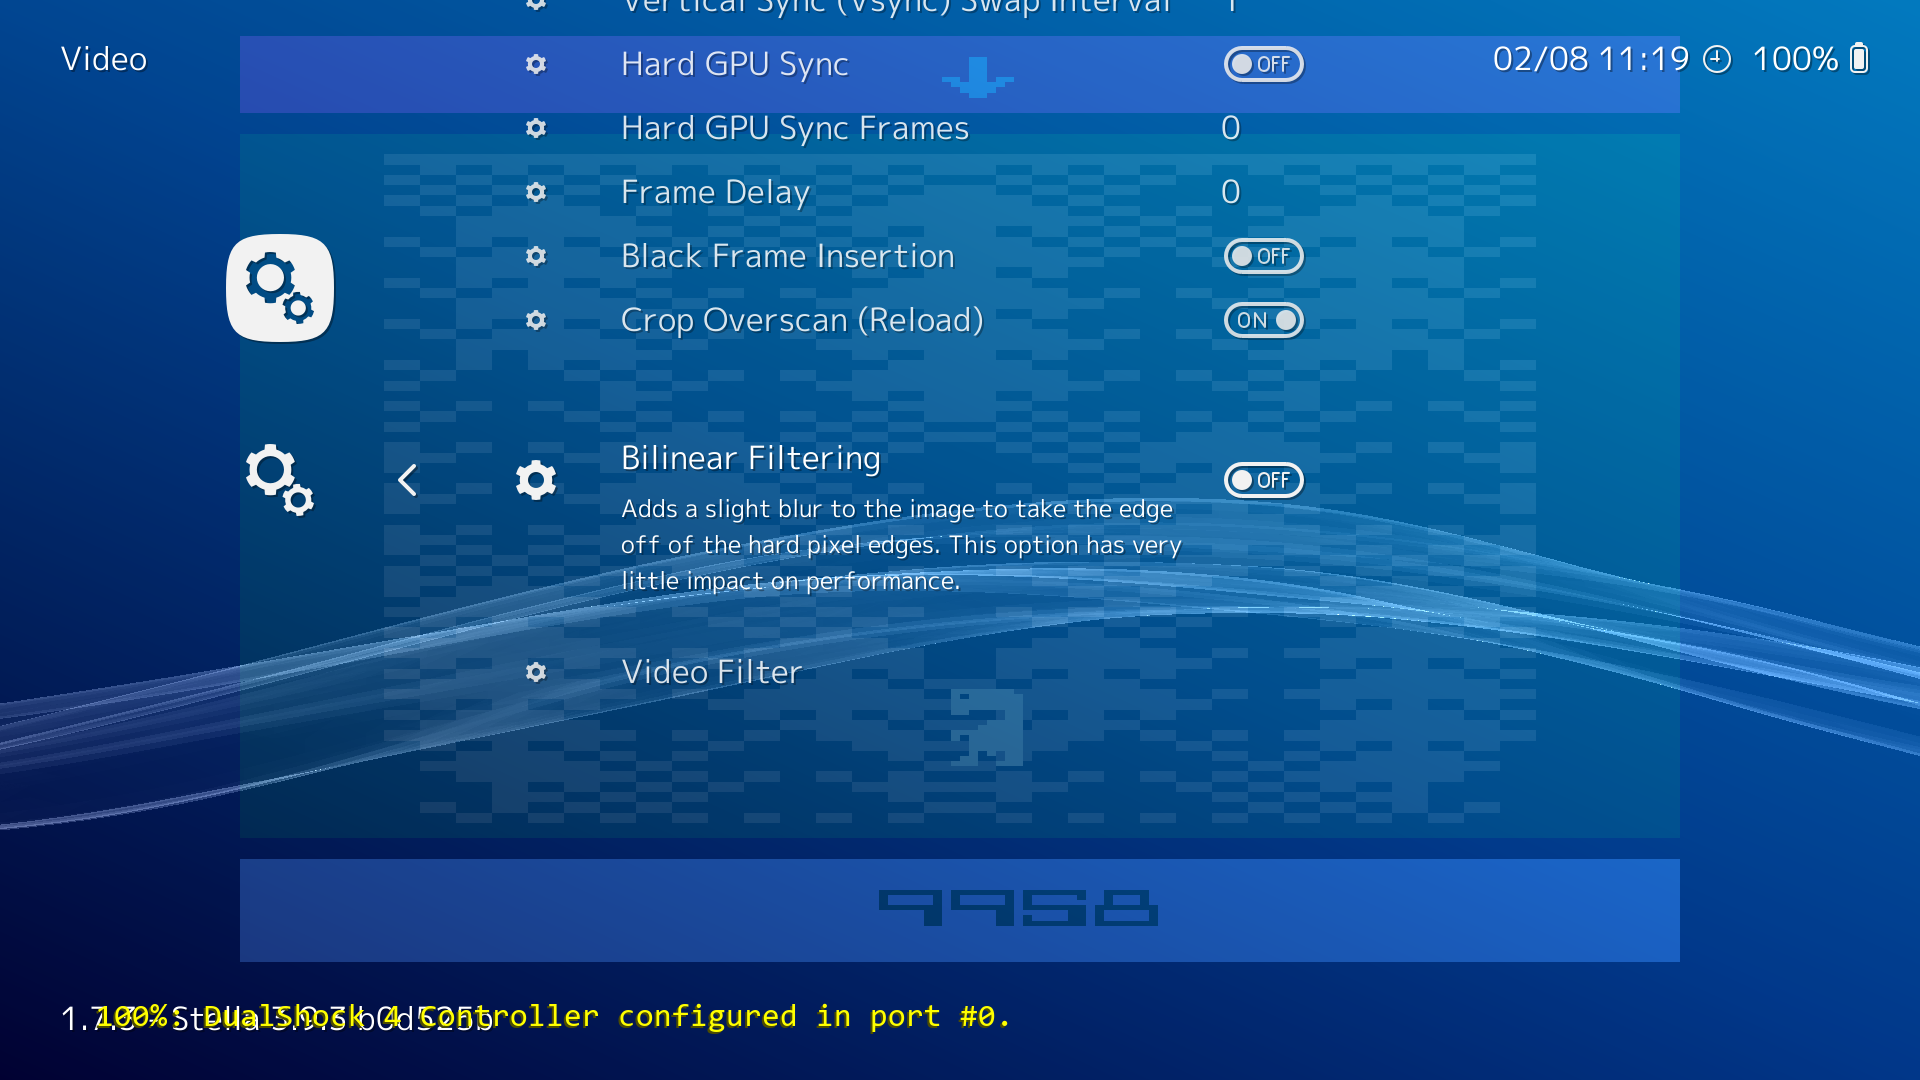
If you’re playing pixel-era games, one of the most important toggles is bilinear filtering (Settings > Video > Bilinear filtering), which will switch between giving the game a hard pixelated look if you switch it off, or soft and blurred if it’s on. We like our pixelated games to retain their original crispness, so prefer to leave it off.
Beyond that, in the Quick Menu core options (load a core, then Quick Menu-> Options), each individual core has its own set of changes you can make.
Using Beetle PSX HW for example, you can bump up internal resolutions to many multiples of the original PS1’s, add a widescreen hack, or use PGXP perspective correct texturing to get rid of the PS1’s warping, wobbly effect when 3D models move around the screen.
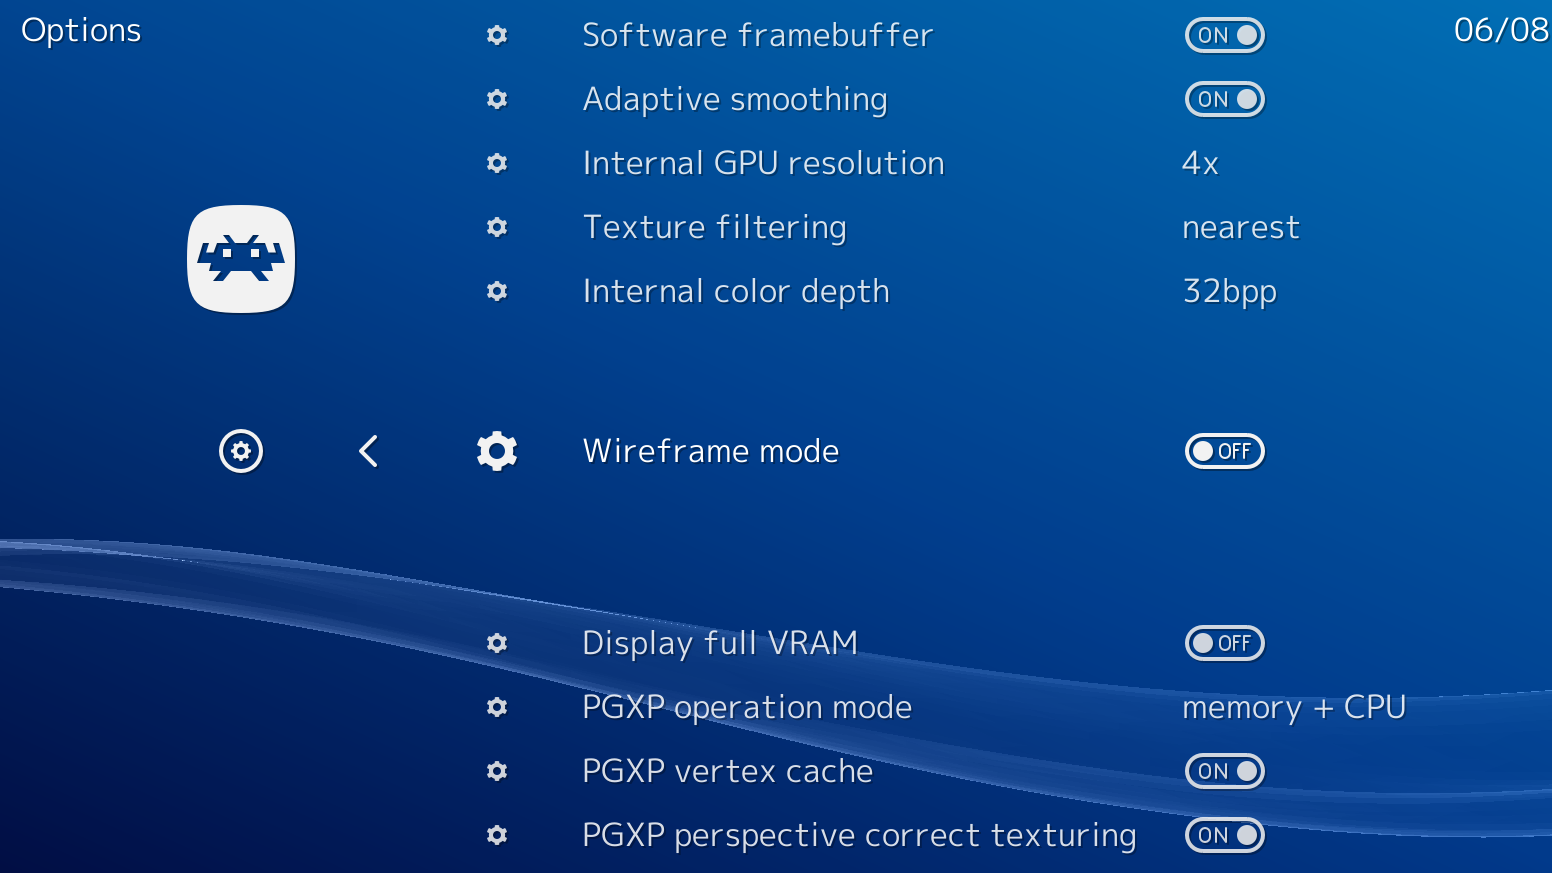
On N64 cores you can virtualise extra hardware like the Expansion Pak or even the 64DD (anyone remember that?).
There are plenty of variables, and it’s worth fiddling around with the settings to find those best suited to you - whether you want to turn everything Super HD, or try to stay as true to the original hardware as possible.
Shaders
Shaders are layers of filtering that go over the top of your game, capable of adding all kinds of effects such as CRT scanlines (for that shabby, authentic feel), smoothed edges via antialiasing, or borders around your play area.
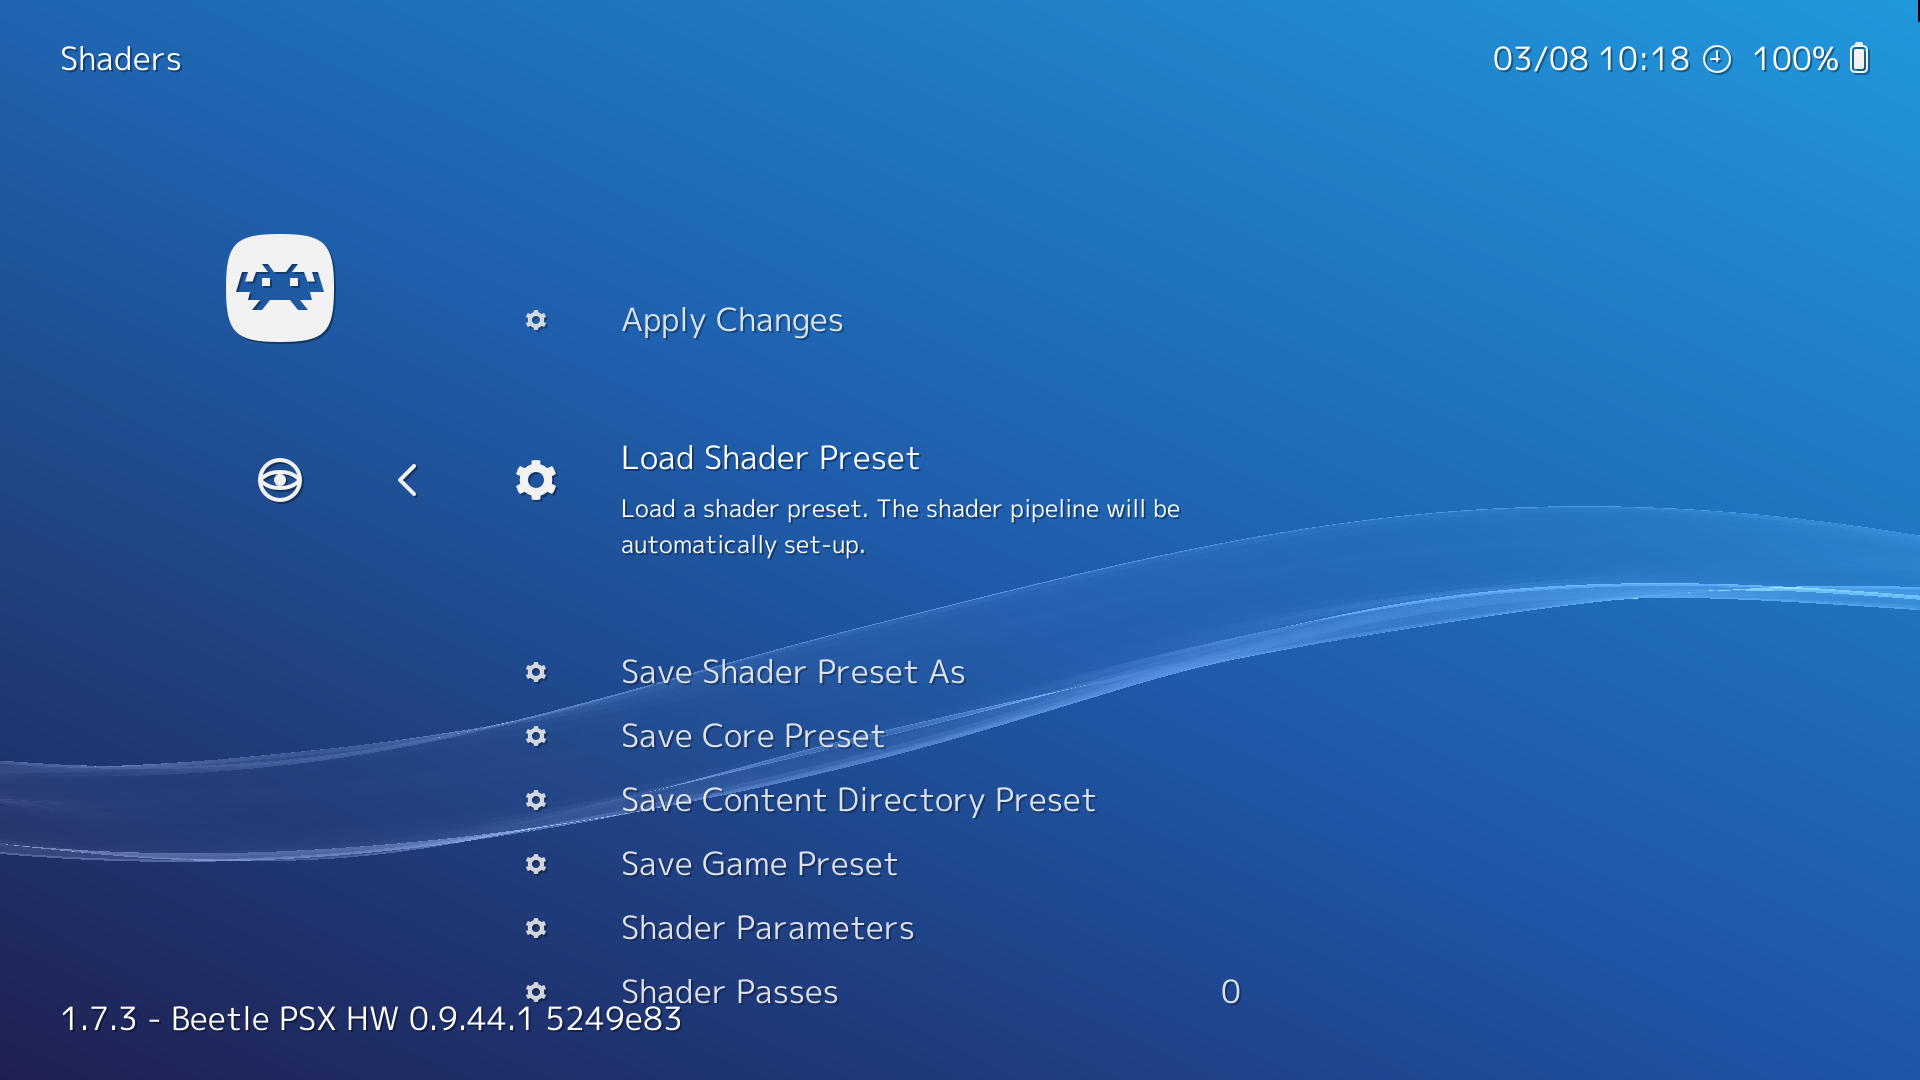
When you load a core, you’ll find the shaders under Quick Menu > Shaders > Load Shader Preset. There are three different file formats for shaders.
They, by and large, contain the same collections of shaders, though which ones you use will depend on the video driver (Vulkan, GL etc.) you use for a given core. The three shader formats are:
cg - Widely compatible but deprecated, not as powerful as the other two formats but good for older PCs.
glsl - Designed for GL drivers
Slang - Designed for Vulkan drivers
For our example, we’ve given ET a Game Boy Advance border, found under Load Shader Presets > shaders_slang > border > sgba (we’re expecting a firmly worded letter from Nintendo asking to dissociate their consoles with ET any day now…).
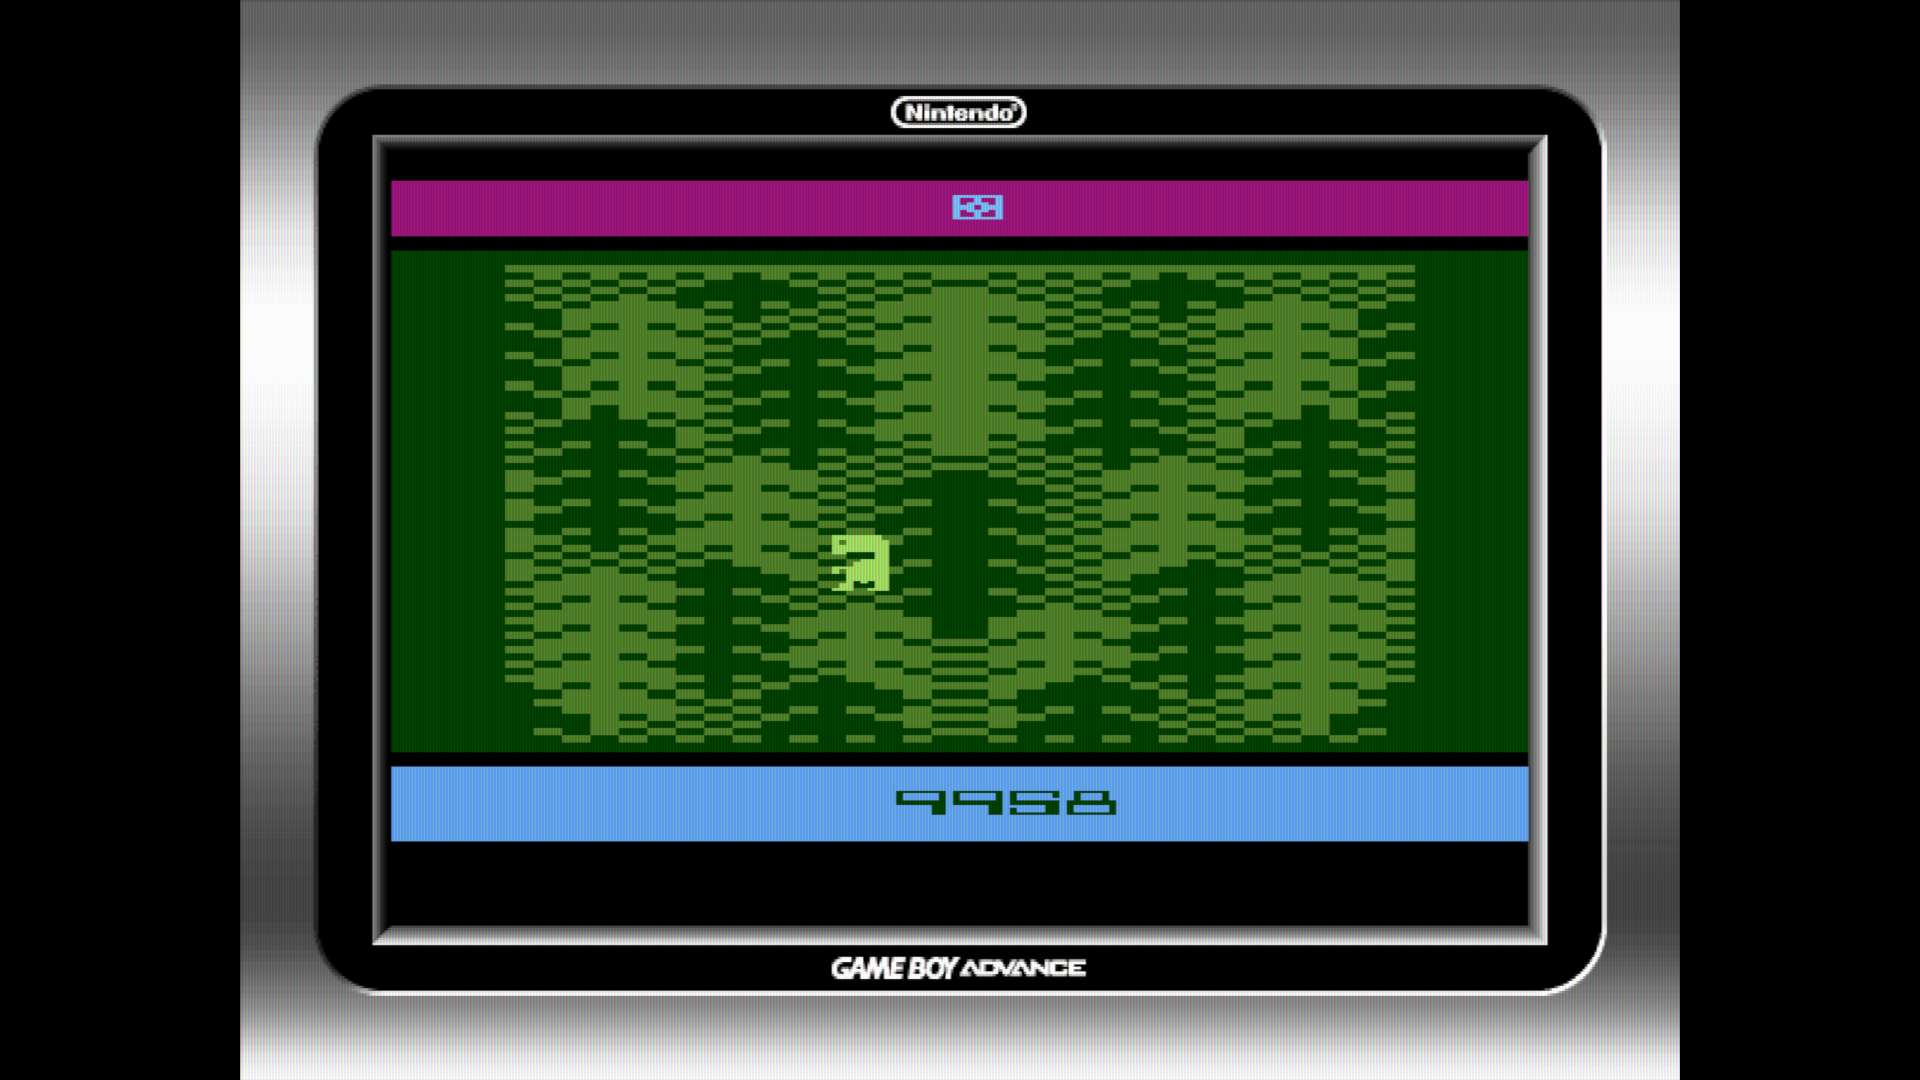
Once you’ve set your shader, you can tweak it under Shaders > Shader Parameters, then save it as its own shader using Save Shader Preset As.
New frontends
The PS3-style XMB interface of Retroarch isn’t bad, but it’s certainly not flashy. It doesn’t support box art or other images for your games, and can feel a little sterile.
Thankfully, there are great frontends you can use for Retroarch, our favourite being Launchbox (which also supports your Steam games). Here’s how to link your Retroarch library up with Launchbox.
First download Launchbox (you’ll need to enter your email address, then use the link sent to your inbox).
Once it’s installed, open Launchbox, go to Tools > Manage Emulators > Add. In the ‘Emulator Name’ box, select Retroarch from the dropdown menu, then point the ‘Emulator Application Path’ box to the directory of Retroarch.exe. Click OK.
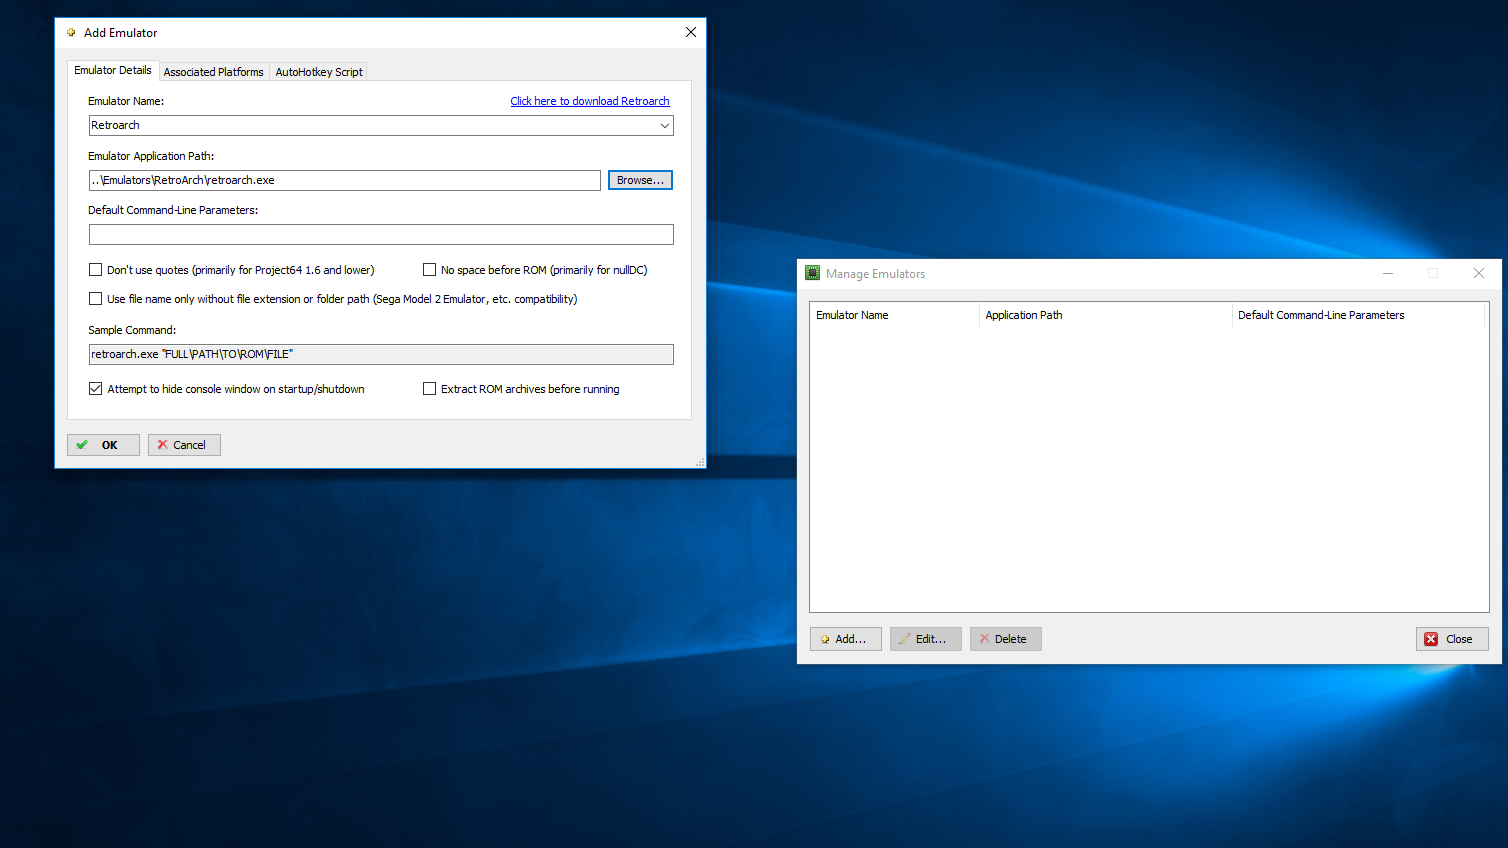
Retroarch should now appear in the ‘Manage Emulators’ box. Select it, click Edit > Associated Platforms, and you should see all your downloaded Retroarch cores there without the ‘Missing Core File’ status.
If your preferred core for a platform isn’t listed, double-click the core listing next to the platform name, then select your preferred core from the dropdown menu. Click OK when you’re done.
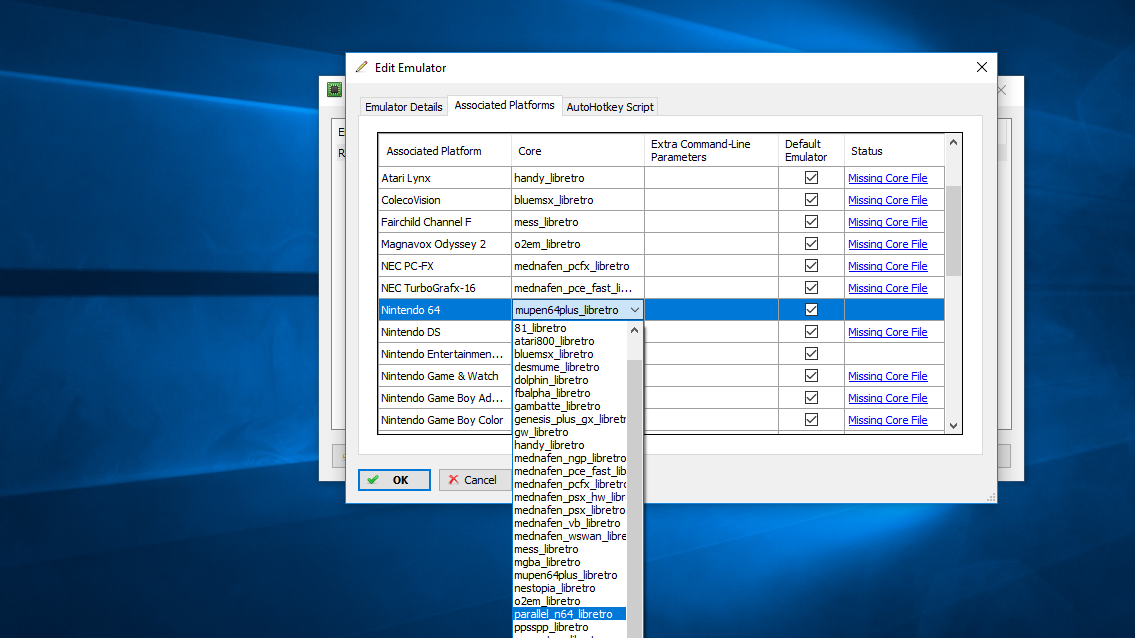
The final step is to import your games (or ROM files) into Launchbox. Go to Tools -> Import -> Rom Files and follow the wizard to add the rom files you want.
We recommend downloading metadata and images for your games for that professional look. We didn’t download all the images when given the option, but box art is a must, and ‘Fan Art - Background’ means that when you highlight the game in your library you get a nice big background image behind it.
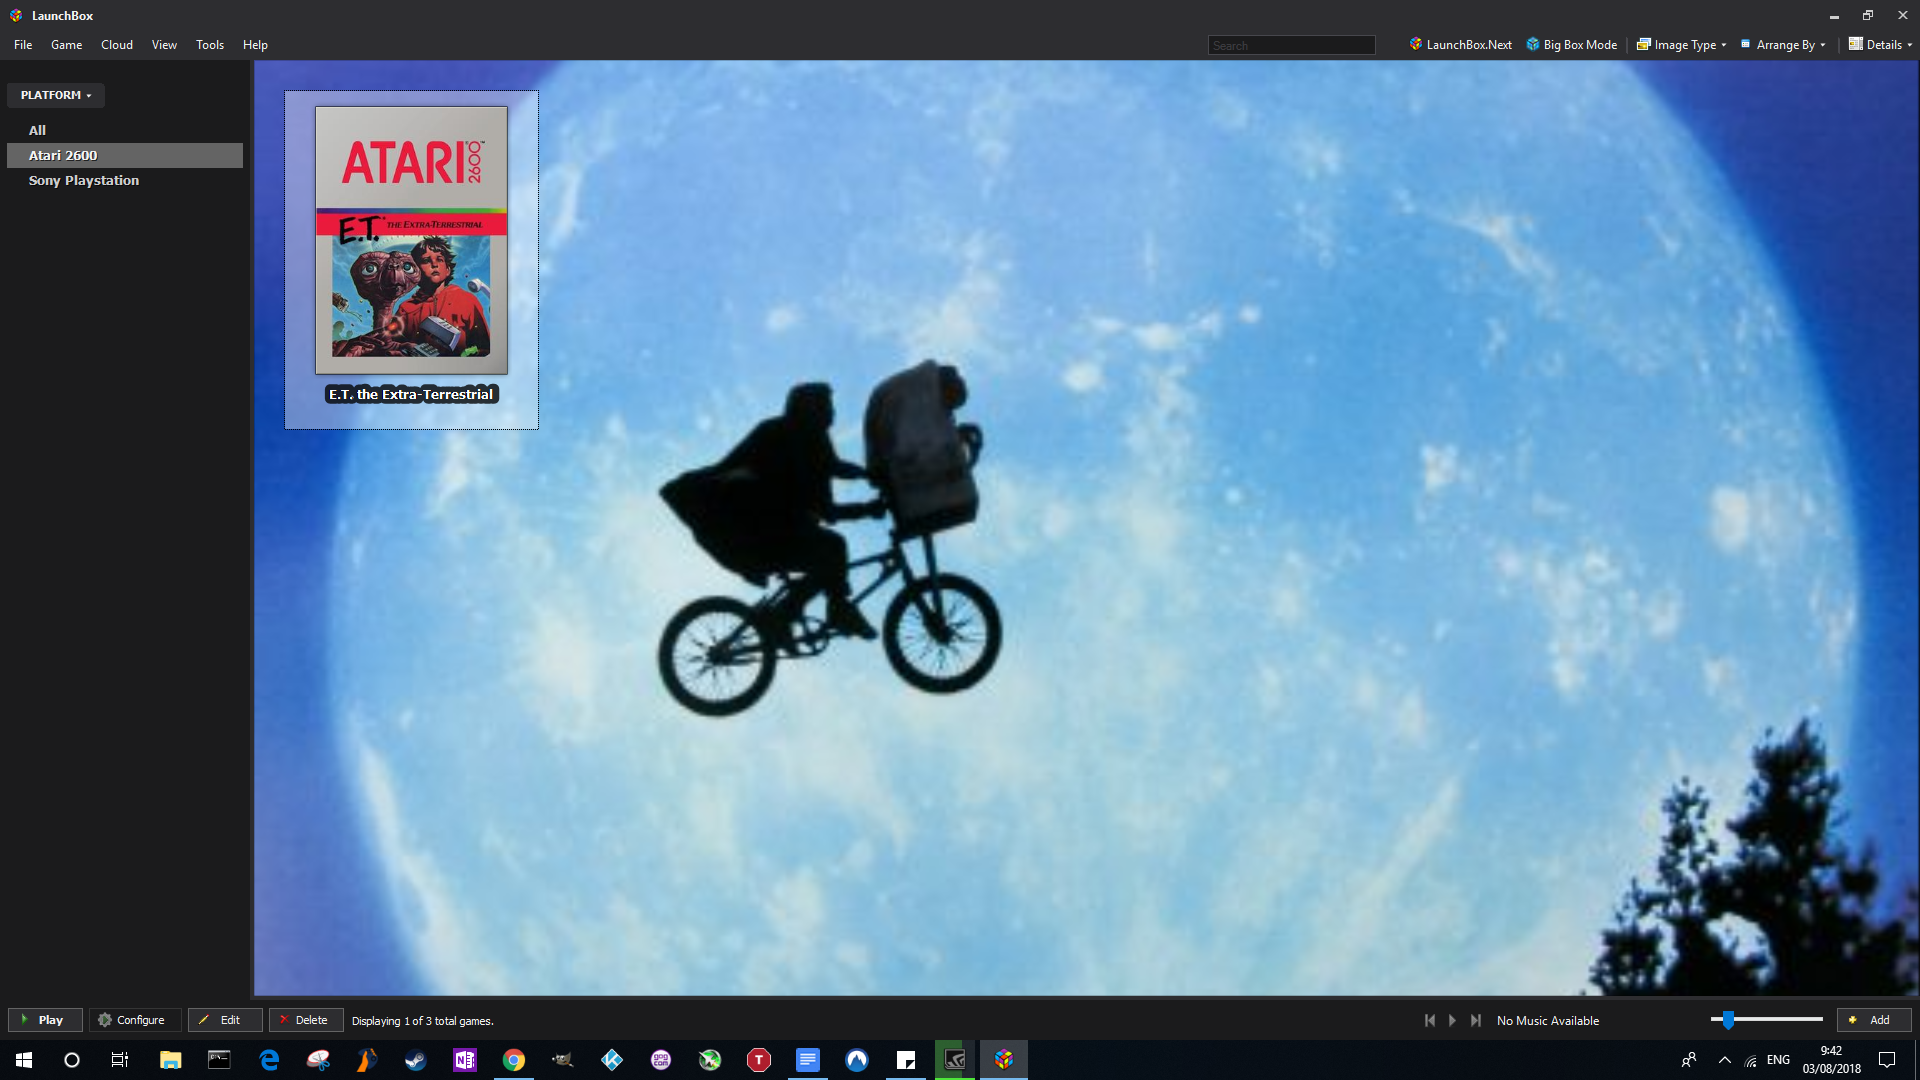
And that’s it. Your games should now be in your Launchbox library, neatly presented with their box art and any extra images you may have downloaded.
One final thing you should do is set up Launchbox to work with your gamepad. Just go to Tools > Options, select Input > Gamepad/Joystick in the navigation pane, then tick the ‘Enable Gamepad/Joystick Input’ box.

Robert Zak is a freelance writer for Official Xbox Magazine, PC Gamer, TechRadar and more. He writes in print and digital publishing, specialising in video games. He has previous experience as editor and writer for tech sites/publications including AndroidPIT and ComputerActive! Magazine.