Double exposure portraits: a simple tutorial for making surrealist images
New dimensions

Sign up for breaking news, reviews, opinion, top tech deals, and more.
You are now subscribed
Your newsletter sign-up was successful
Join the club
Get full access to premium articles, exclusive features and a growing list of member rewards.
In this quick double exposure portrait tutorial we'll show you how to combine images with easy Blend mode effects to create striking, dream-like pictures.

Multiple exposure effects are a great way to creatively combine two or more images.
Traditionally, double exposure portraits were made by exposing the same frame of film more than once.
Article continues belowPhotoshop's Screen Blend mode works in much the same way by multiplying the light values on one layer with those on the layers below.
So the scene can only get brighter, never darker, and white areas stay white.

This makes a striking effect when you combine textures with strong shapes, like the model here, because the texture is confined by the background.
We can also reposition each exposure for a pleasing composition.
Sign up for breaking news, reviews, opinion, top tech deals, and more.

1. Tweak the raw
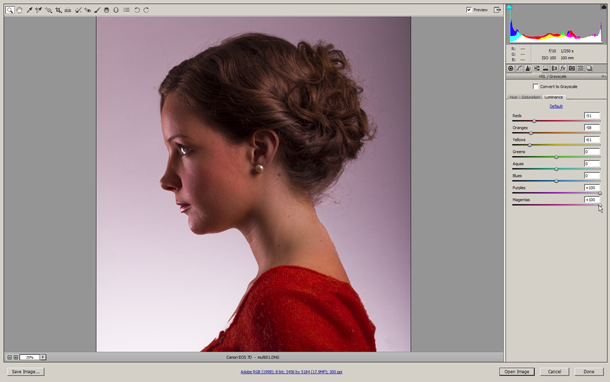
Download our start files and follow along! Navigate to multi01.dng in Bridge then right click the file and choose Open in Camera Raw. Once open, adjust the tones. Set Exposure +0.80, Contrast +39, Highlights +32, Shadows +27, Blacks -6. Next go to the HSL panel.
Click the Luminance tab and set Reds -51, Oranges -58, Yellows -61, Purples +100, Magentas +100. Click Open Image.

2. Dodge the image
Hit Cmd/Ctrl+J to duplicate the layer, then grab the Dodge tool from the Tools panel. In the Options bar at the top, set Range: Highlights, Exposure 50% and uncheck Protect Tones. Choose a soft-edged brush tip and paint over the background to make it completely white, using ] and [ to resize your brush tip as you paint.

3. Drop in the trees
Open multi02.jpg then go to the Layers panel and right click the background layer. Choose Duplicate Layer. In the Destination settings, choose Document: multi01.dng and hit OK to copy the image over, then close multi02.jpg. Go to the main image and rename the top layer 'trees'. We'll now merge the trees with the underlying layer using a Blend mode.
Current page: How to make a double exposure portrait: steps 1-3
Next Page How to make a double exposure portrait: steps 4-6 Become a TechRadar Insider


