Android is taking over the smartphone world as the only viable competitor to Apple's iOS. Google's Andy Rubin recently announced that 850,000 devices are activated every day, which makes it a fantastic platform for development and experimentation.
And while Android and iOS have many similarities, there's one big difference: iOS is proprietary, while Android is open source. That means anyone can grab the code to Android and do what they want with it.
Article continues belowAndroid 2.2.1

The Android-x86 project provides pre-built versions of Android that can be used on a variety of hardware, including the EeePC and a couple of x86 touch devices. Older versions of Android have been built and shown to work on generic PC hardware, and live images of those distributions can be downloaded, run, and installed from the x86 website, but at the time of writing, there's no official version of ICS that works on a generic PC.
You can build your own, but as with any compilation of a Linux kernel, it takes a lot of time and effort. Previous releases have also suffered from lack of mouse control and networking, both of which needed source code patches to the kernel to fix.
We'll take our first foray into Android by running an older version in a virtual machine environment. This is safe, maximises functionality and walks a well trodden path. If you like it, you can move onto a newer version later.
We used VirtualBox, installed on an AMD Linux system running Arch. Android works better on Intel hardware due to modifications in the source code, but we saw no difference on our AMD machine other than a couple of warnings. The same isn't true of ICS, which currently only runs on Intel x86 hardware.
Running the OS

We've had the best experience with the nightly build of Android 2.2, which you can grab from http://android-x86.moonman.dk. With the ISO downloaded, launch VirtualBox and click on the 'New' button. In the wizard that appears, set the operating system to 'Linux', and set 'Other Linux' as the version. We gave our machine 512MB of memory, and a 2GB hard drive as a VDI disk image.
After the new machine has been created, select it in the machine list and open the settings window. On the system page, switch to the processor tab and make sure 'Enable PAE/NX' is active for your CPU.
Now click on the 'Storage' page. VirtualBox defaults to IDE emulation rather than SATA, and we need to add a second device to attach to our ISO image. If the device doesn't exist, click on the controller followed by the 'Add a new attachment' icon (which looks like an optical disc). A small window should appear asking you to choose a disc image, and you should point the resulting requester at the Android 2.2 image.
If an optical drive already exists, select it in the storage tree. Use the disc icon on the far right to display a dropdown menu, then select 'Choose virtual CD/DVD disk file'. Now that everything is configured, click on 'OK' in the Settings window, followed by the green 'Start' button in the main interface. Android 2.2 will boot within the virtual machine.
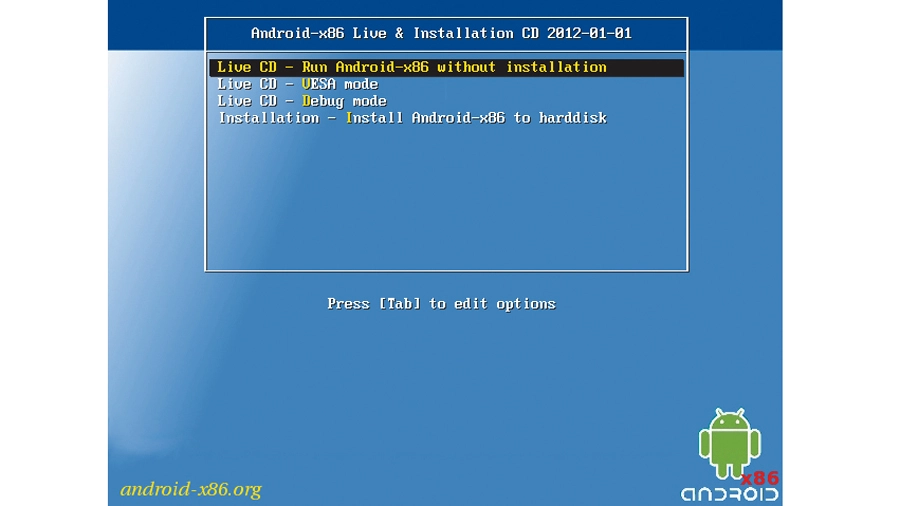
You'll see the boot menu, from which you should choose the first option. HDPI and MDPI refer to the screen resolution of the output device, which you can ignore when running on anything other than a tablet. If you're trying this boot on real hardware, then the third option avoids graphics drivers by using the VESA mode. This is useful if you run into compatibility problems.
If you like what you see with Android, the final option will create a permanent installation on a spare drive partition. A few moments after making your choice, you'll see Android's unlock screen.
The final hurdle is overcome by pressing the right [Ctrl] key and selecting 'Disable mouse integration' from the Machine menu. When you now click on the virtual machine, you should see the mouse and be able to slide the padlock icon up to enter the OS.
Netbook Android

Hopefully you've now played with Android 2.2 and want to upgrade to the latest version. The missing generic build of Ice Cream Sandwich is likely to be a sign that there are problems with the codebase that make the platform highly unstable.
For that reason, any version of ICS you get running will have problems. We've tried native hardware, virtual machines and netbooks, and surprisingly it was the last category that gave us the best experience. If you have a netbook handy, you can get a fully fledged x86 version of ICS running with little difficulty.
We downloaded the ISO image of 4.0.3 built for the Asus platform (android-x86-4.0-asus_laptop-20120101.iso). Either this image or a later version should work with most netbooks, and maybe other laptops and PCs, but even our Samsung NC10 ran the image well, albeit without wired or wireless networking.
Booting Android

As these devices don't have an optical drive, the ISO image needs to be written to a USB stick, which can then be booted on the machine. The tool for the job is Unetbootin, which can be installed within Linux from your distribution's package manager. Versions are also available for OS X and Windows, and they all work the same way.
First, insert your USB stick - 1GB will do. All the data will be lost, so make sure there's nothing on there you want to keep, then launch Unetbootin. The top half of the window is used for selecting a Linux distribution, which can be downloaded and installed automatically.
We want to use the bottom half to locate the ISO and ensure the correct USB device has been selected. If everything is correct, click 'OK'. This will start the conversion and begin to write the bootable data to your USB stick. It should complete in a few minutes.
Like a live Linux distribution launching from a USB stick, Android can now be booted by turning on your machine with the USB device inserted. As long as the BIOS or boot menu is configured to probe USB devices first - and most are - you should see the Android boot menu.
This has three options, with 'Default' being added by Unetbootin. Choose the first, 'Run Android x86 without installation', to test the OS. If everything works, you can choose to install at a later time.
Android takes a few minutes to boot, and will probably complain that your machine isn't an Asus product. After the Android logo, you'll see the starter wizard. This is where, on a real device, you sync the hardware with your Google account, but without network connectivity it makes no sense. Just click through the options to get to the OS quickly.
You'll now see the start page of Android. This adds a few prompts to help you get started, but Android is easy enough to use without any prior experience, especially if you tried version 2.2.3 earlier. The main differences are in the transitions and how the display looks, but all that can be changed too.
Applications are launched from the small matrix icon on the top right, and you can use the arrows in the bottom left to move between what Android calls 'activities'. In Linux terms, these are virtual desktops.
Configuration

Playing with the settings is the first thing you should do. You can get to the Settings panel by clicking on the clock in the bottom right of the display, then on the text that says 'No internet connection'.
Clicking the Wi-Fi icon will turn it on, and hopefully you'll be able to scan for networks with the 'Scan' button at the top of the screen. This didn't work for us, but there are reports of it working with other hardware. We got some connectivity by using a Bluetooth PAN connection to a machine that was sharing its internet connection over Bluetooth. Ensure your laptop supports this feature, and that it's enabled.
After pairing your Android device and your laptop, you should have network connectivity. Android x86 is in a state of rapid development, so there's a very good chance networking will have been fixed.