How to control the Raspberry Pi with your voice
Make your own Alexa

Voice-activated devices such as the Amazon Echo are becoming ever popular, and you can make your own using a Raspberry Pi, an inexpensive USB microphone and some suitable software.
You too can have your Raspberry Pi search YouTube, open web pages, launch applications and even respond to questions, simply by speaking.
The Raspberry Pi has no built-in soundcard or audio jack, so you need a USB microphone or a webcam with built-in microphone for this project. We tested the software using a Microsoft HD-3000 webcam, but any compatible device will do. Visit there's a full list of Raspberry Pi-compatible webcams if you do not already have one, but be sure that whatever device you choose has an integrated microphone.

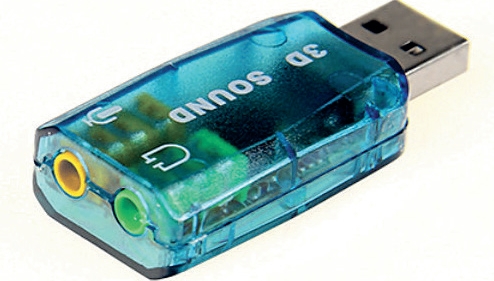
If you only have a microphone with an audio jack, try searching Amazon or eBay for an inexpensive USB soundcard, which plugs into the USB port at one end and has an output for earphones and a microphone at the other.
There’s a number of speech recognition programs for the Raspberry Pi. For this project, we’re using Steven Hickson’s Pi AUI Suite, because it’s powerful as well as extremely easy to set up and configure.
Getting started
Once you follow the steps in the tutorial, you will be able to start the installer. The Pi AUI Suite gives you a choice of a number of programs to install. The first question you are asked is whether it should install the dependencies.
These, quite simply, are the files the Raspberry Pi needs to download for voice commands to work, so select Y and press Return to agree to this.
Sign up for breaking news, reviews, opinion, top tech deals, and more.
Next, you are asked if you want to install the PlayVideo program, which enables you to use voice commands to launch and play video files.
If you choose Y, you’re asked to specify the path to your media files – for example, /home/pi/Videos. Note that upper-case letters are important here. If the path is invalid, the program warns you.

You’re then asked if you want to install the Downloader program, which searches for and automatically downloads files from the internet for you. If you choose Y here, you’re asked to provide settings for host, port, username and password.
If you aren’t sure of these, press Return for now to choose the default options in each case.
The following program is Google Text to Speech Service, which you may wish to install if you want the Raspberry Pi to read out the contents of text files. In order to use this service, the Raspberry Pi needs to be connected to the internet, because it connects to Google’s servers to ‘translate’ the text into speech, and then plays an audio file with the Raspberry Pi’s media player.
If you decide to install this, you need a Google account. The installer asks you to enter your username. Do so, then press Return. You’re then prompted for your Google password. Enter this and press Return again.
The installer also offers you the chance to install Google Voice Commands. This uses Google’s own speech recognition service. Again, you’re asked to provide your Google username and password to continue.
Whether or not you choose the Google-specific software, the program also asks you whether you want to install the YouTube scripts. These tools enable you to speak a phrase such as “YouTube fluffy kittens”, which then causes a relevant video clip to be played.

Finally, the program gives you the option to install Voicecommand, which contains some of the more useful scripts, such as being able to launch your web browser by saying the word “internet”.
The program asks you if you want to let Voicecommand set itself up automatically. If you experience an error at this stage, follow Step 3 of the walkthrough on the next page.
Once installation of Pi AUI Suite is complete and you have run sudo voicecommand -c to set it to listen, you need to prime it with a keyword.
By default, this is “Pi”, but feel free to alter this to something easier, such as the word “Alexa" if you want an Amazon Next, try out a few of the built-in voice commands.
Youtube: Saying “YouTube” and a video title automatically loads a full-screen video of the first relevant YouTube clip.
This is similar to Google’s “I’m feeling lucky”. Say “YouTube” and the name of the video in which you’re interested – for example, “YouTube fluffy kittens”.
Internet: Saying the word “internet” launches your web browser. By default, this is the Raspberry Pi’s built-in browser Midori, although you can change this.
Download: Saying the word “download” plus a search term automatically searches the Pirate Bay website for the file in question – for example, you could say “Download Ubuntu Yakkety Yak” to get the latest version of the Ubuntu Linux operating system.
Play: This command uses the builtin media player to play a music or video file – for example, “Play mozartconcert.mp4” would play that particular file located in the media folder you specified in setup, such as /home/pi/Videos.
Show me: Saying “show me” opens up a folder of your choice. By default, the command doesn’t go to a valid folder, so you need to edit your configuration file to a valid location – for example, show me==/home/pi/Documents.
Raspberry Pi's master's voice
Once the Voicecommand program is installed, you may wish to make a few basic changes to the setup before fine-tuning your configuration.
Open Terminal on your Raspberry Pi or connect via SSH and run the command sudo voicecommand -s .
You are asked a series of yes/no questions next. The first question asks whether you want to permanently set the continuous flag. In plain English, the Voicecommand program is asking whether, each time you run it, you want it to continuously listen for your voice commands.
Select Y for now. Next, you are asked if you want the Voicecommand program to permanently set the verify flag. Selecting Y here means the program expects you to say your keyword (by default, the word “Pi”) before responding to commands.
This can be useful if you want to set the Raspberry Pi to listen continuously and don’t want it to act on everything you say.
The following prompt asks if you want to permanently set the ignore flag. This means that if Voicecommand hears a command that’s not specifically listed in your configuration file, it tries to look for a program in your installed applications and run it.
For instance, if you say the word “leafpad”, which is a notepad application, Voicecommand searches for and runs this even if not specifically told to.
We do not recommend you enable this feature. Because you’re running Voicecommand as a SuperUser, there’s too much risk that you could inadvertently tell the Raspberry Pi a command that could harm your files.
If you want to set up extra applications to work with Voicecommand, you can edit the configuration file in each specific case.
Voicecommand then asks you whether you wish to permanently set the quiet flag, so it doesn’t give a verbal response when you speak. Choose Y or N as you see fit. Next, you’re asked if you want to change the default duration for speech recognition. You should only change this if you’re finding the Pi is having trouble hearing your commands.
If you choose Y, you’re asked to type in a number – this is the number of seconds that the Raspberry Pi listens for a voice command, and the default is 3.
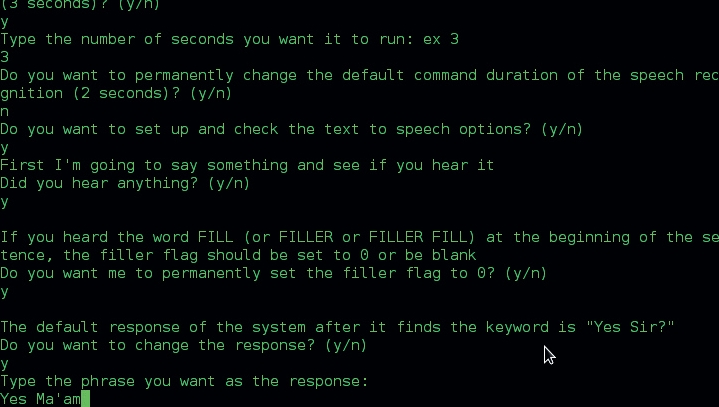
The program then gives you a chance to set up the text-to-speech options. Be sure to turn up your volume before doing this. The program attempts to say something and asks whether you have heard it.

The default response of the system when responding to your keyword is “Yes sir?” Choose Y on the next prompt to change this, then type in your desired response, such as “Yes ma’am?”
Press Return when you’re done. The system plays back the response for you to confirm whether you’re happy with the result.
The procedure is the same for the default message for when the system receives an unknown command. The default response is “Received improper command,” but you can change this to something less robotic if you prefer by typing Y, then your chosen response – for example, “Unknown command.”
You are now offered the chance to set up the speech recognition options. This automatically checks whether you have a compatible microphone installed. Voicecommand next asks you if you want the Pi to check your audio threshold for you.
Make sure there is no background noise, press Y, then Return. It then asks you to speak a command to check that it has the right audio device selected. The program automatically determines the right audio threshold for you, so type Y to choose this.
Finally, the Raspberry Pi asks you if you want to change the default keyword (“Pi”) to activate voice commands. Type Y, then enter your new keyword. Press Return when done.
You are then asked to speak your keyword to acclimatise the Raspberry Pi to your speaking voice. If this seems correct, type Y to complete the setup.
Follow Step 6 of the tutorial on the next page to run the Voicecommand software. Try to start out with a few simple commands. (See Basic Voice Commands boxout for details).
Once you’re comfortable with these, run the command sudo killall voicecommand to shut down the program and edit your configuration file if you wish.

Once your Voicecommand software is up and running, you can edit the configuration file to add new commands or modify existing ones.
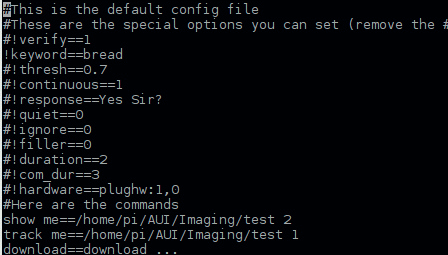
Run the command sudo nano /root/.commands.conf to view the configuration file.
As you’ll see, most of the lines begin with a # symbol, which means the Raspberry Pi ignores them.
Delete the symbol to activate the line. If, for instance, you want to change the keyword that activates the voice recognition software from “Pi” to “Alexa”, you would change the line from #!keyword==pi to -!keyword=alexa.
If you use the Firefox web browser instead of Midori, you may also want to change ~Internet==midori & to ~Internet==firefox-esr &.
The software can run any command. For instance, to open the desktop by saying the word “desktop”, add the following line to the end of the file: desktop==home/pi/Desktop
You can also launch programs as you would from the terminal – for example, notepad==leafpad
As you’re talking to the Raspberry Pi, you may want it to respond. Do this first by opening Terminal and installing the speech synthesis software Festival with the following command:
sudo apt-get install festival
The basic format to get the Raspberry Pi to talk is echo “Your message here” | festival –tts
You can also have the Raspberry Pi read out system information. For example, if you wanted the Raspberry Pi to tell you the date and time, you would add the following line to the config file:
time==echo “The time is” | festival --tts &&
date | festival –tts
Vexing voices
Voice recognition software is a work in progress and the Raspberry Pi may not recognise everything you say.
To improve your chances, be sure to stay near the USB microphone and speak slowly and clearly.
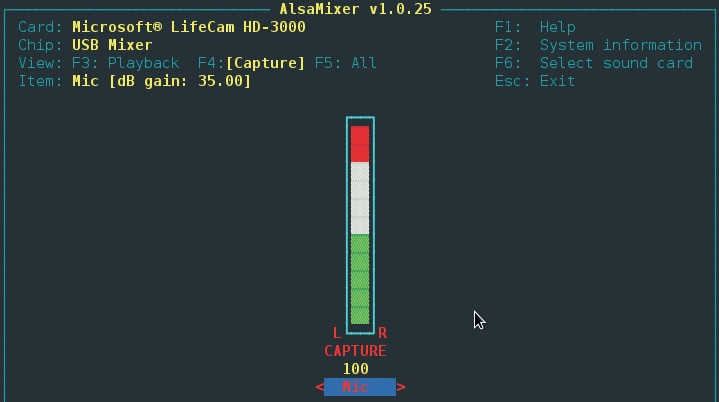
If you’re still having trouble being understood, open Terminal on your Raspberry Pi or connect via SSH and run the command alsamixer to open your sound settings.
Press F4 to choose audio input, then press F6. Use the arrow keys to select your USB device, then press Return. This controls the volume of your USB microphone. Use the up arrow to push it to maximum (100).
If your device isn’t being detected at all, it may need more power than the Raspberry Pi’s USB ports can provide on their own. The best solution for this is to use a powered USB hub.
Once the Download program is installed, if you experience an error connecting, bear in mind that access to the PirateBay website may be restricted where you are.
In order to download files, you also need a BitTorrent client for the Raspberry Pi, such as the program Transmission. You can install this by opening Terminal or connecting to your Raspberry Pi over SSH and running the command sudo apt-get install transmission.
Help with getting started and how to use the client is available from the Transmission website. Needless to say, you should only download files with the permission of the copyright holder.
If you choose to use Google Voice Commands or Google TTS (Text to Speech), bear in mind that anything you say and any text files you submit are sent to Google’s servers for translation.
Google claims not to retain any of this data, but even if it is to be believed, any data transmitted over the internet can potentially be intercepted by a third party.
Google does encrypt your connection to reduce the chance of this happening, however.
If you find you’re happy with the voice command feature, you might prefer the software to start automatically each time you boot the Raspberry Pi. If so, open Terminal on your Raspberry Pi or connect via SSH and run the following command:
sudo nano /etc/rc.localThis opens the file that determines which processes start up when your Raspberry Pi boots. By default, this script does nothing.
Use your arrow keys to scroll to the bottom of the file and, just above the line reading exit 0 , type the following:
sudo voicecommand -cPress Ctrl+X, then Y, then Return to save your changes. Feel free to reboot the Raspberry Pi at this stage to make sure it works.
If you’re unsure whether Voicecommand is running, open Terminal and run the command ps -a to show a list of running processes.
- Find the best webcam for your Raspberry Pi setup