Take Windows Media Center to the next level
It finally feels like we're living in the future, there are indeed flying cars, people are getting robotic limbs and our insect overlords have ushered in a third decade of peace and prosperity. Mmm, one of those may not have happened, but we are certainly in a brave new world of digital innovation.
Despite that thanks to terrible companies blocking innovation, pushing their own awful systems and agendas we're stuck in a world where playing file A on device B via network C still isn't a simple thing.
It's all our stuff and it's all on our paid-for networks and yet that's not good enough. It doesn't help that Microsoft, Apple and whoever next controls the majority, thinks its system is best, be it Windows or iTunes. Frankly we think they're all awful, anything – as Apple should well know – that comes between you and doing what you want, is unnecessary.
Nothing highlights this more than with media. Apple's success shows it got it right, people just need a simple, stylish one-click system to play and enjoy their music and video. But where both Apple and Microsoft got it wrong is with the restrictive ecosystem they both implemented.
Media Center is annoying and limited, iTunes can be elegant but in certain ways is even more restrictive. What you want is a system in place that enables you to enjoy your media, no matter what it is or where it is, on whatever device you happen to have. Thankfully we have the answer, or answers.
From slapping Windows Media Center around the face and neck until it behaves, to installing complete replacements for it, there are ways you can simply get your media better formatted so programs display glamorous posters and details.
None of this effectively changes how you might currently store your media, it's just adding or improving the existing software layer so it interacts far better with it.
Sign up for breaking news, reviews, opinion, top tech deals, and more.
The main key to all of this however, is using a server, which is a scary name for simply having a central storage box. This could be your main PC or a box under the stairs but providing better access to the media stored on it will transform how you enjoy it all.
Windows Media Center on steroids
Have you done this: clicked the Start Menu Windows Media Center link, been vaguely impressed by its opening animation, bored by its set-up process and then instantly confused by why it even exists? Join the club.
Part of the problem is people often use Windows Media Center (WMC) on a desktop system, where it makes no sense; you're best off with Windows Media Player every time. Another key issue is that WMC is designed for remote control use, with you and your bum firmly entrenched on a sofa. But the killer by far is that by default it can't play your favourite files.
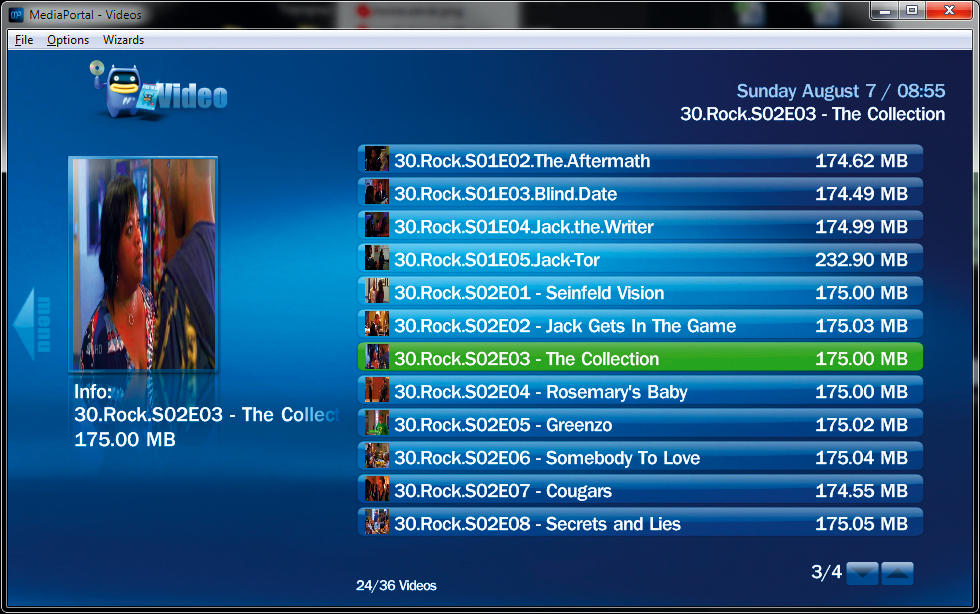
Before we do anything the first thing you'll want to do is make sure WMC is capable of playing the widest range of music and video files possible.
Annoyingly, Windows Vista and 7 altered the way WMC treats system codecs, effectively ignoring the standard installed ones. The situation is further complicated by 64-bit systems using WMC and the sheer number of possible codecs, subtitles and audio decoders out there.
A minimalist approach is to just install the latest Haali Media Splitter from haali.su/mkv this will provide playback, however you will certainly find some more advanced audio codecs missing. We found many people recommending the codec pack from Shark007.net, it is a somewhat overly complicated pack but it offers complete compatibility and a 64-bit companion suite.
Once installed make sure that when you start the configuration tool from the Start Menu to right-click and choose 'Run as Administrator'. Just select the 'Shark007 Recommended Settings' at the bottom and you're away. Playing the field
Now that you know WMC is going to happily play everything you throw at it, plus, almost as importantly, create those pretty thumbnails, just how are you going to enjoy Media Center? In the past you may have thought of a networked HTPC, today even a lowly netbook connected to a HDTV can do the trick with HD content, and do it far more quietly.
We would recommend nabbing a cheap WMC USB infrared remote controller, as they will make your media life a touch more luxurious and work with many other media players as well. eBay should put you right for less than a tenner.
While you can store files locally on the laptop or HTPC we're guessing any sane PC Format reader will be running a server box of some description. Creating a Windows network share is by far the best option, and then you can point Windows Media Center to this for your viewing pleasure.
Mount up
If you would like a more straightforward life the easiest option is to create for yourself a mounted network share, as this will guarantee that the remote folder is mounted and it will also look like a standard drive to Windows. Additionally, this will simplify adding the drive to Windows Media Center as it will automatically pick it up.
Remote shares and local folders are managed via the Media Library, in Windows Media Center you will need to select Tasks > Media Libraries. You're able to add local and remote shares to all the listed sections, for films we recommend Videos over Movies but both will work.
If you want to add a standard Windows shared folder, choose 'On another computer' to add remote shares. If you have problems try 'Let me manually add a shared folder.' The poor design of WMC screams at this point as you cant edit or paste the path in WMC. You'll need to manually type the whole thing starting with a double backslash.
Possibly one of the greatest things we've ever seen for Windows Media Center is the BBC iPlayer plug-in. This was a project to bring iPlayer to WMC, and development got to a working system but it was abandoned in 2009, only to be picked up again here: bit.ly/qB4KKL. Just download and install this bad boy, the interface is beautiful in its simplicity but even manages to mimic the Beeb's iPlayer style.
The chap behind the reboot has recently shown off an update that also integrates TED Talks, 4oD and a host of other channels into the player so keep an eye on this for a massive update. We also suggest taking a look at www.mediabrowser.tv this is another plug-in that provides a new entry in the main WMC menu and offers a slick alternative to the typical Movie or Video display. The free version works perfectly but paid-for add-ons provide even slicker presentations and custom themes. Our final suggestion is the TagSupport plug-in (www.softpointer. com) this enables WMC to support more audio file formats, such as OGG and Flac, which is essential for helping access your entire audio library.
The cable guy
The real point of Media Center is to enjoy music, TV and films on a big screen. The ideal solution is an HDTV and with all offering HDMI, usually a D-Sub VGA port and occasionally DVI, it shouldn't be too difficult getting a suitable cable plus adaptor combination.
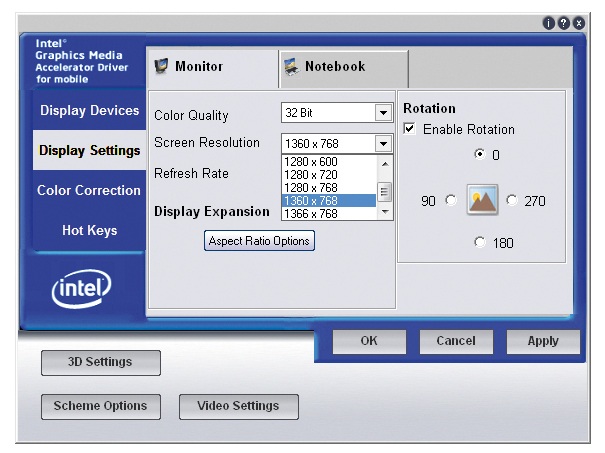
Even with HDMI an HDTV sometimes doesn't correctly detect the resolution. It's often the case you'll need to tweak the exact resolution within the display driver. For full HD 1,920 x 1,080 usually works without issues. At 720p try 1,280 x 720 up to 1,366 x 768 to get a sharp image.
For a genuinely home cinema experience you should consider upgrading to a projector. Entry-level 720p units are surprisingly affordable at around £400.
This isn't an audiophile article, so we're not worrying too much about audio. For us a 3.5mm mini-jack audio cable from the laptop or HTPC to the TV will suffice. Any up-to-date system providing HDMI will carry surround digital audio over the HDMI cable.
For older desktops you may need to internally add a digital audio cable for this to happen. Beyond that, if the PC provides an external optical or coaxial audio output, most HDTVs will provide Share and share alike
Three steps to using Windows network shares
1. Check network settings
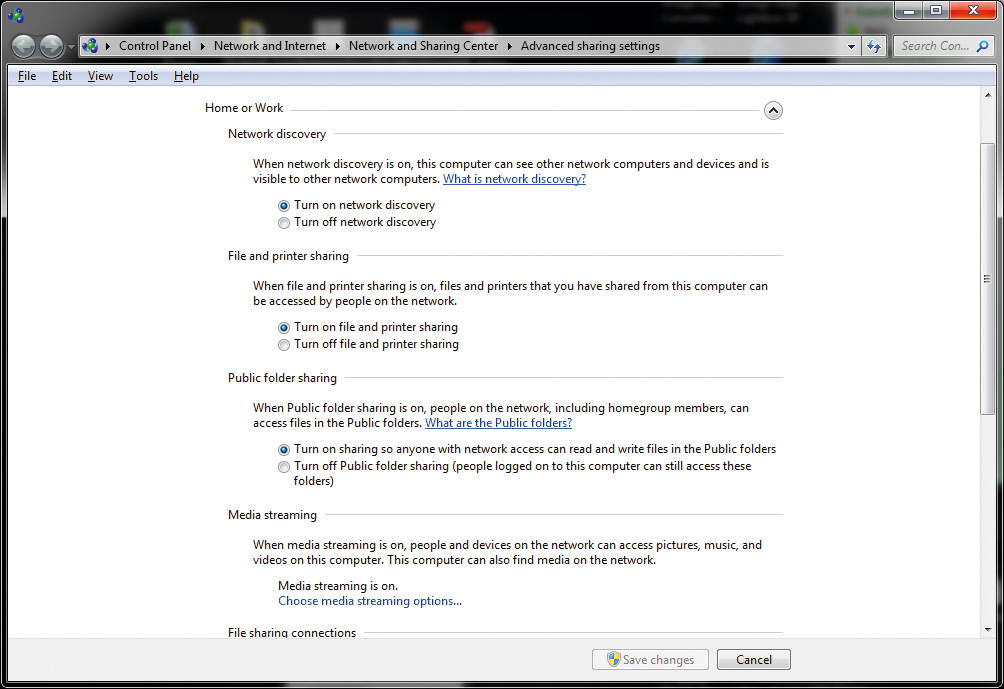
Win7 introduced HomeShare so presuming your network is set on the server box, open the Control Panel > Network and Sharing Center > Manage Advanced Sharing, and make sure 'Turn on network discovery' and 'Turn on file and print sharing' are checked. Also select 'Turn off password protected sharing' and select 'Use user accounts…'
2. Create the share
At this point other PCs on the network should be able to see the server and if you enable it, be able to open shared folders too. Now make a folder or drive available to share. Right-click a folder, select Properties > Sharing > Advanced Sharing, click 'Share this folder' and give it a name. Next we need to add users that can share it.
3. Add users and test
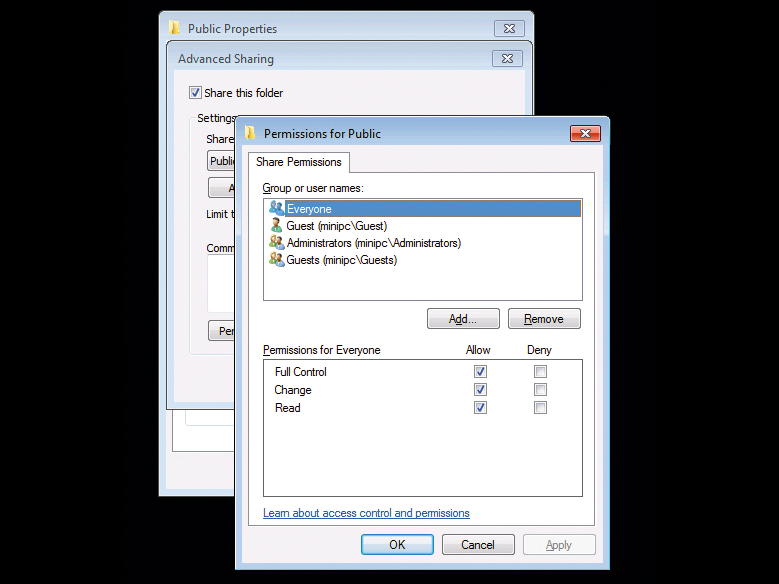
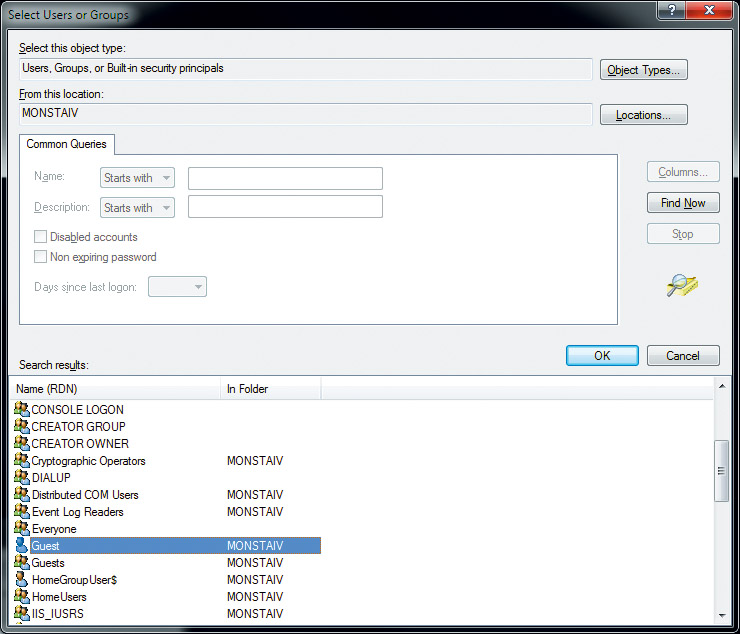
From the same dialog, click Permissions > Add > Advanced > Find Now. This generates a list of possible user accounts. By adding additional users you can implement individual, password protected access to specific folders, usually this is easiest to do by using the Computer Management console.
- 1
- 2
Current page: Power up Media Center: Sharing and display
Next Page Power up Media Center: codecs and alternatives