How to make your Mac child-proof
Set up your Mac so your kids can't accidentally trash it
Parental controls screen out smut and stop your kids developing square eyes. You can also hide drives and prevent accidental edits.
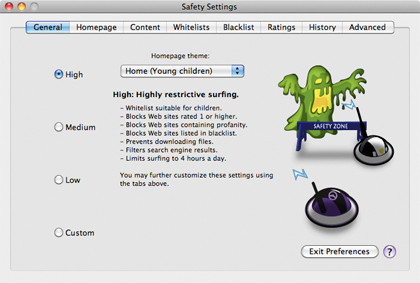
As your children get older and more tech-savvy, you'll need to take things up a notch to keep your stuff, your Mac and your kids safe. You can add third-party software such as the child-friendly browser BumperCar (£18.54) or the parental control system MacMinder (£18.54), but if you're running OS X Leopard or Snow Leopard you've already got some superb parental control features.
Parental controls are on a per-account basis, which means you can have different levels of restrictions for each child. You can restrict how many hours per day each child can spend on the computer, lock them out altogether at specific times, limit which applications, widgets and utilities they use (something that's particularly handy with older children who might want to use applications such as BitTorrent clients for dodgy downloads) and control the kinds of websites they can look at.
There's more. You can put limits on who your children may iChat with and send messages via Mail to on a per-contact basis, and you can even prevent them from seeing profanity in the OS X Dictionary - although the options to stop users from burning CDs and DVDs, changing the printer settings or changing their login password seem more useful to us.
Parental Controls can also log your children's activities so you can keep an eye on what they've been doing, or attempting to do. If you click on the Apps, Web or People tabs in Parental Controls you'll see the Logs button at the bottom right of the window. Click on Logs and you'll have four options to choose from: websites visited, websites blocked, applications and iChat. You can then view logs from the last day, week, month or since the day you first switched on Parental Controls.
It's not all perfect, unfortunately. Creating a list of approved sites can take an eternity, and an old, unfixed bug means Parental Controls' attempts to block adult sites also block some secure HTTP connections. That can prevent perfectly legitimate websites from working: we've encountered problems with Gmail and Facebook over secure HTTP, although of course Facebook isn't supposed to be used by anybody under thirteen.
If there are sites you really want the kids to access you can override the block by adding their IP addresses to the Always Allow These Websites list. Remember too that if you enable Parental Controls on your own account, you can end up limiting your own Internet connection, blocking your applications and generally annoying yourself.
Sign up for breaking news, reviews, opinion, top tech deals, and more.
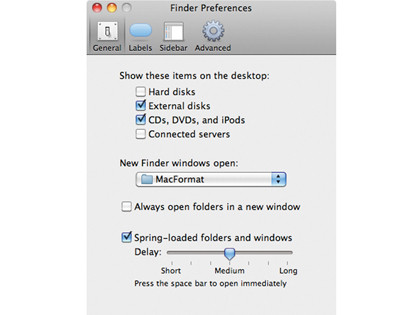
You can hide external drives by unticking them in Finder's Preferences > General and Preferences > Sidebar, but if you'd like more robust protection select the external drive on your desktop and press Command+I. Under Sharing and Permissions you can now change what people can and can't do with the drive, and you can do it per user: just click on the plus sign, select the person, and then specify whether he or she should get full access, read-only access or write-only access. You can do the same with files and folders.
No matter how careful you are, accidents can and probably will happen - which is why we'd strongly recommend you get hold of an external hard disk and use it with OS X's superb Time Machine, which has saved our necks on countless occasions. If a file or folder gets damaged or deleted Time Machine enables you to travel back in time, find an intact copy and bring it back to the present day.
Time Machine has another ace up its sleeve: you can restore your system from a Time Machine backup to a completely different Mac via the OS X Migration Assistant. That means if the worst happens and your Mac gets damaged or destroyed, you can get up and running on a different machine while you wait for your Mac to be repaired or for your new one to arrive.
How to get started with Parental Controls
01. Choose the child
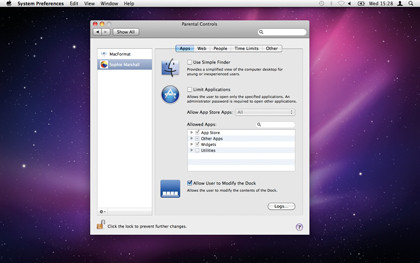
Parental controls are tied to individual accounts, and you need at least one user account - excluding your own - before you can apply restrictions. Open System Preferences, select Parental Controls and click the lock. Select the user account you'd like to change.
02. Allow specific apps
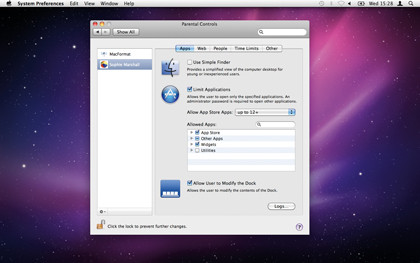
The first screen lets you control the apps a user can open. Ban App Store apps or limit them by age. You can use the Allowed Apps panel to specify which apps this person can access. Enabling Simple Finder makes the OS X desktop friendlier for younger kids.
03. Watch the clock
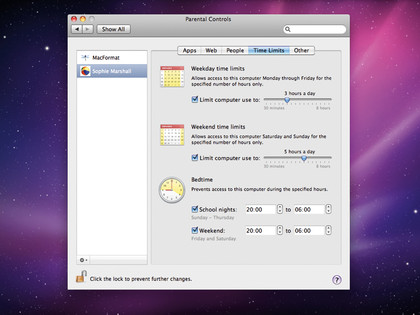
The Time Limits feature makes your Mac off-limits when your kids are supposed to be studying, sleeping or walking the dog… The Time Limits tab enables you to specify how many hours per day each user is allowed, and Bedtime blocks access at specific times.
Current page: Parental controls in OS X
Prev Page How to make your Mac child-proof Next Page How to secure your personal data
Contributor
Writer, broadcaster, musician and kitchen gadget obsessive Carrie Marshall has been writing about tech since 1998, contributing sage advice and odd opinions to all kinds of magazines and websites as well as writing more than twenty books. Her latest, a love letter to music titled Small Town Joy, is on sale now. She is the singer in spectacularly obscure Glaswegian rock band Unquiet Mind.