With its heady mix of festive lights, spectacular food and (mostly) jolly people, Christmas is a great time for taking photos – particularly if Santa has been kind enough to leave a new camera in your stocking.
But these conditions can also make it a challenging time to take high-quality snaps, particularly for those of us in the northern hemisphere. Sure, there's the potential for some stunning landscapes with the sun low in the sky, but with limited daylight and lots of family commitments, that's not always practical or possible.
So how do you take some Christmas photos that are bit more memorable than your slightly overcooked Christmas cake? We've come up with seven great ideas for you to try out over the holidays, either at home or nearby.
These include the best ways to take candid photos of your family enjoying the festivities, but also some more ambitious projects including light painting, Christmas flat lays and, to kick us off, some lovely tree-shaped bokeh. These projects are ideal for making your own Christmas cards or invitations for next year, or simply improving your skills for the new year.
You don't have to do them all and you don't have to do them in any particular order, but they're all pretty straightforward and they might give you some inspiration to go off at a tangent with your own photo projects.
1. Christmas bokeh
Bokeh, as you may already know, is a Japanese word that refers to the quality of the defocused areas of an image – and we’re getting in the mood for Christmas by showing you how to capture bokeh with a festive flavor.
The appearance of the bokeh in an image is dictated by the roundness of the lens’s aperture; the more blades the aperture has, the rounder the aperture and the smoother the blur.
Get daily insight, inspiration and deals in your inbox
Sign up for breaking news, reviews, opinion, top tech deals, and more.
For this project, we’re photographing fairy lights with a wide aperture to create a shallow depth of field, and placing a cut-out shape over the lens. The wonders of physics will cause the out-of-focus areas in the frame to take on the shape of the cut-out; in the same way that rounded apertures soften defocused areas, by creating an aperture with distinct and straight edges, we can produce bokeh that takes on recognizable shapes.
Lomography's Petzval lenses can also create these effects using different-shaped aperture slides, but a simple piece of black card can mimic the style superbly. For the best effect, you’ll need to shoot fairy lights in a dark room – if you shoot outside, even at night, it’s likely that there will be too many bright areas cluttering the background, which will prevent the shapes from standing out.
Set-up: Make your aperture template
Image 1 of 4
1. Mark out your aperture
Draw around your lens cap on a sheet of thick black paper. Intersect this circle to find the centre, and mark out the diameter of your aperture. Calculate this by dividing your focal length by your widest aperture; in our case 50mm divided by f/1.4 gives us 35mm. (Click the arrow above to move to the next step).
2. Cut out your shape
Draw your shape, keeping inside the aperture circle and avoiding intricate details so that you can cut the shape out easily. Carefully cut out the shape using a scalpel, holding the paper around the aperture down firmly to avoid tearing it.
3. Turn out the lights
Shoot in a darkened room with the windows blacked out so the lights stand out. Closing the curtains gave us a dark enough room – if your curtains or blinds aren’t heavy enough to block out all the light you can hang sheets or towels over the windows as well.
4. Light up the back
Find a plain background to shoot against, ideally a dark one, and arrange your lights – the more lights you include in the frame, the more bright and vibrant your bokeh will be. We’ve draped our lights over a small Christmas tree.
How to shoot your bokeh image
Image 1 of 5
1. Keep your distance
Set up your foreground subject and position it and the camera a good distance from the fairy lights in the background; the greater the distance between your focal point and the lights, the more the lights will be blurred. (Click the arrow above to move to the next step).
2. Use a tripod
Place your camera on a tripod to hold it still while composing your image, and set the drive mode to 2-second self-timer to prevent camera shake; this will also free your hands to hold the cut-out shape in front of the lens.
3. Light your subject
Position your foreground subject, and use a torch or household lamp to illuminate it – you can use a simple home-made modifier to direct the light if needed. We’ve placed a diffuser in front of our lamp to soften the light.
4. Open up your lens
Open your aperture to its widest setting to blur the lights. We used Aperture Priority mode with our lens set to f/1.4; if your maximum aperture isn’t as fast, move the subject and/or camera further back from the lights.
5. Shape the light
Attach your cut-out shape to the front of the lens. If you’re using flexible card you can fasten it around the lens with an elastic band. Otherwise, simply hold the card up in front of the lens. For the best results, focus manually.
2. Festive flat lays
Christmas is the perfect time to shoot still life images, not least because of all the interesting and colorful objects that come with the festive season. And while the idea of creating a still life might not sound that exciting, the 'flat lay' approach is much more visually interesting and easier to shoot than traditional still life.
A flat lay is an image of a collection of objects that all relate to a theme and are positioned on a background on the floor or a table. The objects are then carefully composed in a way that looks interesting and aesthetically pleasing, which will then fill the camera frame to tell a story or simply to illustrate a theme. The flat lay is then shot from directly above.
Set-up: design your flat lay
Image 1 of 4
(Image credit: JoyStudio / Shutterstock)
1. Pick a color scheme
The first thing you need to consider when shooting a flat lay is what the color scheme will be. Color is extremely important and it’s best to pick a scheme that focuses on similar tones, or 2-3 colors. Using a color wheel is a great way to identify complementary colors, but if you want a quick fix that always works well for festive themed flat lays, then green, red and white are a classic combination. (Click the arrow above to move to the next step).
(Image credit: Alexander Raths / Shutterstock)
Once you’ve settled on the color scheme of the objects, the next step is to think about what kind of background will work best. The texture of the background can be important and this, alongside the color chosen, can be used to match or contrast with the objects. Backgrounds such as floorboards, a rustic piece of wood, a slate tile, a kitchen worktop or a piece of colored card can all work well.
(Image credit: Konstanttin / Shutterstock)
3. Leave some space
When laying out the objects on the background, if you’re struggling to create a balanced composition less can be more. Try removing some of the objects and don’t be afraid of negative space – this is ideal for adding text so the flat lay can be used as a Christmas card, a label for Christmas presents, a poster for a Christmas event or any other use you can find for the final image.
(Image credit: Ruth Black / Shutterstock)
4. Choose your focal length
When shooting a flat lay it helps to have a tripod with an articulating centre column, because this allows you to secure the camera pointing straight down at the ground or a table. And in terms of focal length, around 50mm is ideal so you can either use a prime lens or a 16-55mm on APS-C cameras and 24-70mm full-frame; these medium zooms work particularly well because you have the flexibility of the zoom to easily refine the composition.
How to shoot flat lays
Image 1 of 4
(Image credit: Future)
1. Use a tripod
Window light is ideal for flat lays, so set up your tripod next to a window with a reflector (or some card covered in aluminum foil) opposite where the light is coming from to reduce shadows, if you’d like to lighten them. The best type of tripod to use is one with an articulating centre column that can be set to a horizontal position so the camera can be pointed straight down. You can also secure a clamp with a camera attachment at the end to a standard tripod to achieve the same kind of positioning. (Click the arrow above to move to the next step).
(Image credit: Future)
2. Level the camera
Many tripod heads have a bubble level where the tripod plate attaches and these are ideal for ensuring the camera is perfectly square when pointing straight down. This can be combined with the camera’s virtual horizon in Live View to provide an additional level of precision. If your tripod head doesn’t have a bubble level, simply use the virtual horizon and turn on the camera grid lines to aid in getting the camera square and composing your shot once objects are introduced.
(Image credit: Future)
3. Camera settings
Set the camera to aperture priority with the aperture set to f/8 to provide a sufficient depth-of-field and the sharpest overall result possible with most lenses – the ‘sweet spot’. Set ISO to 100-250 to ensure the best image quality, and set the self-timer to a 5-10 second delay or use a shutter remote if you prefer. Assess exposure on the LCD screen by checking the histogram, and apply positive or negative exposure as required to obtain a correct exposure.
(Image credit: Future)
4. Arrange objects and shoot
Place your Christmas-themed objects on your background using the camera LCD to aid with positioning. Don’t forget to leave some space for text if adding words later, or if you’re aiming for a complete image think carefully about how you’ll be using it and where objects are best placed. Once all objects are in place, release the shutter using the self-timer or a shutter remote and then check the image is sharp. When you’re happy with the first image try different compositions.
3. Christmas candids
When people come together for special occasions or simply when you’re enjoying a family day out, it’s the perfect time to capture candid moments of your family and friends. Candid photography follows the general rules and techniques of reportage and street photography so you’re free from the complexities and, in some cases, the apprehension of posing people and setting up a mini photo studio during social events.
What’s more, taking the candid approach means that you can still enjoy and participate in the festivities rather than feeling like you’re excluded from them by photography. So, whether it’s a Christmas get together, a wedding or a birthday celebration, capture candid moments that you, your family and your friends can treasure.
Image 1 of 3
(Image credit: Roman Samborskyi / Shutterstock)
(Image credit: Jacob Lund / Shutterstock)
(Image credit: Irina Wilhauk / Shutterstock)
Candid photography is all about capturing unposed images that tell a story, and at times such as Christmas get-togethers, you often have lots of people interacting and having fun which makes shooting candids so much easier. But while the situation provides the opportunities you need to make interesting images, you still need to be almost invisible with your camera and use the settings that allow you to work successfully in often low light situations.
When shooting, don’t worry about perfectly ‘clean’ shots where the foreground and background are uncluttered. The environment is just as important as what’s happening within it – it’s part of the story; shooting through people or with part of the frame obscured by an object helps to create a sense of depth and interest. Take part in the festivities, but keep your camera in your hand and turned on ready to quickly grab shots as you see them.
A fast prime lens with an equivalent focal length of either 35mm or 50mm will provide the perfect field of view for shooting indoors. 35mm is often better because it’s slightly wider, but 50mm is still a great option. Ideally, the maximum aperture will be f/2.8 or wider because shooting wide open allows more light to reach the sensor and ultimately helps to keep ISO levels lower. Plus, shooting wide open will create beautiful bokeh balls when Christmas lights and lamps are in the background of your shots.
How to take Christmas candid photos
Image 1 of 3
(Image credit: Future)
1. Use Auto ISO
Set your camera to Auto ISO mode and go into the menu to set up the parameters. Auto ISO will use the lowest ISO setting possible to achieve the minimum shutter speed set either manually in the menu, or by the camera based on the focal length of the lens used. This camera uses a 35mm equivalent lens so the minimum shutter speed was set to 1/60 sec, the maximum sensitivity was set to ISO 6400 and the base ISO was set to the lowest available at ISO 160. (Click the arrow above to move to the next step).
(Image credit: Future)
2. General camera settings
Set the camera to aperture priority mode with the aperture set to the maximum setting (for this lens it’s f/2). Set the metering mode to evaluative because this mode will meter from all parts of the scene and come up with an average exposure. If you’re shooting raw, you don’t need to worry about white balance, because you can adjust it during post-processing. But if shooting JPEG make sure it’s set to Auto so that color casts from artificial lighting are neutralized.
(Image credit: Future)
3. Dial-in exposure compensation
When shooting under indoor artificial lighting indoor or outdoors at night, the camera’s light meter will often overexpose images because it will see an abundance of black or darker tones as mid-tone grey. To combat this, simply set exposure compensation to -1.0, which will result in much more natural-looking exposures. If you're shooting in the daytime when there’s plenty of natural light coming in through windows, it’s unlikely that you’d need to apply the negative exposure compensation.
4. Paint with light
Light painting, or light graffiti as some call it, is created by moving light sources through an image while the shutter is open. This means exposures of several seconds or even minutes while we fling around torches, glow sticks or anything else that emits light. With a little practice, you can start to create words, shapes and pictures just like our festive-themed night shots.
There’s something addictive about light painting. It’s almost certain that your first attempt will be a complete mess, but you’ll quickly learn, shot by shot, how best to position the lights, which movements work best, when to shield the light source from the camera, and the length of time you need to paint for.
Smooth, fluid movements work best, and serious light painters use all kinds of tricks to create patterns – for example, a torch tied to a length of string and swung around can create an orb-like shape, or even a snowman (see over the page).
All the usual tips for long exposures apply to light painting, so you’ll need a tripod to keep the camera in a fixed position, and a remote cable release if you’re out shooting solo. Your DSLR’s shutter speed maxes out at 30 seconds, which probably won’t be long enough for intricate painting, so you’ll need to use Bulb mode. Learn how to get set up, pick dark nights and good locations, and how shoot in Bulb mode, then over the page we’ll show you a few different ways to paint a scene.
Set-up: essential gear to paint with light
Image 1 of 5
1. Light wand
A toy lightsaber creates fantastic, thick bands of light when swished around in the dark. If you don’t have one, look for a light wand – you can buy them in a range of different sizes and colours.
2. Tripod and remote
You’ll need a tripod to keep your camera still, and a cable release or wireless remote – these have a locking feature that enables you to lock the shutter open when you’re using Bulb mode.
3. Light templates
If you want recognisable shapes, make cardboard templates and shine a torch through, keeping the shape as still as possible. Cover the opening with thin white paper and coloured acetate.
4. Torches
A strong torch will create bright spots or streaks, and can also be used to light the surroundings if you want to give the scene a bit of context. Flashing LED bike lights and a head torch come in handy too.
5. Glow sticks
Glow sticks are weaker than torchlight, but they come in a variety of colours, they’re cheap, and you can swing them around to make a swirling shape that looks almost like coloured smoke.
Step-by-step: How to paint with light
Image 1 of 4
1. Tripod and focus
Set up your camera on a tripod. Pre-focus on a spot by placing a torch in the scene and focusing on this using autofocus, then switch your lens to manual focus to lock the focus. (Click the arrow above to move to the next step).
2. Bulb mode
Select Bulb mode, and attach a cable or remote release with a lock to keep the shutter open (you can also use the camera's companion app for this). Set the ISO to 100 and the aperture around f/8, then take a test shot and adjust the settings if necessary.
3. Use noise reduction
Long exposures are susceptible to noise, even if you use a low ISO. Some cameras have a Long Exposure Noise Reduction feature that takes a second exposure of the same duration as the first, and merges the two.
4. Start painting
Stand on the pre-focused spot with your light sources at the ready. Open the shutter and start painting across the scene. Try to sweep the lights around with a fluid motion to create smooth, flowing shapes.
5. Epic food photos
One of the best things about Christmas is the amount of colorful festive food that’s on offer. If you’re a photographer who’s also a food lover, food photography can be great fun, and even more so at this time of year. And you don’t need any expensive specialist kit – you can easily put together a simple setup at home.
For the best results, you’ll want to use natural light and a reflector. Reflectors enable you to bounce natural light onto subjects to bring out detail in shadow areas, and they come in a variety of colors – we’re using a gold reflector to produce lovely warm tones for our shoot. You can pick up a reflector for around £15/$15, but if you don’t have one you can wrap tinfoil or gold wrapping paper around some cardboard.
We’ve selected some mince pies as our main seasonal subject, but the same principles apply to whatever food you’re shooting. The most important thing is to spend time on the small details, and keep checking the frame for distracting elements.
Take plenty of shots, and fine-tune your setup until you’re happy with the end result. And the best part of this project is that you get to eat your subjects when you’re done.
Step-by-step: Arranging your food
Image 1 of 6
1. Food glorious food
It’s best to use only natural light, so set up your shoot in next to a large window (or in a conservatory). Compose each shot so you’re looking down and over the food. Put the main subject (mince pies in our example) onto a board or presentation plate, and place this in the foreground of the frame; we angled the board to help lead the eye into the frame, and we included some star anise and cinnamon sticks to add interest. Arrange your food and decorations, bearing in mind that you’ll want the main food items to be the centre of attention compositionally, and sharply in focus. (Click the arrow above to move to the next step).
2. The backdrop
Next set up the backdrop. Drape a red piece of material (a scarf or jumper will do) behind the food, and sprinkle items such as mixed nuts and foil-wrapped chocolate coins in the background. Light some small candles, and dot these around the scene. We also stacked some oranges on the right-hand side to balance the composition and, to bring in some festive greens and reds, we introduced a cutting of ivy and some red berries from the garden.
3. Keep it steady
As we’re using natural light, it’s best to set up your camera on a tripod – that way you won’t need to worry if you need to use a slow shutter speed to get a good exposure. Using a tripod also makes it easier to fine-tune the composition of your shots; if your camera remains in the same place, you can see which elements in the frame are or aren’t working, and you can then tweak your camera settings and move items around until you’re happy. This can be a painstaking process, but it’s worth taking some time in order to get the best results.
4. Camera set-up
Set your camera to Aperture Priority (Av) mode, and set the aperture to the widest value available (the smallest number for our lens is f/2.8). If you find that background objects aren’t blurred as much as you’d like them to be, you can always move them further away from the foreground items, and adjust the composition to come down a little lower. Set the white balance to Auto, and for maximum quality set the ISO to 100 and shoot raw files.
5. Manual focus
We used a 50mm prime lens for our shoot. Prime lenses are great for this type of set up, as they deliver superb image quality, and the wide aperture setting will blur the background nicely; a standard lens will work fine, though. To focus the shot, switch your lens to Manual. In our shot we made the mince pies in the centre of the board the focal point. You may need to adjust the distance between the background and foreground objects to get the desired depth of field effect.
6. Lighting your scene
To throw light into the shadows use a reflector. You can use more than one reflector if need be, and you’ll need to keep checking to see what areas need attention; it’s particularly important to light the main subjects well. As we wanted our images to have a warm festive feel we used the gold side of our reflector – if you don’t have a reflector, use tinfoil, or gold wrapping paper wrapped over some card.
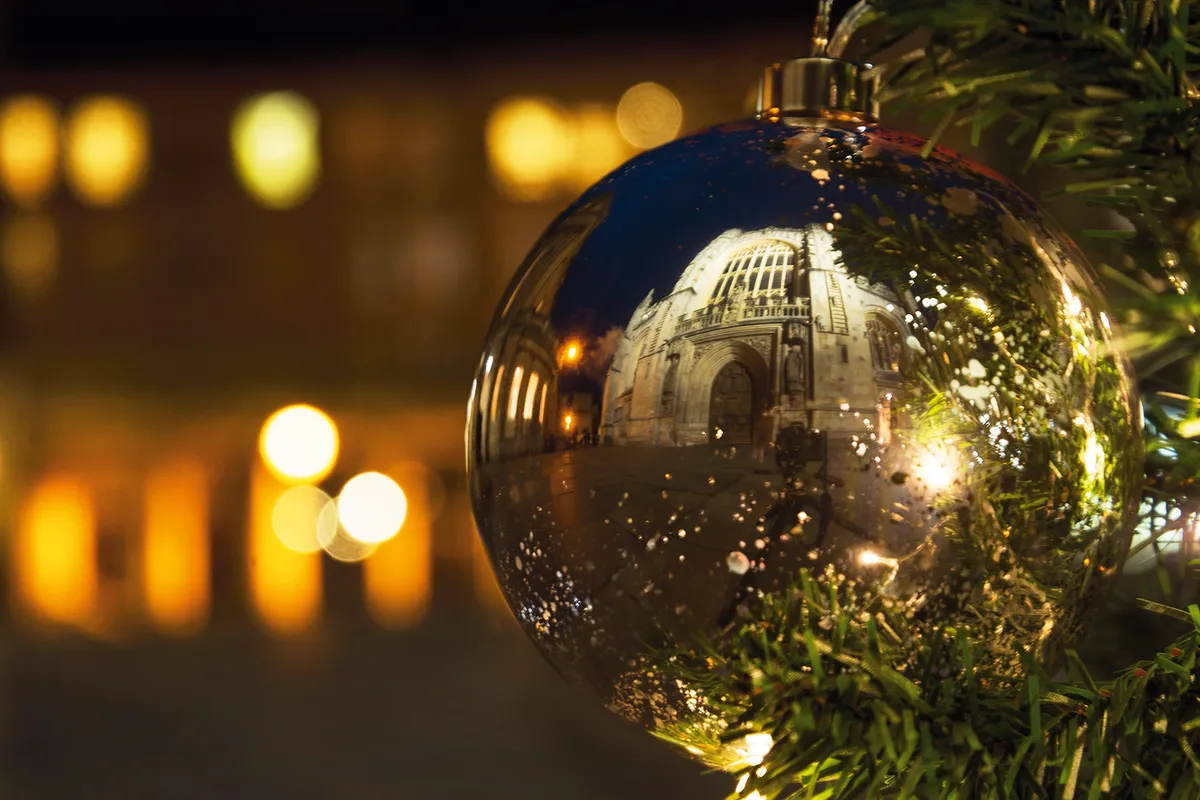
6. Bauble art
While unpacking the Christmas decorations, why not grab a bauble and head out to capture some creative still lifes. That curved, shiny surface gives you a whole new way to capture a seasonal scene. Whether you’re faced with a winter wonderland or a brightly lit cityscape, this fun technique provides a unique and very festive perspective.
Capturing a scene in this way involves some incredibly wide angles due to the spherical surface of the bauble. It can also be quite tricky to get the scale correct; we were able to capture the entire west end of Bath Abbey quite comfortably in the frame, despite shooting only a few metres from the walls. But persevere, and you’ll have a unique Christmas reflection in no time at all.
Step-by-step: Deck the tree
Image 1 of 3
1. Look behind you
Look for interesting backgrounds opposite strong subjects – your bauble will be between the two. We hung our bauble from a small Christmas tree to reflect the well-lit Abbey, and used the warm orange arches of the arcade behind as the background. (Click the arrow above to move to the next step).
2. Hide your camera
Put your camera on a tripod, focused on the reflection. A tripod allows you to set a longer exposure after dark, fine-tune your composition, and remove your own reflection from the shot. Try to disguise the camera within the image – if there’s a dark area, hide it within the shadows.
3. Walk away
We used ISO200 to keep the quality up and f/5.6 to blur out the background, along with tungsten white balance to correct the colour cast from the street lights. Switch your drive mode to 10-second timer so that you can press the shutter release and the move away.
7. Make a snow globe
There’s much fun to be had in Photoshop by merging two images into an offbeat montage. The technique also calls upon many of Photoshop’s most fundamental tools, such as layers and blending modes, so it’s a great way to learn core skills.
Here we’ll combine a light bulb and a tree into a seamless scene. Cutting out the tree would take a while, but we can get almost instant results with the Multiply blending mode. Because the tree is a dark object against a very light backdrop, the lighter areas are effectively eliminated with a single click.
The light patches of snow along the branches are also lost, but it’s easy enough to bring them back simply by painting a mask on a duplicate layer.
The trick to a montage like this is to make it as convincing as possible. So to help make the tree appear as if it’s inside the light bulb we’ll copy the bulb reflections on top of the tree. We’ve provided the bulb and tree images, but you can use the same skills to put anything you like inside the bulb (it helps if it’s shot against a light backdrop). So why not give it a go and make your own fantastical montages using any object that takes your fancy?
Step-by-step: Have a lightbulb moment
Image 1 of 6
1. Remove the element
Open your image and then create a new layer by going to Layer > New Layer. Grab the Spot Healing Brush from the Tools panel, check Sample All Layers at the top, then paint over the dark rods either side of the main element in the bulb to remove them, as in the screenshot above. (Click the arrow above to move to the next step).
2. Copy in the tree
Open your second image and grab the Lasso tool. Draw a rough selection around the tree. Grab the Move tool and check Show transform controls and Auto-select layer. Drag the tree to the tab of the bulb image, then down onto the bulb image. Click on the bounding box and resize as needed.
3. Blend the tree
Choose the Multiply blending mode from the drop-down menu at the top of the Layers panel (you could also try Darken). Click on the Add Layer Mask icon, then grab the Brush tool, set colour to black and paint over the edges and base of the tree to create a smooth transition.
4. Overlay the reflections
Hide the tree layer and highlight the bottom layer. Open the Channels panel, and Cmd/Ctrl-click on the RGB channel to load the lightest parts of the image as a selection. Press Cmd/Ctrl+J to copy to a new layer, then drag the layer to the top of the stack and set opacity to about 50%.
5. Reveal the snow
Add another layer mask and paint black to hide reflections. Highlight the tree layer, hit Cmd/Ctrl+J, change Blending Mode to Normal, click on the mask, go to Edit>Fill and choose Contents: Black. Zoom in, grab the Brush tool and paint with white to reveal the snow on the branches.
6. Create a snowstorm
Create a new layer, make a rectangular selection, fill it with black, then go to Filter>Noise and set Amount to 400, Gaussian and Monochromatic. Hit Cmd/Ctrl+L and drag the black point right. Change Blending Mode to Screen, move it over the bulb and mask out the edges, as in step 3.
Phil Hall is an experienced writer and editor having worked on some of the largest photography magazines in the UK, and now edit the photography channel of TechRadar, the UK's biggest tech website and one of the largest in the world. He has also worked on numerous commercial projects, including working with manufacturers like Nikon and Fujifilm on bespoke printed and online camera guides, as well as writing technique blogs and copy for the John Lewis Technology guide.