


So, you want to know how to use DaVinci Resolve? Easily one of the best video editing software tools on the market (and our pick for best free video editing software overall), Resolve is a full-featured professional application, for both Mac, Windows and Linux, available completely for free.
Now don’t get it confused with DaVinci Resolve Studio - that ‘s the pro-version you have to pay for, although it’s only $295, with all future updates, large and small, free forever. Put that next to subscription-based software, and it’s a no brainer. Especially with its latest iPad version for those looking for the best video editing app that perfectly matches its desktop counterpart.
But we’re not here to talk about Studio (software very few actually need), but to focus on the free version of DaVinci Resolve, which is more powerful than any other free video editor out there. If you’re thinking of diving into the world of filmmaking, but you have no budget, this is definitely the software to gravitate towards. Yes, it’ll be harder to master than the other free alternatives, especially the more advanced features, but the basics of editing are pretty easy to grasp.
Let’s take a look at how you can use this incredible video editor.
How to use DaVinci Resolve: Basic steps
What to do
- Create a new project and import clips
- Edit your film and apply effects
- Export your video
What you'll need
- Raw footage
- A copy of DaVinci Resolve
- The best video editing laptop or best video editing PC you can get - one with loads of RAM
- Skill level: Beginner
Step 1: Import media

Start by launching DaVinci Resolve. If you’ve never used it before, the Projects window will look a little bare, so click on ‘New Project’, lower right of the interface.
You’ll find Resolve is divided into seven different ‘Pages’. Think of them as workspaces, designed to focus on a specific job, although not exclusively so. For instance, although the Media page is designed to handle all the clips you will import, you can actually bring in media from other pages: just go to File > Import > Media
As you’re by default in the ‘Cut’ page, you’ll see your footage top left of the interface. Top right of that section are four icons, to switch between different views. By default, you’re in ‘Metadata’, but you can select ‘Thumbnail’, ‘Strip’ or ‘List’ view instead.
If you’re in either of the first two, mouse over a clip’s thumbnail to scroll through the footage. As you do so, you can hit the ‘i’ and ‘o’ key to mark an in and out point respectively, then drag that selection onto your timeline.
Step 2: Edit

You can carry on adding clips to your timeline in the ‘Cut’ Page, in the same way as described above, but let’s explore ‘Edit’ now, by clicking on its icon at the bottom of the interface, or by going to Workspace > Switch to Page > Edit.
You’ll find the interface more crammed with additional tools: you have transitions and effects lower left, your media, top left, clip properties, top right, and audio mixing lower right.
You can mouse-scroll through your footage’s thumbnail, as well as set in and out points, as before. As you drag a new clip to the timeline, you’ll find that it snaps to the end of those already present. This helps make sure there are no gaps between clips.
If you want to insert a selected clip in between two existing ones, select it, then hit the F9 key (or click on the Insert icon, immediately above the timeline). The default behaviour is overwrite, so if you drag a clip over an existing one, the new clip will replace the previous one. You can of course also add a clip onto another video layer, to offer you more flexibility.
Step 3: Transitions
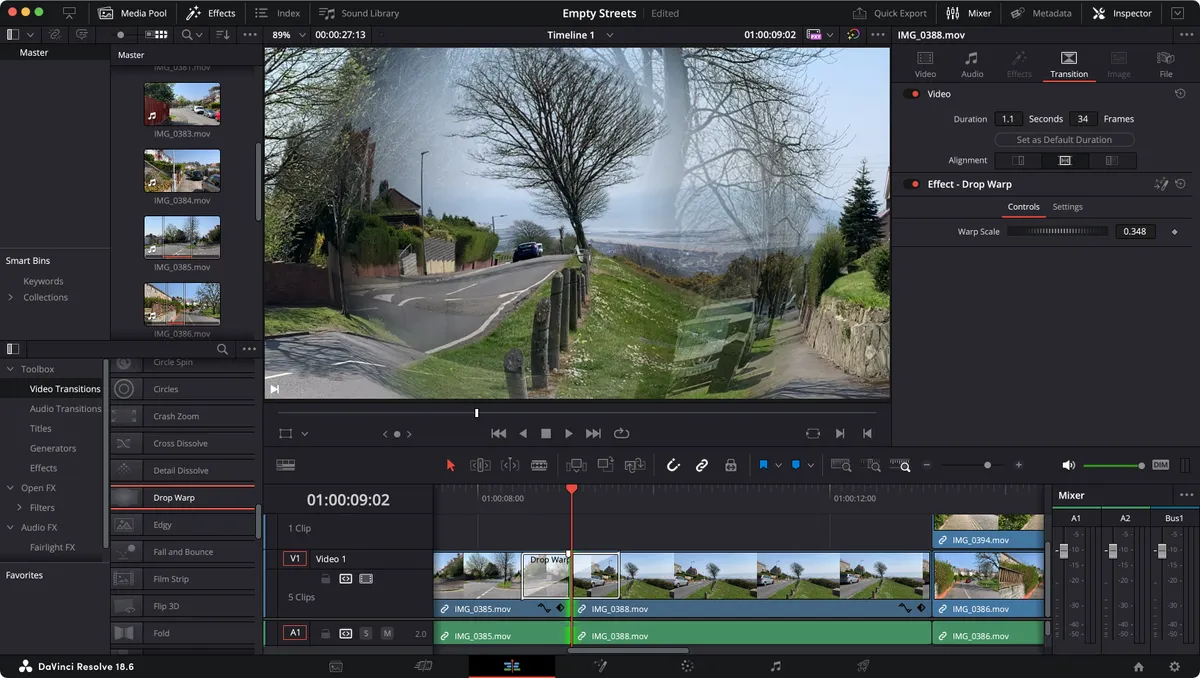
The ‘Edit’ page is also where you can add transitions between clips as well as keyframes to animate your clips, basic features you’d expect any video editor to have, so let’s have a look at how they work in Resolve.
Transitions are located lower right, and selected by default. You can scroll down the list and see all the ones available. Even better, Resolve will use the clips closest to the playhead in the timeline to preview the transition for you, as you mouse over each.
To add one, simply click and drag from that panel, in between two clips in the timeline. The properties section (top right) will offer you changeable parameters, but it’s also possible to make alterations directly in the timeline: drag the transition’s centre to alter its position in your project, or just the edges to lengthen or shorten it, while keeping the centre in place.
Step 4: Keyframes

Keyframes are used to animate objects or entire clips on screen. You move the playhead to one position, set a keyframe, move it again, and alter some parameters to set another. Your computer will figure out the movement between those two different values.
All this is done in the inspector window, top right. Select a clip in your timeline, and click on the Inspector’s Video section (if it isn’t already selected).
To the right of each value is a small white rhombus. Let’s try scaling a clip over time. Move the playhead to where you want a change to start, then click on that parameter’s rhombus. It turns red. Move to another location and alter the parameter’s values. The rhombus at that point turns red too.
You will see two new icons lower right of that clip in the timeline. Click on both of them to reveal those keyframes, which you can manipulate directly from there, and even change each one to bezier curves, should you want to.
Step 5: Exporting

As we're just looking at the basics here, let’s head on over to the ‘Deliver’ page (the last icon at the bottom of the interface, shaped like a rocket).
Check the left sidebar, and make sure it’s set to ‘H.264 Master’. Give your file a name, and choose where to save it. You could leave everything on automatic, aside from the format: change it from ‘QuickTime’ to ‘MP4’ (it should make no difference as QT is essentially MP4 these days, but to guarantee it’ll work on all platforms without a hitch, it’s best to make the switch: better safe, than sorry).
Once you’re happy with all the values, click on ‘Add to Render Queue’.
This will make it appear in the panel to the right (you can add as many renders as you please to the queue). Click on ‘Render All’ and Resolve will export your project, ready to be shared with others.
Final thoughts
Blackmagic Design's DaVinci Resolve is vastly more complex than the little glimpse we showed you - making it easily one of the best alternatives to Premiere Pro, which is used across the film and TV industry.
However, this tutorial shows that for the basics, it’s almost as simple to use as many of the best video editing software for beginners. The advantage here is you have a wealth of other powerful tools at your disposal, poised to be unleashed the moment you’re ready for them, and you won’t have to learn a whole new software program to take advantage of them.
