How to run Linux in a virtual machine
Test new releases without harming your existing installation
Virtualisation isn't the only way to try a new distribution – it just happens to be the most unobtrusive and easiest to use. But if you want to take your testing a little more seriously, running a new release on your own hardware without messing up your primary installation, there are several techniques that can help make the process easier.
Unlike a couple of commercial operating systems we could mention, most modern Linux distributions will quite happily install themselves alongside other operating systems and distributions, automatically adding their boot options to a boot menu.
To be able to do this you will need to make sure you have enough space on your hard drive. This is where things can get tricky, because the first distribution you install on your system will want to use all the available space, making further installations harder to achieve.
It's for this reason that you can save yourself a lot of hassle by forcing the first distribution you install to only use a certain amount of space, and to do this you need to use the manual installation tool.
Go compare
Different distributions use different tools to manage the partitioning process, but they all share the same basic functionality. You get to choose between an automatic installation and a manual installation. The former will usually blank your hard drive or use any remaining space in its entirety, while the latter option requires a bit more know-how.
You'll need a minimum of two partitions: one to hold all the files required by your distribution, and another for what's known as swap space. If there's enough free space on the drive, you'll able to create a new partition and define exactly how much space you want it to occupy.
Sign up for breaking news, reviews, opinion, top tech deals, and more.
You will also need to select a filesystem for the partition, and most people will use either ext4 or ext3, unless you have any special requirements
The swap partition is an area of the hard drive used as an overflow space for data shuffled from your RAM. The rule of thumb used to be that the swap partition should be twice the size of your RAM, with 2GB as an upper limit.
After creating both partitions, you will need to set a mount point for each. The main partition needs to be set to / for root, while the swap space is normally listed as linux-swap. Both will need to be formatted if your installer provided the option, and you can now let the installation progress as normal.
You'll need to go through a similar routine with any further distributions you want to install, using any remaining space to create the partitions you need for each installation.
Resize with GParted
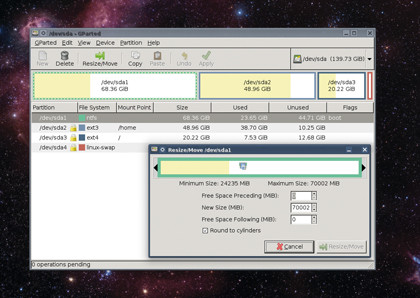
If you're already running a distribution and you want to resize your current partition to make space for a new installation, then GParted, the tool used by most installers, can do the job – with a couple of caveats.
We've had the best results with GParted by booting from a live CD that includes the application, such as Ubuntu. This should give it complete access to your drives and enable you to resize partitions without having to worry about data access.

Resizing is then a simple matter of selecting the partition you want to shrink (or enlarge) and clicking on the Resize button. From the window that appears, drag either the left or right border of the partition to shrink the space it occupies on the drive.
After you've mastered the art of manual partitioning, there's another useful aspect to taking control of your data, and that's creating a separate home partition. You just need to create another partition alongside root and swap, give it a filesystem and assign it a mount point of /home.
Most installations will let you choose an existing partition to use as home and won't require it to be reformatted as part of the process. This means that any user accounts, along with their data, will appear intact and accessible from the moment you boot into the new distribution, which is especially useful if your time happens to be spread across more than one distro.
We would recommend creating a separate user for each distribution. This avoids any potential overlap in home directories and configuration files when you create a user account that already exists in a different distribution.
If you want to port your settings from one account to another, you can do that manually with the command line after you get the desktop up and running. Just copy the entire contents of one home directory to another using the cp -rf source destination command and make sure the owner and group permissions are adjusted to reflect the user who's going to access the new directory (try chmod -R username:username directory).
Even if you can't work with manual partitions, there's still the easiest option of all, and that's the humble live CD. Many distributions now include their own bootable versions, enabling you to test a distribution for hardware compatibility as well as for its design and usability. You can get a very good idea of what the final installation may feel like from a distribution running off a CD, even if the slow data read times from the optical disc may things a little slow.
Distro on a stick
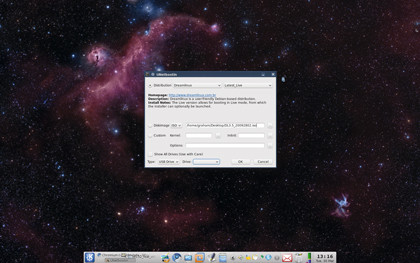
This speed issue can be solved by installing any distribution you may want to try on to a spare USB thumbdrive and booting from this when you restart your machine. Creating a USB-based distribution like this used to be a chore, but thanks to the Unetbootin tool, you can create a bootable stick for all the most common distributions with just a few clicks of the mouse.

Most distributions will include the Unetbootin package, and the application itself will likely need administrator privileges. When it's running, just point it at the location of your distribution's ISO and select the distribution version from the drop-down lists, followed by the location of your memory stick.
Any PC from the last 3–5 years should be able to boot from the USB drive without any further interaction, but sometimes you may need to enter a boot menu from the BIOS, or change the boot order in the BIOS itself.
The end result will be a distro running from external storage with almost the same speed of a native distribution.