How to run almost any OS on your Mac
If you have another Mac, though, remember that you can share a wireless connection over Ethernet from the Sharing pane of System Preferences, so you could connect it to your new Linux-powered Mac to pipe some internet connectivity in over Ethernet just long enough to get Wi-Fi enabled.
In our G4 example - see the next page - once we'd hooked up the Ethernet lifeline, all we had to do was go to the Hardware Drivers utility from System > Administration for the drivers to be detected.
If, however, you're merely curious rather than ready to take the plunge, you could install Linux as a virtual machine within VMware Fusion or Parallels Desktop.
Ultimately, we're happiest when using a Mac as Jobs intended: running Mac OS X. But there are good reasons why you might want to try something different, especially if you've got an old PowerPC Mac hidden in a cupboard somewhere.
Make your Mac a jack of all trades with OS 9, OS X and Linux
As an example of what you could do to give an old Mac a new lease of life, we're going to take a Power Mac G4 and make it triple-boot with Mac OS 9, Mac OS X and the Linux distro Ubuntu.
If you want to make Linux your sole operating system, it's much simpler than the finicky process we're detailing here; you'd miss steps two and three completely, then when installing Ubuntu you'd tell it to use the entire disk.
Sign up for breaking news, reviews, opinion, top tech deals, and more.
This process, of course, wipes the information from the Mac's hard disk, so make sure you copy off any data you want to keep before beginning.
If you have an existing OS X install, you could clone it off to a FireWire hard disk, then, once the internal hard disk is partitioned, clone it back to the OS X partition. It should come as no surprise to learn that this is advanced stuff, and to fit all the instructions into the space we have, we've had to gloss over a few things, and assume a high level of competency.
Go carefully. You might notice, incidentally, that our test machine has a second internal hard disk – ignore it as we're not using it in this example.
Get to grips with Ubuntu
1. Download Ubuntu
On any Mac or PC, download the ISO file (a virtual disc image) of the Ubuntu live installer from here. We've opted for 9.04 as 9.10 has issues with burning.
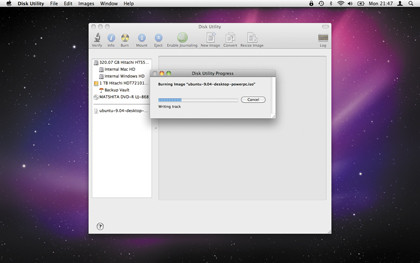
Open Disk Utility, click the Burn icon, select the downloaded ISO then pop in a CD-R and let it burn.
02. Partition the hard disk
Boot your Mac from your Tiger install CD. Launch Disk Utility, select the internal hard disk, then click the Partition tab.
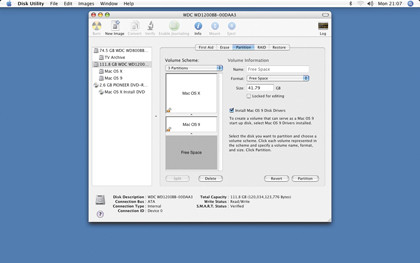
Create three partitions; one Mac OS Extended for OS X, another for OS 9, and define the rest as Free Space. Create them as different sizes (this will be useful later) and note the size of each.
03. Install OS 9 and X
Once the partition has completed, restart the Mac and, as it cycles, pop out the Tiger disc and insert the Mac OS 9 install CD.
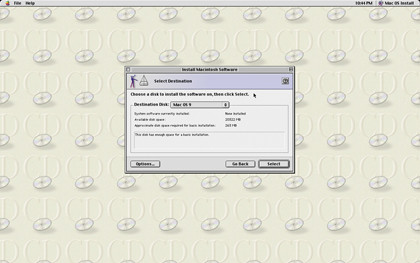
Let it boot, then install OS 9 onto the Mac OS 9 partition you created previously. Complete the OS 9 setup.
Once you're done, install Mac OS X onto the separate OS X partition.
04. Install Ubuntu
Restart your Mac again, inserting the Ubuntu installer and holding c to boot from it. Allow Ubuntu to load, then double-click the Install icon on the desktop.
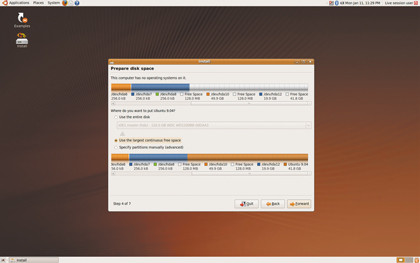
When you're asked where you want to install Ubuntu, pick the second option. Use the largest continuous free space; the graphics show you what will happen.
05. Set boot preferences
After the installation has completed, restart the Mac back into Ubuntu, go to the Applications menu, then pick Terminal from the Accessories menu. Type:
sudo mac-fdisk -l
This will give results like those shown here. Use your notes of partition sizes to identify which partitions Mac OS X and Mac OS 9 are installed on.
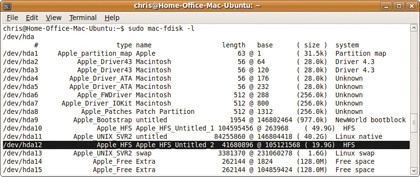
The partition name will be something like /dev/hda10 and /dev/hda12.
Now type:
sudo cp /etc/yaboot.conf /etc/yaboot.conf.backup
to make a backup of the file we're about to edit. Then type:
sudo nano /etc/yaboot.conf
The installer will have identified the Mac OS X installation, so go to a line that says something like macosx=/dev/hda10 and, under that, type:
macos=/dev/hda12
or whatever the number was that you noted. To make Mac OS X default, on a new line under the one you've just written, type:
defaultos=macosx
then press CTRL+x to exit and save.
Press Y when asked if you want to save, then return to confirm the file name. In the Terminal, type:
sudo ybin -v
Once the process has completed, you can restart from Ubuntu, and Mac OS X will boot. For more info, see here.
-------------------------------------------------------------------------------------------------------
First published in MacFormat Issue 218
Liked this? Then check out The Mac switcher's guide to running Windows alongside OS X
Sign up for TechRadar's free Weird Week in Tech newsletter
Get the oddest tech stories of the week, plus the most popular news and reviews delivered straight to your inbox. Sign up at http://www.techradar.com/register