DJI Mavic Air 2 tips and tricks: 7 ways to master our favorite drone
Master the Mavic Air 2 with our beginner-friendly guide
Sign up for breaking news, reviews, opinion, top tech deals, and more.
You are now subscribed
Your newsletter sign-up was successful
The DJI Mavic Air 2 has set a high bar for what we can expect from mid-range drones. In fact, it currently sits top of our list of the best drones you can buy.
But while it's a relatively easy drone to fly, thanks to features like Active Track 3.0, it's somewhat trickier to fully master. That's why we've put together this list tips and tricks to help take your Mavic Air 2 game, and your aerial photography, to the next level.
Whether you're a complete beginner or a more experienced flier who wants to dig into the specifics of white balance, there'll be some handy tips here that will make flying your Mavic Air 2 a more enjoyable, and productive, experience.
Still at the early stage of considering buying a DJI Mavic Air 2? Our first bonus tip is to buy the Fly More Combo bundle. The standard kit includes a controller, cables, gimbal guard, three pairs of propellers and two sets of control sticks for the controller. But the Fly More Combo represents excellent value for money, particularly as it includes extra batteries.
Along with everything in the standard kit, you get two extra batteries, three more pairs of propellers, a battery charging hub, an ND filter set, a battery to power bank adaptor and a small shoulder bag to carry everything. If you can stretch to the Fly More Combo, it's well worth considering as one battery is rarely enough.
Got your Mavic Air 2 and ready to fly? Let's crack on with the tips and tricks...
1. Use a landing mat
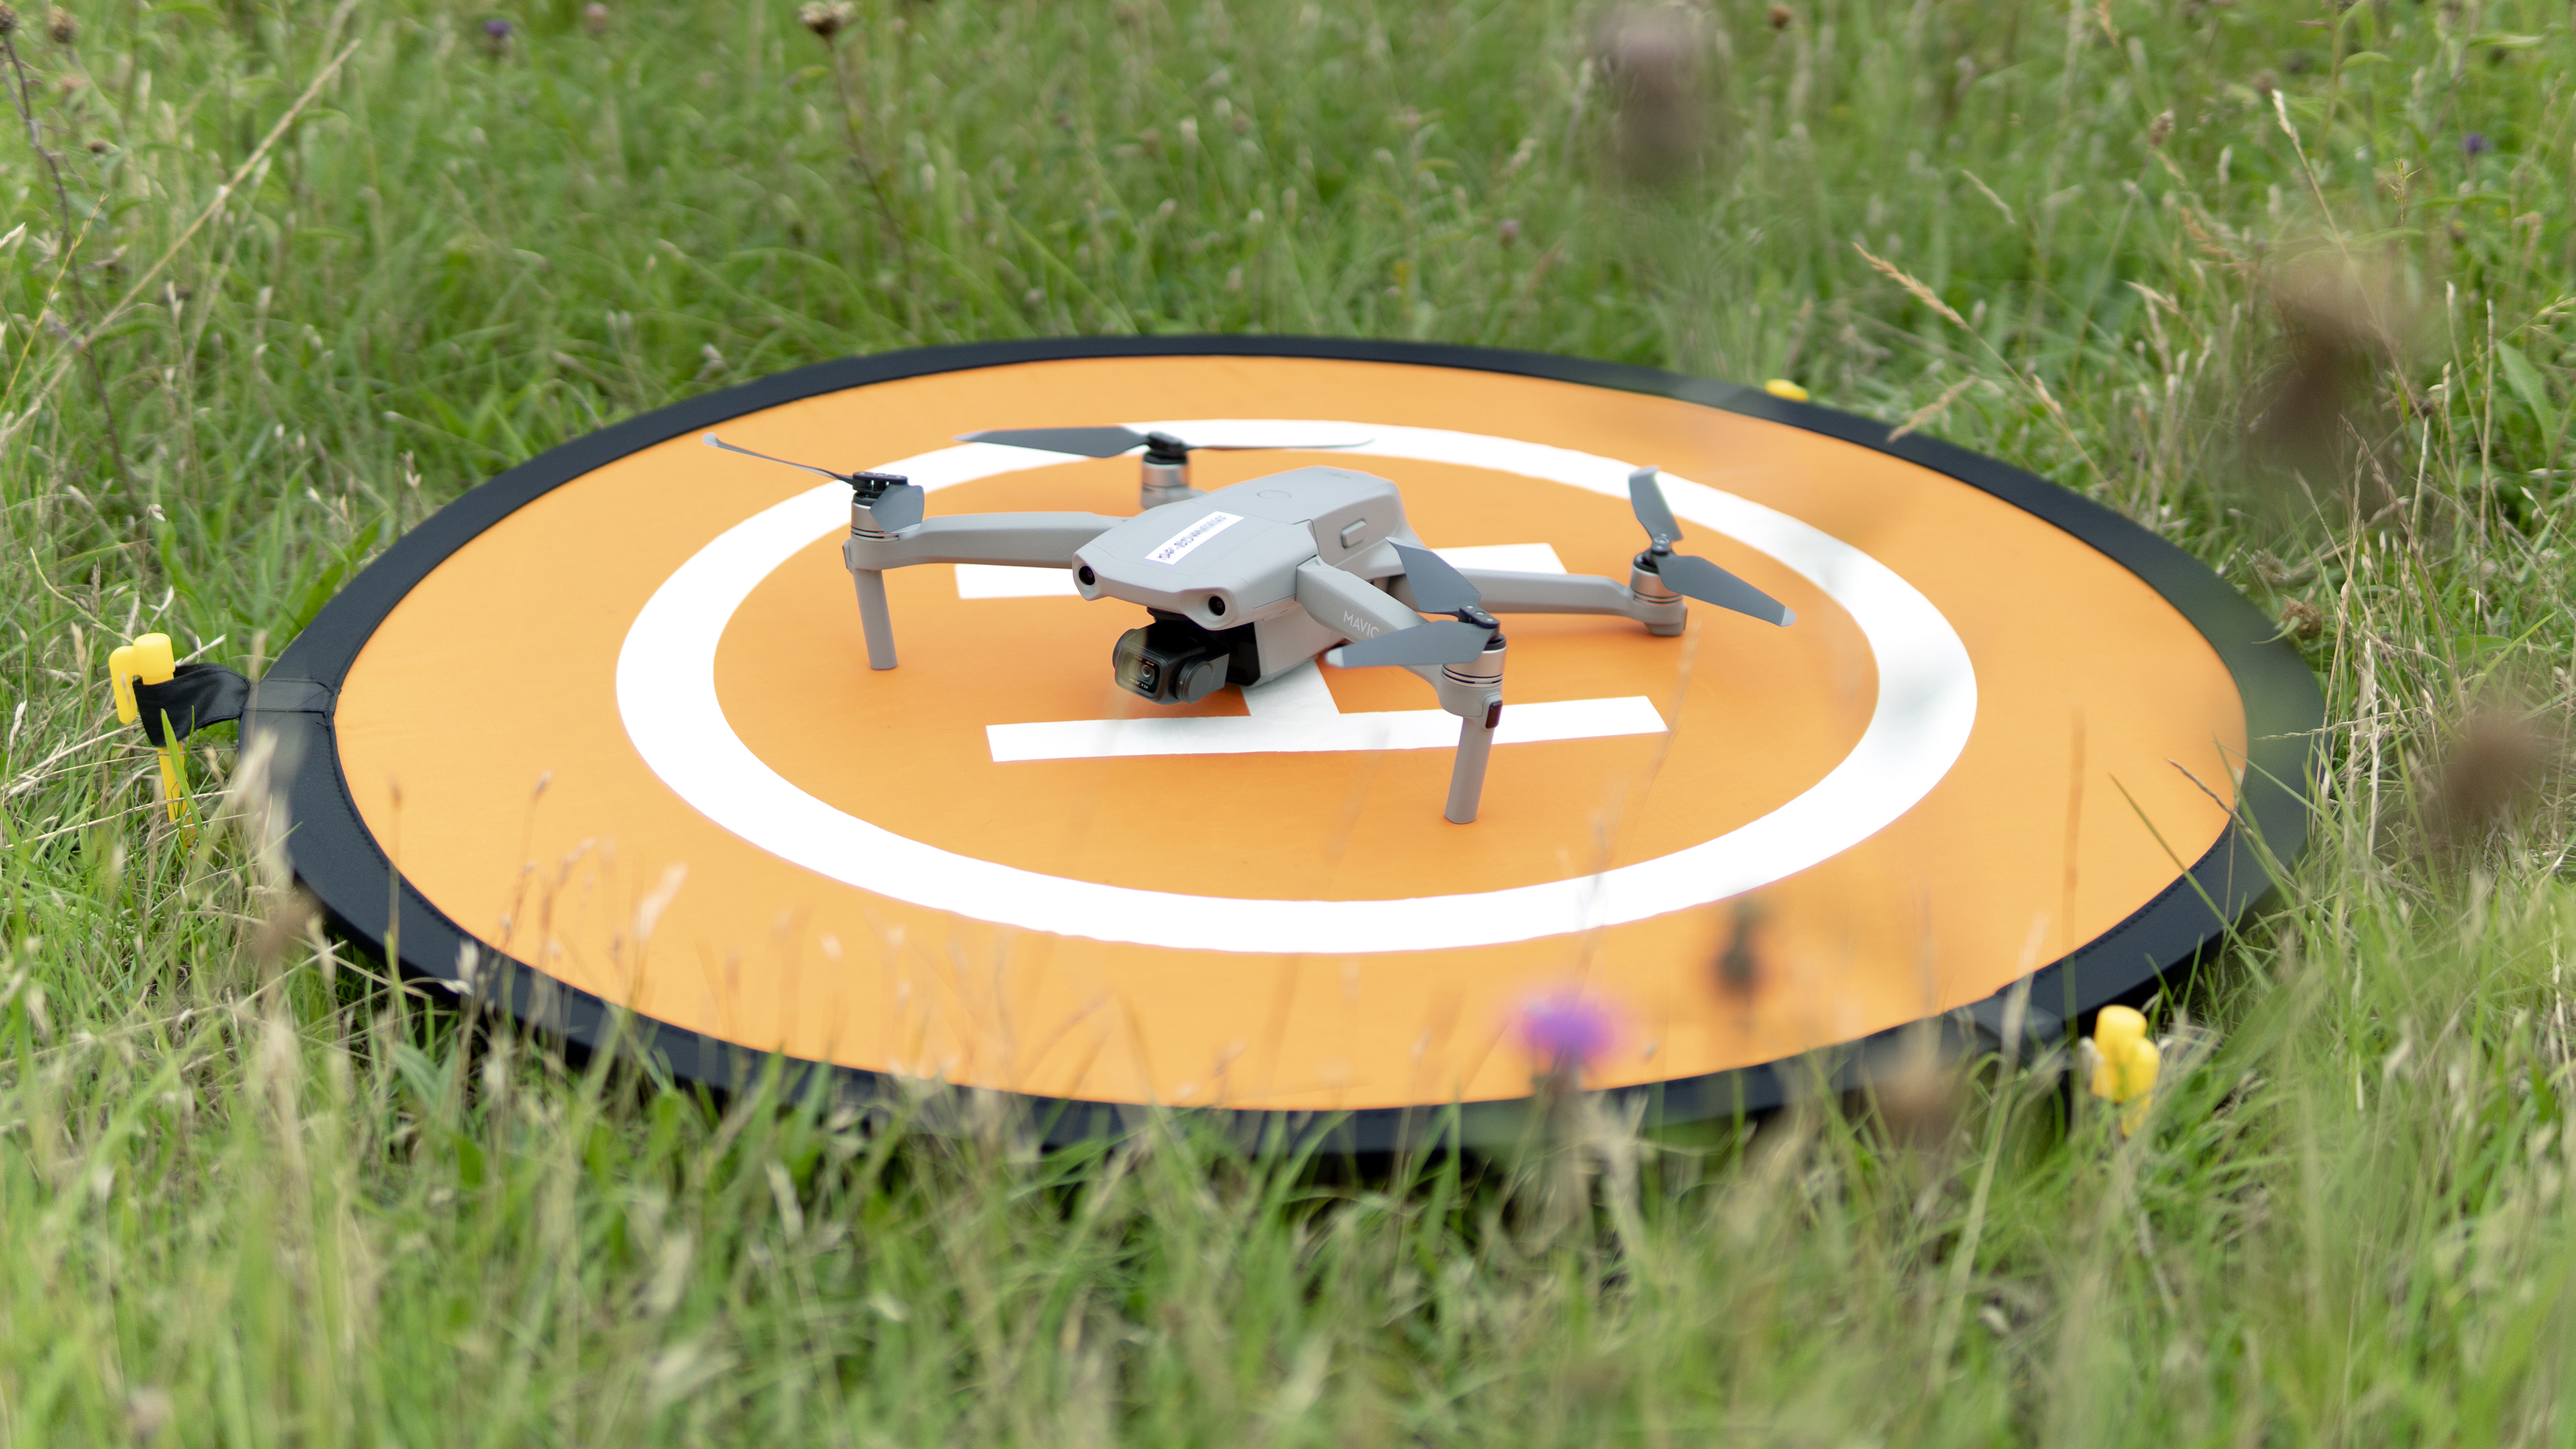
Being such a small drone, the Mavic Air 2 sits extremely low to the ground, which means that its propellers are also low compared to other DJI drones like the Mavic 2 Pro and Mavic 2 Zoom.
Sign up for breaking news, reviews, opinion, top tech deals, and more.
This isn’t a problem in many situations, but when taking off and landing on grass it can interfere with the rear propellers. The danger here is that even short grass can throw the drone off-balance as it lands and takes off, which can result in a minor crash.
The simplest and best remedy for this is to buy a landing mat. These mats fold up like a photographic reflector so they’re small and lightweight. Plus, they include three ground pegs to keep them safely anchored to the ground.
The PGYTECH Landing Pad For Drones is an affordable option that’s available in three diameter sizes: 55cm, 75cm and 110cm. For the Mavic Air 2, the 55cm is enough, although if you’d like more space for landing, we recommend the 75cm version (the 110cm option is unnecessary).
One side of the landing mats is orange and the other is blue, so you can choose which side you prefer visually. Another advantage of the mat is that it’s also an extremely clear landing point to be recorded by the drone if you need to hit the Return To Home function.
2. Embrace slow motion
Slow-motion video is a game-changing drone feature that allows pilots to capture sublime footage of moving subjects. The Mavic Air 2 is capable of shooting video in 4K at 60fps, which is incredible, but it’s the ability to shoot at 120fps and 240fps in 1080p that produces the most visually exciting slow-motion footage.
This feature is great fun to use, and completely transforms your videos, but there are a couple of things to bear in mind when using it.
Assuming you’re outputting video at 24fps, one second of filming produces ten seconds of footage, and at 120fps the output duration is half of this – so five seconds. This means that, for the majority of subjects, you only need to shoot for around five seconds at 240fps and ten seconds at 120fps.
If you output video at 30fps, to work out the output duration, simply multiply the filming time by eight for 240fps and by four when shooting at 120fps.
The reason for shooting only short bursts is that while slow-motion video looks incredible, watching the same footage in slow motion for more than 15 to 20 seconds can quickly become boring. To access the slow-motion video settings, click on the icon above the shutter button, select 'video' and then 'Slow Motion' before setting the desired frame rate.
3. Stay safe by setting limits
In many countries, the maximum legal altitude and distance from the drone pilot that you can fly are an altitude of 120m/400ft, and to a distance of 500m/1640ft. The most important point here is that even with the maximum altitude and distance, you must always keep your drone within unaided line of sight, which means you can’t use binoculars or similar to extend your vision.
To ensure that you never exceed these amounts, you can limit altitude and distance within the DJI Fly app. To do this, simply click on the three dots in the top right corner of the app, click on 'Safety' and use the slider to set the desired amounts.
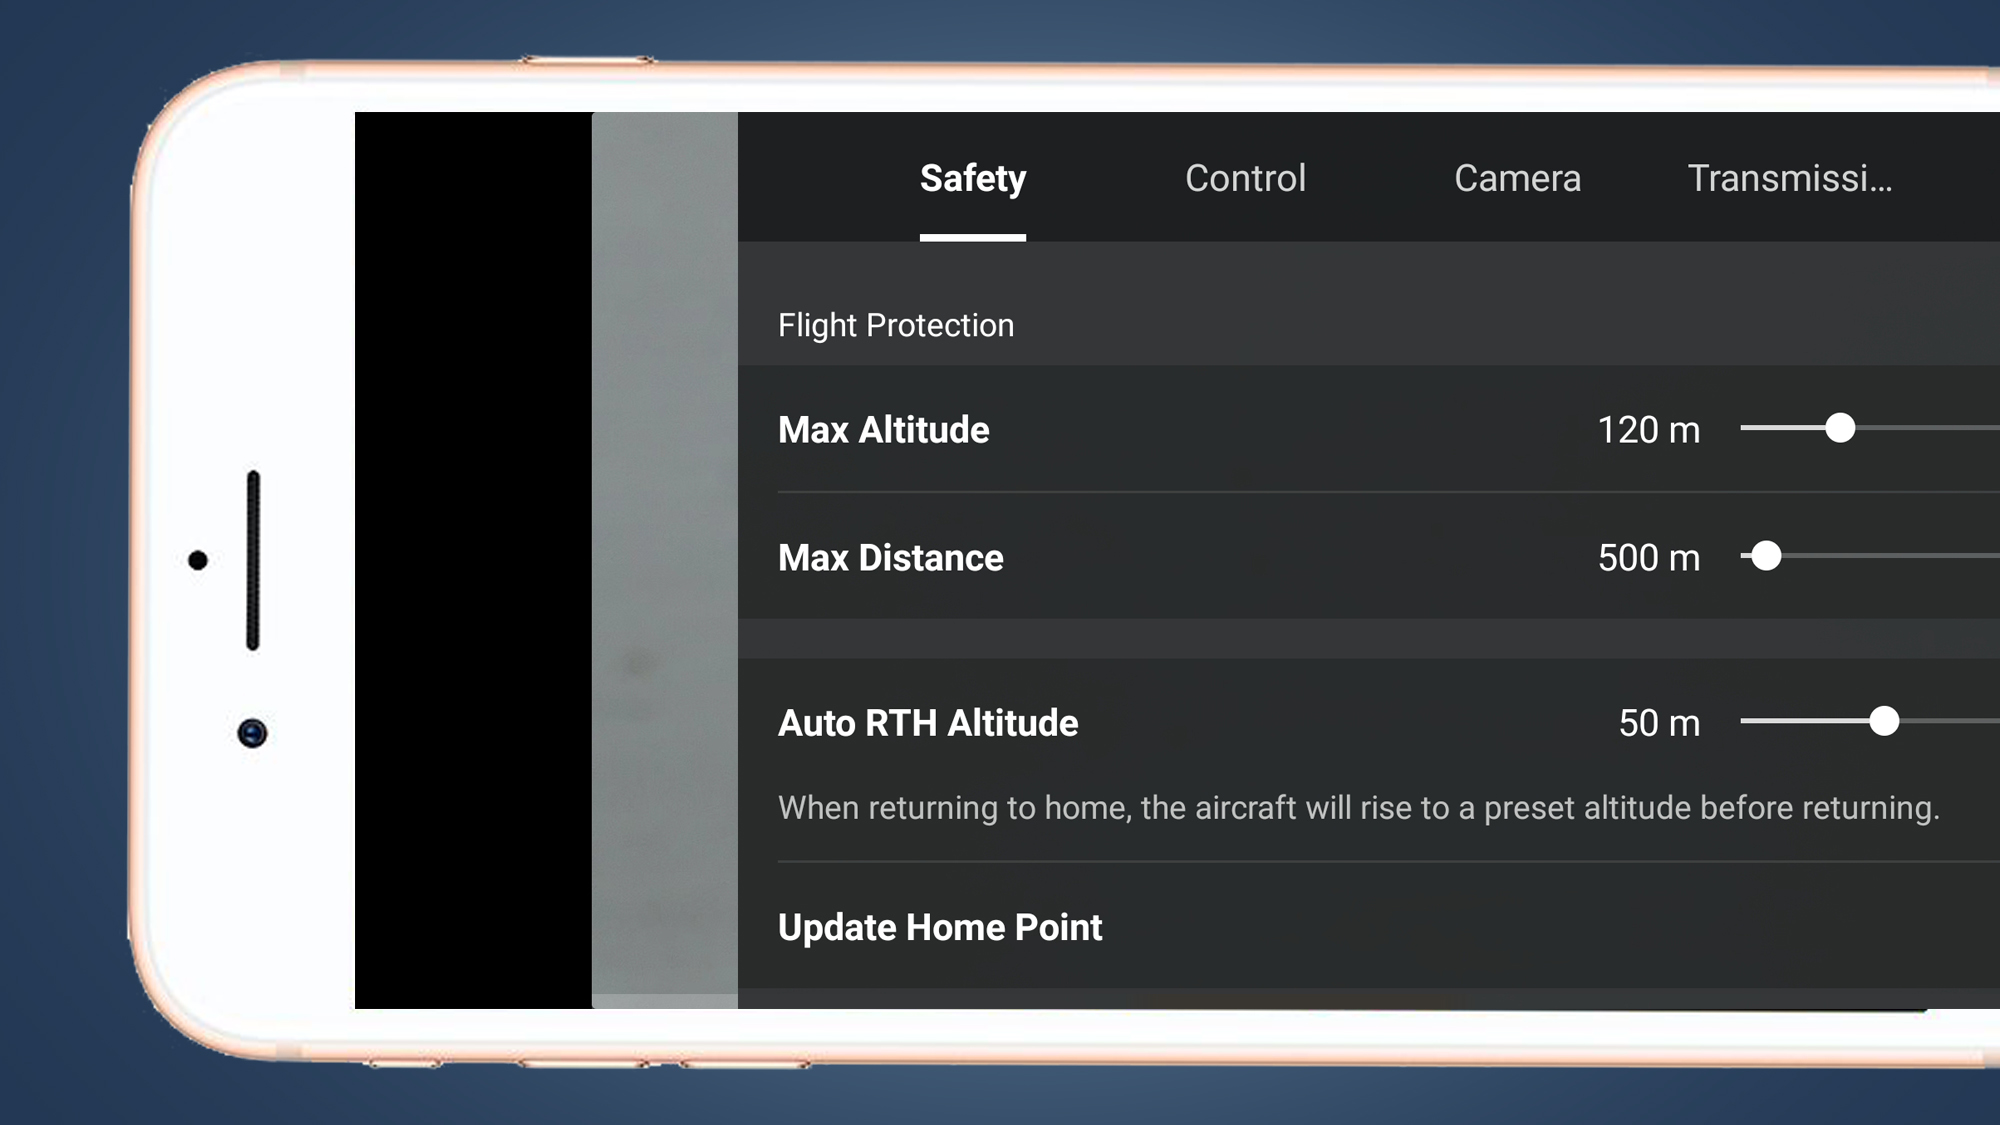
While the maximum legal limits are a great starting point, you may find it useful to set the distance to 300m or 400m, because it’s not always possible to see the drone when it’s 500m away from you – this is very much dependent on the weather conditions.
Another useful setting within Safety is the Return To Home altitude. By default, this is set to 30m, which in many situations is more than enough. But if you’d like to set up an altitude that will be even safer in a range of locations, you could increase the altitude to 40m or even 50m.
4. Take a 48MP photo
If you're pretty new to drone flying, some of the best Mavic Air 2 features are the ones that remove all of the usual technical demands while still producing great results – and one of these is the ability to shoot 48Mp stills in JPEG format.
This is impressive considering the Mavic Air 2 only has a 12MP sensor, and is ideal for people who want to create large prints (of up to 67.7x50.08cm/26.7x20 inches), compared to a standard JPEG or Raw file (which is only 33.9x25.4cm/13.3x10 inches).
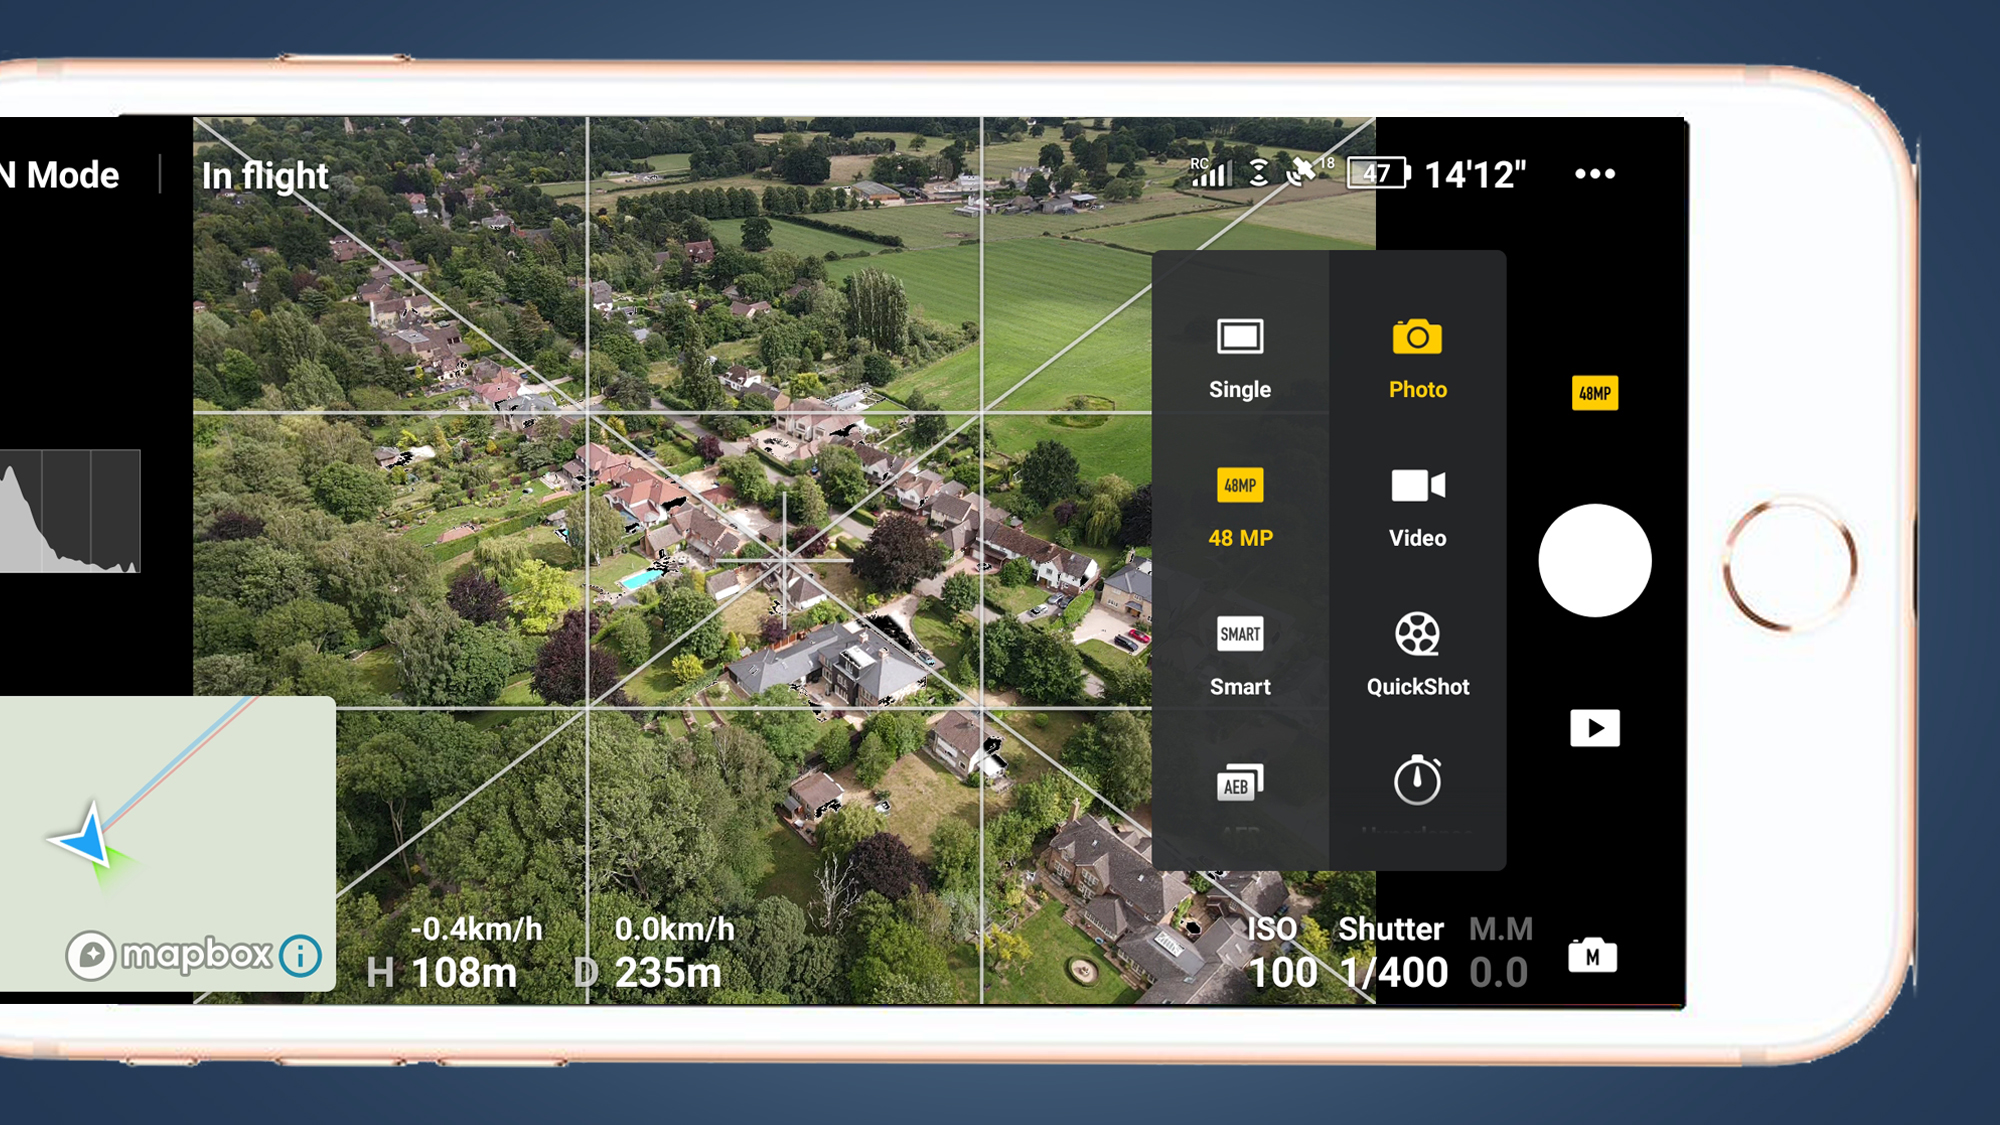
To Access the 48MP stills mode, simply click on the shooting mode icon above the shutter button on the phone screen when the camera is in stills mode – it’s clearly labelled in the scrollable menu on the left of two that appear.
In this mode, even if you’ve set the drone to shoot in Raw format, 48MP images will be captured in JPEG format.
- Read our in-depth DJI Mavic Mini review
5. Go manual to control your white balance
The Mavic Air 2 has two white balance settings: Auto and Manual. Curiously, there are no presets that allow you to quickly and easily switch between Daylight, Cloudy or Shade, for example.
Manual white balance is controlled using a slider where white balance has to be set in Kelvins, and the problem is that if you don’t know the manual figures for each type of light source/conditions, you'll struggle to use this setting. Perhaps in the not too distant future DJI will update the app with user-friendly presets – but for now, you can use our guide.
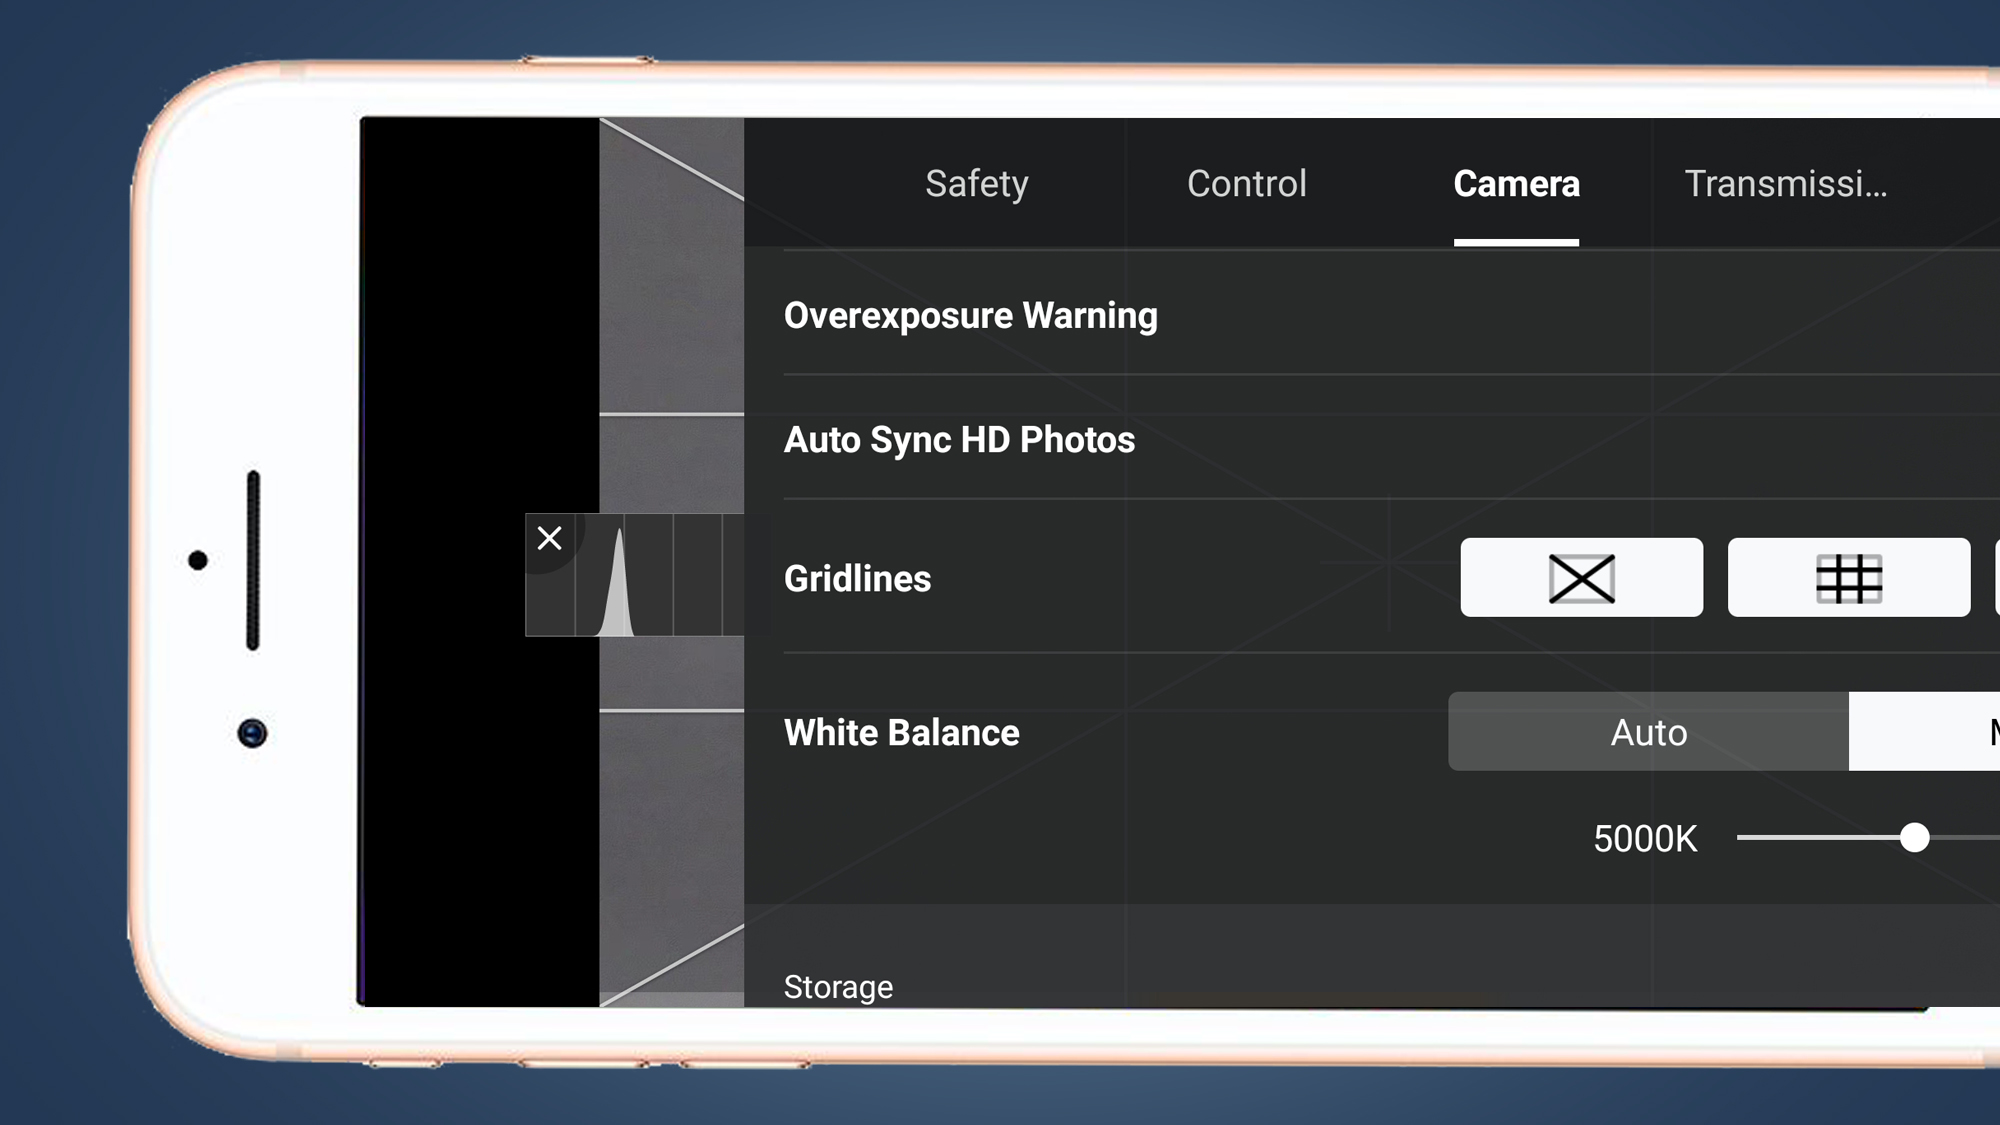
For stills photography, Auto can work well, although you may require more control, but for video it’s not recommended. When shooting video, if white balance is set to Auto, the settings can change during filming as light or the angle of the drone changes, which will be visible in the footage and is always undesirable. For video, white balance needs to be fixed.
So, whether you’re a stills photographer who would like more control over white balance or a videographer who demands it, you need to know the manual settings in Kelvins so you can dial them in. So here are the basic settings you need to know: Daylight is 5500K, Cloudy is 6500K, Shade is 7500K.
Indoor settings for obvious reasons are less likely to be required, but just in case Tungsten is 3000K and Fluorescent is 4000K.
- Read our in-depth DJI Mavic Air 2 review
6. Experiment with the Gimbal mode
The default gimbal mode on the Mavic Air 2 is 'Follow Mode'. This is, for the most part, the most useful mode because it provides the smoothest results, but 'FPV Mode' (first-person view) can be used to create a completely look and feel in your video footage. So, what’s the difference between these two settings and when should you use them?
Experimenting with different settings is always worthwhile because you can always discover new effects and more unique ways of creating video, so it’s worth trying the different modes. Follow Mode produces the smoothest settings because it uses 3-axis stabilization and keeps the horizon level as the drone moves. And to be honest, you’ll use this most of the time.
FPV Mode, though, locks the roll axis of the gimbal, so the horizon will tilt to varying degrees depending on the speed and movements of the drone. This gives you a greater sensation of flight thanks to a ‘raw’ looking video effect. Imagine a fixed camera on the front of a fighter jet as it thunders through valleys, and this is similar to the effect you get with FPV Mode.
To switch between the two modes click on the three horizontal dots in the top right of the DJI Fly app and click on the Control tab, scroll down and you’ll see the mode options. Try these in both standard flights when recording video, and when using the subject tracking feature to see how the two different modes complement your creative vision.
7. Turn on visual guides
Shooting stills or video while flying a drone is a skill that takes a little practice, but it's fair to say that stills are a little more straightforward. This is because you can leave the drone in hover while you adjust the camera angle and settings, before taking your shot.
When it comes to shooting video, though, it pays to lean on several guides that are built into the DJI Fly app.
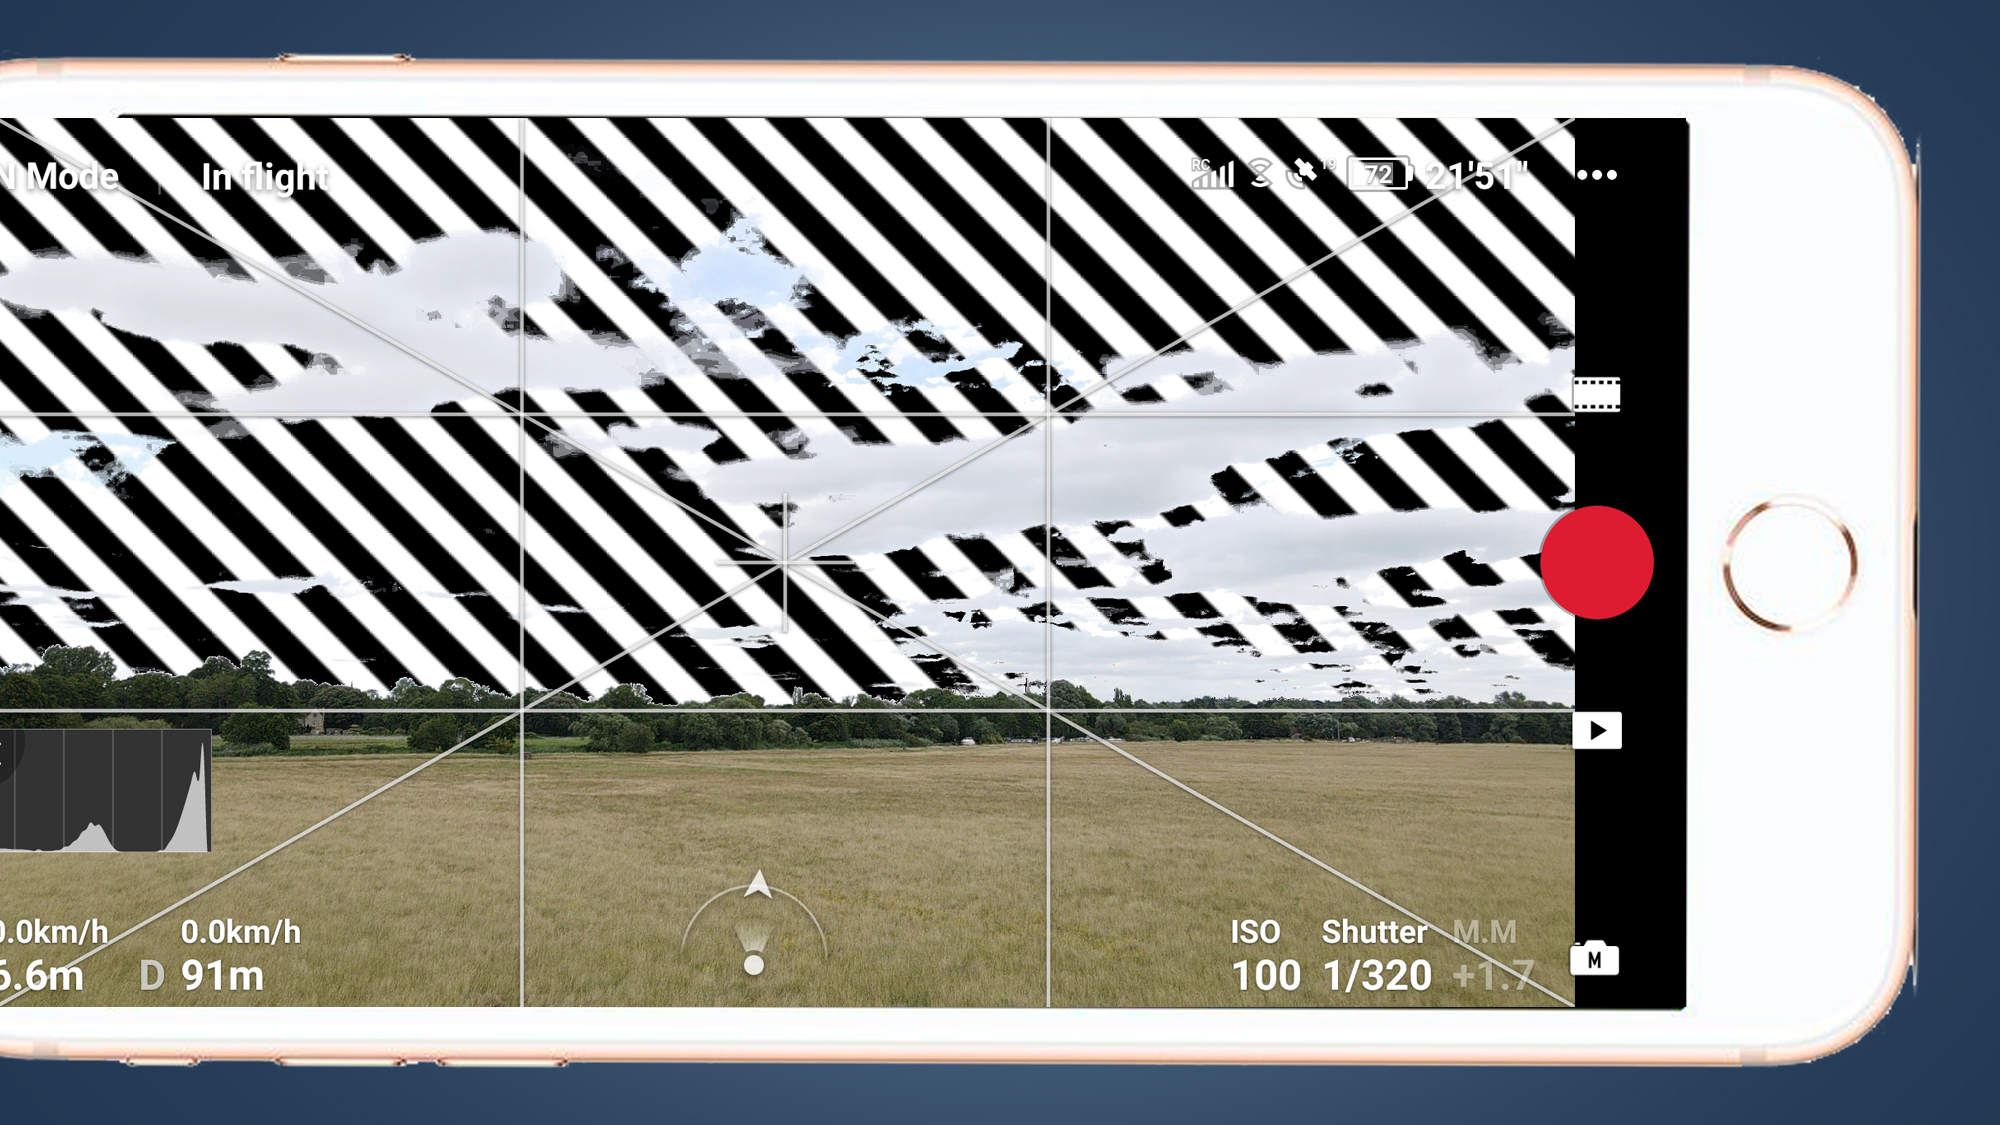
The histogram is invaluable for assessing exposure, and the overexposure warning (zebra lines) provides a visual display of which parts of the image are overexposed so you can adjust exposure accordingly.
Finally, rule-of-thirds gridlines, diagonal grid lines and a small central cross all help you to compose shots quicker and easier than without them. To access these settings, click on the three dots in the top right of the app, click on camera and scroll down to the relevant settings to apply them.
- These are the best drones you can buy right now
James Abbott is a professional photographer and freelance photography journalist. He contributes articles about photography, cameras and drones to a wide range of magazines and websites where he applies a wealth of experience to testing the latest photographic tech. James is also the author of ‘The Digital Darkroom: The Definitive Guide to Photo Editing’.