Install Linux on Your Mac

You might have some problems with screen resolution, among other things, when booting from the CD. We will fix this after the complete install.
5. Partition's Over
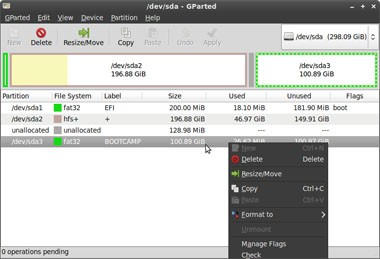
The menu in Linux Mint has a pseudo-Spotlight built in. Click the menu (bottom-left of your screen) and type gparted in the search bar. Click the only search result, Partition Editor. Now you need to delete the partition you just created in Mac OS X. This may seem unintuitive, but it’s the only way to make sure all the partitions are in the right format.

Gparted in action: Let the filesystem wars begin.
Leave the partition labeled EFI alone, but right-click and delete the partition labeled BOOTCAMP, which should show up as /dev/sda3, unless you have multiple hard drives in your Mac. Remember to click Apply after this is finished, because gparted waits for your approval before taking its software chainsaw to your hard drive.
Pick a Distro, Pick a Mac
Linux has a number of distributions. We chose Linux Mint because it’s relatively easy to configure and comes with things like Adobe Flash out of the box. Generally, for first-timers, if a Linux distro is a variant of Ubuntu, it should be fine.
To complete the steps outlined here, you need an Intel Mac. We went with a Core 2 Duo iMac, but we also put Linux Mint on a Mac mini (a little harder, since we had to use a different driver for the mini’s Nvidia graphics card) and a unibody MacBook Pro. Using a unibody ’Book requires a few more tweaks to make the no-button trackpad work--see MacBook Aluminum for details.
6. Installation Station
7. One Last Thing
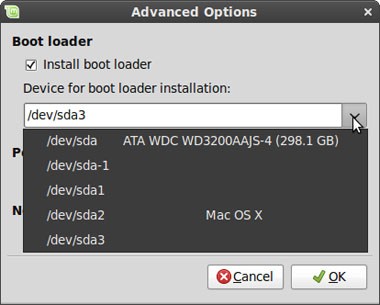
After you set your user information, you’ll see a screen that says, “Ready to install.” However, you’re most definitely not ready to install. There’s one last thing to do. Click the Advanced tab in the bottom-right of the window, and change the “Device for bootloader installation” drop-down menu to whatever partition you are going to have Linux on. Choose the same ID as the partition you erased with gparted in step 5--for most computers, that’s /dev/sda3.

It's funny how a drop-down menu can completely make or break an OS install. Poetic justice?
This is incredibly important, because the Linux bootloader, called Grub, is notorious for messing with the way Mac OS X boots. So when you tell the installer to install Grub to your Linux partition, you allow your Mac to select which partition to boot and then go through Grub to your Linux partition.
After you finish this step, click OK to accept the changes, and then click Install.
Sign up for breaking news, reviews, opinion, top tech deals, and more.
Quick Tip
You can access the files on your OS X partition with the Linux file browser. Open the volume labeled Macintosh HD (or equivalent), and type in your password when it prompts you. If a folder is marked with an “x,” you have to right-click it, then “Open it as root” to gain access.
8. Sync or Be Sunk
After the install is finished, you can’t click Restart. Instead, click Continue Testing, click the menu button, and then click Exit. From there, you can choose to shut the computer down. And then the fun/hell of configuration starts. The first thing you need to do when you start your computer is sync your partitions. Luckily, rEFIt makes this really easy. At the rEFIt screen, navigate to Start Partitioning Tool and press Enter. If your partitions are not in sync, it will prompt you to sync them, and if they are in sync, you don’t have to do anything.