A Pilates expert says these are the five ‘essential’ moves most people should be doing
Strengthen your whole body and boost your flexibility with these five exercises from a certified Pilates instructor of more than 30 years
I love Pilates. The practice has helped me build full-body strength and mobility, allowing me to move freely and keep injuries at bay. It’s also my favorite way to break up a day sitting behind one of the best laptops, other than a jaunt around the block walking my dog.
If you want to give Pilates a go, expert Portia Page says there are five foundational moves worth learning above all others; the hundred, kneeling side kick, saw, push-up and leg circles.
Below, she walks you through each one, explaining the many benefits on offer and some optional modifications to make them more accessible.

Portia Page has been in the fitness industry for more than 30 years. She is an NCPT (nationally certified Pilates instructor) and a Balanced Body master instructor for Pilates, Barre and more.
She also holds further certifications with the ACE (American Council on Exercise) and AFAA (Athletics and Fitness Association of America).
Portia Page’s five essential Pilates exercises
1. The hundred
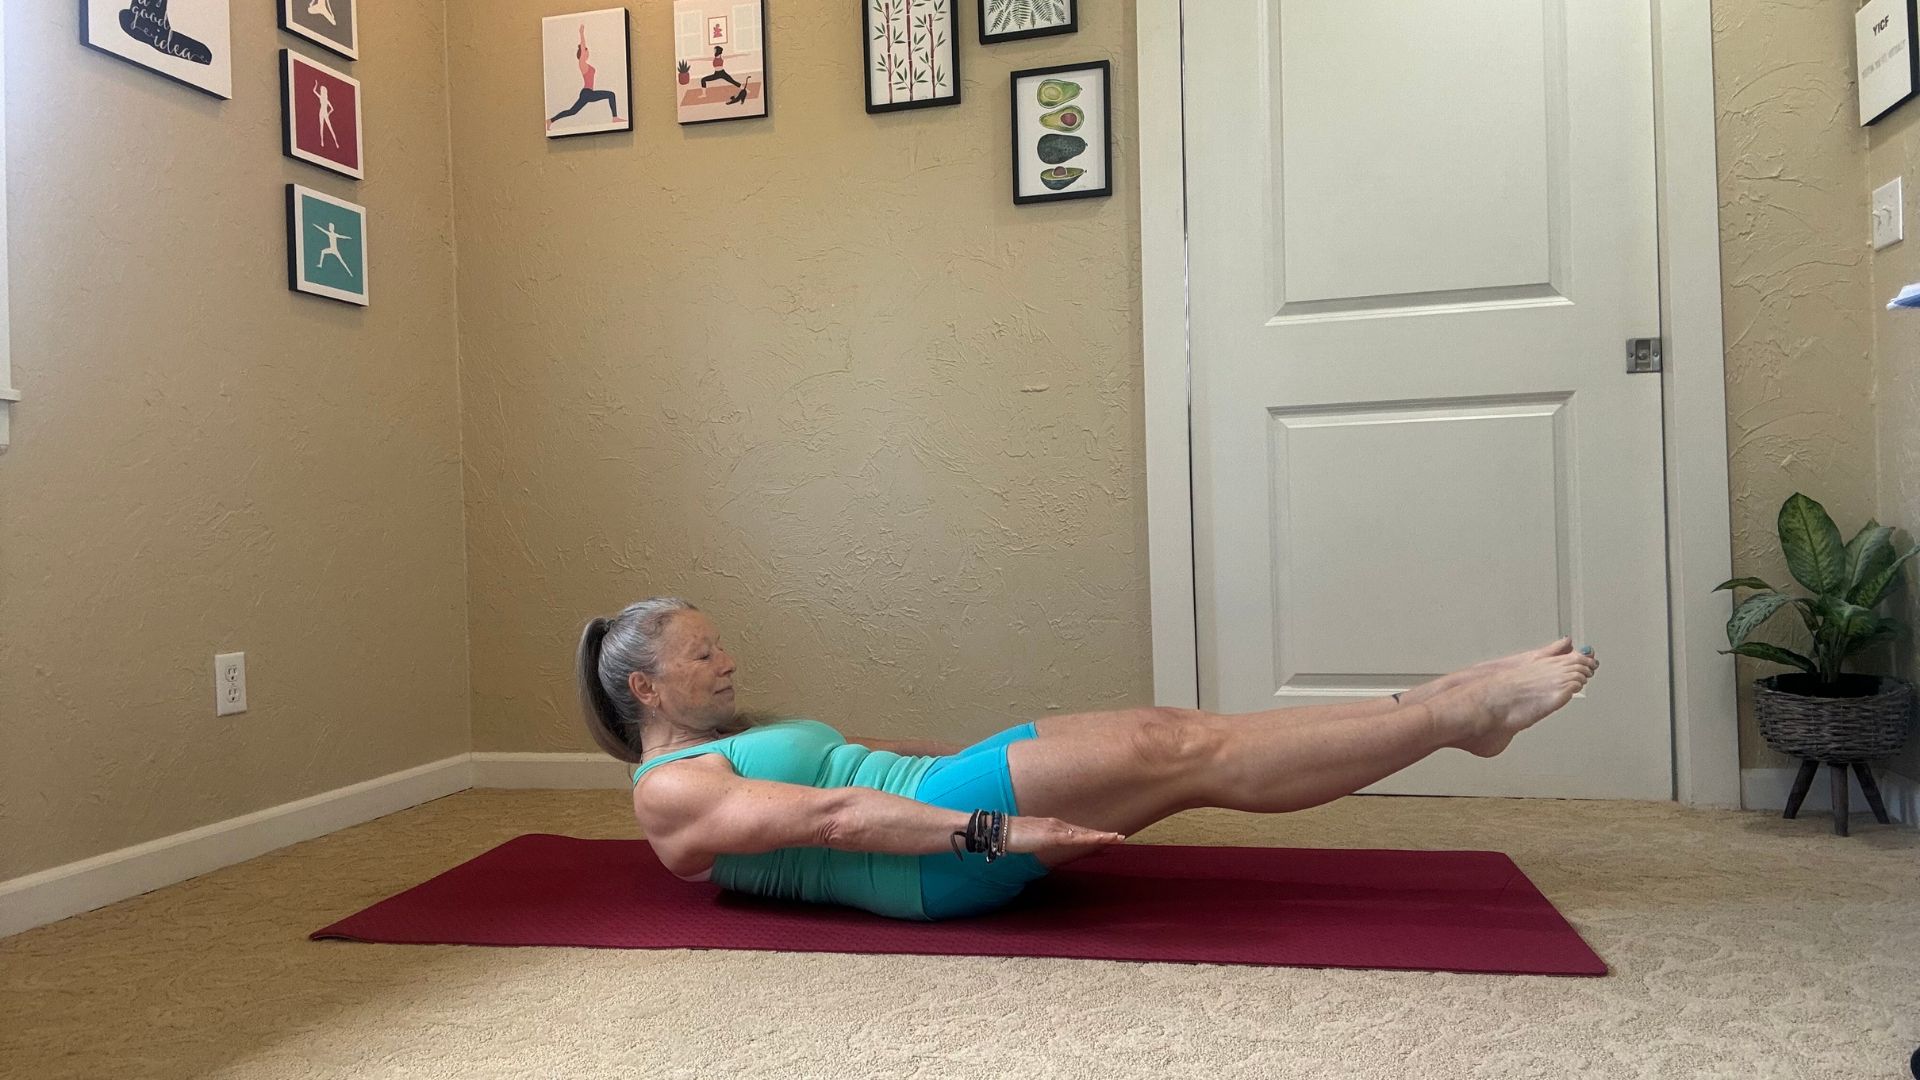
- Lie on your back with your legs outstretched.
- Engage your core muscles and squeeze the glutes. Breathe in to prepare, then exhale and lift your head and feet off the ground.
- Continuing to exhale, lift and curl the head up to your chest and extend your arms towards your hips so they’re parallel to the floor, palms facing down.
- Begin breathing in for five counts, and out for five counts. As you do this, pump your arms so your hands move up and down a few inches with each count.
- Repeat this until you reach a prescribed number of pumps with your arms. Page recommends 100 for experienced exercisers.
Modifications
If you feel your lower back lifting off the floor when doing this move, Page suggests two possible remedies. You can try bending your knees so your shins are parallel with the floor, or bending your knees and placing your feet flat on the ground.
She also has tips for anyone who feels their neck straining when reaching it towards the chest.
“Try keeping the head and shoulders propped up with either a towel or pillow. O you can take a towel folded lengthwise in your hands, place it behind your head, then hold your head up and hold the position for 30-60 seconds.”
Sign up for breaking news, reviews, opinion, top tech deals, and more.
Benefits
“The hundred warms up the body,” Page explains. “It also teaches correct breathing with abdominal engagement, increases abdominal strength and increases upper back flexibility.
“Everyone needs strong abdominals to support their torso and limbs throughout daily activities. A strong core is also helpful for maintaining good posture, which keeps the body in a relaxed-yet-ready state throughout the day in all positions, whether you’re sitting, standing, walking or otherwise.”
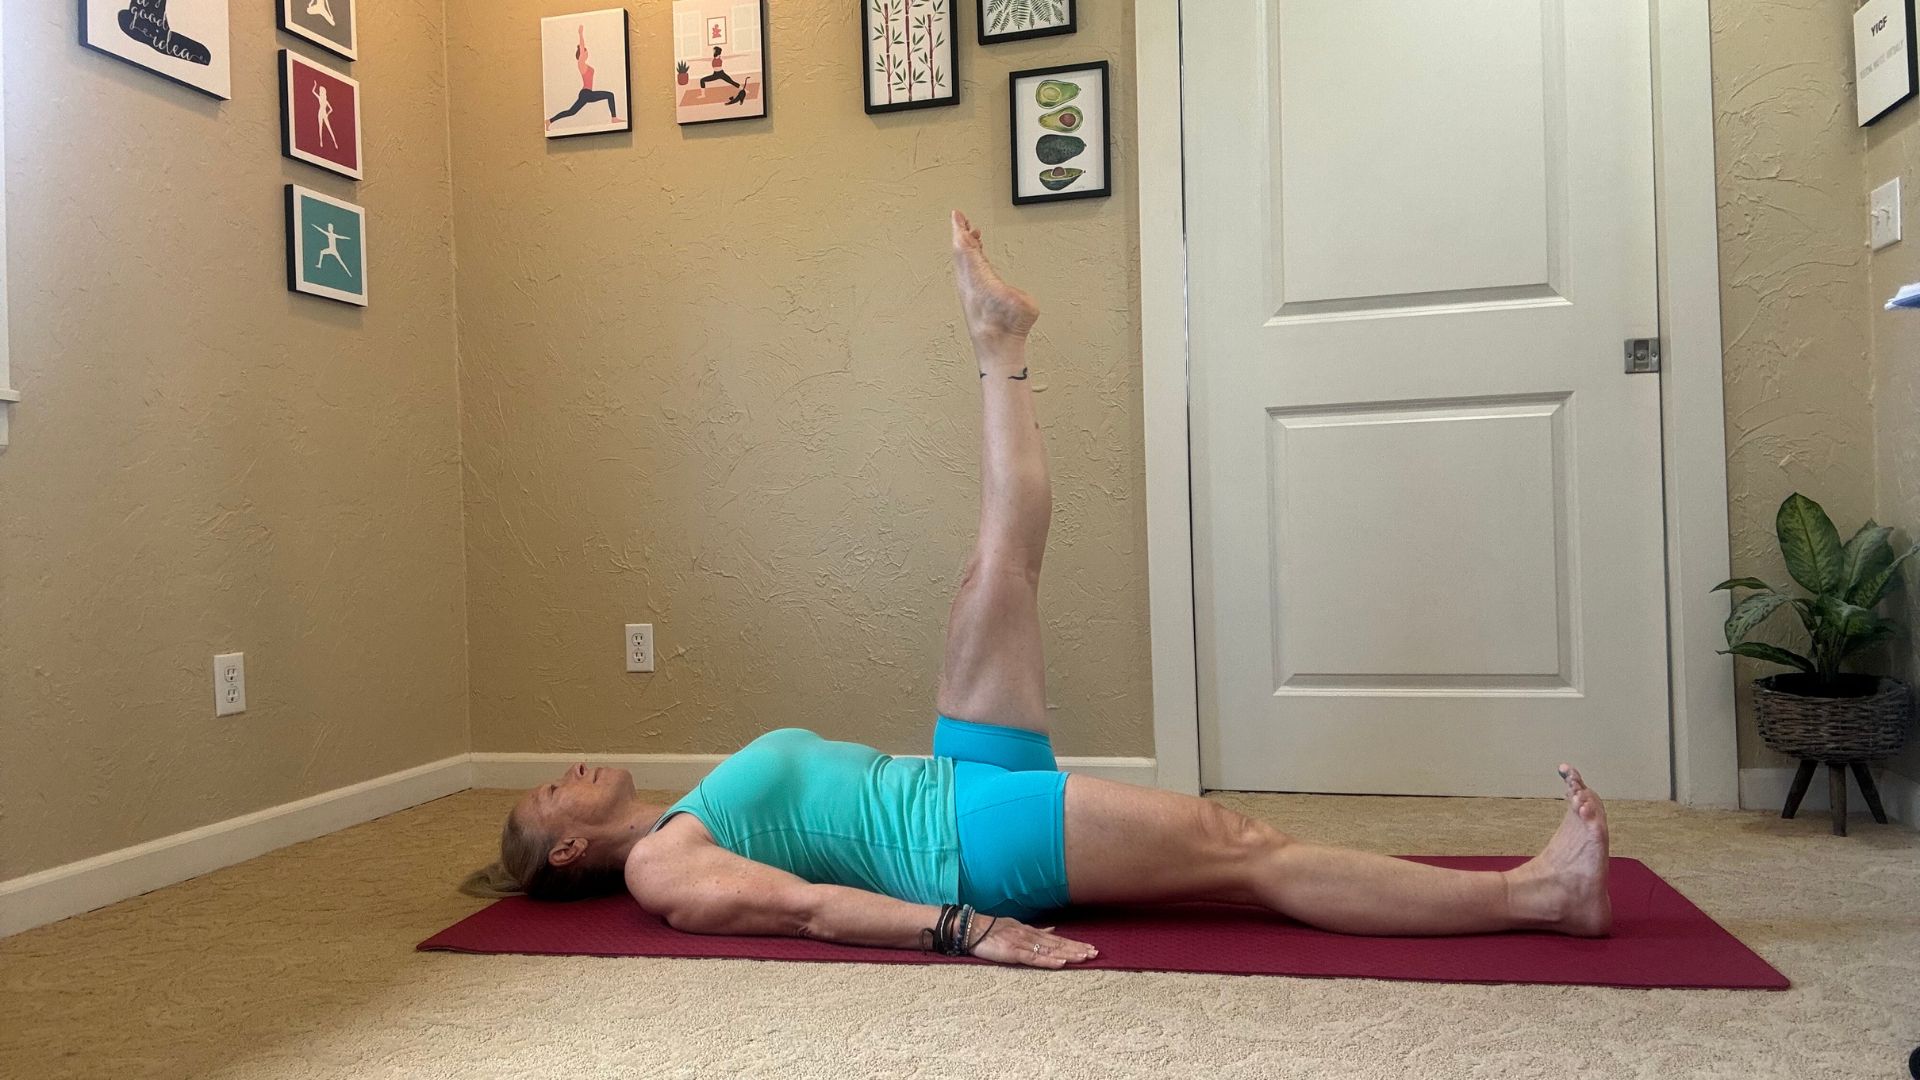
2. Leg circles

- Lie on your back with your arms on the floor by your sides, palms down.
- Extend your left leg vertically towards the ceiling with the toes pointed. The right leg should remain on the floor with the heel grounded and the toes flexed up to the ceiling.
- The grounded leg is the anchor for this movement along with the torso, head and arms, and should stay relatively still throughout the movement.
- Inhale and move your left foot in a semi-circle across your right leg. Continue to inhale as the leg circles down at an angle.
- Exhale and move your left foot in a second semi-circle to complete the circular movement pattern, this time bringing it across the outside of your body.
- Repeat this 3-6 times in this direction, then 3-6 times in the other direction, before swapping legs and doing the same on the other side of your body.
Modifications
If you have limited flexibility in your legs, you may be unable to extend them vertically towards the ceiling. If this is the case, Page recommends lifting your thigh vertical with your knee bent so your shin is parallel to the ground, then making small circles with your knee rather than your foot.
Benefits
“This move increases the flexibility of the hips and legs,” Page says. “It also warms up the hip joint and pelvis, strengthens the abdominals, builds awareness of the upper body muscles and develops control through the torso and arms.”
3. Kneeling side kick
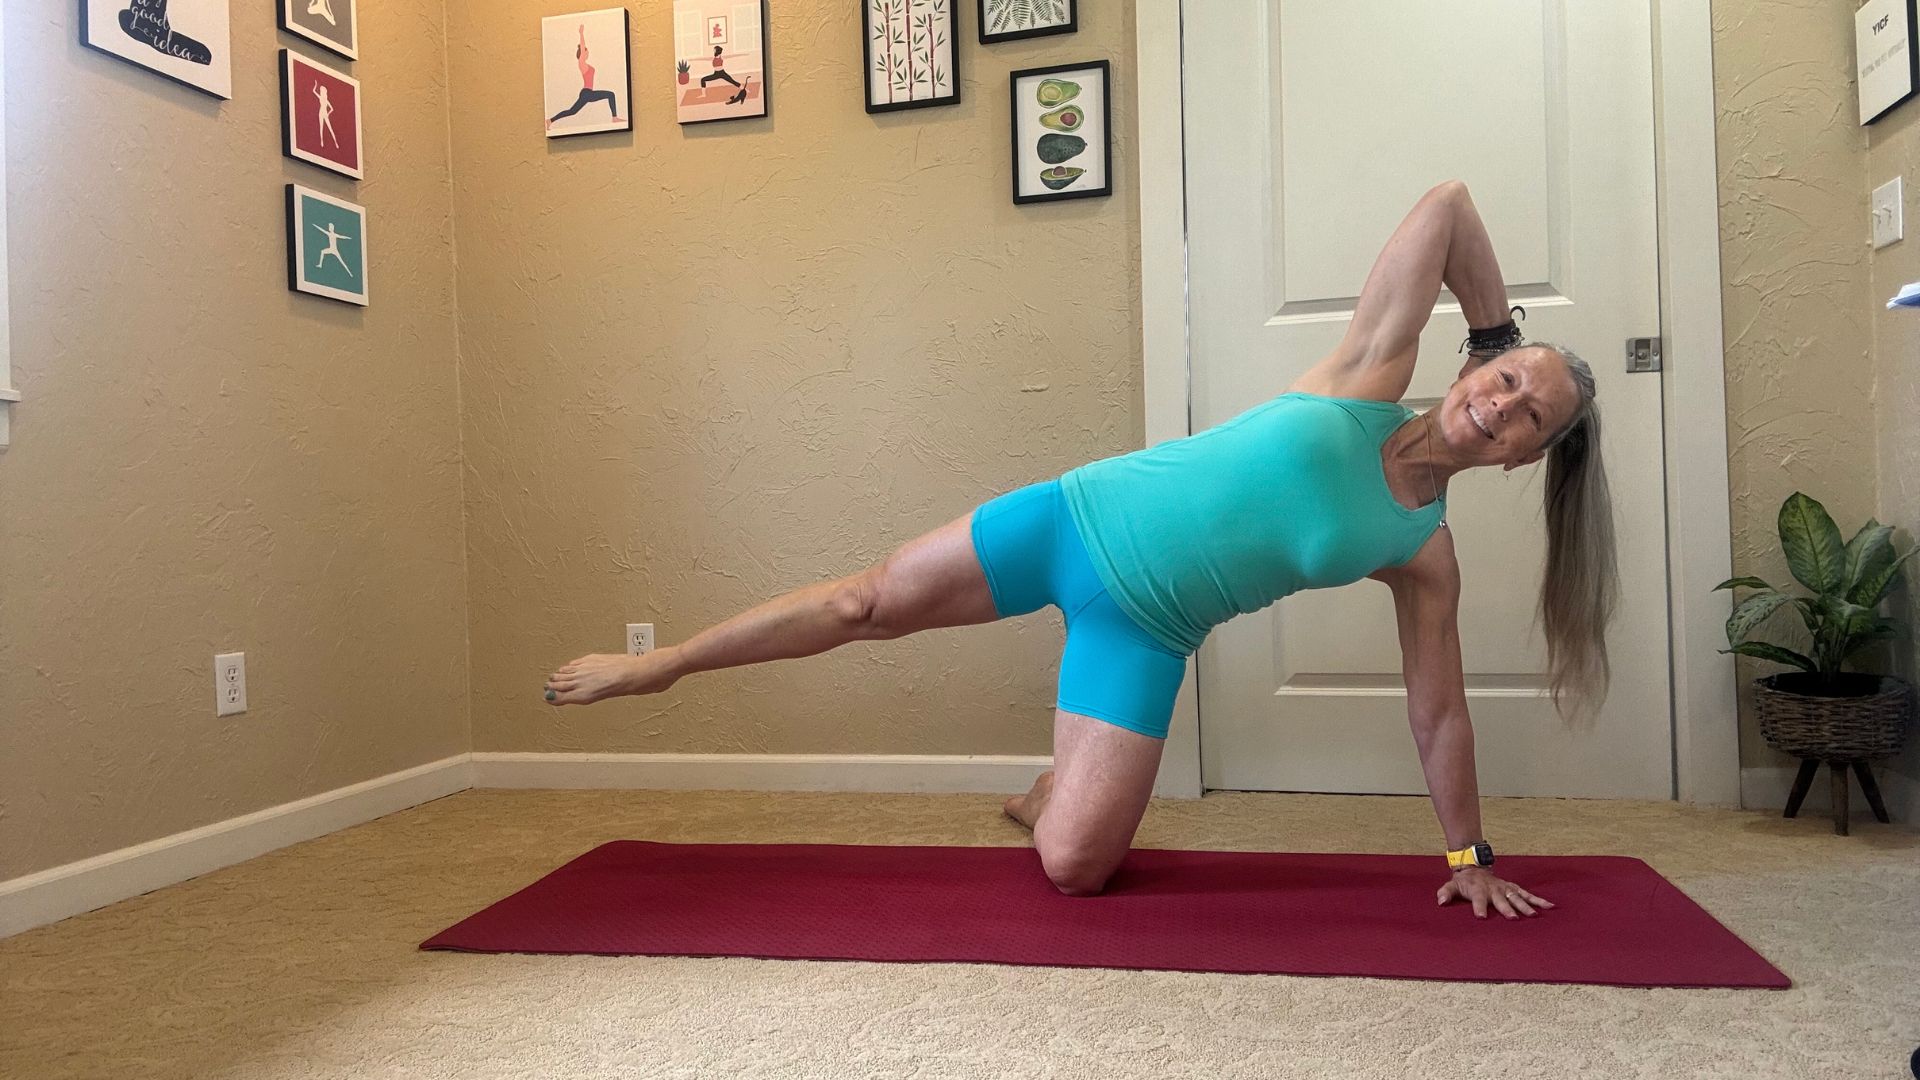
- Kneel on the mat with your right knee bent and your left leg stretched out to your left hand side.
- Place the inside of your left foot on the ground, then place your right hand on the ground to your right so it’s in line with the right knee and under the right shoulder.
- Place your left hand gently on the back of your head so your left elbow is flared out to the side.
- Inhale to prepare the abdominals, feeling them contract to protect the lower back.
- Exhale and lift your left leg until it’s parallel with the ground.
- Inhale with a double breath and bring your left leg forward until you feel a stretch in your hamstrings (the muscles on the back of the thigh). Keep the lifted leg straight and the foot flexed throughout.
- Exhale and swing your lifted leg back at hip height with the toes pointed, until you feel a stretch in the hip flexors.
- Repeat this for 6-10 repetitions then switch sides and repeat.
Modifications
Some people may experience discomfort when supporting their weight through the planted wrist. To avoid this, Page suggests lying on your side as you do this move, pushing your bottom leg into the ground and extending your lower arm in front of you for stability.
You can also reduce your range of motion in any part of the exercise to make it challenging but achievable (this might mean not lifting your leg as high, or moving it as far forward or backward).
If your flexibility is limited, reduce your range of motion.
Benefits
“Doing the kneeling side kick stretches the hamstrings and hip flexors, and strengthens and sculpts the outer thighs,” says Page. “It also brings awareness and control to the lumbo pelvic region for everyday activities.”
4. The saw
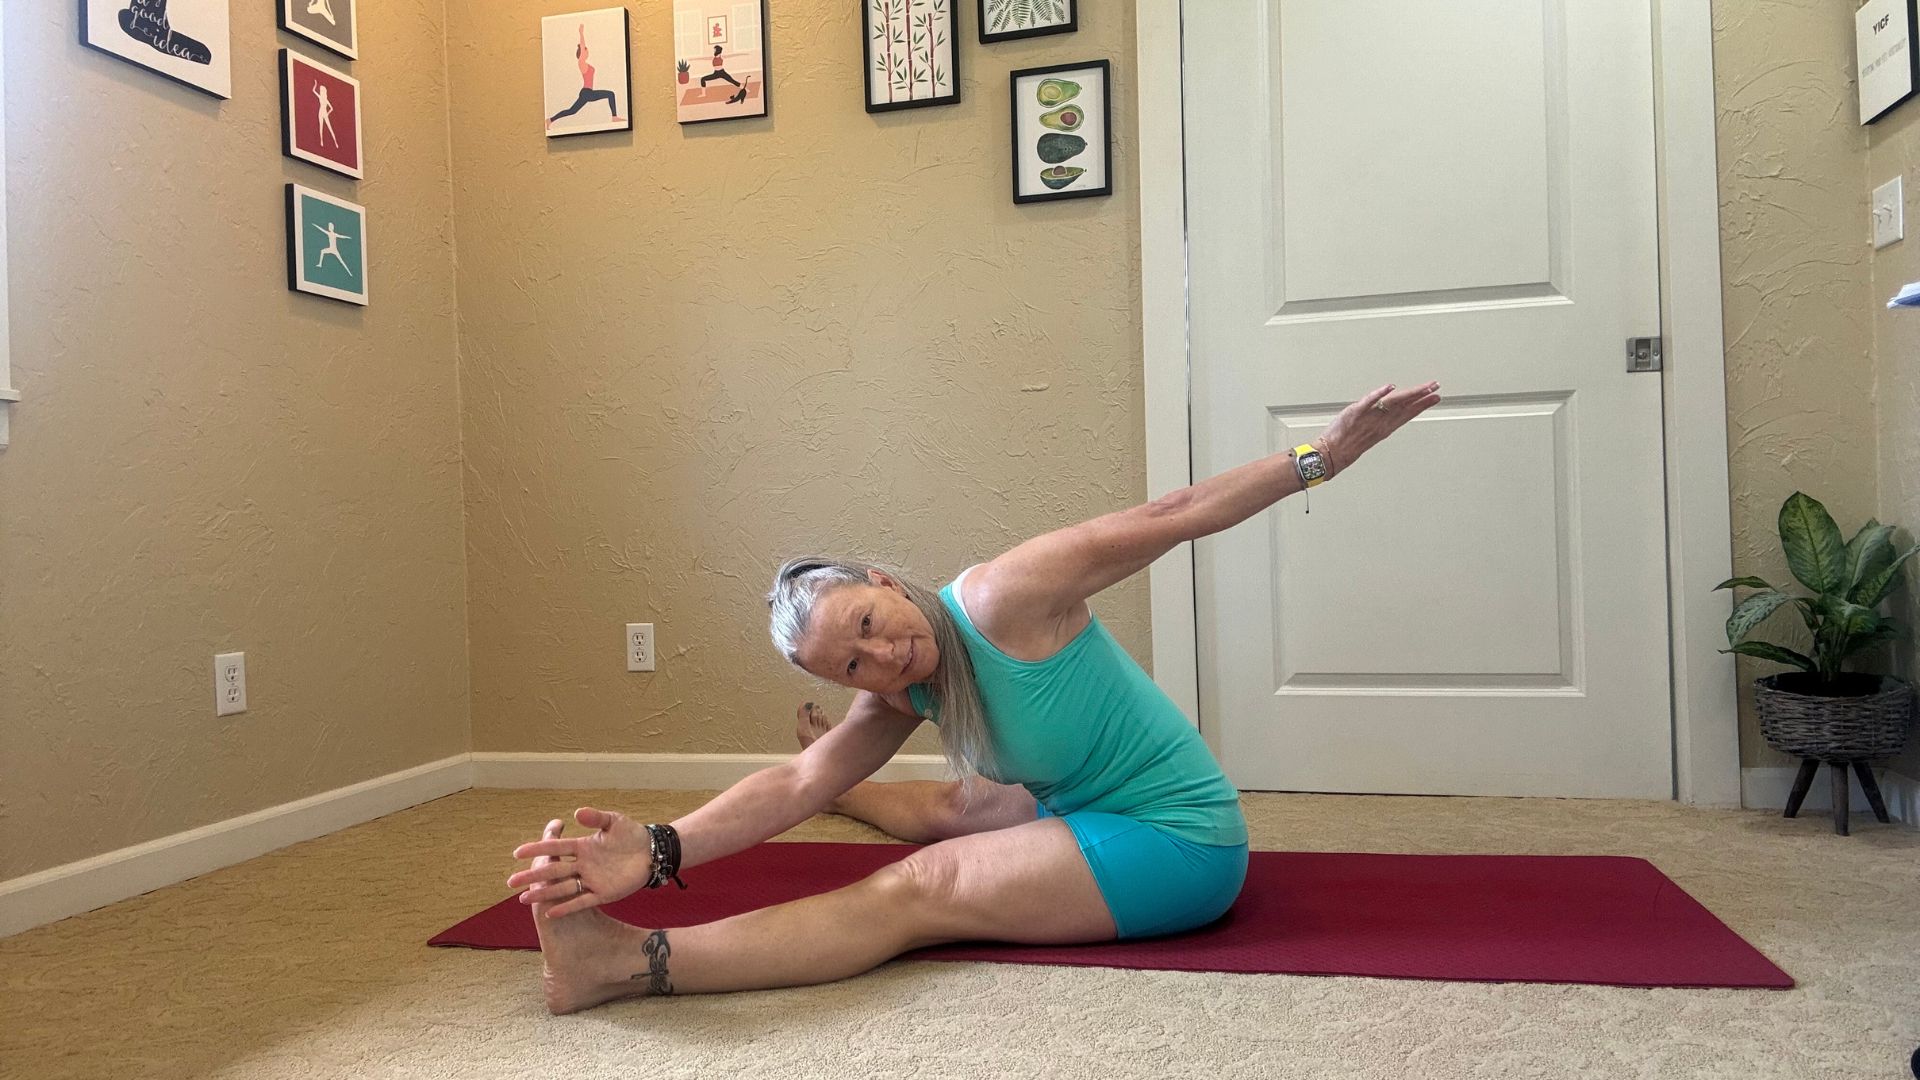
- Sit on the ground with your legs extended and your feet wider than your hips. Flex your feet so your toes are pointing towards the ceiling.
- Reach your arms out to your sides so they’re parallel with the floor, palms down.
- Inhale and rotate your torso to the left, keeping your arms outstretched shoulder height.
- Exhale as you reach your right hand to your left foot, and bring your left arm behind your body.
- Inhale as you round up out of the stretch, keeping the upper body turned to the left, then exhale as you return to the start position.
- Repeat this four to six times on either side of the body.
Modifications
“If your lower back is tight or your hamstrings are less flexible, preventing you from sitting tall, you can sit on a pillow or small box to lift the hips off the floor and give you room to sit up on top of your sit bones,” Page explains.
Benefits
“Do this move to increase your mobility and rotation of the spine,” Page says. “It teaches correct sitting posture too, as well as strengthening and stabilizing the core and pelvis.”
5. The push-up
- Stand upright with your feet hip-width apart and your arms extended overhead.
- Inhale and lower your arms, bringing your chin towards your chest.
- From your standing position, slowly curl the spine and reach your arms towards the ground. Bend your knees as much as you need to place your hands on the floor in front of you.
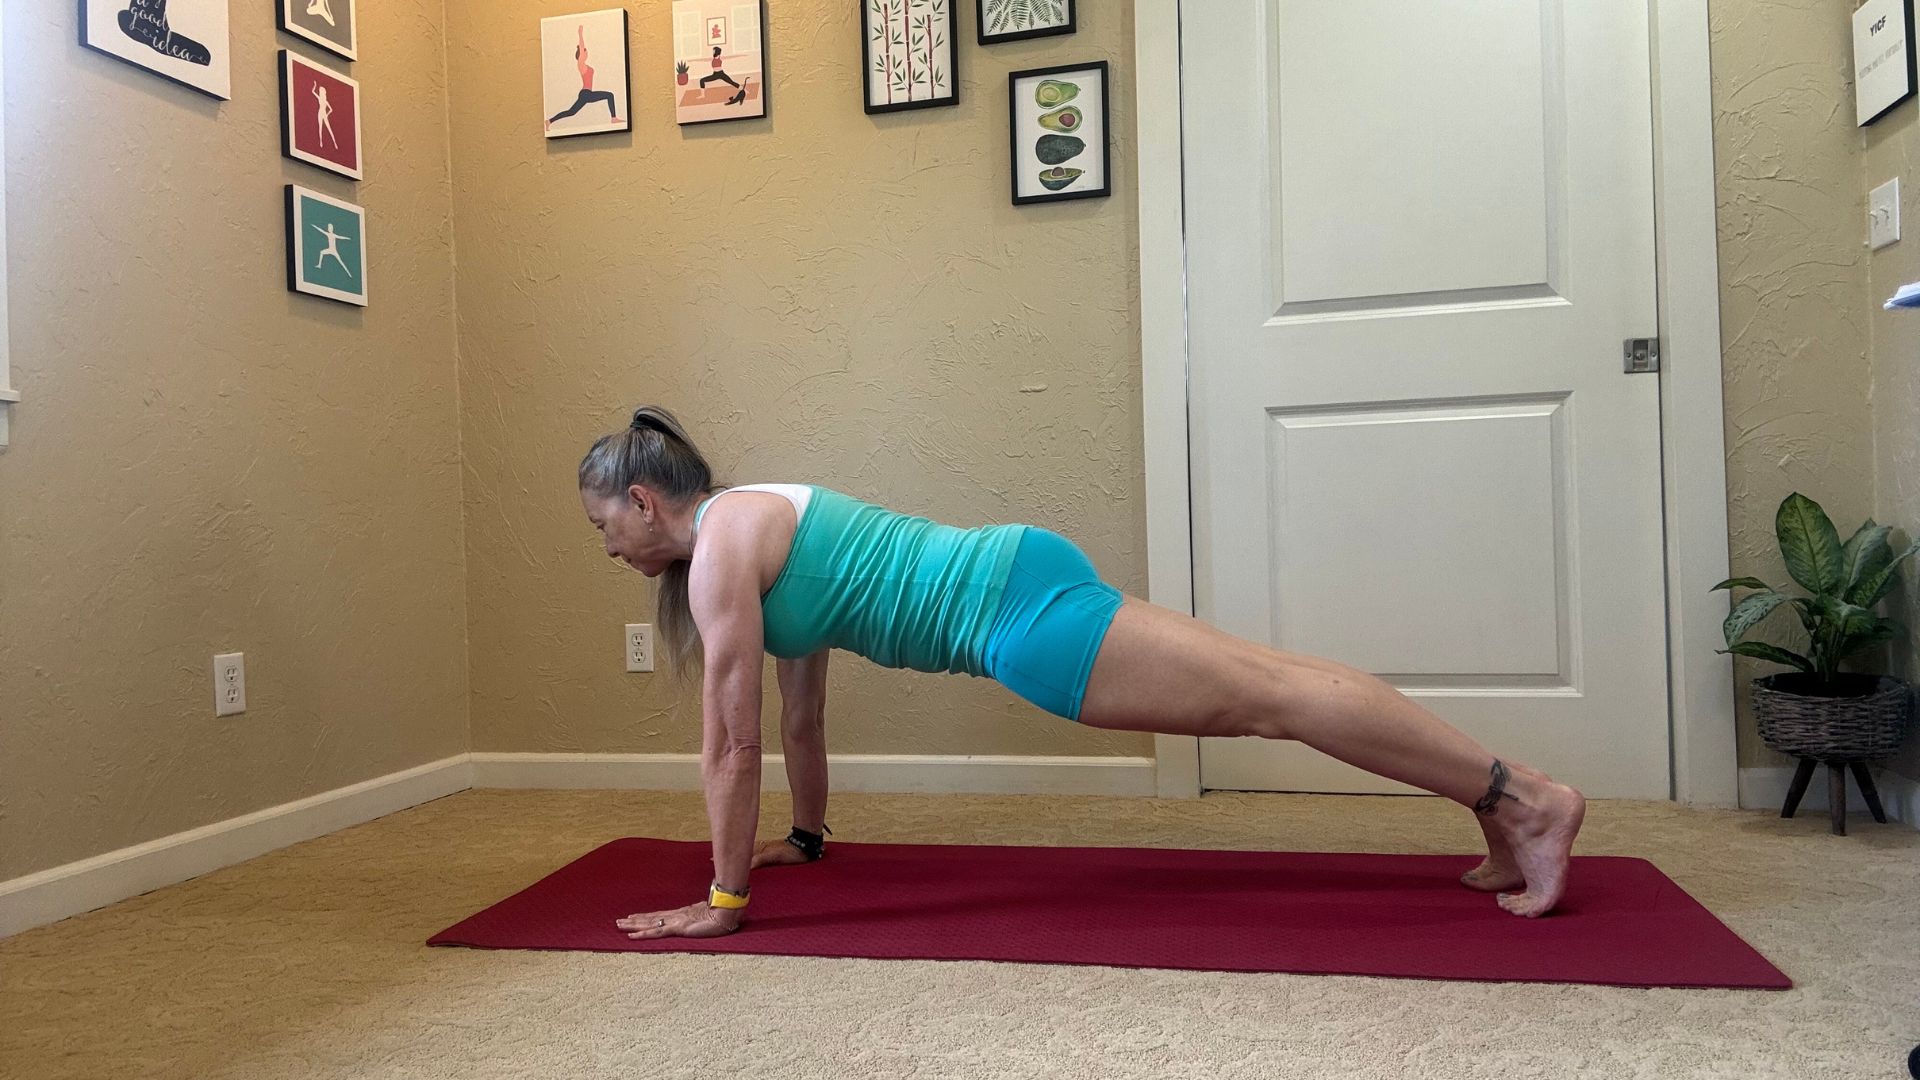
- Exhale and walk your hands out in front of the body until you are in a push-up or high plank position. Just like the image above, get your hands under the shoulders and your body forming a straight line from your head to your heels.
- Inhale and bend your elbows to lower your body as one unit towards the floor until your shoulders are at elbow height.
- Exhale and straighten your arms, pressing the body away from the floor.
- Repeat this four to six times, then inhale and walk your hands back toward the feet.
- Exhale as you restack the spine and stand up tall, arms by your sides, to complete the movement.
Modifications
“If you feel pain, discomfort or a lack of control in the lower back when bending and straightening the elbows, lower your knees to the ground when in the plank position,” Page advises.
“If there is discomfort in your upper body or wrists, perform the plank and push-up against a wall, or a raised surface like a windowsill or sturdy chair.”
Benefits
“The push-up strengthens the entire body,” says Page. It's simple, but effective.
You might also like...
- 'Walking is one of the most important things we can do for our long-term health’ – trainer shares three of her favorite lunch break walking workouts to try
- ‘Stretching needs to be a crucial part of your life’ – flexibility expert recommends these three stretches to ‘hit the whole body’
- I tried Chris Hemsworth’s Furiosa workout using just a couple of dumbbells, and it was more effective than I expected
Harry is a huge fan of picking things up, putting them down again and writing about it, which uniquely qualifies him for the position of fitness and wearables writer with TechRadar.
He’s an NCTJ-qualified journalist with a degree in English and journalism and several years’ experience covering the health and fitness beat. This has involved writing for the likes of Men’s Health, Women’s Health, Runner’s World, Fit&Well, Live Science and Coach.
Harry is passionate about all things exercise-related, having spent more than a decade experimenting with a wide range of training styles. He's used strength training, bodybuilding, Pilates, powerlifting, gymnastics, rowing, yoga, running, calisthenics, CrossFit and more to build a fit, functional body (and have fun while doing it).
When he’s not writing or training, he can usually be found racing his dog Archie up scenic hills in the south west of England or working to complete his NASM-certified personal trainer qualification.