


Some types of PC infection can render your computer unusable because it's unable to boot into Windows. If the master boot record is overwritten or any of the Windows files called upon during the boot process are compromised, you could be left with a paperweight instead of a computer.
However, even in desperate situations like these, it's possible to find and neutralise an infection by using a boot CD.
Rescue remedy
There are numerous discs available that are capable of booting your computer, including a number of Linux Live CDs that provide full GUI environments.
However, for a quick and easy option, you can do a lot worse than AVG's Rescue CD. You can download it for free from here. Select the ISO version and use a CD-burning program like CDBurnerXP to burn the ISO image to disc. Make sure you use the correct ISO burning option as simply copying the ISO file to disc won't result in a bootable CD.
You can now use this disc to boot your computer, provided of course that your CD/DVD drive is enabled in the BIOS as a boot device.
Cleaning up
When your PC recognises the boot disc and starts from it, you'll see a simple welcome screen. It will automatically boot into the rescue CD in 10 seconds, but you can take this option to run Memtest86+ to thoroughly check your RAM if you think this might be causing your problem.
Otherwise, boot into the Rescue CD properly, which will mount all your hard drives and boot up your network connection. If you have a router sharing your internet connection, this will enable the rescue disc to access the internet. You can use this to update the virus definitions and then go on to scan your PC as shown in the walkthrough.
A full scan of your hard drives can take a while, but you can interrupt it at any time by pressing [Ctrl]+[C]. If it's left to run its course, the scan will eventually provide a report menu.
This offers several options. Choose 'Report File' to display a summary of all the detected files. You can opt to delete all of them. This will remove the infections, but be careful when choosing this option, because if any of the detected files are important to Windows' operation, your PC will be rendered unusable.
Restoration drama
A safer option is to choose to rename all the infected files, because you can restore them if necessary. The program automatically renames each of the files by adding the suffix '_infected.arl' to the end of the filename. This prevents them from being used, but you need only rename them back to their original names if they're important files and you want to reinstate them.
For a more cautious approach, you can opt to handle each infected file individually. This can be a pretty time-consuming process, but this way you get to choose whether to delete or rename the file concerned in each case.
In addition to the incredibly useful virus scanner, the rescue disc includes a file manager, access to the Windows Registry and a data recovery utility.
Using your AVG rescue disc
Remove infected files and give your PC a clean bill of health
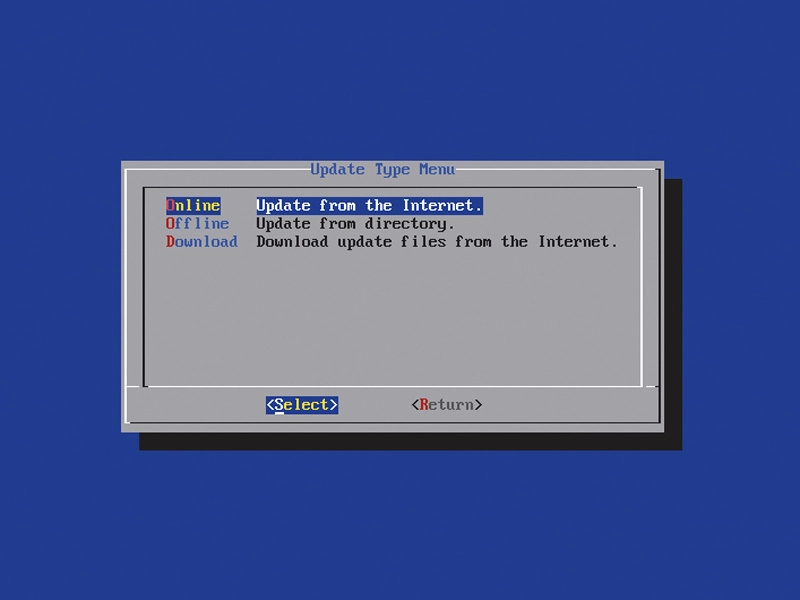
1. Update virus definitions

Once you've burnt the ISO image to a disc and used it to boot your PC, you need to accept the terms of the AVG Rescue disc. If an internet connection is detected, you'll be prompted to check for updates. If it does, make sure you choose to update from the internet.
2. Scan for infections

From the Update options, choose to update definitions only. Once they're downloaded and installed, you'll be returned to the main menu. Here you have a number of options. Select 'Configure and run on-demand scan' from this list. This will scan your hard drives.
3. Scan options

Select the options you want to use for the scan. Those selected are marked with asterisks. Highlight an option using the arrow keys and press [Enter] to select or deselect it. Choose 'OK' to begin the full scan. This may take some time, so make sure you've got the kettle on!