50 expert tips to speed up your PC
The road to a faster PC starts by properly optimising your hardware. While some of these procedures can be risky, they can also prove very effective, often delivering direct and noticeable performance gains in every area of your system.
1. Update the BIOS
Upgrading your PC's BIOS, or firmware in other devices like the router, could be a quick way to improve performance, fix bugs and even add new features. Look for the current BIOS version number on your boot screen or in the BIOS set-up program and then visit the manufacturer's site to check for recent upgrades.
2. Disable unwanted devices
Speed up the boot process by turning off motherboard devices that you're not using, such as integrated sound, graphics, extra network ports and so on. Look for a BIOS set-up menu called something like Integrated Peripherals to find the options that you need.
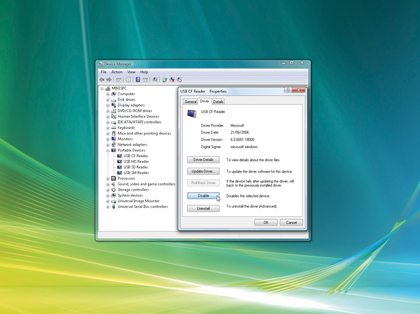
Once Windows starts, launch Device Manager (devmgmt.msc), locate any remaining unwanted devices, right-click them and select 'Disable' to save more resources. Be careful, though – disable the wrong device and you're likely to find that your PC won't be able to reboot. If you're in any doubt about what a service does, look it up on the internet or leave it well alone.
3. Kick-start your PC
Sign up for breaking news, reviews, opinion, top tech deals, and more.
Optimising your BIOS settings will make for a quicker boot. Turn off the extended memory test, since it's useless, then turn on a QuickBoot or FastBoot mode (the names may vary) for a little extra speed.
Next, browse your BIOS set-up program looking for the boot order settings (often found under a Boot or Startup | Boot menu), which is a list that determines where your system looks for bootable devices.
Make sure that your hard drive comes right at the top of the list to avoid your system wasting time checking other devices. If you need to boot from CD later on (typically to install a new operating system or run a Live CD), you can temporarily change it back.
4. Get rid of USB checks
If you leave a USB drive connected to your PC and it appears in the boot order before your hard drive, then your PC will give the drive some time to initialise before checking whether it's bootable. In some BIOSes this time is called the USB Mass Storage Delay, and it can be determined by you.
If you never boot from a USB drive then set this to the lowest available figure to minimise any delay. If you find that you need to boot from a USB device in the future, simply increase the figure again.
5. Overclock the CPU
Overclocking your CPU – or running it faster than its rated speed – can get you 10 to 20 per cent more performance for a few minutes' work. There are risks, though. More speed means more heat and maybe more voltage too.
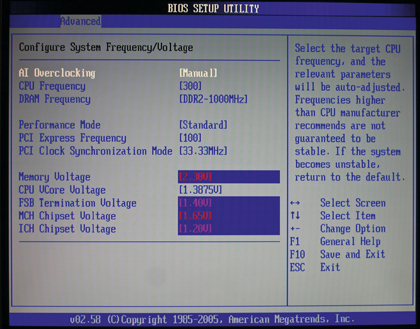
You'll use more power, and components will have a greater chance of failing – so don't try this unless you're willing to accept the risks of doing so. Assuming you are, launch your BIOS set-up program and look for the overclocking settings (try the Advanced menu). Exactly what's available depends on your hardware, but in principle increase your CPU and memory frequencies just a little.
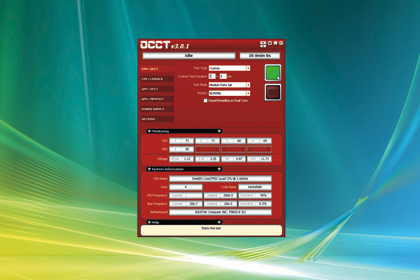
Boot your system and stress-test it with tools such as memtest86+ and OCCT to confirm that all is well. If it is, increase the frequencies a little more, and see what happens; if not, reduce the frequencies or increase the voltages (VCore, memory voltage), which should allow you to run a little faster (although doing this also risks burning out your components).
Don't do anything until you know what's appropriate for your hardware, though. The Extreme Overclocking forum is a great place to find out more.
6. Safely overclock the CPU
If you've got an Intel Core 2 Duo or Core i7 CPU, check your BIOS for a setting like 'Intel Dynamic Acceleration' or 'Turbo Mode', and ensure it's turned on. This handy setting will automatically overclock one core while shutting off the others, improving single-threaded performance.
If you're already overclocking, though, this setting stands a good chance of locking up your PC. Disable it and you may be able to push things just a little bit further.
7. Clean your laptop fan
Over time, the fans and vents on a laptop will become covered with dust, hairs and assorted gunk. The system then runs hotter, so your fan is on for longer and battery life falls. Worse still, your CPU speeds may be throttled to try and reduce the temperature. It's a very good idea to open the case and carefully clean away any dust to make sure that the airflow is unobstructed.
8. Speed up graphics
Overclocking your graphics card can give games a little extra zip. How you get to the right settings will vary, but on our test PC, you right-click the desktop, select Nvidia Control Panel | Adjust GPU settings and choose 'Custom clock frequencies' to find the 'Core bus and memory bus' figures.
Increase them just a little to give more speed. After that, it's much like overclocking your CPU: test that everything is OK, increase the clock rate again if it is, wind the settings back a little if your PC crashes and repeat until your system is stable. You can read more on ATI and Nvidia tweaks at TweakGuides.
9. Safely speed up graphics
Some BIOSes offer very basic PCI Express graphics card overclocking with a setting called 'PEG link mode'. If you don't intend to try more intensive overclocking, set this to its highest setting (usually Faster) and you should see a little extra speed.
10. Optimise the RAM
It takes time to access your RAM, but you can minimise this delay by playing around with the BIOS memory timings. There's normally a timing entry set to By SPD, which means that your system uses the default timing values set by your RAM. Set this to Disabled or User defined and you can choose your own timings.
Look for CAS Latency, say, reduce it by one setting, reboot and test that your system is working correctly. Repeat until your PC becomes unstable, then increase the value by one and move on to something else (check your BIOS documentation for more).
Crashes here could stop your PC booting at all, even into the BIOS, so make sure that you know how to reset your BIOS to its default settings before you start messing around with any values.
11. Edit the BIOS
If your Nvidia drivers are proving unhelpful, then there is another way to ramp up your graphics performance – edit the BIOS directly. Of course, this is also the quickest way to trash your card altogether. Don't try this unless you're willing to take the risk.
To do it, download a copy of Nibitor and then run it. Click Tools | Read BIOS | Select device, choose your graphics card and click 'OK', then click Tools | Read BIOS | Read into Nibitor to start experimenting. Annoyed that you can't change the shader clock in the driver?
Just click the Clock rates tab and change it to whatever you like. Tweak the other settings, click File | Save and then use a tool like NVFlash to update your card. See www.mvktech.net for more detailed instructions.
12. Stop network throttling
Windows Vista limits network transfers when you're playing multimedia files to stop your music or video skipping. Great idea, but it can reduce performance on some high-speed network connections.
To fix this, go to HKEY_LOCAL_MACHINE\SOFTWARE\Microsoft\Windows NT\CurrentVersion\Multimedia\SystemProfile and create a new DWORD value called NetworkThrottlingIndexValue.
Set this to values between one and 70 (10 is the default, higher values mean less throttling) or FFFFFFFF to disable throttling completely.
13. Turbocharge GMA
Many laptops use Intel's Graphics Media Accelerator (GMA) video chipset, which is too slow for most games or other graphics-intensive packages. Some low-voltage GMA chipsets are drastically underclocked, though, and are able to perform far better than the default settings suggest.
GMABooster takes advantage of this to increase your GMA clock rate by x2.4, without voltage changes or affecting system stability.
14. Disable acoustic mode
Some BIOSes contain a setting that makes your hard drive run more quietly. This sounds great, but unfortunately it negatively affects performance.
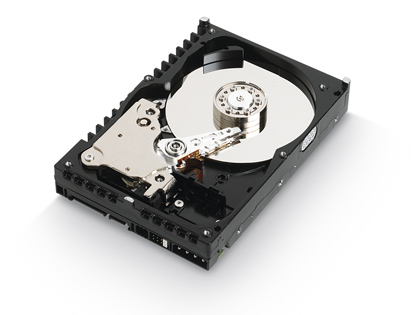
If you're more concerned with increasing your system's speed than reducing the amount of noise it makes, check your BIOS program for a setting like HDD Acoustic mode (it's in the Performance section on Dell desktops, for example) and make sure that it's set to 'Performance' rather than 'Quiet'.
15. Enlarge the cache
Windows Vista stores your hard drive writes in a cache. This helps it to write data more efficiently and improves performance. To run faster still, launch devmgmt.msc, expand the Disk Drives section, right-click your drive, select Properties | Policies and check Enable advanced performance.
Windows now uses a larger cache and writes from it less often, improving performance but also increasing the risk of data loss if the drive loses power.
16. Use ReadyBoost (or not)
Windows Vista can use high-speed USB flash drives to cache data and hopefully improve performance. To try it out, plug in a USB device and then confirm that you'd like to use it with ReadyBoost if you're asked. If you're not, go to Computer, right-click the device and select Properties.
If the feature can be used, there will be a ReadyBoost tab; click this, select Use this device, choose the space that you'd like to give to Windows and click OK.
Alternatively, if you have no interest in using ReadyBoost, turn it off to save a few system resources. To do this, launch services.msc, double-click ReadyBoost, click Stop and set Startup type to Disabled.
17. Avoid Wi-Fi interference
Poor wireless network performance is sometimes down to interference, perhaps because your neighbours are also running a Wi-Fi network on the same channel. To find out if this is happening, run a network detector like Inssider or Vistumbler to see what's going on.
If you find that your neighbours already have wireless kit working on channel 11 (a common default) then switch your kit to channel six, say, to see a real performance boost.
18. Try CompactFlash cards
They're more expensive and less portable than USB flash drives, but CompactFlash cards can be much faster to use. If your system has an internal reader (so not one connected via USB) then give one a go; we tested the SanDisk Extreme IV CompactFlash card and found that it delivered speeds of over 40MBps, more than twice what you'll see with many USB drives. It also worked with ReadyBoost on our PC and delivered a noticeable improvement in performance.
19. Reformat your USB drive
If you must stick with USB drives instead of switching to CompactFlash cards, make sure that they're formatted using the best filesystem. NTFS delivers the worst performance, so avoid it like the plague.
FAT32 is better, but if you only need to use the drive on Vista systems then use exFAT for the best speeds.
To reformat your USB drive, right-click on it, select Format and then choose either FAT32 or exFAT in the File System list. See TestFreaks for some benchmark figures.
20. Up the DRDY thingy
The BIOS DRDY (Device Ready) timing setting configures how quickly IDE or SATA devices will become available after they've completed their existing commands.
Changing this setting to its highest possible option (which is usually Optimise) will improve system performance a little, but it could also result in a crash or even data loss. As always with potentially dangerous tweaks, experiment with it at your own risk.