When you're used to the world of Windows or OS X, Linux can seem a little unforgiving.
Not only does command-line access hand over the complete keys to the manor to any unwitting user with access to the administrator's account, there's rarely a safety net should things go wrong.
Despite advances in most Linux desktops (where the ubiquitous Trashcan safely buffers deleted files), you get no such protection from most system specific configuration, installation and maintenance tools.
And while it's rare for anything to go wrong without your direct input, some accidents do happen, especially if you enjoy tinkering with the latest distro release each month.
But this being Linux, there's plenty you can do to dig yourself out of a hole, which is why it's always a good idea to have a repair-worthy distribution close to hand when performing configuration and installation tasks.
One of the best developments in recent years has been the Live CD. These offer a fully functional Linux installation that runs from an optical drive. If you've got enough memory, you can even install new packages to the RAM disk just as you would when completing a standard installation.
This makes a recent release of a Live CD-based installer like Ubuntu Jaunty the perfect system recovery tool. Not only does it include every package you might require, but because it runs from the optical drive rather than the hard drive, your data isn't touched and there's no chance files will be overwritten without direct input. It's the obvious place to start when you get stuck.
Sign up for breaking news, reviews, opinion, top tech deals, and more.
1. Booting Linux
Probably the most common problem is when the Linux boot menu disappears or gets corrupted. The most likely reason for this is that a shared Windows installation has re-stamped its authority over your disk's master boot record, overwriting the Grub boot loader with its own system launching code.
In these cases, you need to boot into a different Linux environment, either off a Live CD or from any other Linux booting media you can get hold of. The distribution you choose will also need to have Grub installed.
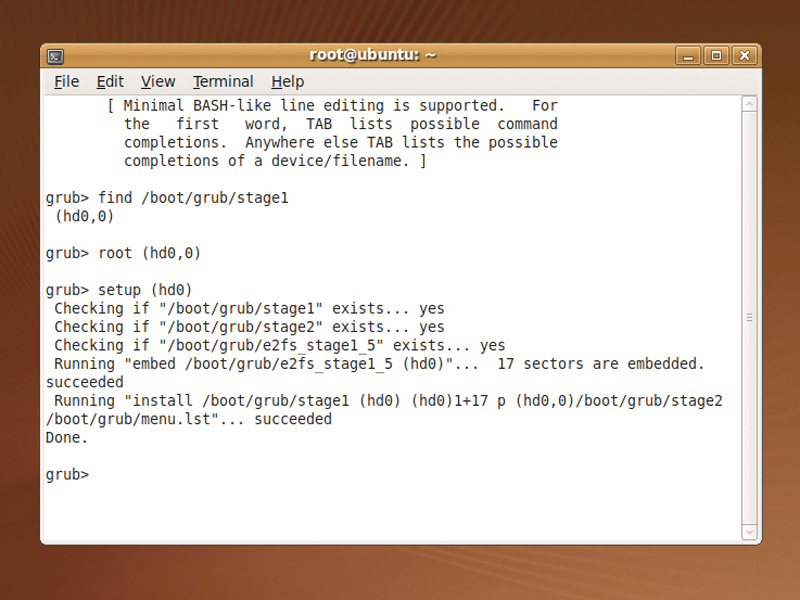
With Ubuntu, open the Terminal from the Accessories menu and type sudo grub. This will launch the boot loader with administrator privileges. From the 'grub' command prompt, type find/boot/grub/stage1. This Grub function searches every compatible drive attached to your system for the '/boot/grub/stage1' file, which is used to launch the operating system.

GETTING GRUBBY: The command line can seem daunting, but it's really not
When the file is detected, it'll output the drive and partition number of your lost installation using the format (hd1,0). Your output will look different, but it's the drive number followed by the partition number of the Linux partition that you're looking for.
Grub should only be installed on a single partition on a single drive, so you shouldn't find more than one version of the file. To restore the Grub bootloader to your drive, type root (hd1,0), swapping the drive and partition number with the output you found with the previous 'find' command. Then type setup (hd1), swapping 'hd1' for your drive number.
You should now find that your Linux partition and booting ability has been restored. The only potential problem is that this process could overwrite a Windows bootloader, and if Windows was installed after the original Grub installation, it won't launch from the boot menu.
2. Booting Windows
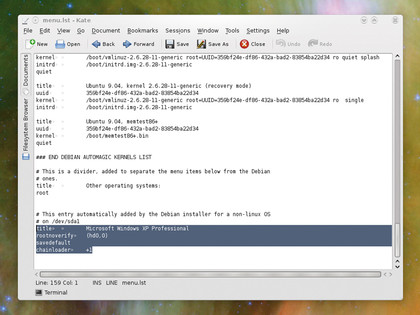
Fortunately, adding Windows to your Grub menu is easy enough, and it's straight forward to add any other OSes you want to boot from your system if you've got an example entry to work from. The key to the boot menu is a file called '/boot/grub/menu.lst', and if you open this in a text editor, you should see that the formatting is relatively easy to understand.
For instance, here's a typical entry for booting a Windows installation off the first partition of the drive:
title Microsoft Windows
root (hd0,1)
makeactive
chainloader +1
You can make this Windows boot entry the default selection by adding a line that has 'savedefault' as the only word.

PLAIN TEXT: The formatting of 'menu.lst' is fairly straight forward and easy to understand
Adding Linux entries isn't quite so easy, as you need to get the path to both the 'initrd.img' (RAM disk) and 'vmlinuz' (kernel) files correct, according to how they sit on the Linux filesystem. The best way is to copy and paste an existing entry and change the paths accordingly.
Older versions of Grub won't support newer filesystem types. ext4, for instance, is a major upgrade to the standard Linux filesystem and it needs a specially modified version of Grub to boot into it. This could cause a problem if you installed a new Linux distro using ext4 alongside an older one with its older version of Grub.
The only option in this case is to upgrade Grub, either manually or through a distribution that ships with the modified Grub, such as Ubuntu Jaunty.
- 1
- 2
Current page: Corrupt Windows and Linux boot menus
Next Page Restoring the MBR and fixing partition tables