


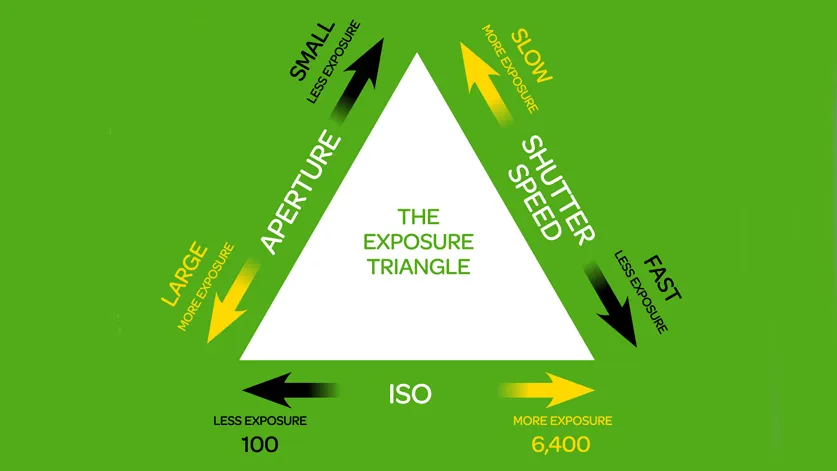
The Exposure Triangle sounds like the name of a complex spy novel, but in reality this is the term used for the three fundamental elements of exposure: aperture, shutter speed and ISO.
The Exposure Triangle explained
Creating a harmonious exposure using the aperture, shutter speed and ISO is a juggling act. As soon as you make a decision about one element, you'll need to compromise with another.
The trick to balancing The Exposure Triangle is to get all three elements working together so you get the results you want ,and not what the camera tells you you can have.
Because of that, it's really worth putting in the groundwork and getting to grips with the basics of shutter speed (how long the camera's sensor is exposed to the light), what an aperture is (how much light the lens lets in, which also affects depth of field) and ISO (the sensitivity level of the sensor). Once you know how to do this, there's nothing you can't do.
In addition to their role in exposure, the choice of aperture, shutter speed and ISO have a significant impact on the look and feel of your pictures.

Aperture, as we mentioned above, affects the depth of field, or how much of an image appears sharp. Shutter speed also affects image sharpness, with slower shutter speeds leading to blurred images - whether that's caused by the subject moving or the camera not being held still.

The choice of ISO enables you to use the optimum combination of aperture and shutter speed when the amount of light would normally prevent you from doing so. However, increasing the ISO also reduces the quality of your images.

Use the exposure triangle to decide how to adjust the exposure: the key is that when you increase the exposure for one element (a yellow arrow), you need to reduce it for one or both of the other elements (the grey arrows) in order to maintain the same exposure.
The camera can do this for you in Program, Aperture Priority or Shutter Priority, but it's something you'll need to consider when shooting in Manual mode.
Get the hang of this relationship, and you'll gain much more control over the look and feel of every image you capture.

It's also worth remembering that at one time, shutter speed and aperture were the only exposure variables you could change from one shot to the next as the ISO was set by the type of film you were using, but the introduction of digital cameras has made it possible to change ISO on the fly rather than unloading film or switching bodies.
Photographers now have more control over exposure than ever before. Now, let's take a look at some of the common questions new photographers have about exposure...
Understanding exposure in photography
Exposure - allowing light to hit the camera sensor to record an image - is measured in what's commonly referred to as 'stops', with each stop representing either double or half the level of exposure of the adjacent stop. Increase the exposure by one stop, and the camera sensor receives twice the level of exposure. Decrease it by one stop, and the exposure level is halved.
The three camera settings that give you control over the exposure - aperture, shutter speed and ISO - can each be measured in stops. For instance, a shutter speed of 1/50 sec is one stop slower than 1/100 sec, which means the sensor is exposed for twice as long. However, the same 1/50 sec shutter speed exposes the sensor for half the time of a shutter speed of 1/25 sec.
ISO is similarly clear-cut, with an ISO of 400 one stop more sensitive than ISO 200, but one stop less sensitive than ISO 800. The relationship between the range of apertures available on a lens is similar, but the numerical sequence is more confusing: the fact that f/5.6 is one stop smaller than f/4 but one stop larger than f/8 takes a bit of getting used to.
What's a correct exposure?
Once you activate the camera meter by half-pressing the shutter release, the camera will suggest an exposure based on the brightness of the area being metered. This is usually expressed in the order of a shutter speed value at a given aperture and ISO - say 1/60 sec at f/8, ISO 200.
In the camera's automatic and scene modes, that's about as far as it goes. Just shoot. The semi-automatic exposure modes - Aperture Priority, Shutter Priority and Program - give you more control over how you expose the shot, each in a different way; while Manual mode gives you full responsibility over aperture, shutter speed and ISO.

Although there might be a preferable exposure, there are a number of ways in which to achieve it. It's all about balance: if you increase one of the three settings that control the exposure (aperture, shutter speed or ISO) then one or both of the other settings have to decrease by an equivalent total to maintain the same overall level of exposure.
For example, an exposure of 1/25 sec at f/16, ISO 100 is equivalent to an exposure of 1/400 sec at f/2.8, ISO 100. Because the shutter speed has been reduced by four stops (1/25 - 1/50 - 1/100 - 1/200 - 1/400), which means less light is being captured, the aperture has to increase in size by four stops (f/16 - f/11 - f/8 - f/5.6 - f/2.8) to allow more light in - otherwise the picture would be four stops darker.
Which combination you choose is down to the look you want to achieve: do you want a large depth of field or a shallow one? Do you want moving objects to be razor-sharp or have motion blur?
That's a lot to think about...
Don't panic! If you choose to shoot in one of the semi-automatic modes, the camera does most of the donkey work for you. Once you set an aperture in Aperture Priority mode, for example, the shutter speed will be set automatically. If you decide to change the aperture, the camera will adjust the shutter speed accordingly to maintain the same exposure.
It's a similar story with Shutter Priority mode: you set the shutter speed, and the camera attempts to match this with an appropriate aperture. You can even use the Auto ISO option to let the camera handle that choice of sensitivity too. In Program mode, you can simply shift the combination of aperture and shutter speed with a spin of the camera's control dial.
Of course, all of these adjustments rely on the camera having achieved the optimum exposure reading to begin with - and, as we learned last issue, this doesn't always happen. This is where exposure compensation plays a part.
Exposure compensation

Exposure compensation can be applied in Aperture Priority, Shutter Priority or Program mode. It's also measured in stops: the exposure indicator scale you see in the viewfinder or on your camera's rear display has stops clearly marked on it. You can usually increase or decrease the exposure by up to five stops.
You'll see that there are smaller marks on the scale, too. These represent half-stops or third-stops, depending on how your camera is set up. Although exposure can be shifted in full stops, you get much finer control by adjusting the exposure in these smaller increments.

