Using Linux to map routes and walks
Map your trails and share them with the world

As a mountaineering and cycling enthusiast, I use my GPS to record my tracks and my digital camera to record the views.
To share my experiences, I wanted to be able to show my tracks on a map in a web browser. Like with Google Maps, I wanted to link my photos to a Point of Interest (POI) on the map and pop up the photo when the user clicks on the POI.
The whole process involves using a disparate collection of open source tools - first to extract tracks from the GPS, then to geo-tag the photos using the GPS data, and finally to display both the track and the photos on a map using the OpenLayers JavaScript library.
Download data

The initial step is getting the data from your GPS. I have a Garmin eTrex, which has a serial port. However, many newer devices come with USB ports.
If your GPS unit has a serial port, you will probably need to get a USB to serial cable. These are widely available on eBay.
We shall use GPSBabel to download the tracks and waypoints from the GPS. GPSBabel is the Swiss Army knife of the GPS world. It converts waypoints, tracks and routes between many different formats.
If you're using a serial to USB converter, when you plug it in to your computer and run dmesg you should get output similar to:
Sign up for breaking news, reviews, opinion, top tech deals, and more.
[ 5753.489759] usb 5-1: pl2303 converter now attached to ttyUSB0
[ 5753.489786] usbcore: registered new interface driver pl2303
[ 5753.489789] pl2303: Prolific PL2303 USB to serial adaptor driver
If you're using a Garmin GPS, you will get the best results by downloading the raw tracklog. Saved tracklogs are stripped of much information, including time data. If you want to geotag your photos, you need the time data!
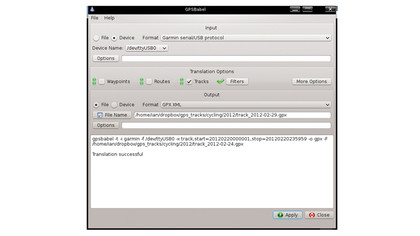
It's best to save your data in GPX format, as this is the most widely supported GPS data format. GPSBabel has a GUI front-end, which is written in Qt. The GUI builds a command line, which is passed to GPSBabel. The command is displayed in the GUI, so once you're familiar with the program you can use the command line to download tracks.
Many recent GPS devices have USB ports and will appear as a mass storage device, so you can download the tracklog using a file manager.
Specify a range
I clear the tracklog from my GPS only when it's getting full. However, I don't really want to download the whole log every time I have been for a walk or bike ride. GPSBabel lets you specify a whole range of filters, including time ranges, to specify what data is downloaded from your GPS.
The following command downloads the tracklog for the specified day and saves it as a GPX file:
gpsbabel -t -i garmin -f /dev/ttyUSB0 -x track,s tart=20120212000001,stop=20120212235959 -o gpx track.gpx
You are a geek, so your camera's clock agrees with your GPS clock? Err… I hate to admit this, but mine doesn't.
The clock in your GPS is synchronised with the GPS satellite, so should always be correct. Almost all digital cameras store information about when a photograph was created in EXIF tags. The relevant tags are 'DateTimeOriginal', 'CreateDate' and 'TimeCreated'. So what you need to do is update these tags using the difference between the camera's time and the GPS time.
We are going to use Phil Harvey's exiftool to correct the EXIF information. In my case, the camera's clock was 1hr 21 minutes ahead of the GPS clock, so I needed to subtract 1 hr 21 minutes from the time in EXIF tags. Using exiftool, the command is:
exiftool "-DateTimeOriginal-=0:00:00 01:21:0" \
"-CreateDate-=0:00:00 01:21:0" \
"-TimeCreated-=0:00:00 01:21:0" *.JPG
Note the - in front of the equals sign, which subtracts the time offset. Before updating your EXIF tags, you will probably want to create a backup copy of your photos in case you make a mistake. You can also create a copy of the EXIF data to a text file for all the photos in the current directory by using the following command: