Windows 7: the complete guide
Get to know the essentials of Windows 7
Set up the perfect backup plan
Protect your files, settings, programs and Windows itself from being lost forever with our essential backup guide

The importance of backing up can't be overstated, which is why Windows provides all the tools you need to back up your documents, photos, emails and other files.
All you need to provide is a suitable backup device – an external USB hard drive is the best choice here (try to pick one that's larger than your computer's hard drive).
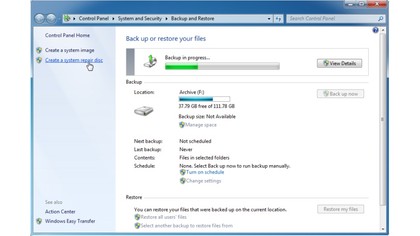
Launch Windows Backup by clicking 'Start', typing backup into the Search box and then clicking 'Backup and Restore'. Now click 'Set up backup' to get started.
When the wizard appears, select your backup drive and click 'Next' to choose what to back up.
The recommended choice is to let Windows choose what to back up. This should cover most – if not all – of your data and will also make a complete backup of your hard drive known as a system image for emergency purposes.
Personalise
If you have files stored elsewhere on your system, or you don't want to take a system image, select 'Let me choose' and click 'Next' to make your choices from those available.
Sign up for breaking news, reviews, opinion, top tech deals, and more.
The final choice is to choose how often your backup is updated – the default setting is weekly on a Sunday. Click 'Change schedule' to choose a different day and time, or pick a different schedule (this can be daily or monthly).
Once done, click 'Save settings and run backup' and let Windows start protecting your files. While you wait for the backup to complete, click 'Create a system repair disc' and follow the prompts to create a bootable rescue disc using a blank CD or DVD.
In the event of a system failure, your files should now be safely backed up.
Get a faster, smoother computer
Keep your computer running fast and smooth by managing both your hard drive and its contents efficiently
The key to maintaining your PC's performance is looking after your hard drive: both the drive itself and its contents.
Start by performing regular disk checks on the drive.
Click 'Start > Computer', right-click your hard drive and choose 'Properties'. Switch to the Tools tab and click 'Check now'. Tick both boxes and click 'Start', followed by 'Schedule disk check' when prompted.
Restart your PC to have the drive verified and – if problems are found – fixed.
Next, click 'Start', type defrag and click 'Disk Defragmenter'. If you're running a solid-state drive, make sure you disable this tool.
Otherwise, set it to run at a time when your PC is on, but you're not using it. This will help keep your files in order and keep Windows performance at its maximum.
Next, you can free some much needed space from your hard drive.
First, open the Properties settings for your drive again (see above), but this time click the 'Disk cleanup' button.
"The key to maintaining your computer's performance is looking after your hard drive"
After a short scan, you'll be shown how much space can be reclaimed. Not all available options are ticked by default.
If you want to go deeper, click the 'Clean up system files' button. You may free up several gigabytes of space this way, or just a few hundred megabytes.
Switch to the More Options tab to find two more options to try.
The first is a simple shortcut to the Programs and Features Control Panel (see Remove unwanted programs, below), while the second will wipe all Restore points except the most recent and should increase your free space dramatically.
Current page: Windows 7: backup and personalization
Prev Page Windows 7: troubleshooting Next Page Windows 7: everything else