3. Adding functionality
There's obviously a lot more to Windows 7 than the refined visuals, but some of the new functions are closely tied to its desktop appearance, and you can modify KDE to take on similar characteristics.
One thing you notice in Windows 7 is its lack of menus. Those that do appear tend to be beneath the toolbar icons and are a mixture of icons and dropdown text. You can emulate this in KDE by pressing [Ctrl]+[M] to remove the menu bar, but this will stop you getting to the functions you need.

The solution is to drag those functions into the toolbar using the 'Configure Toolbars' function in the right-click menu of any KDE toolbar. This lists most of the options within the menu, and you can drag them onto a current toolbar or create a new one to copy the menu's functionality.
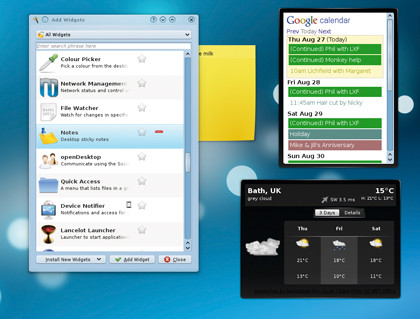
Another aspect of Windows 7 that combines the visual with the functional is its use of desktop widgets. These have become an integral part of the desktop personalisation process, and KDE 4 has made the same leap to making them part of the standard desktop.
KDE's widgets are called Plasmoids. Even the desktop window that holds your files is a special kind of Plasmoid, and this can be forced to use the entire desktop with the Rescale widget by dragging it to fill the whole screen when Plasmoids are unlocked. Alternatively, get rid of it completely by clicking on the '-' symbol in the Plasmoid list.
4. Desktop widgets
Sign up for breaking news, reviews, opinion, top tech deals, and more.
A default installation will include tools for updating news, as well as the usual array of widgets for things such as weather and system performance. There are dozens more you can install by searching for plasmoid in your distribution's package manager.
If you're not too keen on KDE's offerings, you can install Google's Gadget equivalents, as these come as both GTK+ versions for Gnome and Qt versions for KDE users, too.

Another new feature in Windows 7 that KDE can emulate is its ability to snap windows into various divisions of the desktop. But for this to work, you need to be using KDE's window manager rather than the Emerald window manager that we're using for the Windows-like borders.
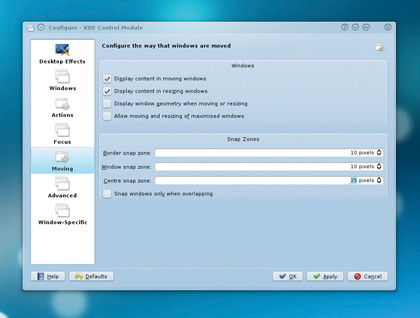
If you do stick with KDE's manager, the window snapping options can be found by right-clicking on the window border, selecting 'Configure Window Behaviour' and clicking on the 'Moving' button in the list.
You need to enable the Centre snap zone and give this a value of around 25 pixels in order to approximate the handy new snapping functionality of Windows 7.
5. Desktop panel
The final part of the KDE 4 desktop that can be manipulated to behave more like Windows 7 is the desktop panel sitting at the bottom of the screen. The default 4.3 look for this is called Air, which is light-grey and low-contrast (in fact, it feels somewhat similar to Mac OS X).
The default Windows 7 theme is similar to the glassy Aero look of Vista. You can change the KDE theme for the panel by right-clicking on the desktop and selecting 'Desktop Settings'. The appearance of the panel is changed by choosing a theme from the dropdown Desktop Theme menu, and we've found 'Oxygen' to be the closest match.

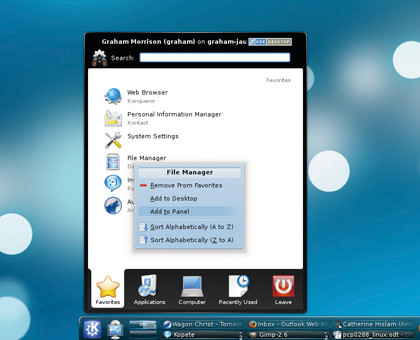
You can also pin applications to the panel in the same way that you can with Windows 7. From the Launch menu, right-click on the application you want quick access to and select 'Add to Panel'. Its icon will then appear.
You can rearrange the panel by clicking on the cashew icon on its right end. If the cashew symbol isn't there, click on the same symbol in the top right corner of your screen and click on 'Unlock'.
You'll then be able to drag, resize and arrange icons and sections of the panel just as you would a sentence in a word processor.
- 1
- 2
Current page: Windows 7 functionality and desktop panel
Prev Page Colour scheme and window decoration