How to build your own Kodi media streaming box
Kodi and Pi
Now connect your micro SD card to your PC using a suitable card reader and use the $ dmesg | tail command or Disks utility to identify its mountpoint.
Once done, type the following commands – which assume your drive is sdc and that your image file is in the Downloads folder.
$ umount /dev/sdc1
$ cd Downloads
$ sudo dd if=OpenELEC-RPi.arm-6.0.1.img of=/dev/sdc bs=4M
You'll want to use sudo dd if=OpenELEC-RPi2.arm-6.0.1.img of=/dev/sdc bs=4M if installing OpenELEC on the Raspberry Pi 2. Wait while the image is written to your micro SD card – this may take a while, and there's no progress bar, so be patient (time for a cup of tea, perhaps?).
Once complete, unmount your drive and then eject it. Insert the micro SD card into the Pi, connect it up to monitor and keyboard and switch it on. You should immediately see a green light flash, and the screen come on.
Sign up for breaking news, reviews, opinion, top tech deals, and more.
The OpenELEC splash screen will appear, at which point it'll tell you it's resizing the card – it's basically creating a data partition on which you can store media locally if you wish. After a second reboot, you'll eventually find yourself presented with an initial setup wizard for Kodi itself.
If you've not got a mouse plugged in, use Tab or the cursor keys to navigate between options, and Enter to select them. Start by reviewing the hostname – OpenELEC – and changing it if you're going to run a media server and the name isn't obvious enough already.
Next, connect to your Wi-Fi network by selecting it from the list and entering your passphrase. You can then add support for remote SSH access as well as Samba.

SSH access
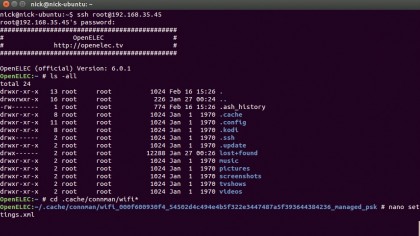
Switch on SSH and you have access to the underlying Linux installation via the Terminal (use ssh root@192.168.x.y substituting 192.168.x.y with your OpenELEC device's IP address. The password is 'openelec').
The main purpose for doing this is to configure OpenELEC without having to dive into System > OpenELEC. Start by typing ls-all and hitting Enter – you'll see the core folders are hidden by default.
Basic commands are supported – such as ifconfig for checking your network settings, and top to see current CPU and memory usage. There's not an awful lot you can do here – the idea is to give you access to useful tools only.
Network settings in OpenELEC are controlled by the connman daemon, eg –to change these, navigate to storage/.cache/conman where you'll find a lengthy folder name beginning wifi_.
Enter this folder using cd wifi* and then type nano settings to gain access. If you'd like to set a static IP address from here, change the following lines:
IPv4.method=manual
Then add the following three lines beneath IPv6.privacy=disabled:
IPv4.netmask_prefixlen=24
IPv4.local_address=192.168.x.y
IPv4.gateway=192.168.x.z
Replace 192.168.x.y with your chosen IP address, and 192.168.x.z with your router's IP address (get this using the ifconfig ). Save your changes and reboot.

You can now control Kodi remotely if you wish via your web browser: type 192.168.x.y:80 into your browser (substituting 192.168.x.y with your Pi's IP address). Switch to the Remote tab and you'll find a handy point-and-click on-screen remote to use – what isn't so obvious is that your keyboard now controls Kodi too, as if it were plugged into your Raspberry Pi directly.
You'll also see tabs for movies, TV Shows and music – once you've populated your media libraries you'll be able to browse and set up content to play from here. This approach relies on your PC or laptop being in line of sight of your TV – if that's not practical, press your tablet or phone into service as a remote control instead.
Search the Google Play store for Kore (Android) or the App Store for Official Kodi Remote (iOS) and you'll find both apps will easily find your Raspberry Pi and let you control it via a remote-like interface.
By default, OpenELEC uses DHCP to connect to your local network – if your Raspberry Pi's local IP address changes, it can be hard to track it down in your web browser for remote configuration.
Change this by choosing System > OpenELEC > Connections, selecting your connection and hitting Enter. Choose 'Edit' from the list and pick IPv4 to assign a static IP address you'll be able to use to always access Kodi in future.
You can simply stick with the currently assigned address, or pick another. Make sure you select 'Save' to enable the change.
Current page: Build, install and configure
Prev Page Why choose Kodi? Next Page Set up libraries in Kodi