How to use a Raspberry Pi with the Internet of Things
IoT programming
Sign up for breaking news, reviews, opinion, top tech deals, and more.
You are now subscribed
Your newsletter sign-up was successful
In this project we’re going to use the Sense HAT in conjunction with the Raspberry Pi’s camera module to create a script that takes pictures whenever you move the Sense HAT’s joystick.
This isn’t the most practical use of both HAT and camera, but it’s designed to show you what you can do.
We’ve already added the Sense HAT libraries, now we need to open a shell in Wyliodrin STUDIO to install the Raspberry Pi Camera’s Python libraries, plus enable the camera itself:
$ sudo apt-get update
$ sudo apt-get install python-picamera
$ sudo raspi-config
Scroll down and select ‘6. Enable camera’, select Enable followed by Finish then reboot when prompted. You’ll need to re-connect to the Raspberry Pi when you’re done.
We’re going to code this project in Python—there’s no direct support for the Sense HAT in Visual Programming, so instead we’re going to cannibalise code from other sources.
First, click the folder button at the top of the Wyliodrin window. Click ‘Create new Application’, give it a suitable name and leave ‘Python’ selected as the language and click ‘Create’.
The project will appear in the Projects window—click it to open it. You’ll see an example script is already present. Click the play button and you’ll see three lines appear in the console:
Sign up for breaking news, reviews, opinion, top tech deals, and more.
python.main.py
Hello
Project exit with error 0
(The final line indicates the project has successfully concluded.) Now select all the code in the project window and hit ‘Delete’ to remove it.
Now make your own project by typing the following lines of code to call the required Python libraries:
from sense_hat import SenseHat
from time import sleep
import picamera
The next few lines create variables we’ll use:
sense = SenseHat()
event = sense.stick.wait_for_event()
camera = picamera.PiCamera()
The following line waits until joystick movement is detected:
event = sense.stick.wait_for_event()And these final lines of code take the photo:
camera.start_preview()
sleep(2)
camera.capture('/home/pi/test.jpg')
As you type, you’ll notice Wyliodrin offers up autosuggestions to speed up data entry—press Tab when a matching one appears to select it. Once it’s complete, verify your Raspberry Pi is connected and click the play button.
You should see python main.py appear in the console, indicating the script is now running. If you press or move the joystick on the back of your Sense HAT, the camera will launch into life—if your Raspberry Pi is hooked up to a screen you’ll see the camera preview appear and two seconds later the image will be snapped.
At this point Project exit with error 0 should appear in the Wyliodrin console indicating the script has successfully completed.
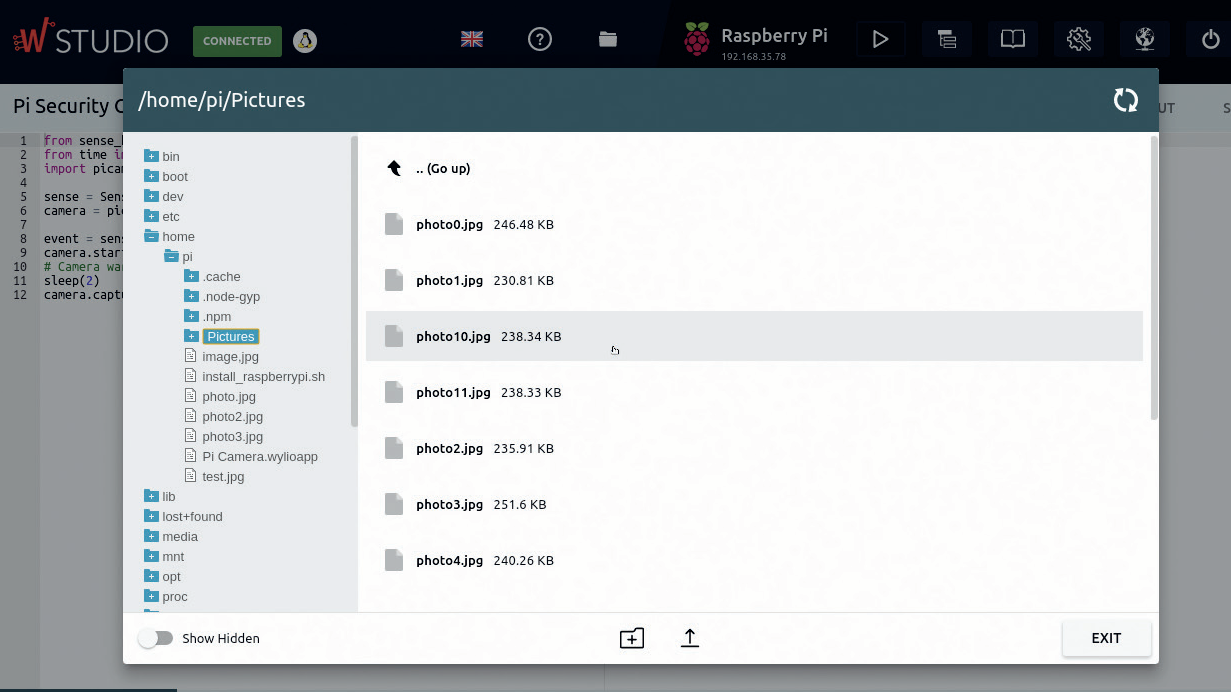
Want to verify this? Click the File Manager button and navigate to the home/pi folder where you should see a test.jpg file is now present.
Click this and you’ll be prompted to download it to your own PC where you can review it.
Congratulations, you’ve just completed your first project. This isn’t something we’ve coded from scratch; instead we’ve plundered the relevant APIs (https://pythonhosted.org/sense-hat/api and http://picamera.readthedocs.io/ respectively) for code we’ve then adapted.
And that’s the beauty of Python, its code is logical enough to make it easy to get started with programming from scratch. Have a good read through and you’ll see ways in which you can improve or adapt the script further—e.g. set a specific resolution for the picture or capture video instead of a photo.
By default, your code is stored on your PC, which means you need to manually run it from within Wyliodrin STUDIO.
That’s fine during the testing process, but what if you want to be able to run it direct from your Raspberry Pi?
One solution is to open the Projects window, then click ‘Export ‘next to the project you wish to export.
This allows you to save it as a standalone file with a .wylioapp extension, which you can then transfer to your Raspberry Pi via File Explorer—the problem is, you’ll need to install Wyliodrin STUDIO on your Pi (see the official guide for more info) in order to run it – when connecting, choose ‘Chrome (Local Computer)’ to do so.
A far easier option – particularly if you’ve completed your project – is to simply copy and paste the Python code into your text editor, then save it with a .py extension.
This can then be transferred to your Raspberry Pi and run either via Python like so:
$ python script.py
Or you can make the file executable and run it directly:
$ chmod +x script.py
$ ./script.py
Note: There’s no direct link between Wyliodrin in your browser and Wyliodrin STUDIO—if you want to transfer a Python script between them, the simplest solution is to once again copy and paste the actual code between them.
Visual programming
Wyliodrin makes programming in Python as straightforward as can be, but there’s an even easier way to program called visual programming, which works by dragging a series of code blocks into place, then tweaking their variables to put together a fully formed piece of Python without knowing any Python commands.
Sadly, support for the Raspberry Pi is limited to direct interaction with the GPIO pins (this doesn’t work with the Sense HAT because it communicates using the I2C protocol, which isn’t supported) as well as basic commands for the camera.
Nevertheless, the step-by-step guide (right) reveals how visual programming works by building a very simple project that will use the Raspberry Pi camera to take a series of photos in succession.
To start, click the Projects folder button and click ‘Create new application’. Give your project a title, then click the Language drop-down menu. Scroll up to reveal Visual at the top.
Select this to use visual programming to create your new project and click ‘Create’. It’ll appear in the Projects window, so click its icon to open it in the Application tab of Wyliodrin STUDIO.
You’ll see a couple of blocks are in place—click ‘Show code’ on the right, and the Python code that these blocks represent will be shown. Click each block in turn and press ‘Delete’ to remove them.
Now the screen is clear, follow the step-by-step guide (again, see right) to put the building blocks for your project in place. Once done, run the project and pose for those photos—use Wyliodrin STUDIO’s File Explorer to download them from your Raspberry Pi to your PC for reviewing.
Build your project with visual programming
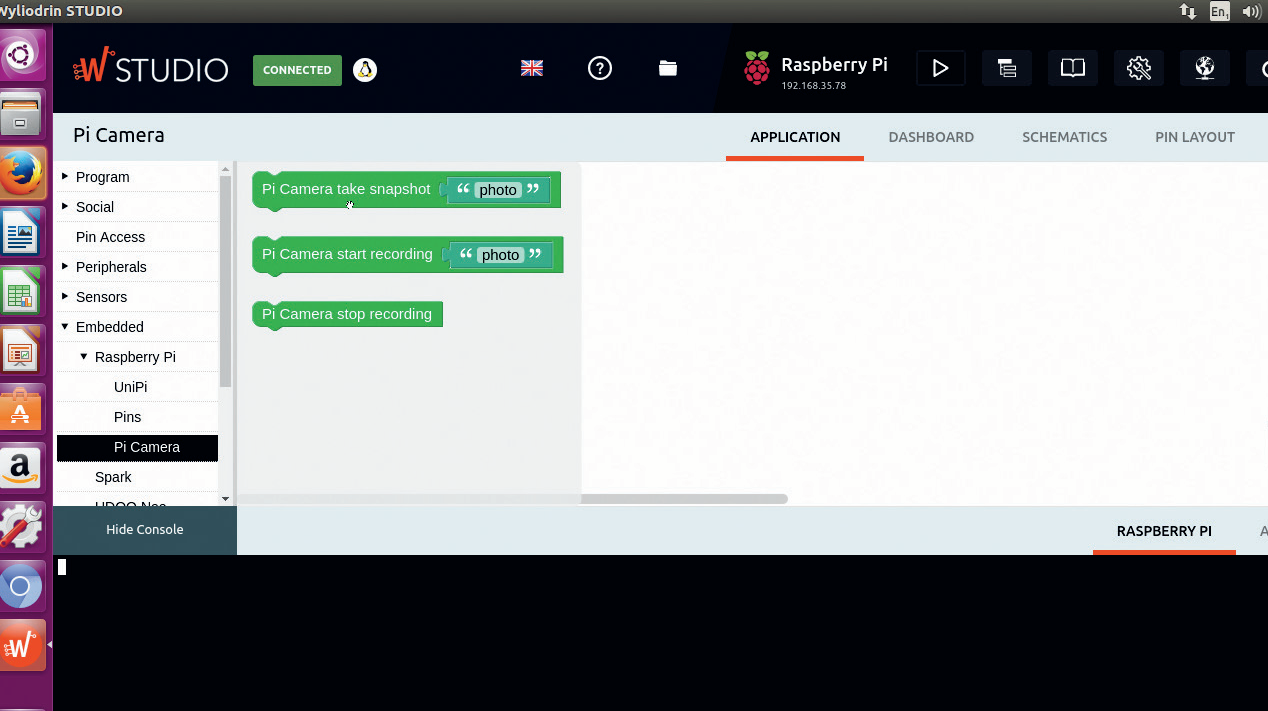
1. Add a camera block
Visual programming’s building blocks are organised into sections on the left: ‘Expand Embedded’ followed by ‘Raspberry Pi’ and click ‘Pi Camera’.
A pop-up menu will appear revealing three available building blocks. We want the first block, so drag this out into the middle of the screen. Click the ‘Show code’ tab on the right to reveal the underlying Python code.
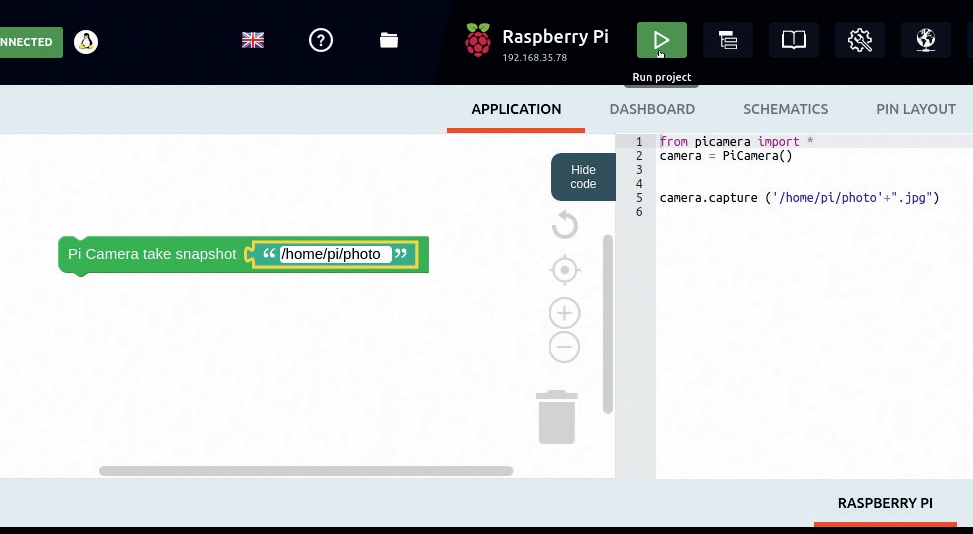
2. Modify the code block
You’ll see the block consists of two elements: the command, and a snippet of text. You might be tempted to click Play, but the code doesn’t work in its present form; you need to click inside the string marked ‘photo’ and change it to a path – for example, /home/pi/ photo.
Once done, click the play icon, then use File Explorer to verify the photo’s been taken.
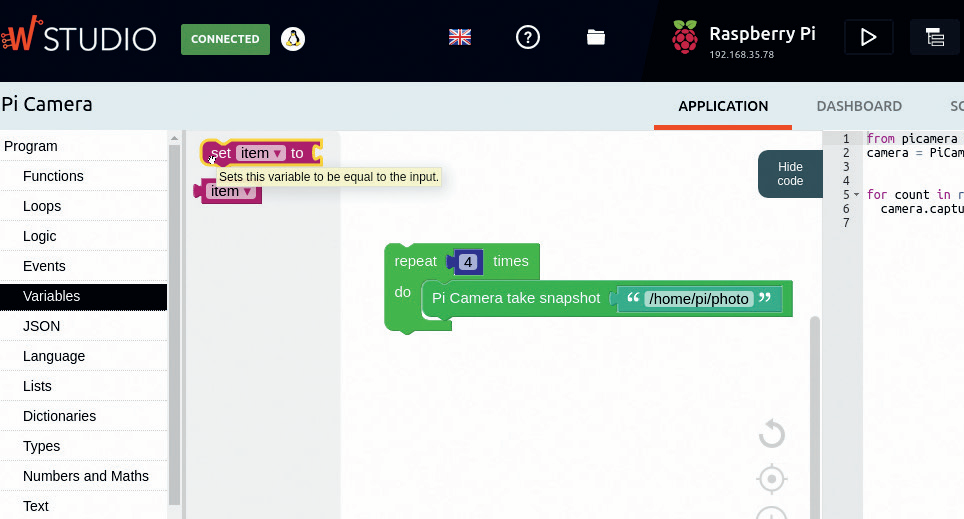
3. Add a loop
We’re going to add a loop to the script, so it takes four photos (photo1.jpg, photo2.jpg and so on), each one five seconds apart.
Start by selecting Program > Loops and dragging the ‘Repeat 10 times’ block on top of the original block to surround it, clicking inside the 10 to reduce the number. Choose Programs > Variables and drag ‘set item to’ above the Repeat block.
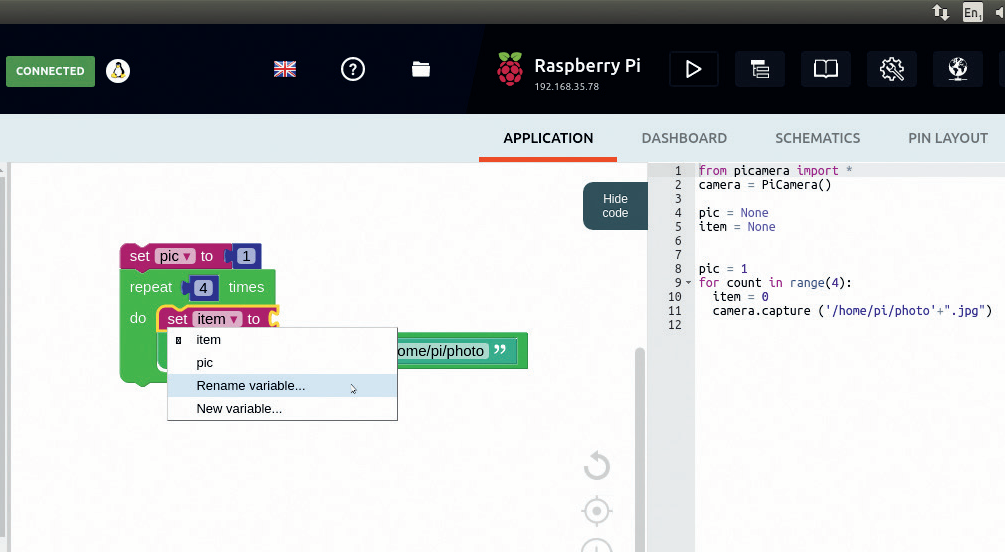
4. Set variables
Click ‘item’ and choose ‘Rename variable’. Change its name to ‘pic’. Select Programs > Numbers and Maths and drag the top number so that it clicks into place to the right of ‘set pic to’. Change it to 1.
Now drag another ‘set item to’ variable block so it sits above ‘Pi Camera takes snapshot’ inside the repeat loop variable. Rename the variable to ‘photo’.
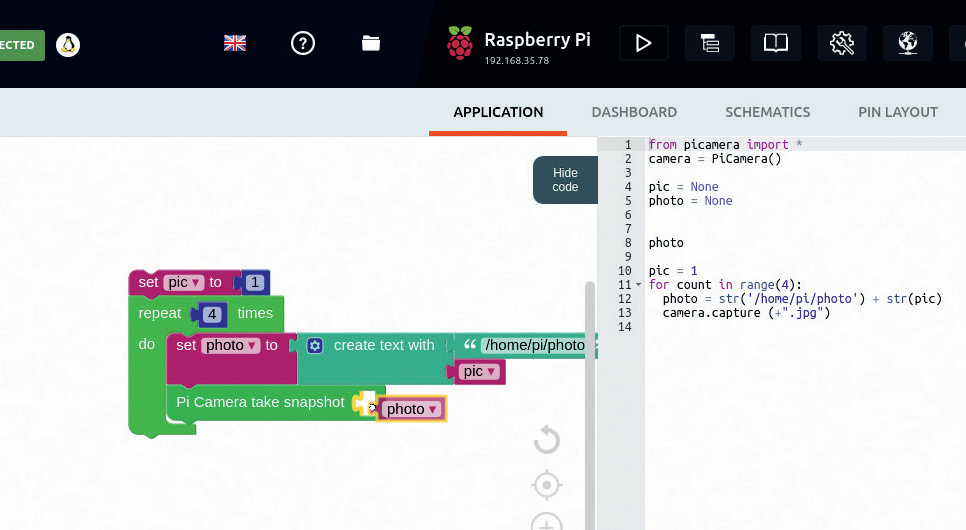
5. Complete the filename variable
Expand Program > Text and drag ‘create text with’ to attach it to the ‘set photo to’ block. It has two inputs—drag the string from the ‘Pi Camera takes snapshot’ into the top block, then go to Program > Variables and drag the ‘pic’ variable into place underneath the string variable. Finally, drag the ‘photo’ variable from Program > Variables into ‘Pi Camera takes snapshot’.
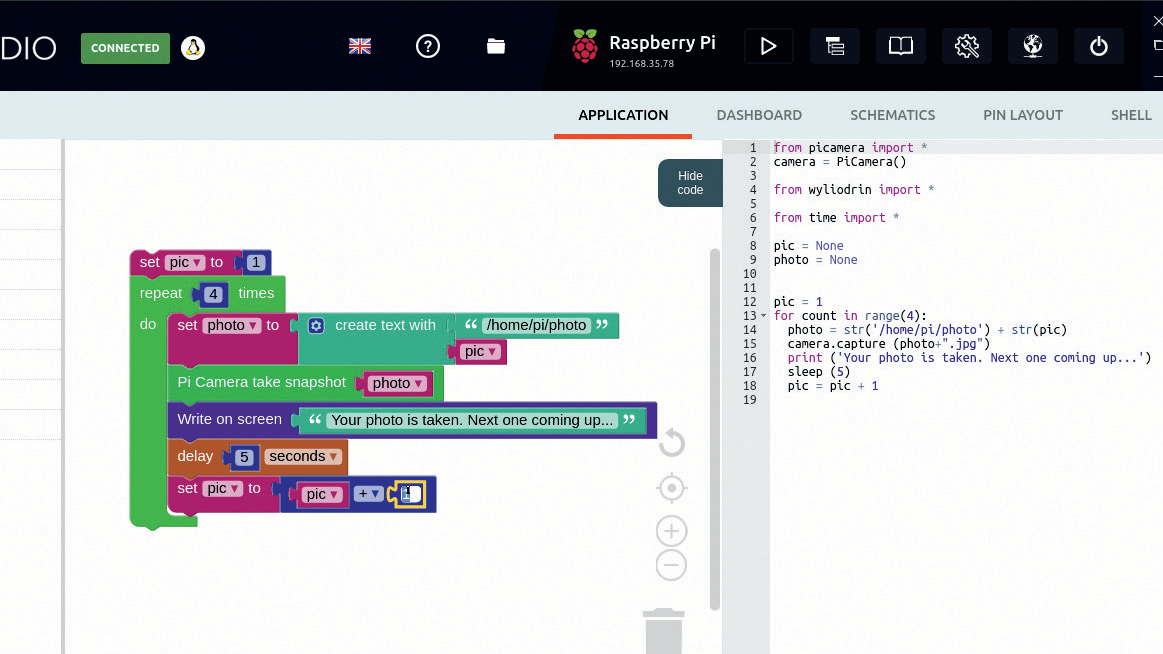
6. Finishing touches
Use Program > Screen and Keyboard to provide some feedback when a photo is taken, then insert a delay of five seconds from Program > Timing.
Now add ‘set photo to’ from Program > Variables and attach the ‘+’ block from Program > Numbers and Maths. Drag the pic variable into the left-hand input, and drag the number block into the other, setting it to 1.
- Enjoyed this article? Expand your knowledge of Linux, get more from your code, and discover the latest open source developments inside Linux Format. Read our sampler today and take advantage of the offer inside.