How to change your mouse cursor
Picking a new cursor for your mouse is a great way to personalise Windows
Sign up for breaking news, reviews, opinion, top tech deals, and more.
You are now subscribed
Your newsletter sign-up was successful
There are a huge number of ways to customize the look and feel of your laptop or computer so you can really make the operating system feel like your own. From simple things such as changing the desktop background image to choosing a new color scheme that affects all apps and windows, there is certainly no shortage of ways to stamp your mark on your computer.
One potential change that is often overlooked is selecting a new look for your mouse cursor. There is no need to stick with the same boring white arrow that everyone else has - you can opt for something much more interesting. But picking new mouse cursors can be about much more than just aesthetics; there are also choices you can make that will make your mouse easier to use and your cursor easier to see.
In our guide below, we've included instructions for how to customize default cursors on both Windows and macOS, as well as how to import your own custom cursors from your computer on Windows.
Step by step guide for how to change your mouse cursor
- Choose a new cursor theme
- Adjust cursor size
- Change cursor visibility settings
Tools and requirements
- Windows 10 / 11 or the latest macOS update
- (Optional) a custom mouse cursor
Step by step guide (Windows)
1. Accessing cursor settings
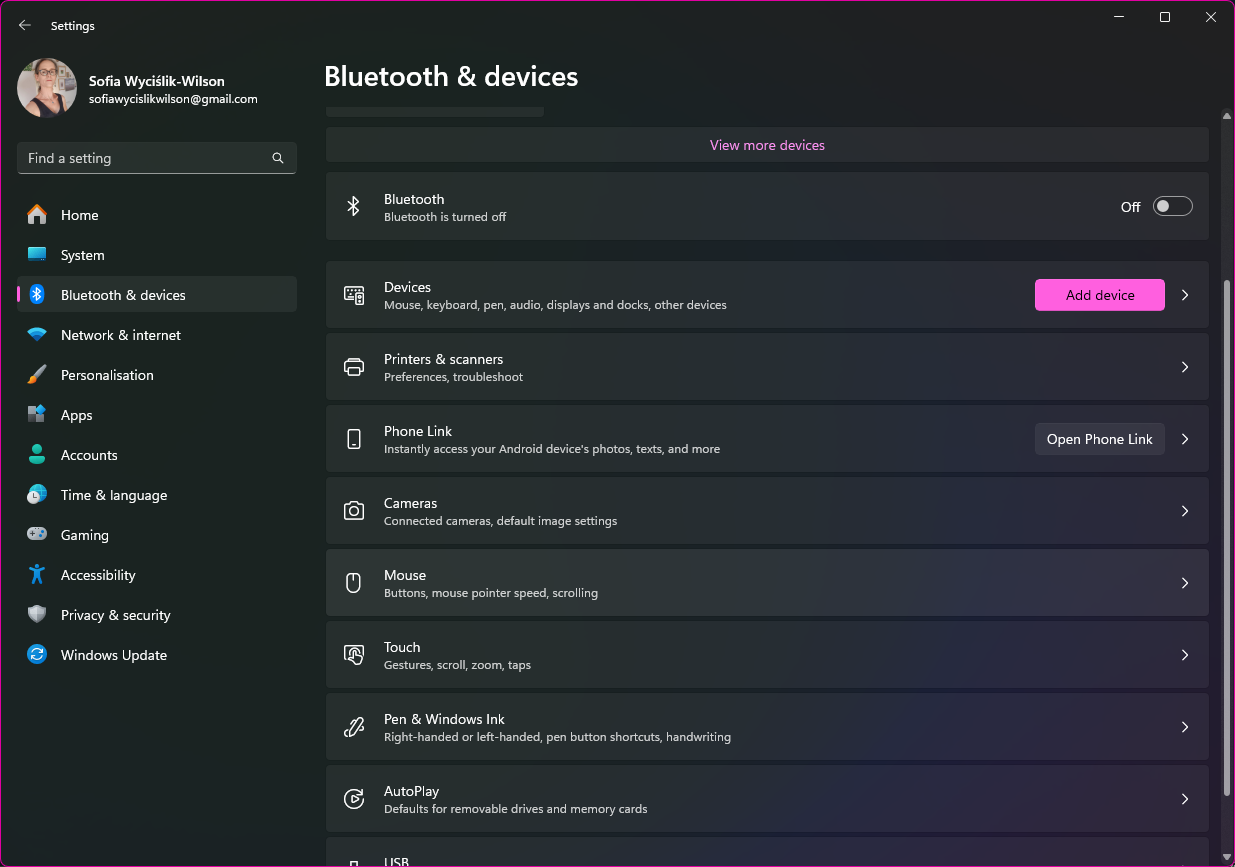
First off, head to your Settings app via the taskbar or Start menu. You can also use the keyboard shortcut Windows + I. Click the Bluetooth devices section in the list in the left-hand pane and then click the Mouse section to the right. You can jump straight to this section by searching for 'mouse' from the Start menu and clicking the Mouse settings link.
From here, you can both edit the default cursor and add a custom one; we'll start with tips for the former, and round off with customization in our last step.
2. Changing default mouse pointer options
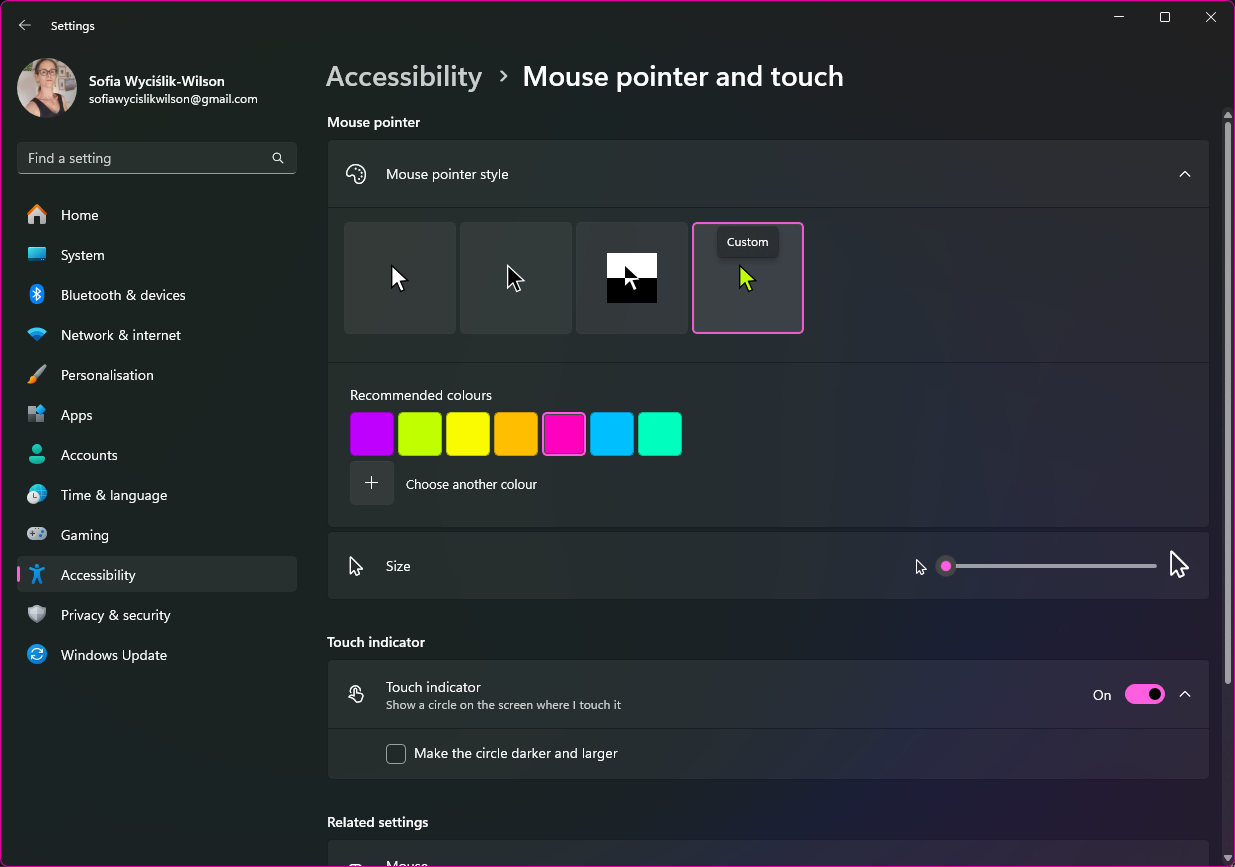
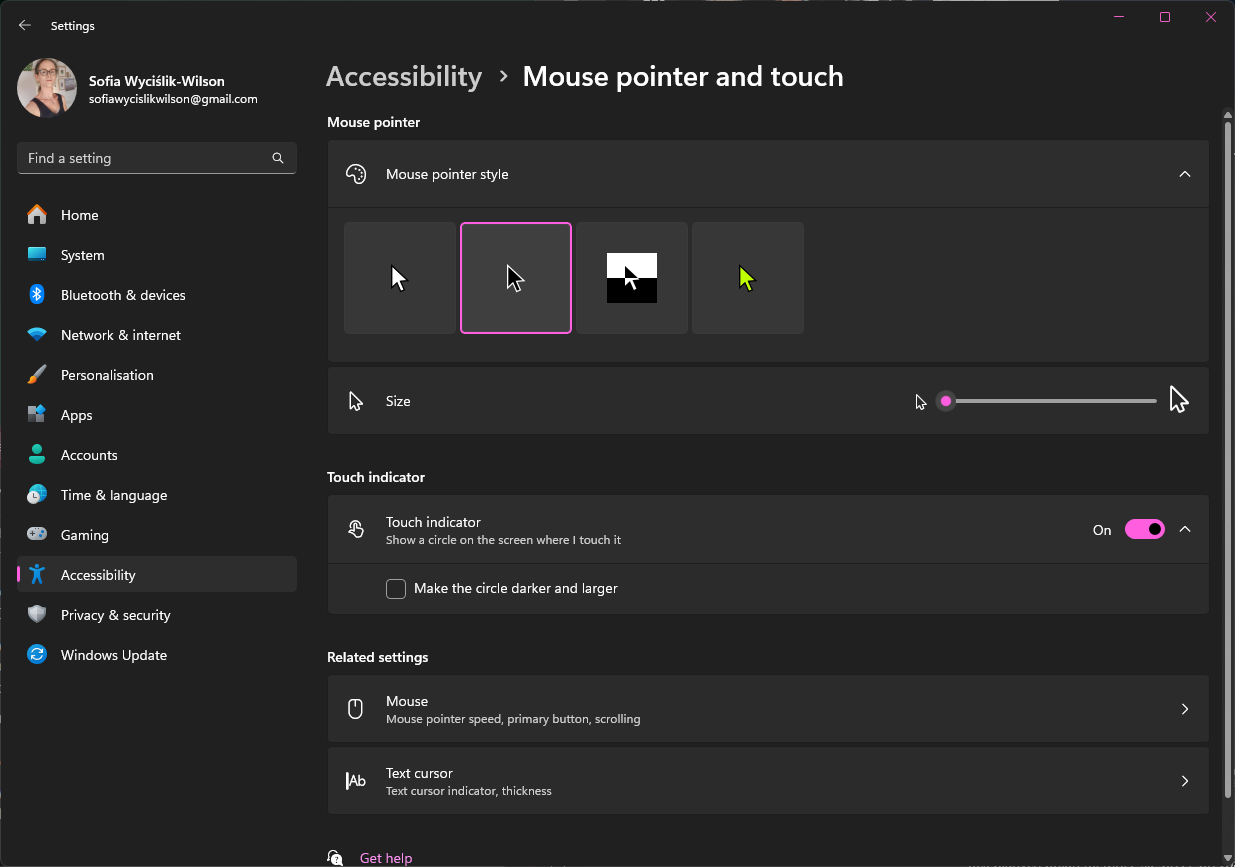
Look for the Related settings section of Mouse options and click the Mouse pointer heading. There are four basic styles to choose from - white (which should be selected by default) black, contrast (which means the cursor will change color according to what is in the background), and Custom. If you select Custom (indicated with a green cursor) you will then be able to use the color popup that appears to select the coloring you'd like to use.
3. Changing cursor size
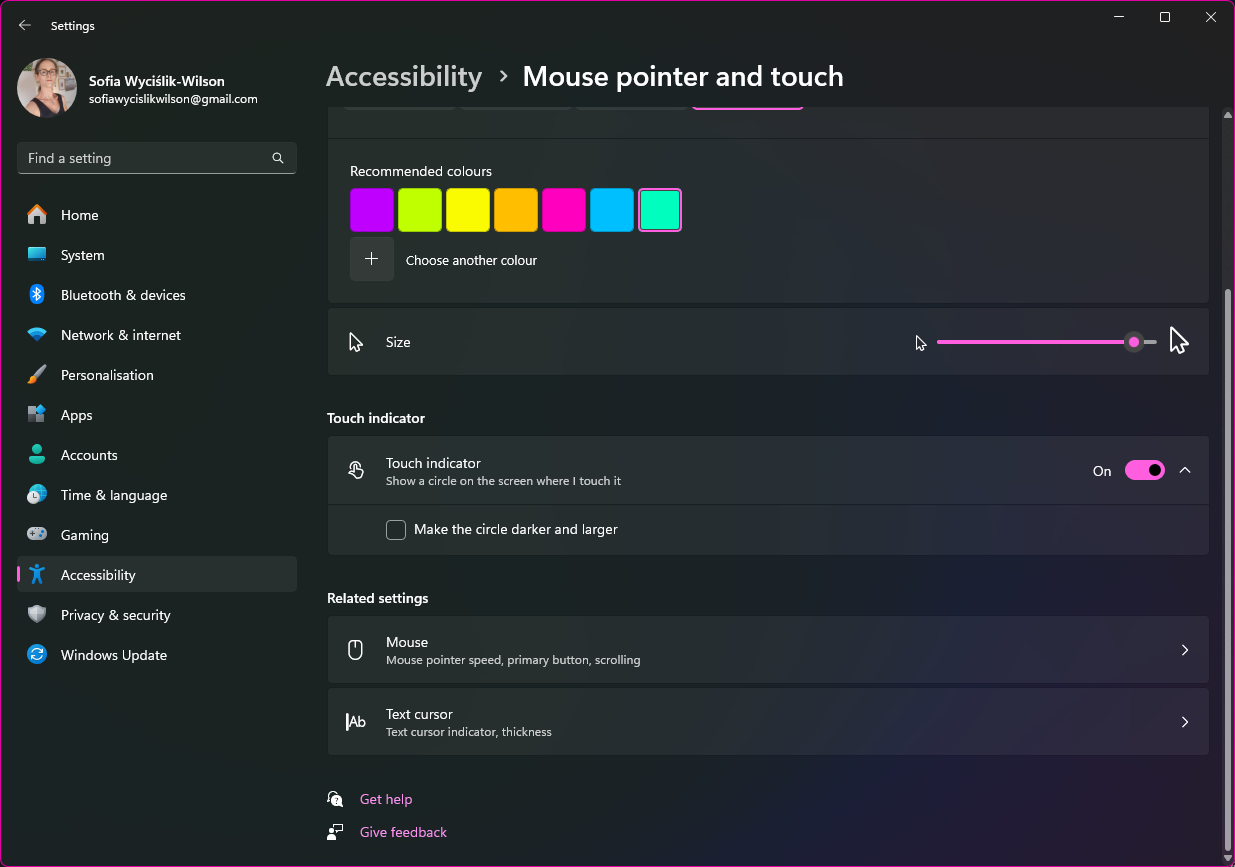
Whether out of necessity or simply preference, you can increase the size of your mouse cursor quite dramatically. Immediately beneath the cursor and color picker, you will see a slider labeled Size. By moving this to the right, you can make your cursor larger. The cursor resizes in real-time as you move the slider, so you can easily tell when you have reached the most suitable setting.
4. Adjust text cursor
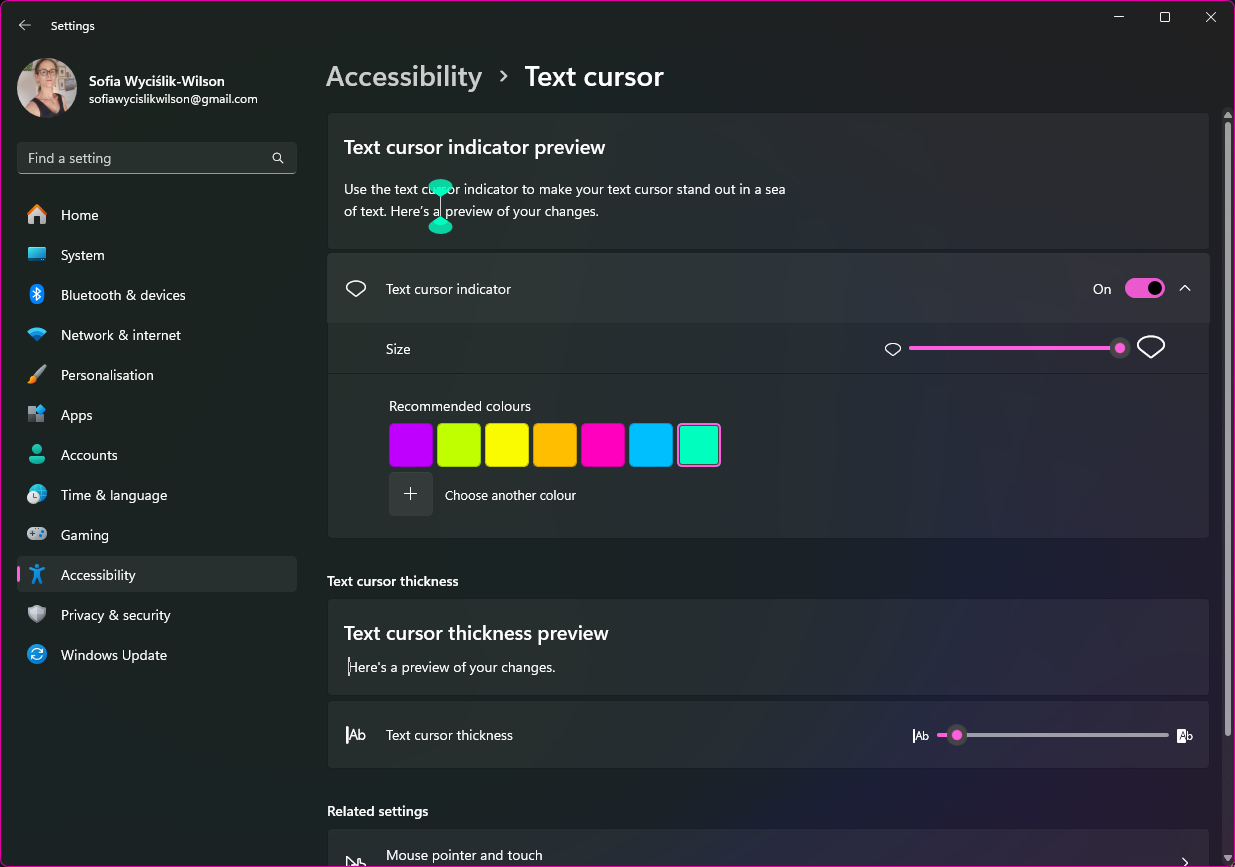
As well as tweaking the setting for the main cursor arrow that you will see most of the time, you can also customize the text cursor that is used when you are selecting or working with text. Move to the Accessibility section of Settings and click the Text Cursor heading. A handy option to enable is the Text cursor indicator, which are markers that appear above and below the vertical bar of the text cursor to improve visibility. Move the toggle to the On position and then choose a size and color for the indicators.
5. Make the text cursor thicker
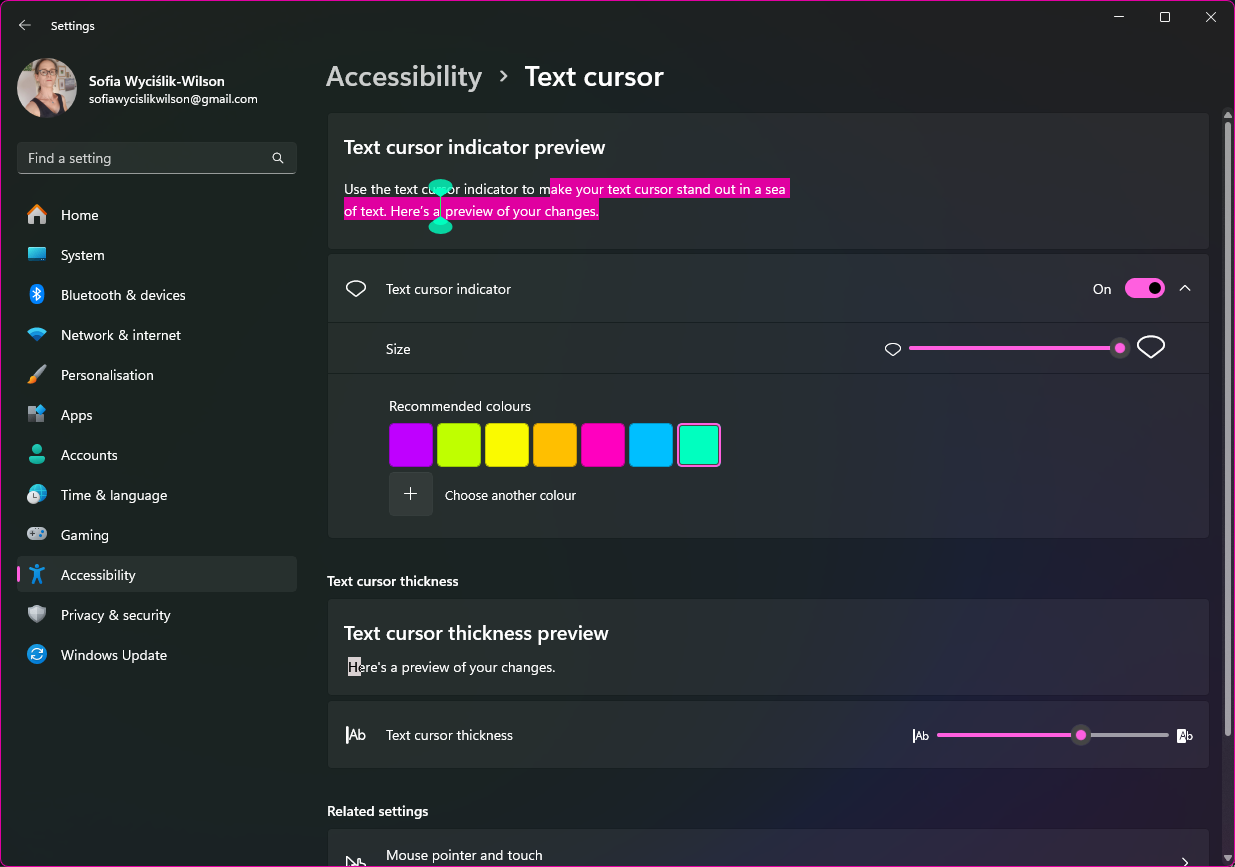
Below the settings for the text cursor indicator, you will find the Text cursor thickness options. By moving the slider to the right, you can make the text selection cursor fatter to help make it easier to see. As you move the slider, a preview of how things will look can be seen just above.
6. Accessing more settings
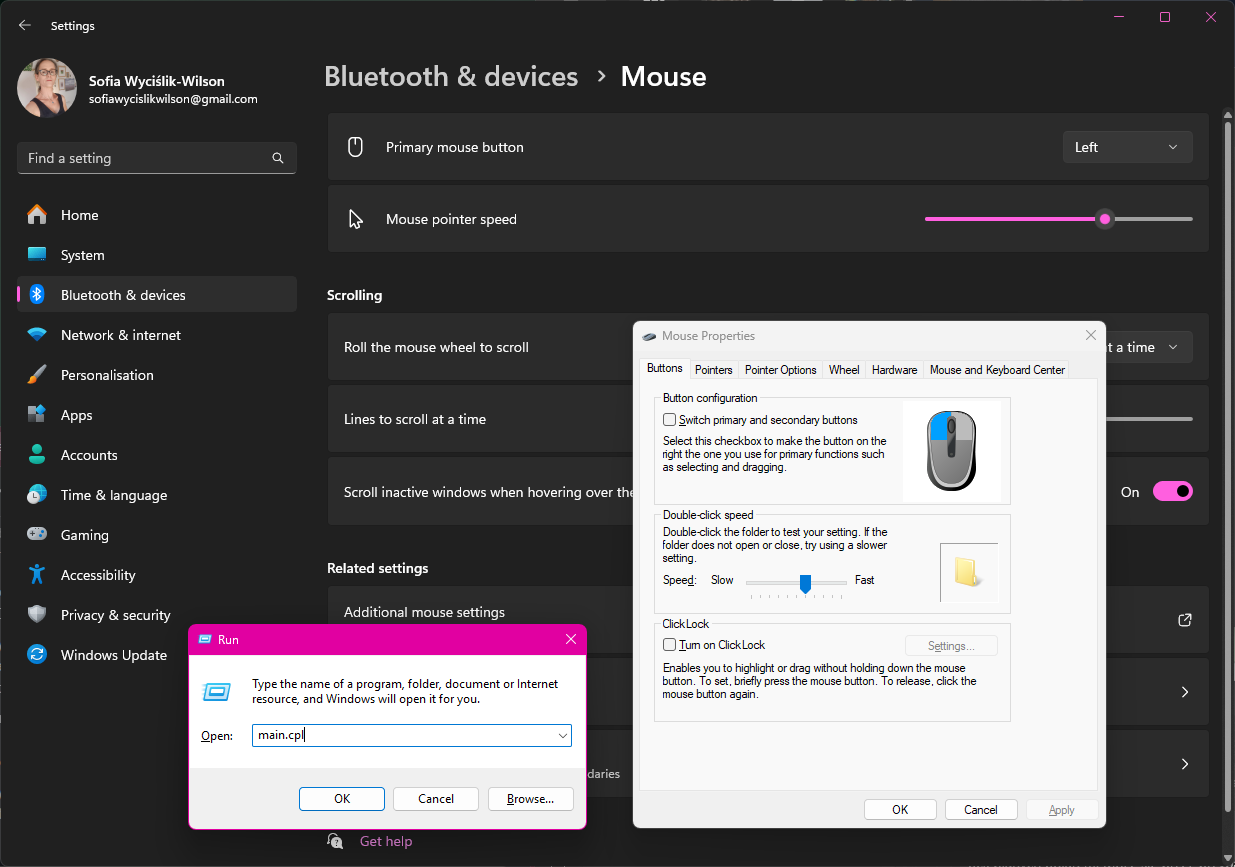
Move back to the Mouse section of Bluetooth & devices, scroll down to the Related settings area once again, and click Additional mouse settings. This will open up the old-style Control Panel where there are more mouse-related settings to tinker with. You can also access this by pressing Windows + R and typing main.cpl in the Run dialog.
7. Choose a pointer scheme
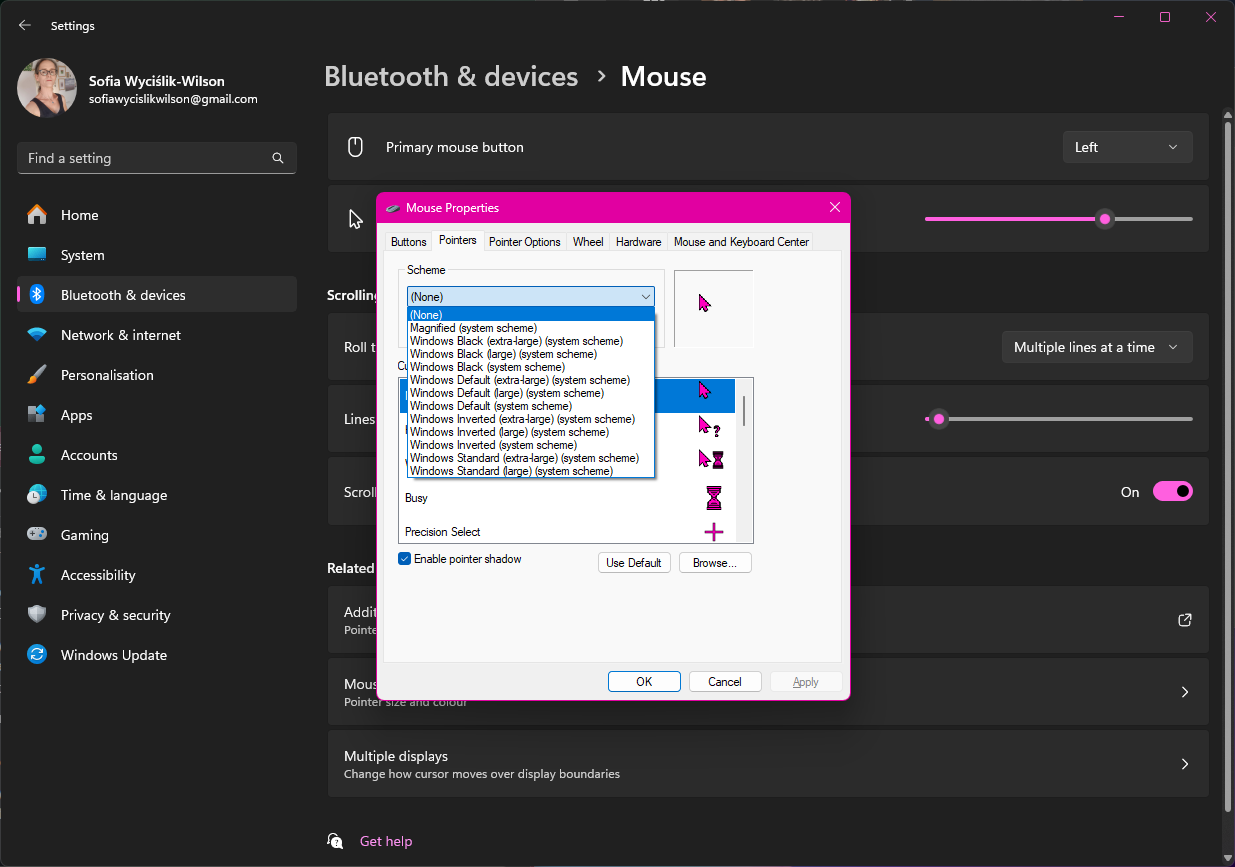
Move to the Pointers tab, and you can use the Scheme drop-down menu to choose from a number of pre-defined mouse cursor themes. When you make a selection from the list, you will be able to see a preview of how your cursor will look in different states. There is a handy Enable pointer shadow check box which you can enable or disable as you see fit as well.
If you click the Browse button, you can also import custom cursors, whether these are bespoke files you've created or downloaded online.
8. Enable pointer trails
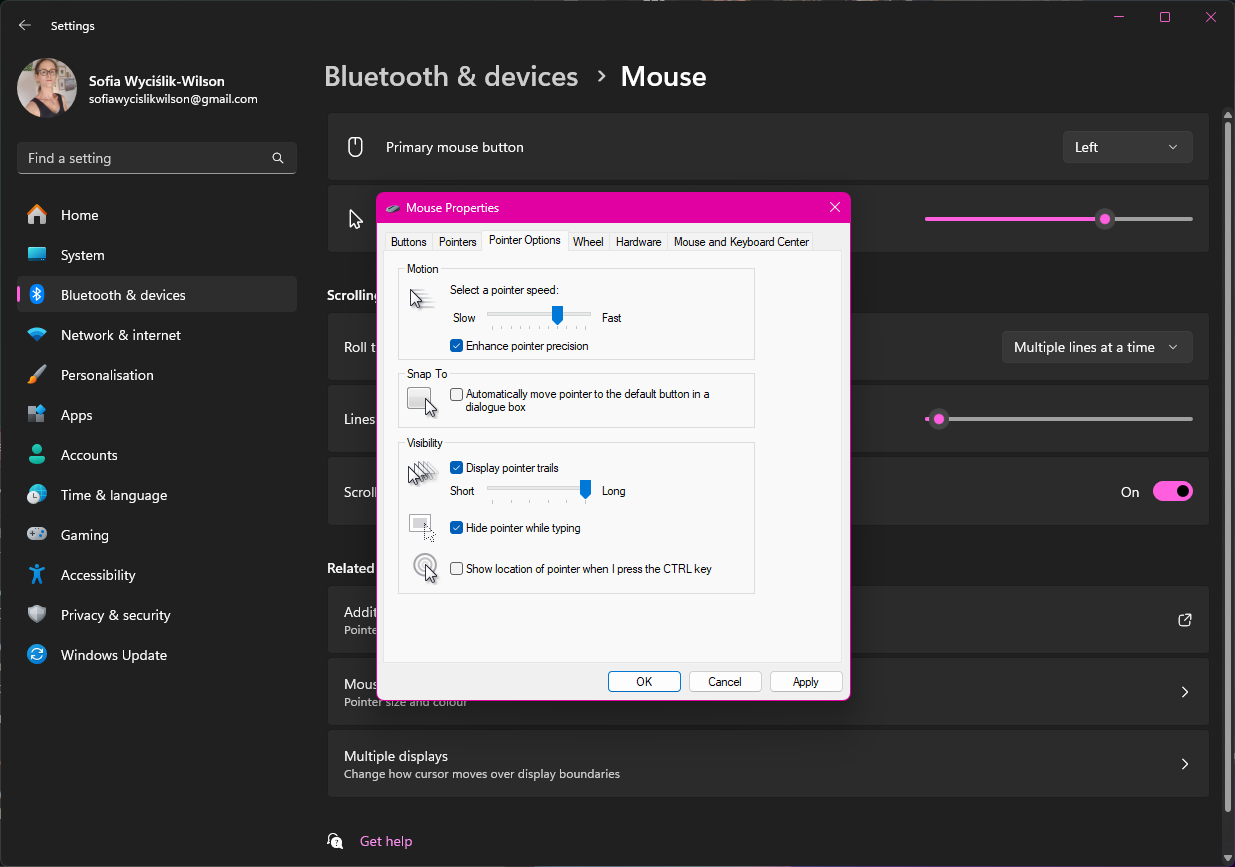
A final option worth investigating can be found by moving to the Pointer Options tab. Here, in the Visibility section, there is an option labeled Display Pointer Trails. When enabled, your cursor leaves a stream of disappearing trails behind it to help make it easier to see. If you do choose to enable this setting, you can then use the slider to choose how long the trails should be.
Step by step guide (Mac)
1. Go to the Accessibility menu
Apple is notoriously bland when it comes to certain customization features, and while there are a few options on macOS, they're not as rich as Windows' customization features.
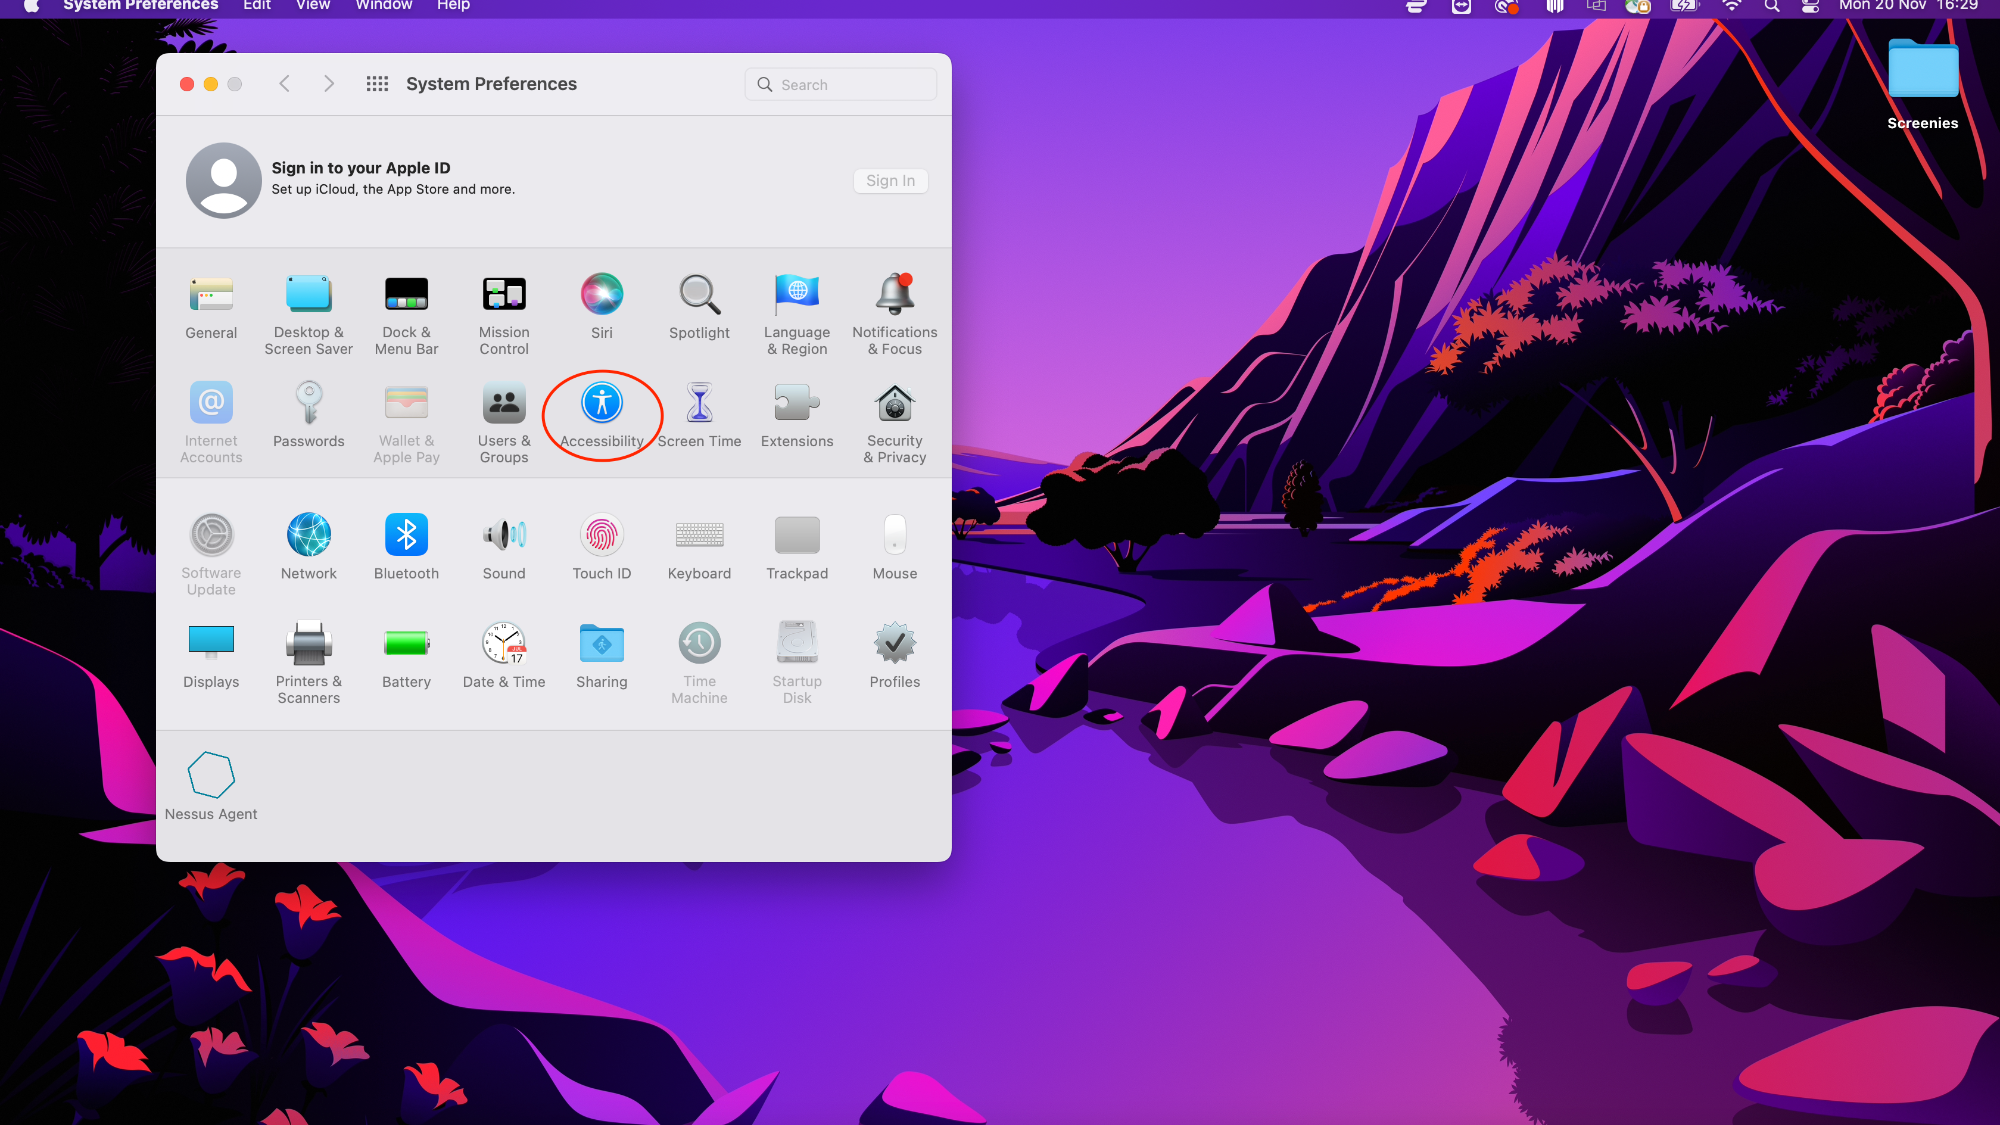
First up, you'll want to open System Preferences and click on Accessibility.
2. Go to the Display menu
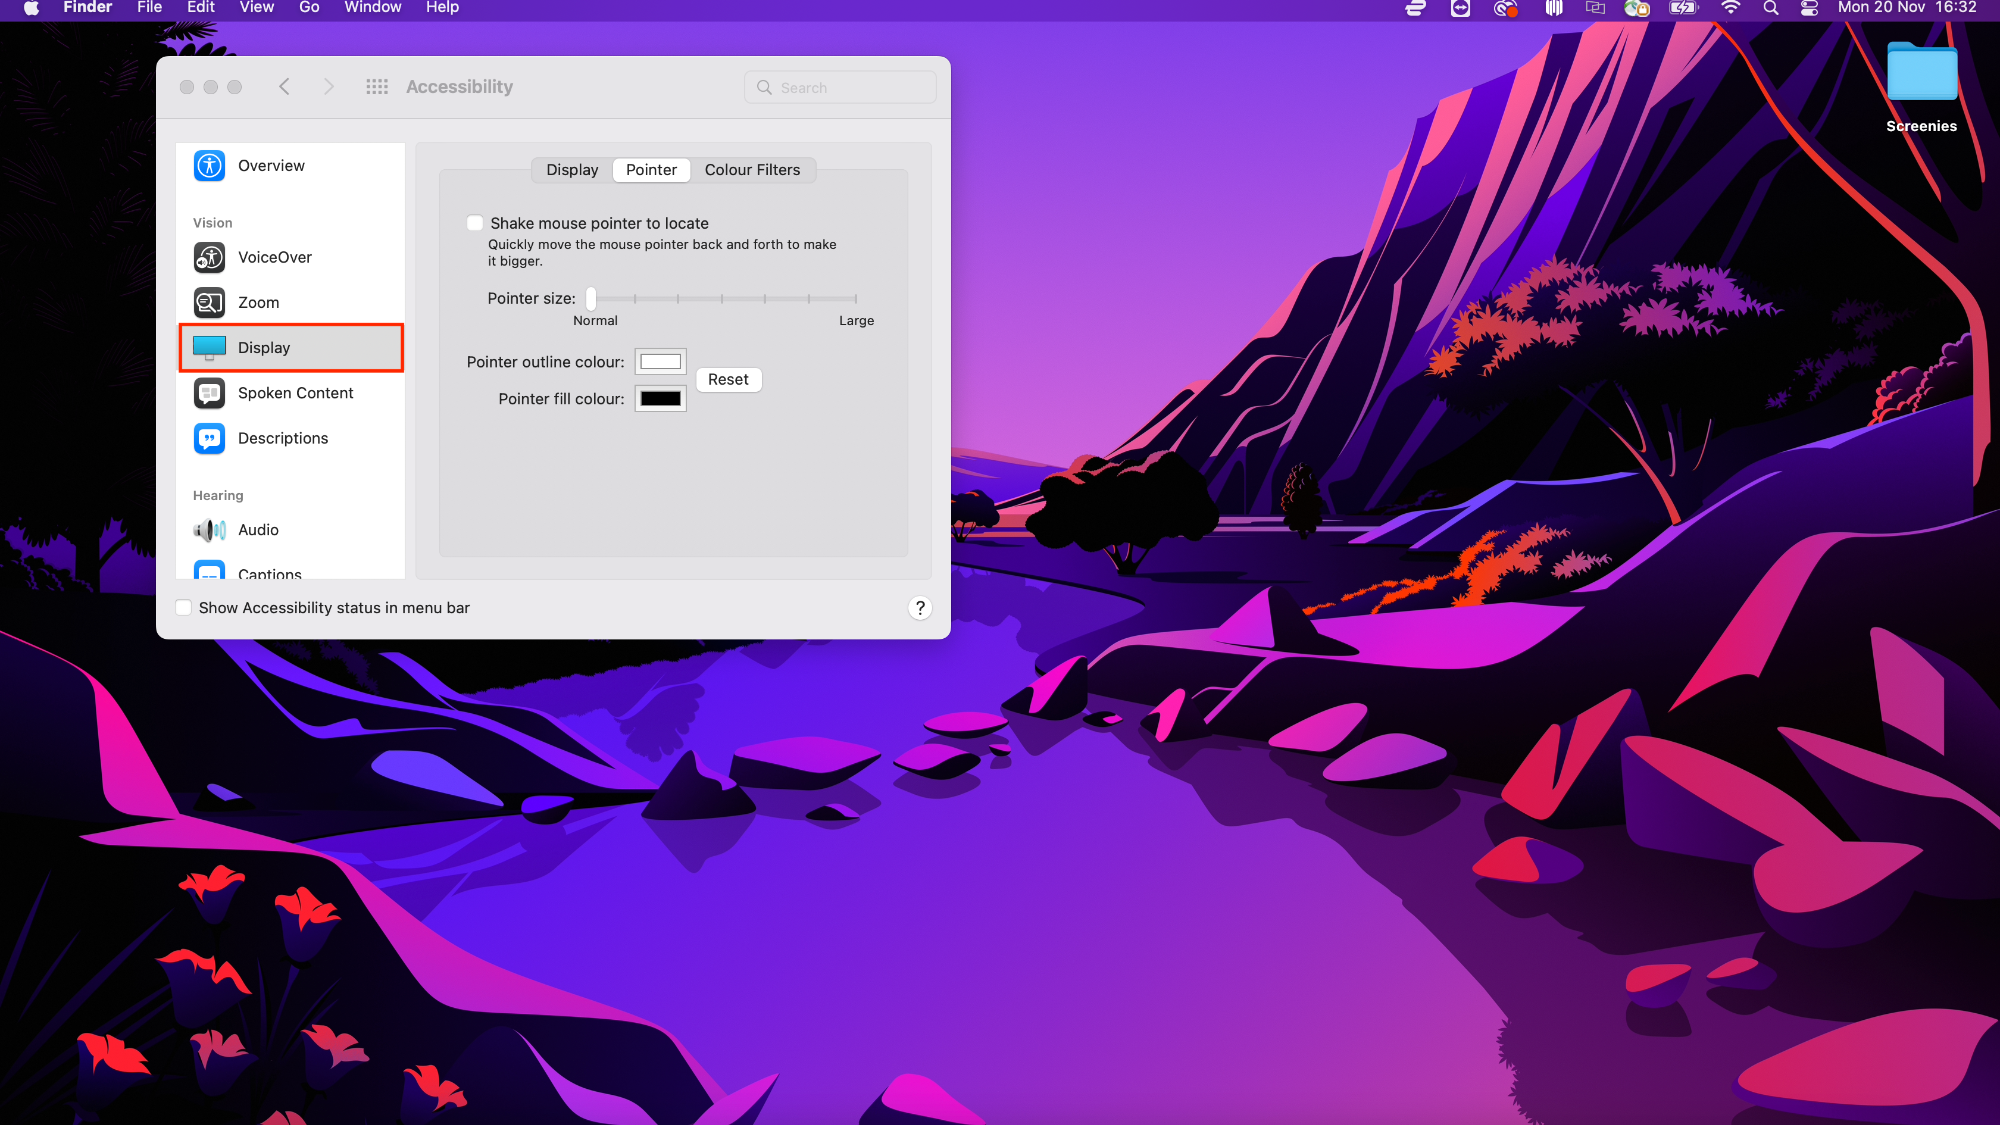
Next, scroll down to the Display menu and click the Pointer tab. From here, you can adjust the pointer size, as well as customize the pointer outline color and fill color.
Final Thoughts
Changing the look of your mouse cursor is multi-purpose. It not only gives you a simple way to personalise the look of your computer and make it more pleasant to look at, by increasing size, adjusting colours and so on, you can also make your computer easier and more enjoyable to work with.
The ability to change your mouse cursor is something that has been built into Windows for many years, so there is no need for additional software. However, if you would like access to a few extra option - such as access to a library of cursors to choose from and a range of special effects - you might be interested in trying out Stardock's CursorFX tool.
Apple, on the other hand, likes to make things a little more difficult when it comes to customization. There are programs available to allow custom cursors, such as Mousecape, which is a free cursor manager, but as with anything we hazard caution when downloading software online.
You might also like...
- How to download and install macOS 14 Sonoma
- How to download and install Windows 11
- How to organize apps and windows with FancyZones
Sign up for breaking news, reviews, opinion, top tech deals, and more.

Sofia is a tech journalist who's been writing about software, hardware and the web for nearly 25 years – but still looks as youthful as ever! After years writing for magazines, her life moved online and remains fueled by technology, music and nature.
Having written for websites and magazines since 2000, producing a wide range of reviews, guides, tutorials, brochures, newsletters and more, she continues to write for diverse audiences, from computing newbies to advanced users and business clients. Always willing to try something new, she loves sharing new discoveries with others.
Sofia lives and breathes Windows, Android, iOS, macOS and just about anything with a power button, but her particular areas of interest include security, tweaking and privacy. Her other loves include walking, music, her two Malamutes and, of course, her wife and daughter.
- Josephine WatsonManaging Editor, Lifestyle