How to dual-boot Linux and Windows

Many of us like to run more than one operating system on a single machine. It's a great way of experimenting with how the other half live, testing new distributions and even playing a few Windows-based games.
But dual and triple booting has always been considered something of a dark art. This is because it involves the double jeopardy of messing around with your disk partition tables and playing with a pre-installed operating system. If things go wrong, it can be a disaster. Or at least, that's the popular perception.
The reality is that dual booting needn't be a risk, and installation can be effortless. With the latest distributions, you might not even notice the process. All this means that if you've been put off by older installations and those old horror stories of things going wrong, it's time to try dual booting again, and our our aim is to demystify exactly what is happening and give you the confidence to delve into the world of dual boot.
But before we push off into the world of running Linux alongside Windows, and Linux alongside Linux, there are a couple of important considerations.
First, dual-booting still involves a lot of data shuffling, and while we've not seen the process go wrong for years, if your data is valuable, it's not worth the risk. If you've got anything on your system that you couldn't live without, make a copy of it now before it's too late.
Secondly, with multiple-boot systems, planning is everything. If you've got a blank system that you know you're going to install more than one operating system on to, you can save yourself a lot of time by working out how those systems are going to be arranged, how much space you'll need for each OS, and how you'd like them to be installed.
Partitioning your drive before you install the first operating system can save you tons of number crunching and the risk of repartitioning. If you do this, follow our partitioning guide, then install Windows first followed by your favourite Linux distribution.
Sign up for breaking news, reviews, opinion, top tech deals, and more.
Finally, as with all things Linux, the main thing is to enjoy the freedom of being able to dual boot, because Linux is the only mainstream operating system that actively encourages you to do so.
Install Ubuntu 10.04 alongside Windows with these three easy steps
1. First boot
There are two ways to dual boot with a Windows system preinstalled. The first is to add a new or spare hard drive to your system and use this for version of Linux you want to install. The second solution is to use the installer to automatically resize your Windows partition to make room for the new Linux one.

This works well, and it's the method we've used, but there is a slight risk that if anything goes wrong during the resizing process, you may lose all your date. Back up now! Insert the Ubuntu disc into your optical drive and reboot your machine.
If your system ignores the disc and jumps back to Windows, you'll need to either look for a BIOS boot menu key as soon as your computer starts, or enter the BIOS and change the boot order manually.
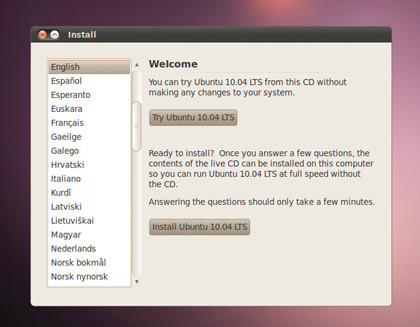
If the drive is successfully read Ubuntu presents the welcome screen, from where you can choose between running the CD in live mode, or proceeding directly to the installation. We chose the latter.
2. Get the balance right
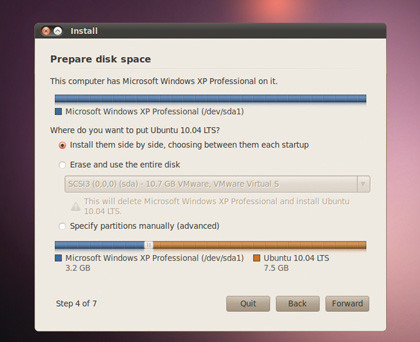
You now need to answer a couple of standard pre-installation questions, including which time zone you're located in and the layout of your keyboard. After these you'll see the 'Prepare Disk Space' page. If your Windows installation has been detected properly, the first line on the page will explain that 'This computer has Windows on it', and the default option of 'Install them side by side' will be selected.

Keeping the options at their default value will create a dual-boot system. Use the divider in the horizontal bar at the bottom of the window to adjust the sizes of the Windows and the new Linux partition. The Ubuntu installer knows how much space is currently filled within the Windows partition, and it won't let you reduce the size of its partition to less that this.
Which partition you give the most space to depends on which you're going to use most, but we'd recommend at least 10GB for the Ubuntu installation, and much more than 10GB if you intend to make the Linux environment your main operating system.
3. Resize and migration
When you're happy with the division in space between the two operating systems, click on Forward. Resizing the Windows partition and creating new ones for Linux can take some time. In the background, Windows data is being moved into adjacent blocks of your hard drive before the partition table is rewritten to include the new Linux partitions and the resized Windows partition.

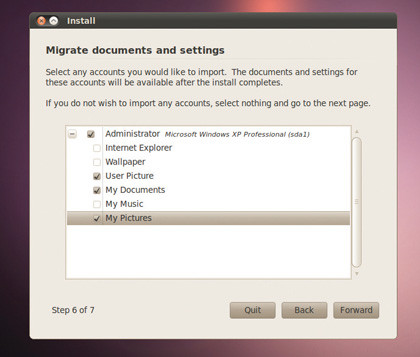
When the resize processed has finished, you'll see the user account settings page. Enter a username, password and a name for your computer and choose whether to log in manually. The next page is Ubuntu's Migration Assistant. This will attempt to import data from the Windows partition and move it to your new user account.
You can choose to import your bookmarks, wallpaper, avatar, music, images and documents, all of which will be placed in their corresponding home folders. Finally, click on Forward, read the overview and click on Install to create a new Ubuntu installation.