How to build an iPhone app
Adding new items
This is actually two tasks: adding a button, and writing the code to respond to the button being tapped. The first task is very simple - in the 'viewDidLoad' method, put this line of code:
self.navigationItem.
leftBarButtonItem =
[[[UIBarButtonItem alloc] initWithBa
rButtonSystemItem:UIBarButtonSystemItemAdd
target:self action:@ selector(addTapped)] autorelease];
That does several things at once, so let me break it down:
'self. navigationItem.leftBarButton' means that we're setting the left button (each navigation bar can have one button on the left and one on the right).
'UIBarButton Item alloc' creates the new button, and 'initWithBarButtonSystem Item' creates the button using the 'UIBarButtonSystemItemAdd' style. This means it will be displayed with a '+' symbol.
'Target:self' means that when the button is tapped, the message saying so will be passed to 'RootViewController.m'.
Sign up for breaking news, reviews, opinion, top tech deals, and more.
'@ selector(addTapped)' is how 'RootViewController.m' will be told the button was tapped - the 'addTapped' method will be run.
'autorelease' decrements the use count of the button. It won't be freed, though, because the 'leftBarButton' will retain it. That single line of code creates a new button with a '+' symbol and sets it up to call 'addTapped' in 'RootViewController.m' when it's tapped, then add its to the navigation bar.
We don't actually have the 'addTapped' method yet, but it's not complicated - all it needs to do is create a new 'NSMutableString' with some default text in, then reload the table so that it appears.
Put this new method somewhere in your 'RootViewController.m' file:
- (void)addTapped {
[self.items
addObject:[NSMutableString
stringWithString:@"New Item"]];
[self.tableView reloadData];
}
As you can see, to add an object to an NSMutableArray you just need to use the 'addObject' method, although what follows might confuse you a bit - it creates a new NSMutableString out of a plain text string.
Note that all NSStrings in Objective C must start with '@' to distinguish them from plain C character constants.
If you run the app now, you can add new rows by tapping the [+] button. It's still not useful though, because you can't actually edit anything - let's do that next.
Off into IB

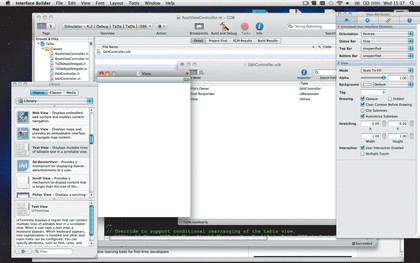
INTERFACE BUILDER: The UI is split across four windows, so if you were planning to use a 13in MacBook for your coding, you might want to reconsider
We're on the last leg of our project now. Only one thing remains: we need to be able to edit to-do list items. When a new item is added, we create it as a mutable string and add it to our collection, so all we need now is a simple user interface to allow editing of items.
Right-click 'Classes' and choose 'Add | New file'. Select 'UIViewController subclass' and leave the checkboxes below deselected, except for the one marked 'With XIB for user interface' - that's the bit that lets us drag and drop user interface elements as we need them.
When you're asked for a name, call it 'EditController' - this is what we'll be using to edit to-do list items, and Xcode will create 'Edit Controller.h', 'EditController.m' and 'EditController.xib' for us.
It's the last one we're interested in - it's an XML file that can be edited by Interface Builder, so double-click it to open it in IB.
Interface Builder
Interface Builder is made up of four main windows: the Library, which showcases all the UI components you can use; the Workspace, which is the graphical layout view where you can create your user interface masterpieces; the Document Window, which shows you a tree-based version of your layout; and the Inspector, which is where you can set various properties of your interface.
Right now we want the workspace, so look in the Document Window for 'View' (it'll be under 'File's owner and first responder') and double-click it to bring up the Workspace. This will be a big, empty white space, with a small grey iPhone status bar visible at the top.
You need to go to the Library window and drag a Text View into that white space. When you hover over the space, you'll see the Text View stretch to take up all the available space; let go, and you'll drop it in there.
Using the Inspector, delete all the default text that's in the Text View. In order to use the Text View in our app, we need to add it as a property (which follows the same four steps as before), then hook it up in IB. Let's tackle the property part first.
In Xcode, modify 'EditController.h' to this:
#import
@interface EditController :
UIViewController {
UITextView *textView;
}
@property (nonatomic, retain)
IBOutlet UITextView *textView;
@end
In the '.m' file, you need to add @ synthesize textView; beneath '@ implementation EditController', and add [textView release] into the 'dealloc' method - just as we did for the 'items' property in 'RootViewController.m'.
There's one small difference here, and that's 'IBOutlet'. When IB is looking for things to connect to, it scans your source code for IBOutlet, so adding that to our property basically means 'This is something we want to use in IB.'
Save all the files in Xcode, then switch back to IB. Because we've told IB that 'textView' is of interest to it, we now just need to connect the 'textView' variable inside the 'EditController' class to the Text View we drew in the workspace window.
To do that, look for 'File's owner' in the Document window, hold down [Ctrl], then click and drag a line from there to the text view, and let go. A menu will appear showing the list of possible connections, and you should see 'textView' in there. Click it and you're done - save the file and close the file.
We've already launched IB, so there's one more thing we need to do: give our navigation bar a title. To do that, go into Xcode and double-click 'MainWindow.xib' from under the 'Resources' folder. When it loads into IB, doubleclick the navigation bar at the top and give it the text Ta Da - this will be used to generate the back button too, so it's quite important.
Editing items
With our simple user interface done, the next step is to make it appear when one of our to-do list items is tapped. That's controlled in 'RootViewController.m', in the 'didSelectRowAtIndexPath' method.
Apple has put some code in there that we can make use of - uncomment it, then change the two instances of 'DetailViewController' (with a capital D!) and the single instance of 'Nib name' to 'EditController'.
Before that compiles, you need to tell Xcode you want to draw upon the 'EditController.h' file you made earlier, so switch to the 'RootViewController.h' file, and add this just beneath the existing #import line:
#import "EditController.h"
That handles creating and showing the editing window, but it doesn't actually show the to-do list text in the view - we need to do that ourselves by passing in the selected string in for editing.
The first part of that is to create an 'NSMutableString' property inside 'EditController' called 'todoItem' I've already shown you how to complete all four steps in the process of creating properties, so just repeat them here.
The interesting bits are how to show the text of the to-do item in the view, and that's done back in 'RootViewController.m' - before the call to 'pushViewController' is made in 'didSelectRowAtIndex Path', you just need to set the 'todoItem' variable like this:
detailViewController.todoItem =
[self.items objectAtIndex:indexPath. row];
That uses 'indexPath.row', which, if you remember, tells us which table row we're dealing with - to pull out the correct 'NSMutable String' from the 'items' array, and stores it in the 'EditController'.
Once that's step is complete, we can make the text appear in our UI by uncommenting the default 'viewDidLoad' method in 'EditController.m' and added this single line of code:
textView.text = todoItem;
So, when the view loads - which happens immediately after the call to 'pushViewController' - we set the text view's text according to the item we passed in. Perfect!
Final tweaks
At this point we can list items, add items and bring up the editing window, but any changes that are made aren't saved. This is really easy to change though, because it's just a matter of waiting for the user to go back to the previous view, and then grabbing 'textView.text' and saving it.
The 'go back to the previous view' event is sent to us in the form of 'viewWill Disappear', which 'EditController' receives whenever it's going to be replaced by any other view.
In 'EditController.m', you need to create a 'viewWillDisappear' method - make sure you follow Apple's example and call the same method on the super class before doing your own thing. Here's what it should look like:
/- (void)viewWillDisappear:(BOOL) animated {
[super viewWillDisappear:animated];
[todoItem setString:textView. text];
}
The interesting bit there is the call to 'setString', which changes the contents of an 'NSMutableString' to some new text. This 'NSMutableString' is shared between the 'EditController' and the 'RootViewController', which means we're changing our master copy of our to-do list item.
There's just one last thing to do before we can call this project finished, which is to update our 'RootViewController' table when a to-do list item has been edited.
We've just 'viewWillDisappear' in 'EditController', so now we need to work with its counterpart, 'viewWillAppear', in 'RootView Controller'. Again, you'll find a commented-out version already in there, towards the top, so all you need to do is remove the comment marks, then add this single line of code to the method:
[self.tableView reloadData];
We have that 'tableView' because we inherited from 'UITable ViewController', and when you call 'reloadData' it then restarts the entire process of asking how many rows there are and what those rows contain.

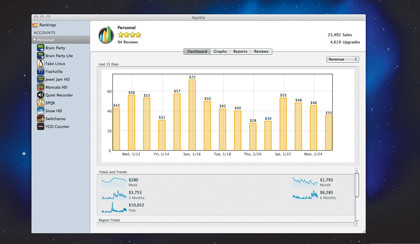
APP VIZ: Once the money starts rolling in, you'll find that Apple's sales tracker is rather inadequate for monitoring your app's performance
That's the end of the project - we're not doing a whole lot here, but if you've absorbed everything in these pages you'll have a great grounding in the core concepts of iOS app development, including memory, view controllers, Interface Builder, strings and arrays, and of course iTunes Connect - the bit where you can actually make money!
But there's no point in learning all this if you don't use it, so if you want all this abstract knowledge to bed down properly in your brain and become genuinely useful, it's time to put what you've learned to work and get started on making your first app.
It doesn't need to be some incredible, fortune-making idea, but if you do come up with something great and happen to make a mint from your efforts, don't forget who taught you!