
 Become a TechRadar Insider


It’s time to look at how to add titles in Adobe Premiere Pro. Widely considered one of the best video editing software for industry professionals and hobbyists alike, Premiere Pro excels at pretty much any video projects, from YouTube clips to an independent movie-making. The best part of using Adobe’s creative software is how integrated it is with the rest of that company’s portfolio - from Adobe Express to top VFX software After Effects
But all the best video editing apps have to start with the basics. With that in mind, we’re looking at how to add titles in Adobe Premiere Pro and how you can use them in your next project.
- Best video editing software for beginners: Tested, reviewed, and rated
How to add titles in Premiere Pro: Basic steps
What to do
- Open the Essential Graphics panel
- Drag your preferred template onto your Timeline
- Alter its parameters until you’re happy with the results
What you'll need
- Adobe Premiere Pro
- A project in progress
- Skill level: Beginner
Step 1: Selection

If you’ve launched Premiere Pro for the first time, the panel you need might not be open by default, so go to Window >Essential Graphics to reveal it. It’ll appear as a sidebar, to the right of the interface.
You’ll see dozens of thumbnails, representing various templates, many of which are titles. Some come with built-in animations, which you can preview by mousing over a thumbnail and moving the cursor from left to right.
Find one you like and drag it to your Timeline.
It is possible none of those strike your fancy, or you’d like to just start from scratch. If that’s the case, go to Graphics and Titles > New Layer > Text (or use the Command-T or Control-T shortcut - depending on the computer you’re using), and Adobe will add a generic text box on your Timeline, at the Playhead’s location, above all other media.
Step 2: Position

Once you’ve added a text box to your project, its position isn’t set in stone. You can obviously click and drag it to another location with ease. If you need to be more precise, keyboard shortcuts are the way to go (you’ll find keyboard shortcuts are designed for frame-accurate alterations in Premiere Pro).
Select your text box, press down the Command (or Control) key, then hit the left or right arrow key once to move it back or forward one frame. Holding the Shift key at the same time, would move your clip 5 frames at a time.
You also have control over your text’s duration right from inside the Timeline. Move the cursor to the clip’s edge, and you’ll see it turns into a red vertical bar with an arrow pointing away from it. When that happens click and drag it inward or outward to decrease or increase its duration respectively. As you do so, you’ll see a small floating window containing information to help you be as frame accurate as you can.
Step 3: Type

You might be wondering how you can replace the generic wording with something more appropriate to your needs. The process is actually very intuitive: simply move the playhead so it’s roughly in the middle of the text box (this is to make sure any intro or outro animation is not active).
Make sure the selection tool is triggered. You can see if it is in the vertical toolbar, immediately to the left of the Timeline: the topmost one, represented by a slanted arrow, should be blue. If it isn't, click on it, or hit the ‘V’ key. Now move over to the main preview panel, and click on the generic text. You’ll find resize handles appear. Use any of them to change its size, or click inside the box and drag it to reposition it on the screen.
To edit the text, double click inside the box to highlight it. Just type away, and make it your own.
Step 4: Customization
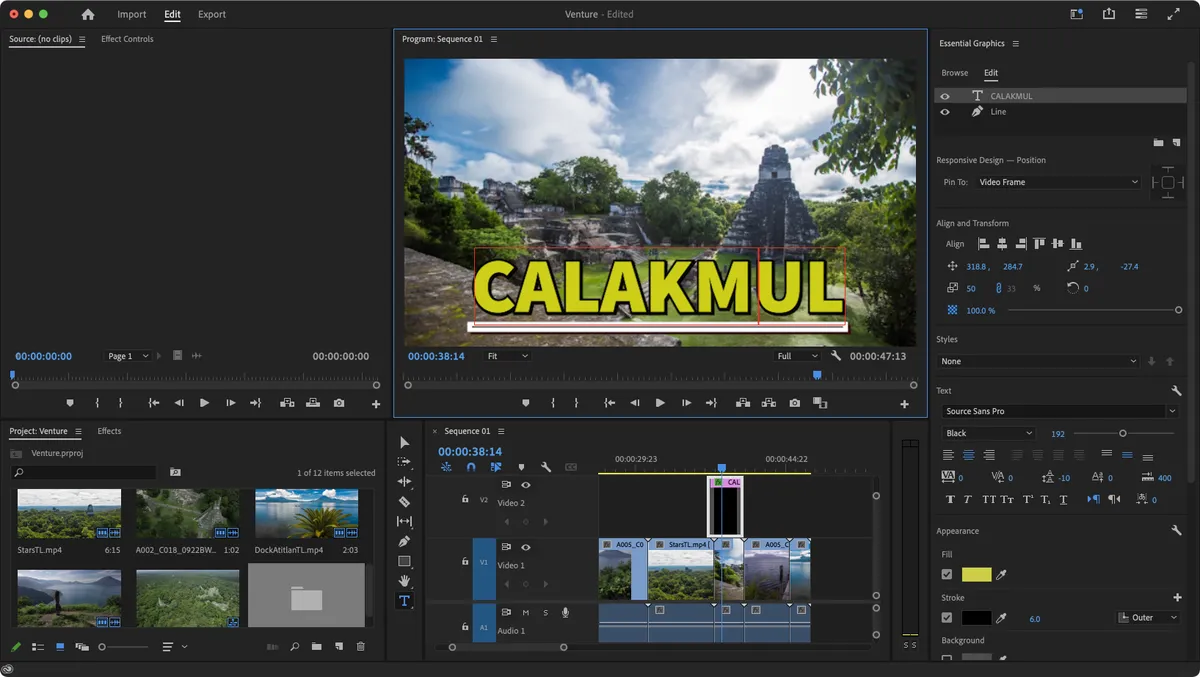
There’s only so much you can do in the Timeline. The bulk of the parameters you can alter are to be found in the Essential Graphics panel. When a text box is selected in the Timeline, that panel will automatically switch to its ‘Edit’ tab.
Anything that can be changed, can be altered here. Every aspect of the text, from the font, to its style, alignment, position, size, colour, highlight, shadow, you name it, you can likely change it.
As you’d expect, it’s also possible to animate most of these changes through the use of keyframes: move the playhead in the timeline to where you want the change to start, then click on the icon in the Edit tab that represents the value you wish to alter. It turns blue. Move the playhead to another position, and alter that value there - you’ll see that icon turns blue once more. Now, as you scroll the playhead in the timeline, you’ll see the animation taking place.
Step 5: Effects

If you choose a template text box, rather than creating one from scratch, you’ll likely notice at the top of the Edit tab a list of objects and effects. This is in addition to the text layer. It means you can apply, and customise various effects to your text, effects which can in turn be animated.
To do this, go to Window > Effects to reveal that panel, lower left of the interface. Scroll through until you see something you like, and drag it to that section in the Edit tab. To change its parameters, go to Window > Effect Control, which will open a panel, top left of the interface, where you’ll find all the parameters you can alter for all the objects you’ve added to your text.
One thing worth noting: with the text box selected in the Timeline, going to Graphics and Titles > New Layer > Text, as you did in Step 1 will actually add another text box inside the selected one. All of this allows you to create complex titles which are easy to reposition in your timeline as you’re essentially moving a single clip.
Step 6: Template creation

By now, you may have created a pretty unique text box, with animations, and effects galore. In fact, you might want to save it, so you can reuse it either in this project or others. Thankfully, Premiere Pro has a way to help you do just that: with it selected in your timeline, go to Graphics and Titles > Export as Motion Graphics Template.
You will have the opportunity to name it, and choose where to save it (it’s best to keep it in your local templates folder, as selected by default, but you can save it anywhere you please). Once you click on ok, you’ll then be able to choose it from the list of available templates in the Essential Graphic’s panel’s Browse tab, just like all the others.
Final thoughts
Adobe Premiere Pro is a very powerful desktop video editor, with a wealth of features. This how-to is there to serve as an introduction, to encourage you to experiment and try something new.
There are many more advanced features, including a way to venture into After Effects (or even some of the best Adobe After Effects alternatives) to create even more eye-catching templates. But even by limiting yourself to what Premiere Pro has to offer, you should see that your options are quite vast, allowing you to create complex titles with little effort. Have fun and explore.
For more help, see our guide How to add transitions in Premiere Pro.
- Best video editing laptops: Tested, reviewed, rated by us
