For our initial test, we pointed Nessus at a fresh installation of Ubuntu 8.10 before any updates had been downloaded. We had installed a Sendmail server, SSH and the Apache 2 web server – all without any security patching. The results are enough to make anyone make sure that their systems are up to date.
Within a few minutes, Nessus had found all of the open ports and interrogated the TCP stack to reveal that the machine was running Ubuntu 8.10. It had also revealed the fully qualified domain name of the machine. An ICMP (ping) test revealed that the machine would tell anyone who asked it the correct time and date, which can be useful in defeating time-based authentication methods.

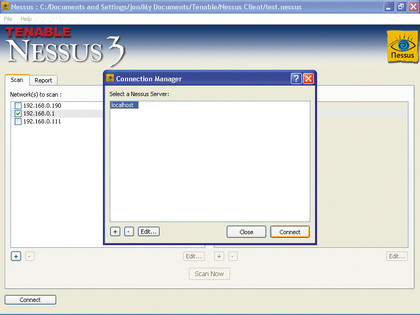
REPORT: The report tab will highlight any vulnerabilities within your home network
Nessus then found Sendmail (and helpfully gave us a warning about leaving it open to the world). It also discovered a service called ZeroConf (sometimes known as Bonjour) on UDP port 5353, which enables anyone to discover the hostname and operating system version that the machine was using as well as a list of the services running on it. But where the app really went to town was on the Apache web server.
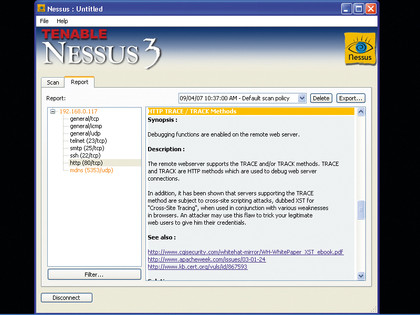
Nessus first mapped the directories that it could find on the web server and identified the server as 'Apache/2.2.9 (Ubuntu)' by having it answer a bogus connection request. It then tested the connection to see what extra information the server sends when it fulfils each page request. Finally, it discovered that the web server supports the TRACE and TRACK methods.
Nessus warned us that these methods have been found to be subject to cross-site scripting attacks when used in conjunction with various browser vulnerabilities. "An attacker may use this flaw to trick your legitimate web users into giving him their credentials," it said, and gave advice about how to successfully remove the threat.

UBUNTU: Within just a few minutes, Nessus has found several potential problems within a brand-new Ubuntu 8.10 installation
Sign up for breaking news, reviews, opinion, top tech deals, and more.
Create a custom policy
Nessus gives two pre-build scan options: the default scan used above, or the Microsoft Patches scan, which can tell if a Windows machine has been updated. However, you can also create a custom scan. To do so, go to the Scan tab of the main interface and select the '+' button under the right-hand pane. This opens a dialogue box where you can specify the options that you want for your scanning policy.
On the Policy tab, enter a name for it. The Options tab allows you to set some basic options, such as the number of hosts to interrogate in parallel and the number of tests to run on each host. If you uncheck the 'Safe checks' option, Nessus will run some checks that may cause the targets to need resetting.
Windows 98 servers may crash and restart themselves, and printers with their own IP addresses may need rebooting. If you have any plug-ins that mount denial of service attacks when you scan, those attacks will be mounted for real. However, we can tell Nessus not to scan fragile devices on a later tab.
At the bottom of the Options tab there is a pane that lists the types of scan available to Nessus. Clicking on them all gives the application a more comprehensive scanning capability. The Credentials tab is useful for when you know some of the relevant username and passwords to gain access to different kinds of services on a remote machine. Nessus will attempt to exploit this information to gain access, elevate its privileges and try to find things that it shouldn't be able to access.
The dropdown menu at the top of the tab gives several different types of credential that you can supply, including SSL (for secure connections), SMB (for Windows shares) and even information for Oracle databases. In the SMB section, enter the username and password for an account on Windows that has administration rights over a target machine. When you next scan it, prepare for a shock at the amount of information that will be produced.
The Plug-in Selection tab lists every single plug-in available to Nessus. If you register your copy of Nessus for home use, this list will grow over time as new plugins become available. Expand the Windows top-level tree and scroll through a few of the subentries. Each one is a plug-in designed to check for a specific vulnerability.
Exploring other plug-in families reveals that there are even plug-ins to check for exploitable vulnerabilities introduced by bugs in well-known antivirus tools!
Refine the scan further
To customise your scanning policy further, you can uncheck whole families of vulnerability checks on this tab. So if you have no Linux software, for example, you can turn off the various Linux checks, and so on. This will reduce the amount of time that it takes for the scan to run. For a home or corporate network that isn't subject to much congestion, it should be fine to leave the default settings on the Network tab as they are.
They're still worth explaining, however. There are three tickboxes. The first makes Nessus intelligently limit the amount of traffic that's sent in parallel to the machine under interrogation. Clicking the first option will instruct it to detect network congestion and throttle back the amount of traffic that it generates accordingly. If you're running Nessus in Linux, then the second option allows it to use kernel-based network congestion.
Finally, the third tickbox tells Nessus to stop pointlessly scanning machines that are already powered down. You can also limit the amount of traffic sent by entering absolute values into the three input boxes. The first sets the overall number of connections that Nessus can open in parallel during a scan. The second box tells Nessus the maximum number of these that it can open on any one host, and the third gives a value at which point to detect a timeout when a machine fails to respond.
Finally, there's the Advanced tab. Here, you can fine-tune your attack using information that you already know, and by entering default usernames and passwords if you know them. As with the Credentials tab, the dropdown menu allows you to choose between different topics. Because switching off safe checks may cause some hosts to require resetting after being scanned, select the 'Do not scan fragile devices' option and make sure that 'Scan Network Printers' is not selected.
Another interesting section on this final tab is 'Global variable settings'. The 'Thorough tests' tickbox causes suitable Nessus plug-ins to work harder by delving more deeply. This option also creates far more network traffic and inevitably makes your scans take a lot longer. To see more detail in the scan reports, set report verbosity to 'verbose'.
Like other vulnerability scanners, Nessus isn't infallible, so it's capable of giving false positive results. To reduce this tendency, change the Report Paranoia setting to 'Avoid False Alarms'. If you now press the 'Save' button and return to the Scan tab on the main interface, your custom scan policy will appear beneath the others, ready for use whenever you want.
To use it, select the hosts that you wish to scan using their tickboxes, select your scan policy and hit 'Scan Now' to begin. Before you exit Nessus, remember to save your session from the File menu.
- 1
- 2
Current page: How to interpret your vulnerability scan results
Prev Page How to scan your system for vulnerabilities