How to set up and manage a home network with AirPort Utility 6
Use Apple's new app to manage your network
Sign up for breaking news, reviews, opinion, top tech deals, and more.
You are now subscribed
Your newsletter sign-up was successful
Managing many routers and switches is done through a web browser, but looking after a network that runs on Apple's networking devices means using a native Mac application.
Recently, Apple introduced a new version of its AirPort Utility (found in Applications/Utilities). This new-look application offers a streamlined set of features and a completely overhauled, more graphical appearance that we explain here.
However, there are some caveats to its use. It's only available for OS X Lion, and it can only be used with AirPort hardware that supports 802.11n wireless networking - although that covers most of the AirPort devices released since 2007.
Once you've determined your hardware's compatibility, and if the features that version 6 is missing aren't of concern, you can bail out on the older, cluttered versions. AirPort Utility isn't the sort of app you need to use that often, but when maintenance is necessary or a problem rears its ugly head, its improved presentation and clear, descriptive explanations help to accomplish things more easily.
For example, you might find that a connection is too poor for a games console or other networked device to receive streaming video. That might be remedied by adding another base station to act as a relay, improving your network's reception in the room where the device is located. When you do that, AirPort Utility 6 automatically steps in to help configure the base station for such a purpose.
Your job is to find a good position for the base station, and you can refer back to the utility and use its simple readouts to see whether it's working out.
Top three features: Complete control of your network
1. Timed Access Control
Sign up for breaking news, reviews, opinion, top tech deals, and more.
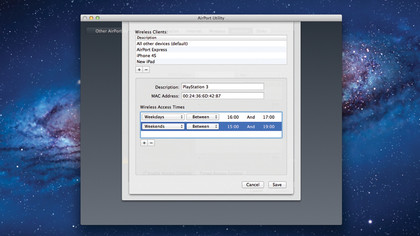
Use this to restrict wireless access to your network, and, optionally, to restrict the time your kids spend online. Click the base station, press Edit, then the Network tab.
Tick the box labelled Enable Access Control, then press the Timed Access Control button. You'll need the MAC addresses of devices to allow online.
To bar others, select 'All other devices (default)' and choose 'No Access' in the Wireless Access Times box.
2. Share storage
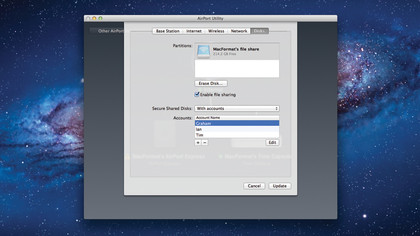
The storage inside a Time Capsule - or attached to a Wi-Fi base station via USB - can be shared over the network.
In the Disks tab in the device's settings, tick 'Enable file sharing', then choose the level of protection: the same password used to configure the base station; a different one for disk access; discrete user accounts with permission to read, read/write (required for Time Machine backup); or not see the disk at all.
3. Back to My Mac
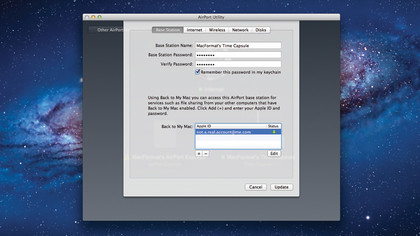
Gain remote access to your Mac and any storage attached to a Time Capsule or AirPort Extreme, using your iCloud account. Enter your credentials in the Base Station tab of a device's settings, and enable Back to My Mac in System Preferences > iCloud.
Some reconfiguration of the modem that provides your internet connection may be necessary. For more advice check out apple. com/support/icloud/back-to-my-mac.
Visual Guide: Making sense of Airport Utility
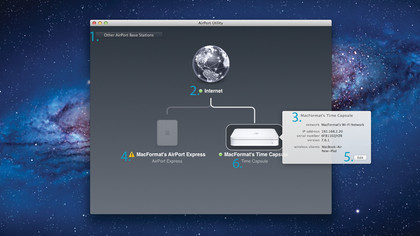
1. Other AirPort Base Stations button
You might see only an internet node in the network map. For example, if you are online via an iPhone's Personal Hotspot feature and sharing that via another of your Mac's network interfaces. Click this button and choose the correct interface.
Base stations added to the network but unconfigured are also listed here. Click one to set it up. The utility offers to configure additional AirPort hardware to extend a Wi-Fi network already broadcast by another.
2. Internet connection
The status light next to Internet will change from green to amber if there's a problem with the connection. Then it's time to check out the cable, DSL or 3G modem that provides your link to the outside world.