How to add transitions in your favorite video editing software
See how to add transitions between your clips

It’s not always readily apparent how to add transitions in Premiere Pro, Final Cut Pro, Resolve, and other top video editors. But it’s a useful effect to master, letting you smoothly move between scenes or show the passage of time.
You’ll find plenty of different transitions in the best video editing software, including the best free video editing software. The concept is simple: rather than have a straight cut from one clip to the next, you’ll use a non-linear video editor to blend the start of one clip and the beginning of the other, creating something visually arresting (and meaningful).
The most popular video transitions are fades, but there’s also wipes, slides, dissolves, and more. You only need to watch Star Wars: A New Hope to see a whole range of transitions in action - and the effect they have on the story and the audience.
Article continues belowTo help you add more to your movie, we’ve explored how to add video transitions in the top video editors.
Want to become a movie-making pro? We’ve been testing the best alternatives to Adobe Premiere Pro
How to add transitions to your video
How to add transitions in Adobe Premiere Pro
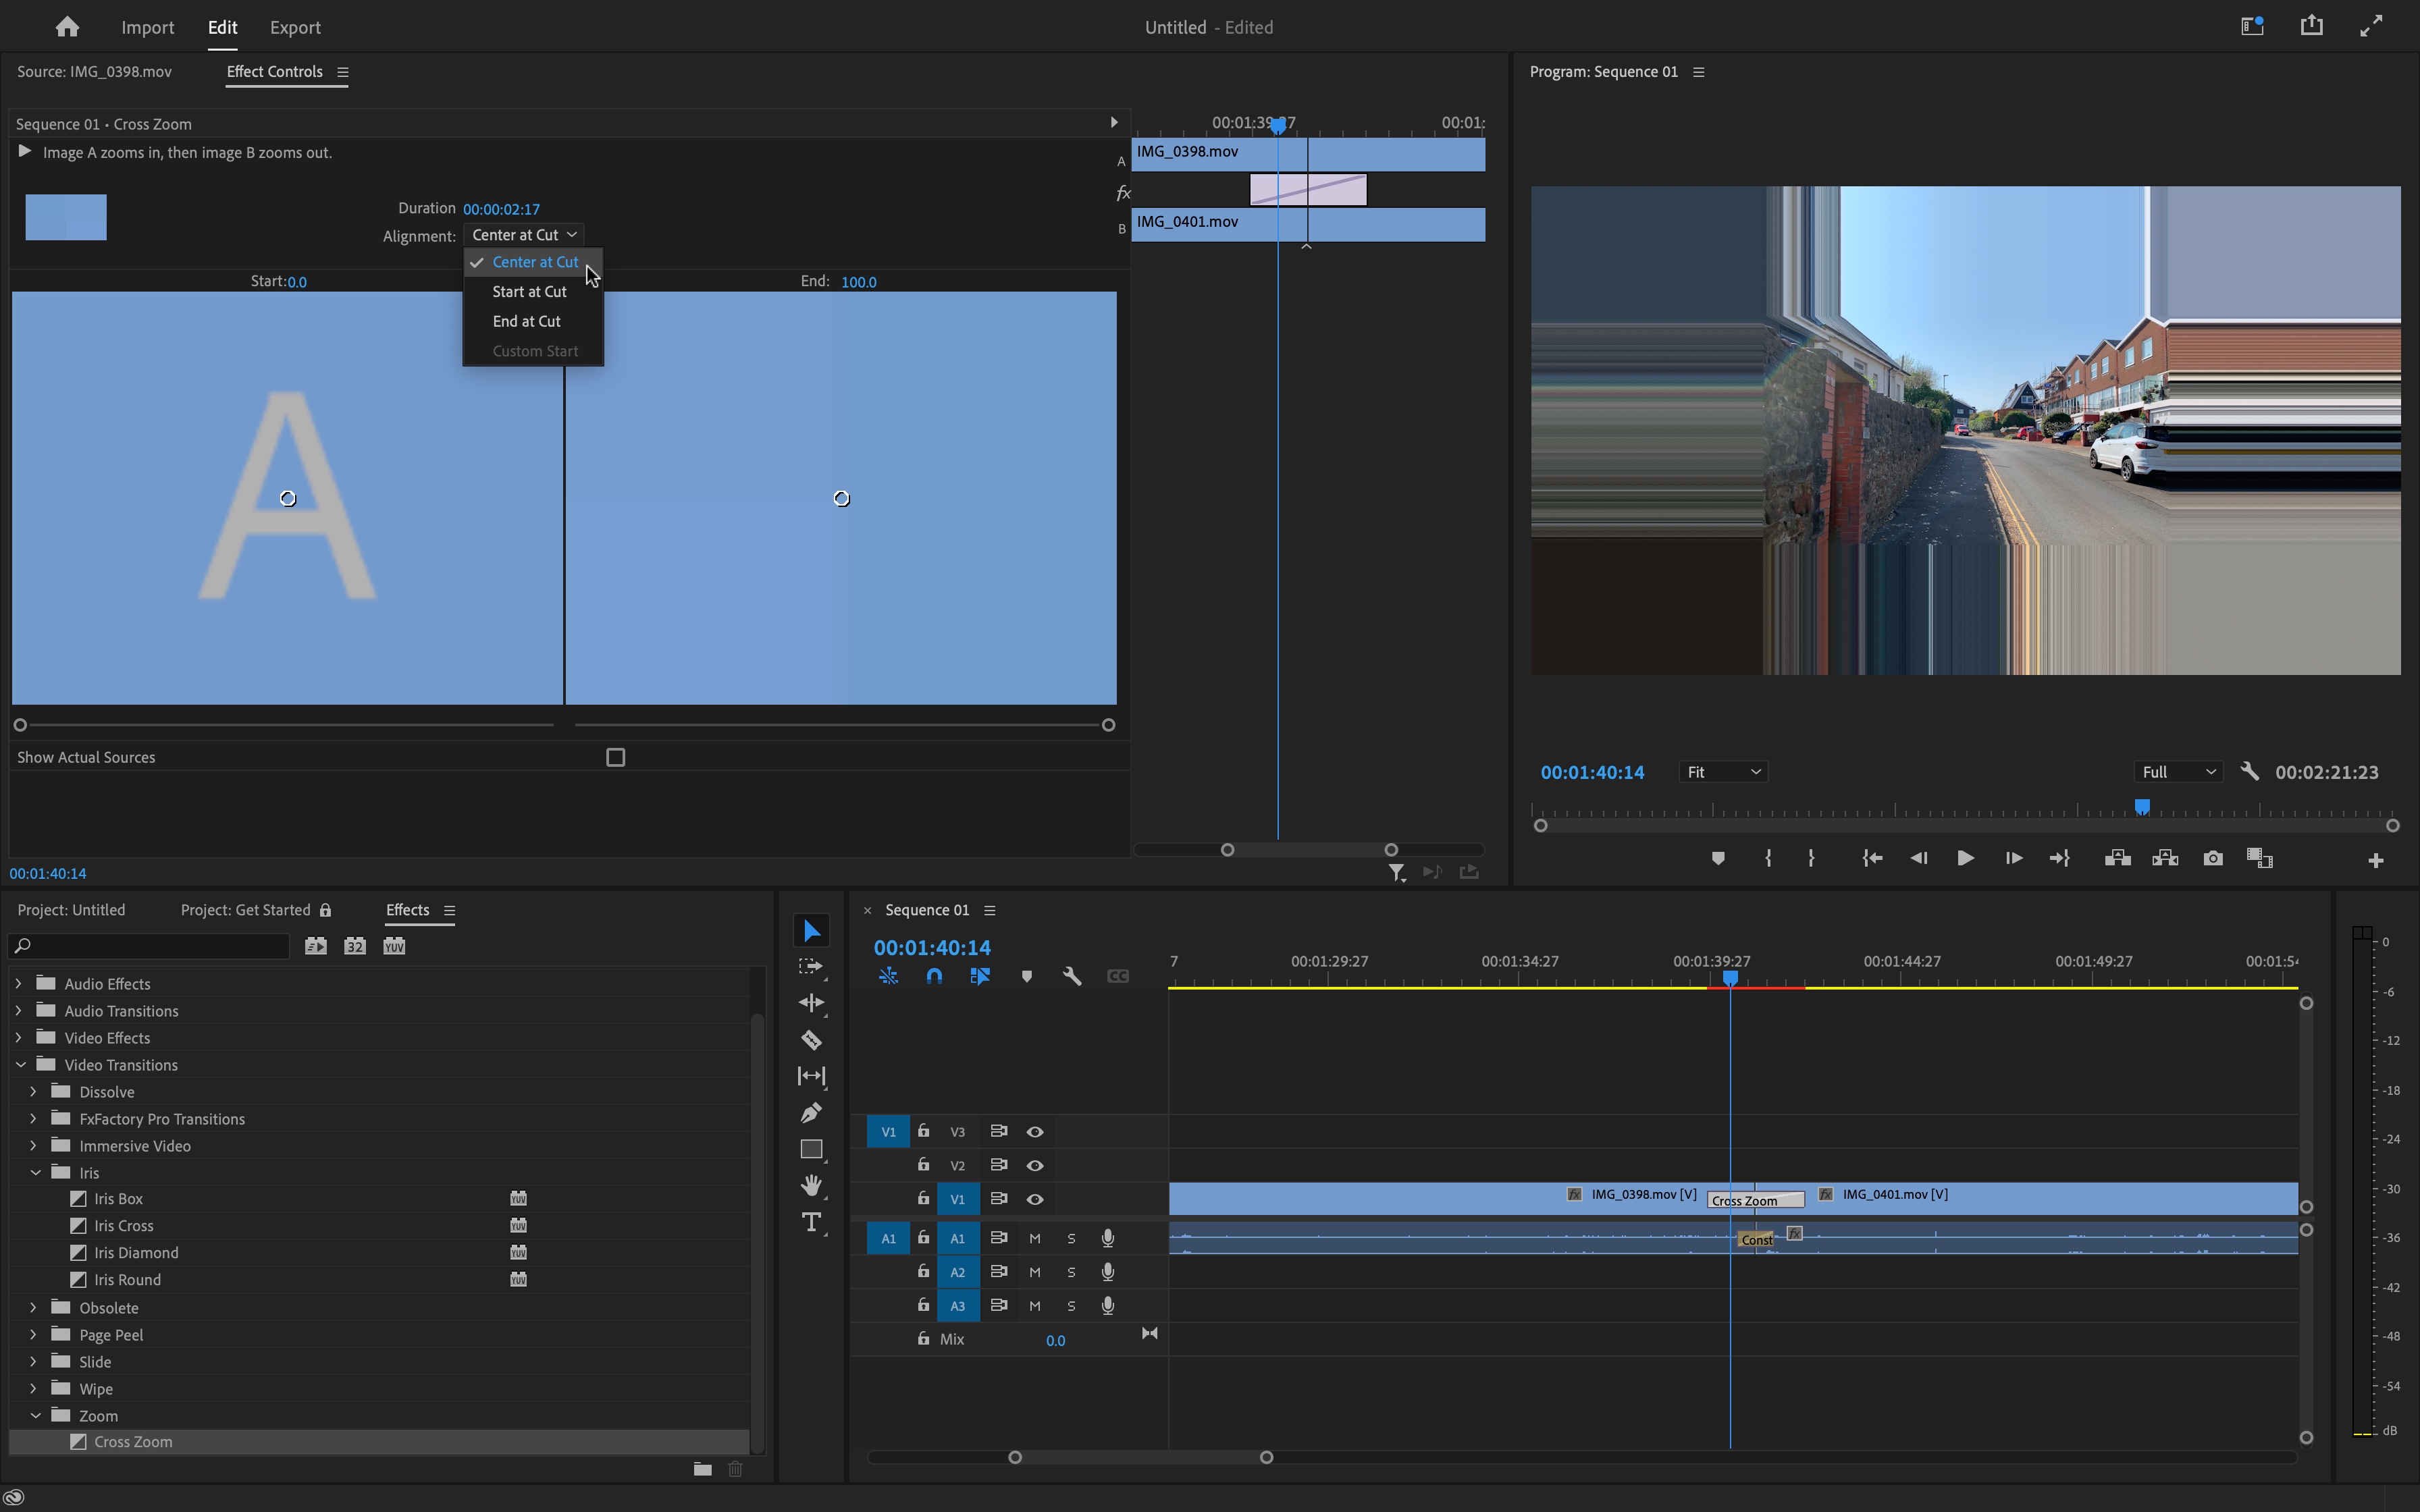
The easiest way to add a transition in Adobe Premiere Pro between two clips (after you’ve trimmed both to give the transition enough to work with), is to right-click in between them and choose ‘Apply Default Transitions’.
This will add a basic cross dissolve. You can drag its edges to increase or decrease its length, or double-click on it to get an input field where you can be frame-accurate in your alteration.
Sign up to the TechRadar Pro newsletter to get all the top news, opinion, features and guidance your business needs to succeed!
If you want a different transition, go to Window > Effects to reveal the effects panel (usually located lower left of the interface). From there, expand Video Transitions to see them broken down by category. Drag your chosen transition in between two clips in your timeline.
Use the Effects Controls panel to further customize your effect.
How to add transitions in Apple Final Cut Pro
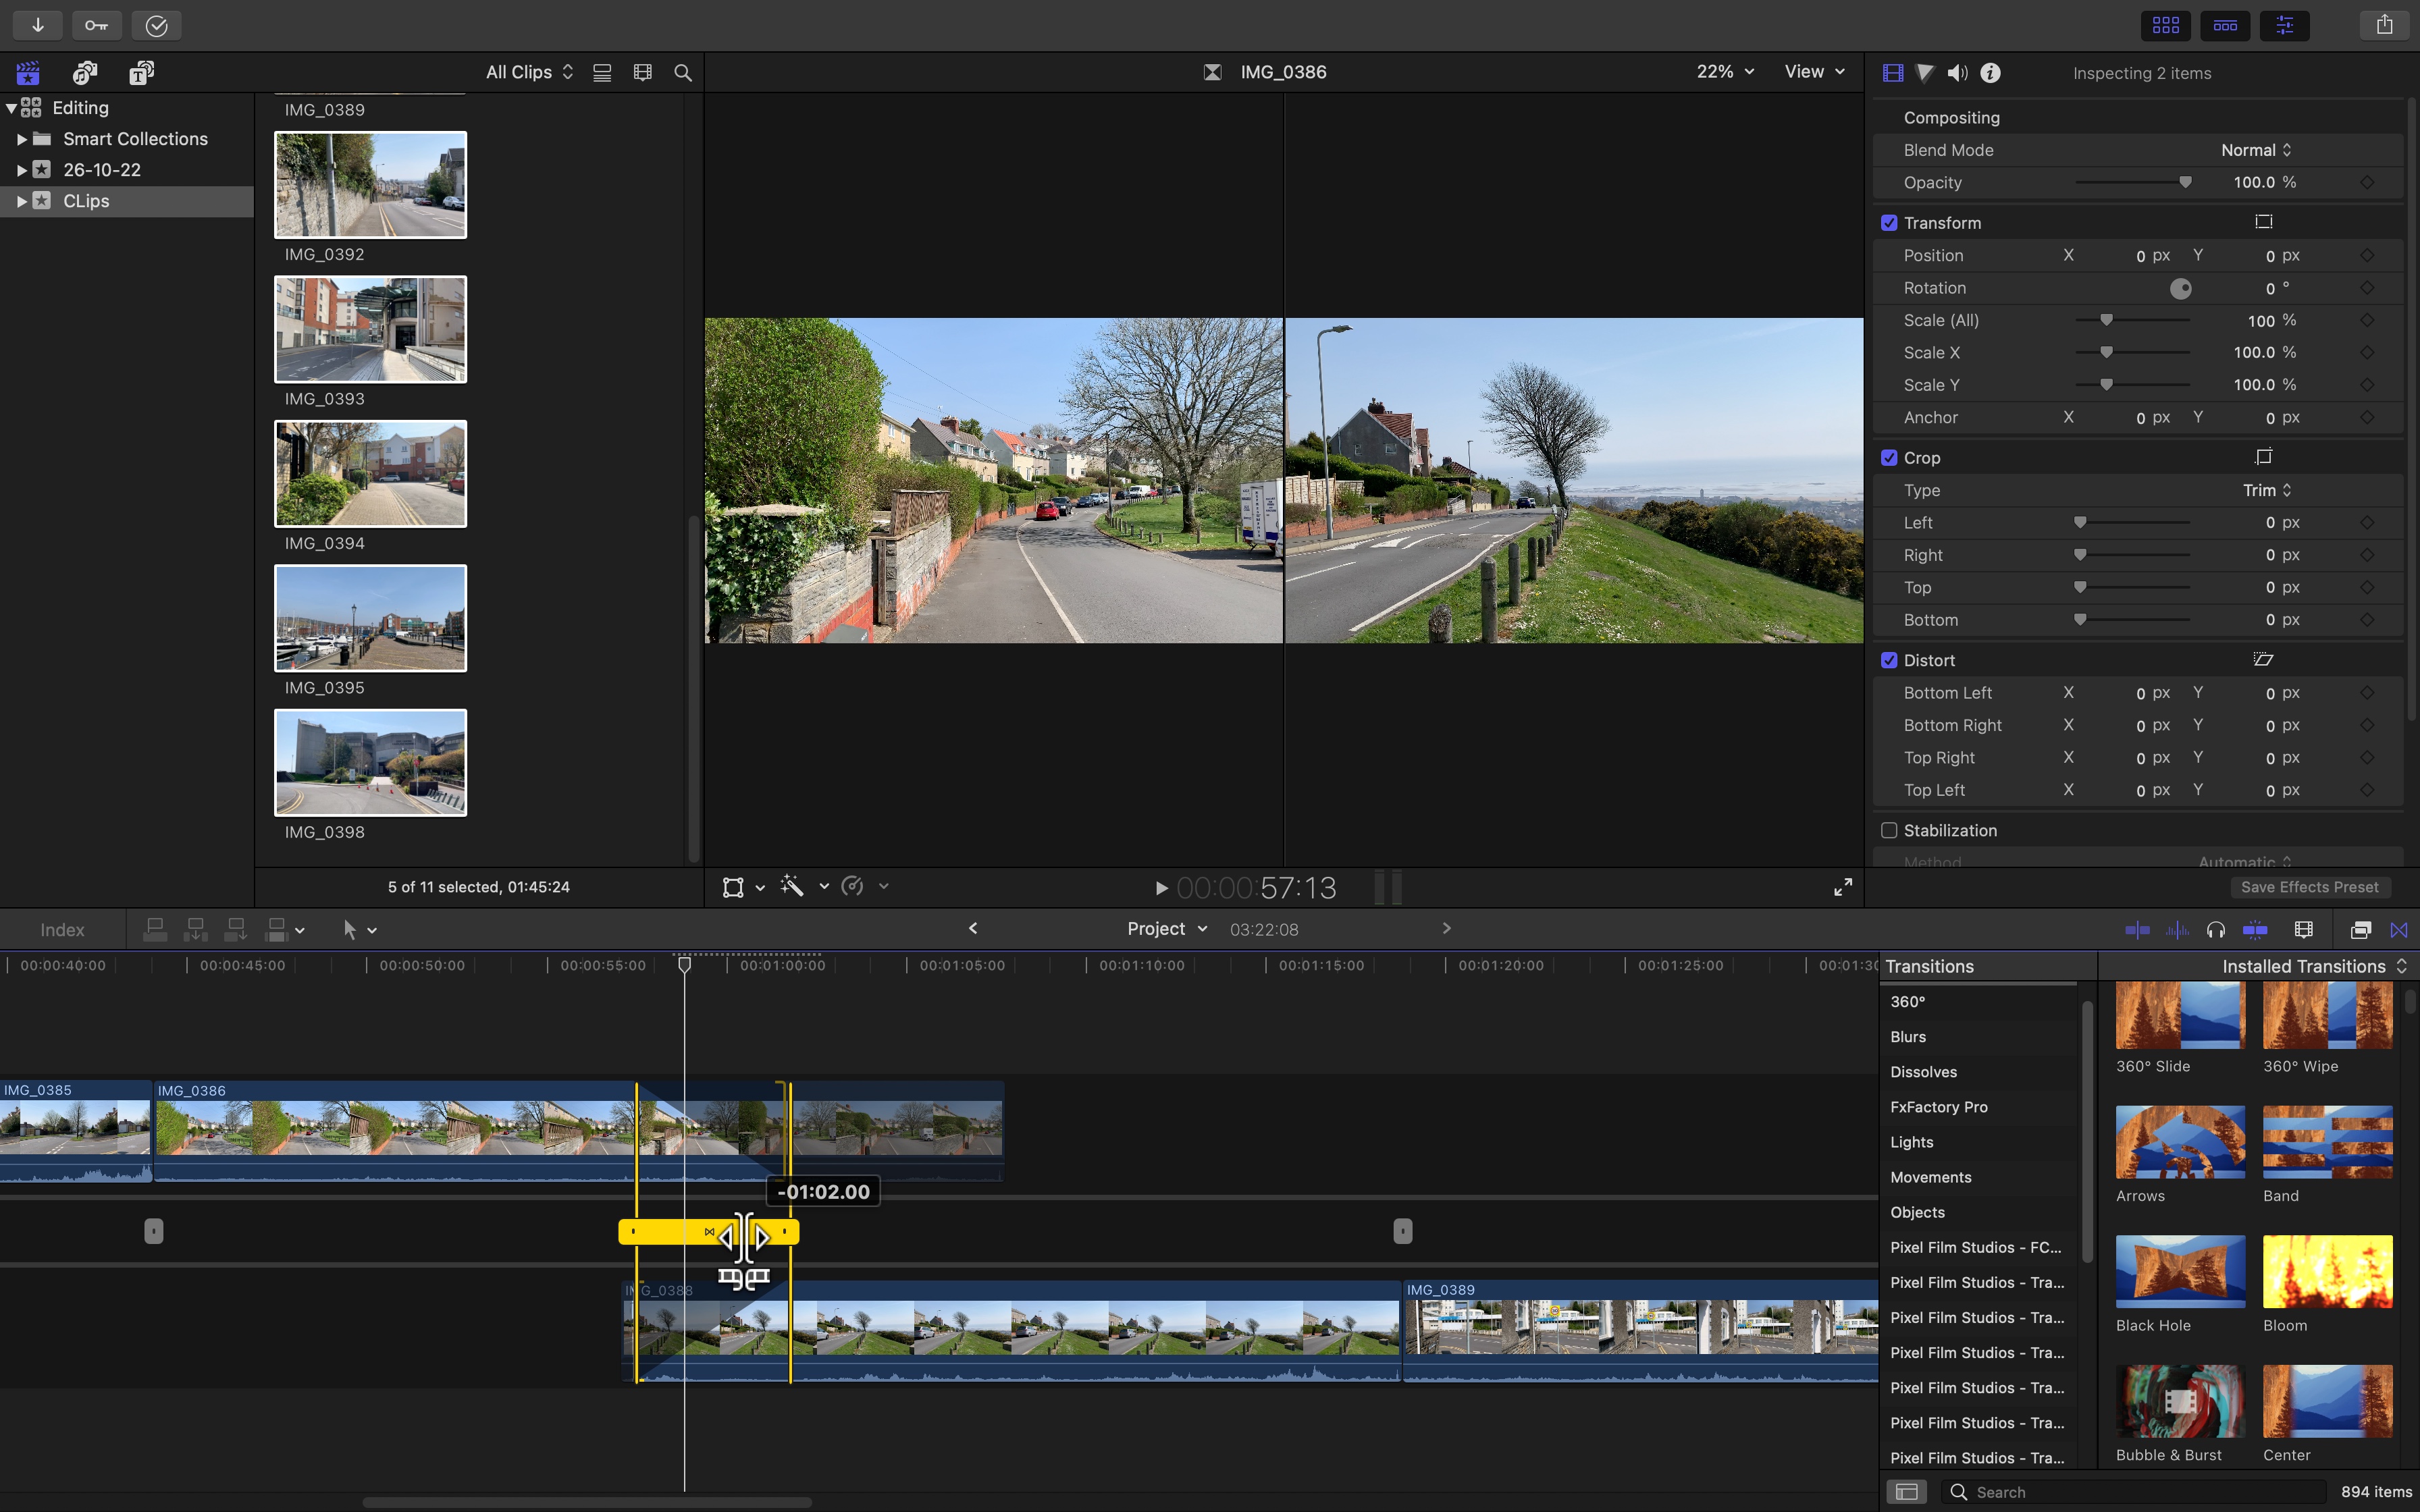
In Apple Final Cut Pro, start by making sure the clips you want to apply a transition to are suitably trimmed so the effect has some footage to work with. You’ll find all available transitions by clicking on the little icon shaped like two triangles pointing at each other, in the toolbar, top right of your timeline, or by going to Window > Show Workspace > Transitions.
Mouse over each one to see a preview of the effect both within the thumbnail but also on the main preview section.
Once you’ve found the one you like, drag it in between your two clips to apply an automatic duration of one second. This can be altered by dragging its edges.
You’ll find some changeable parameters in the Inspector, top right of the interface, and you’ll also gain access to additional controls by double-clicking the transition in your timeline to expand it.
How to add transitions in DaVinci Resolve
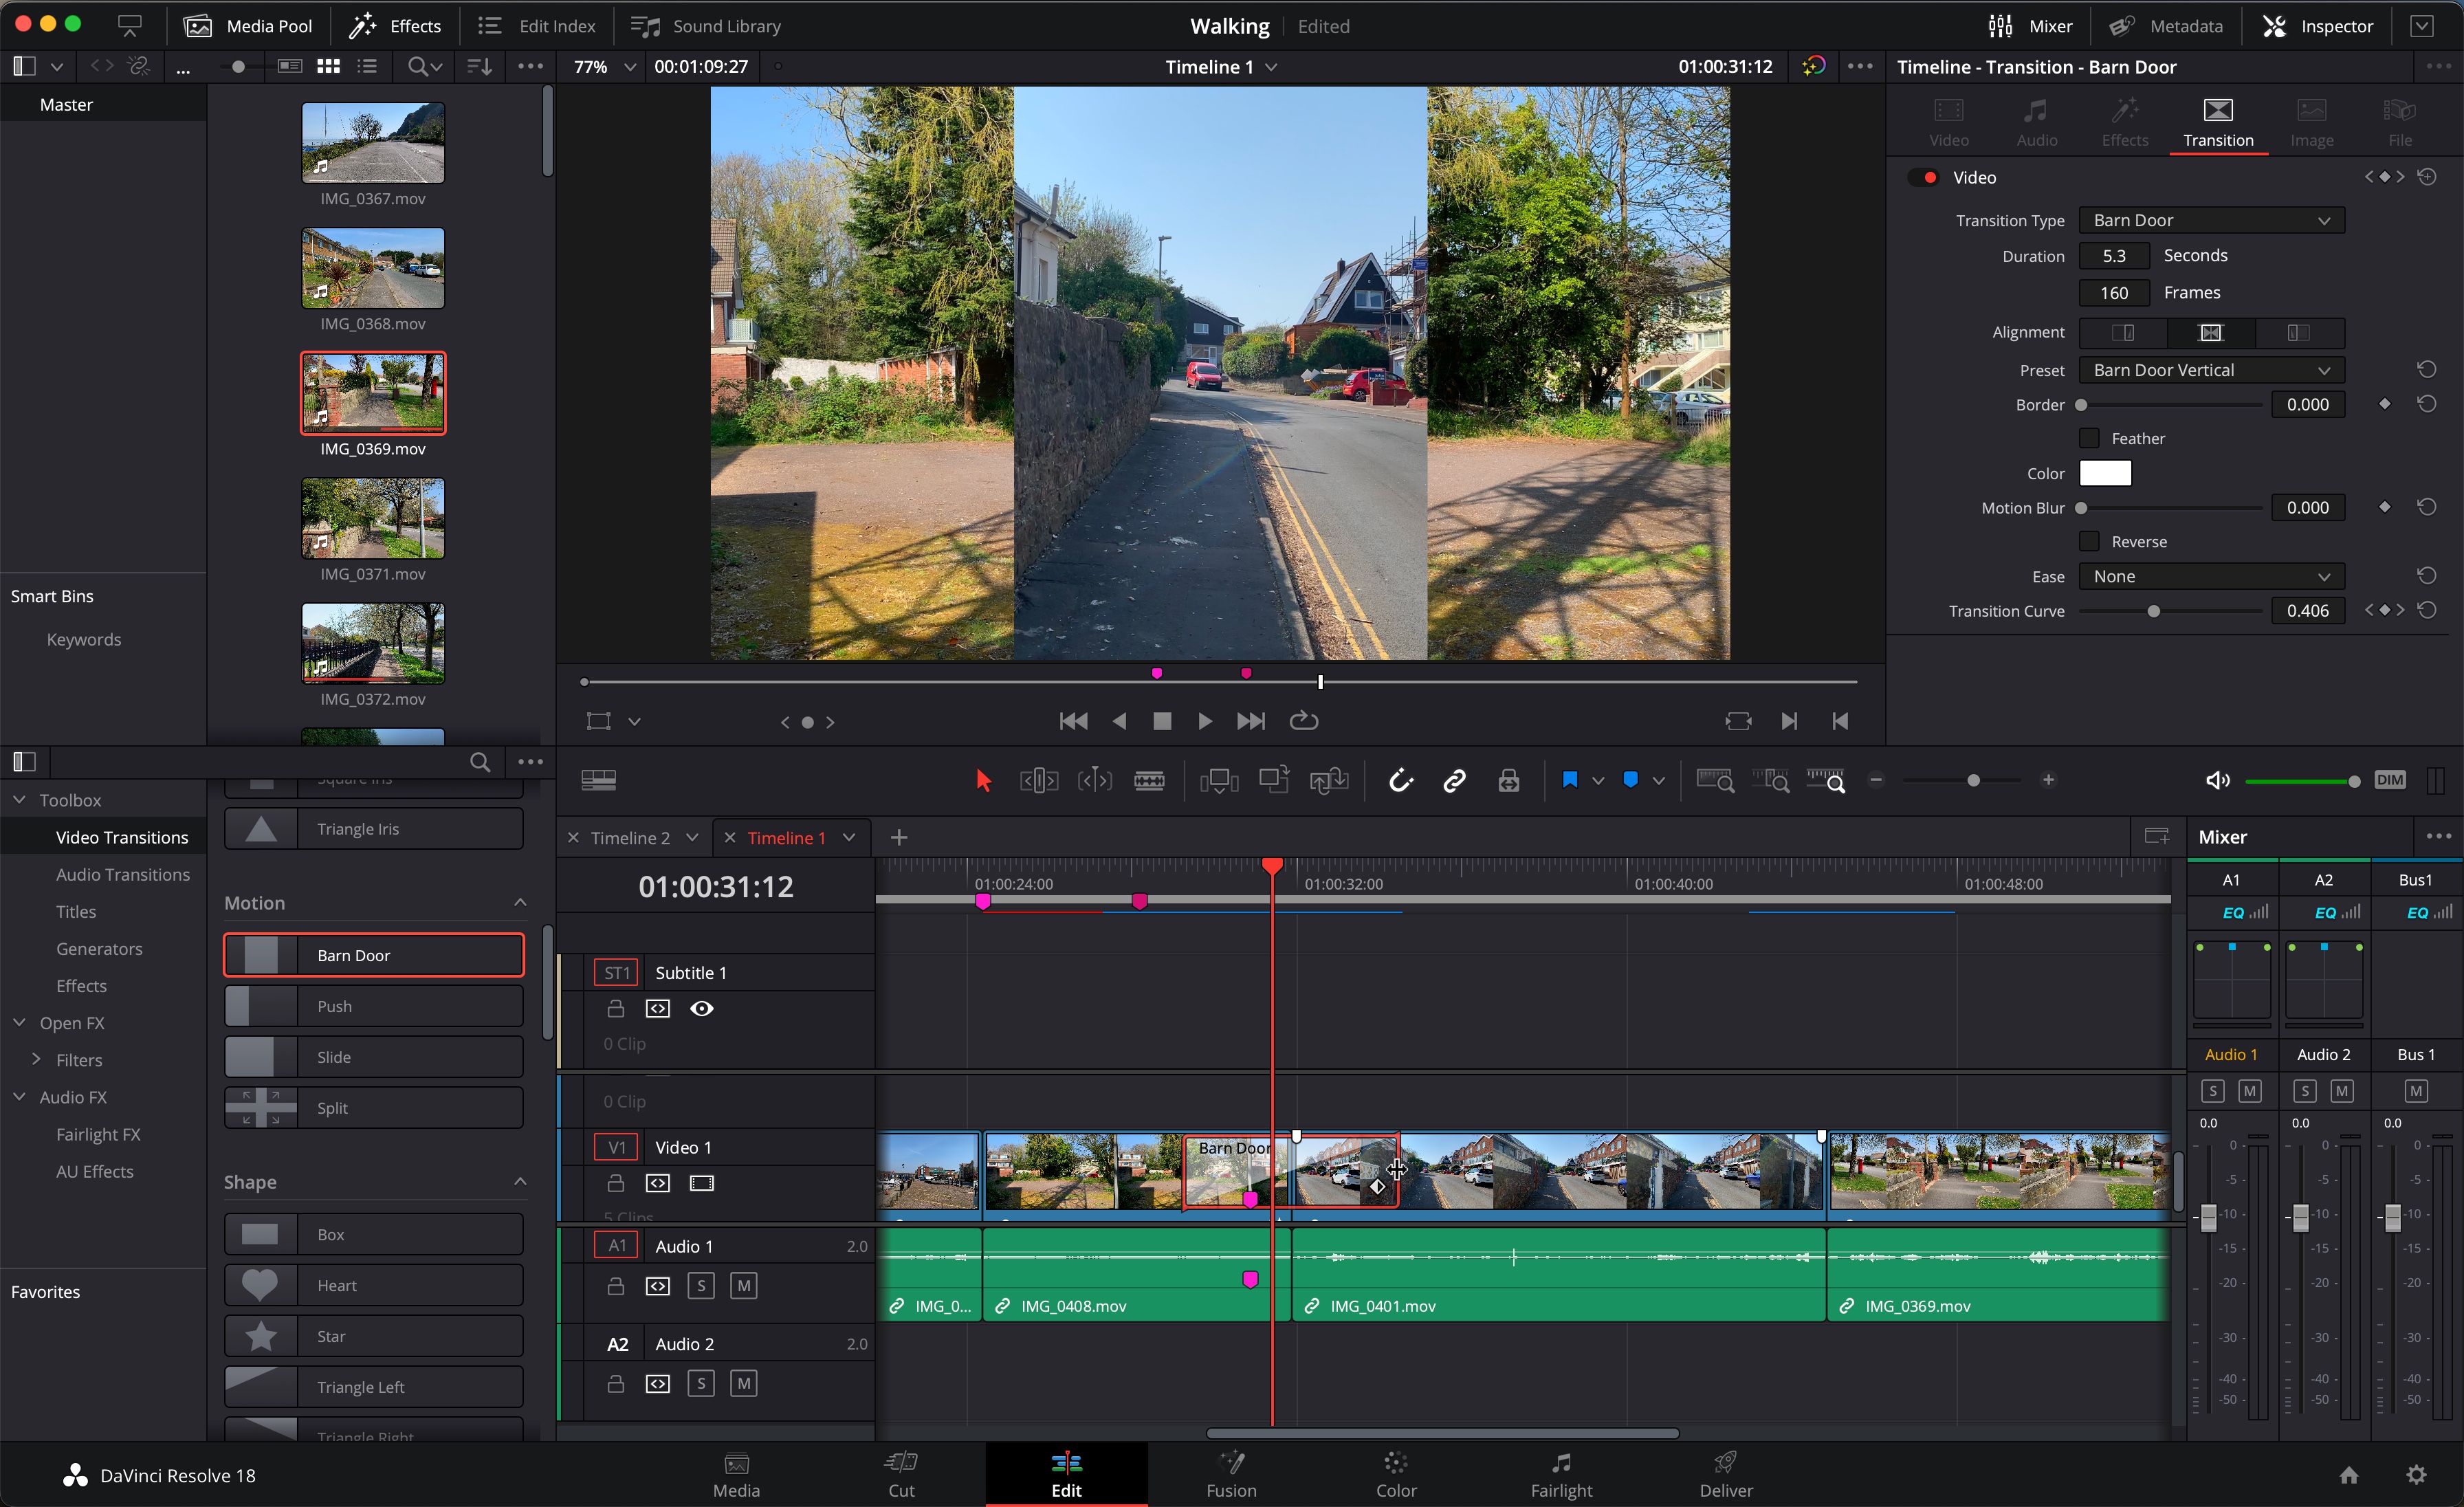
While in the Editing Workspace of DaVinci Resolve, you’ll find Video Transitions in the Toolbox section, lower left of the interface.
Make sure the clips you want to apply a transition to have enough footage before and after the cut. If they don’t, drag the connecting edge of the clips inwards to give the effect more footage to play with.
With the two clips touching each other, drag your chosen transition from the list on the left, over in between both clips.
As you hold the mouse button, you’ll see an outline over the clips representing your transition. You’re able to place it before the cut, after it, or use the cut as the center of the transition, depending on where you move the cursor.
Release the mouse button, and the transition is added.
It’s then possible to stretch and contract it directly in the timeline, or further customize it via the Inspector window, top right of the interface.
How to add transitions in CyberLink PowerDirector
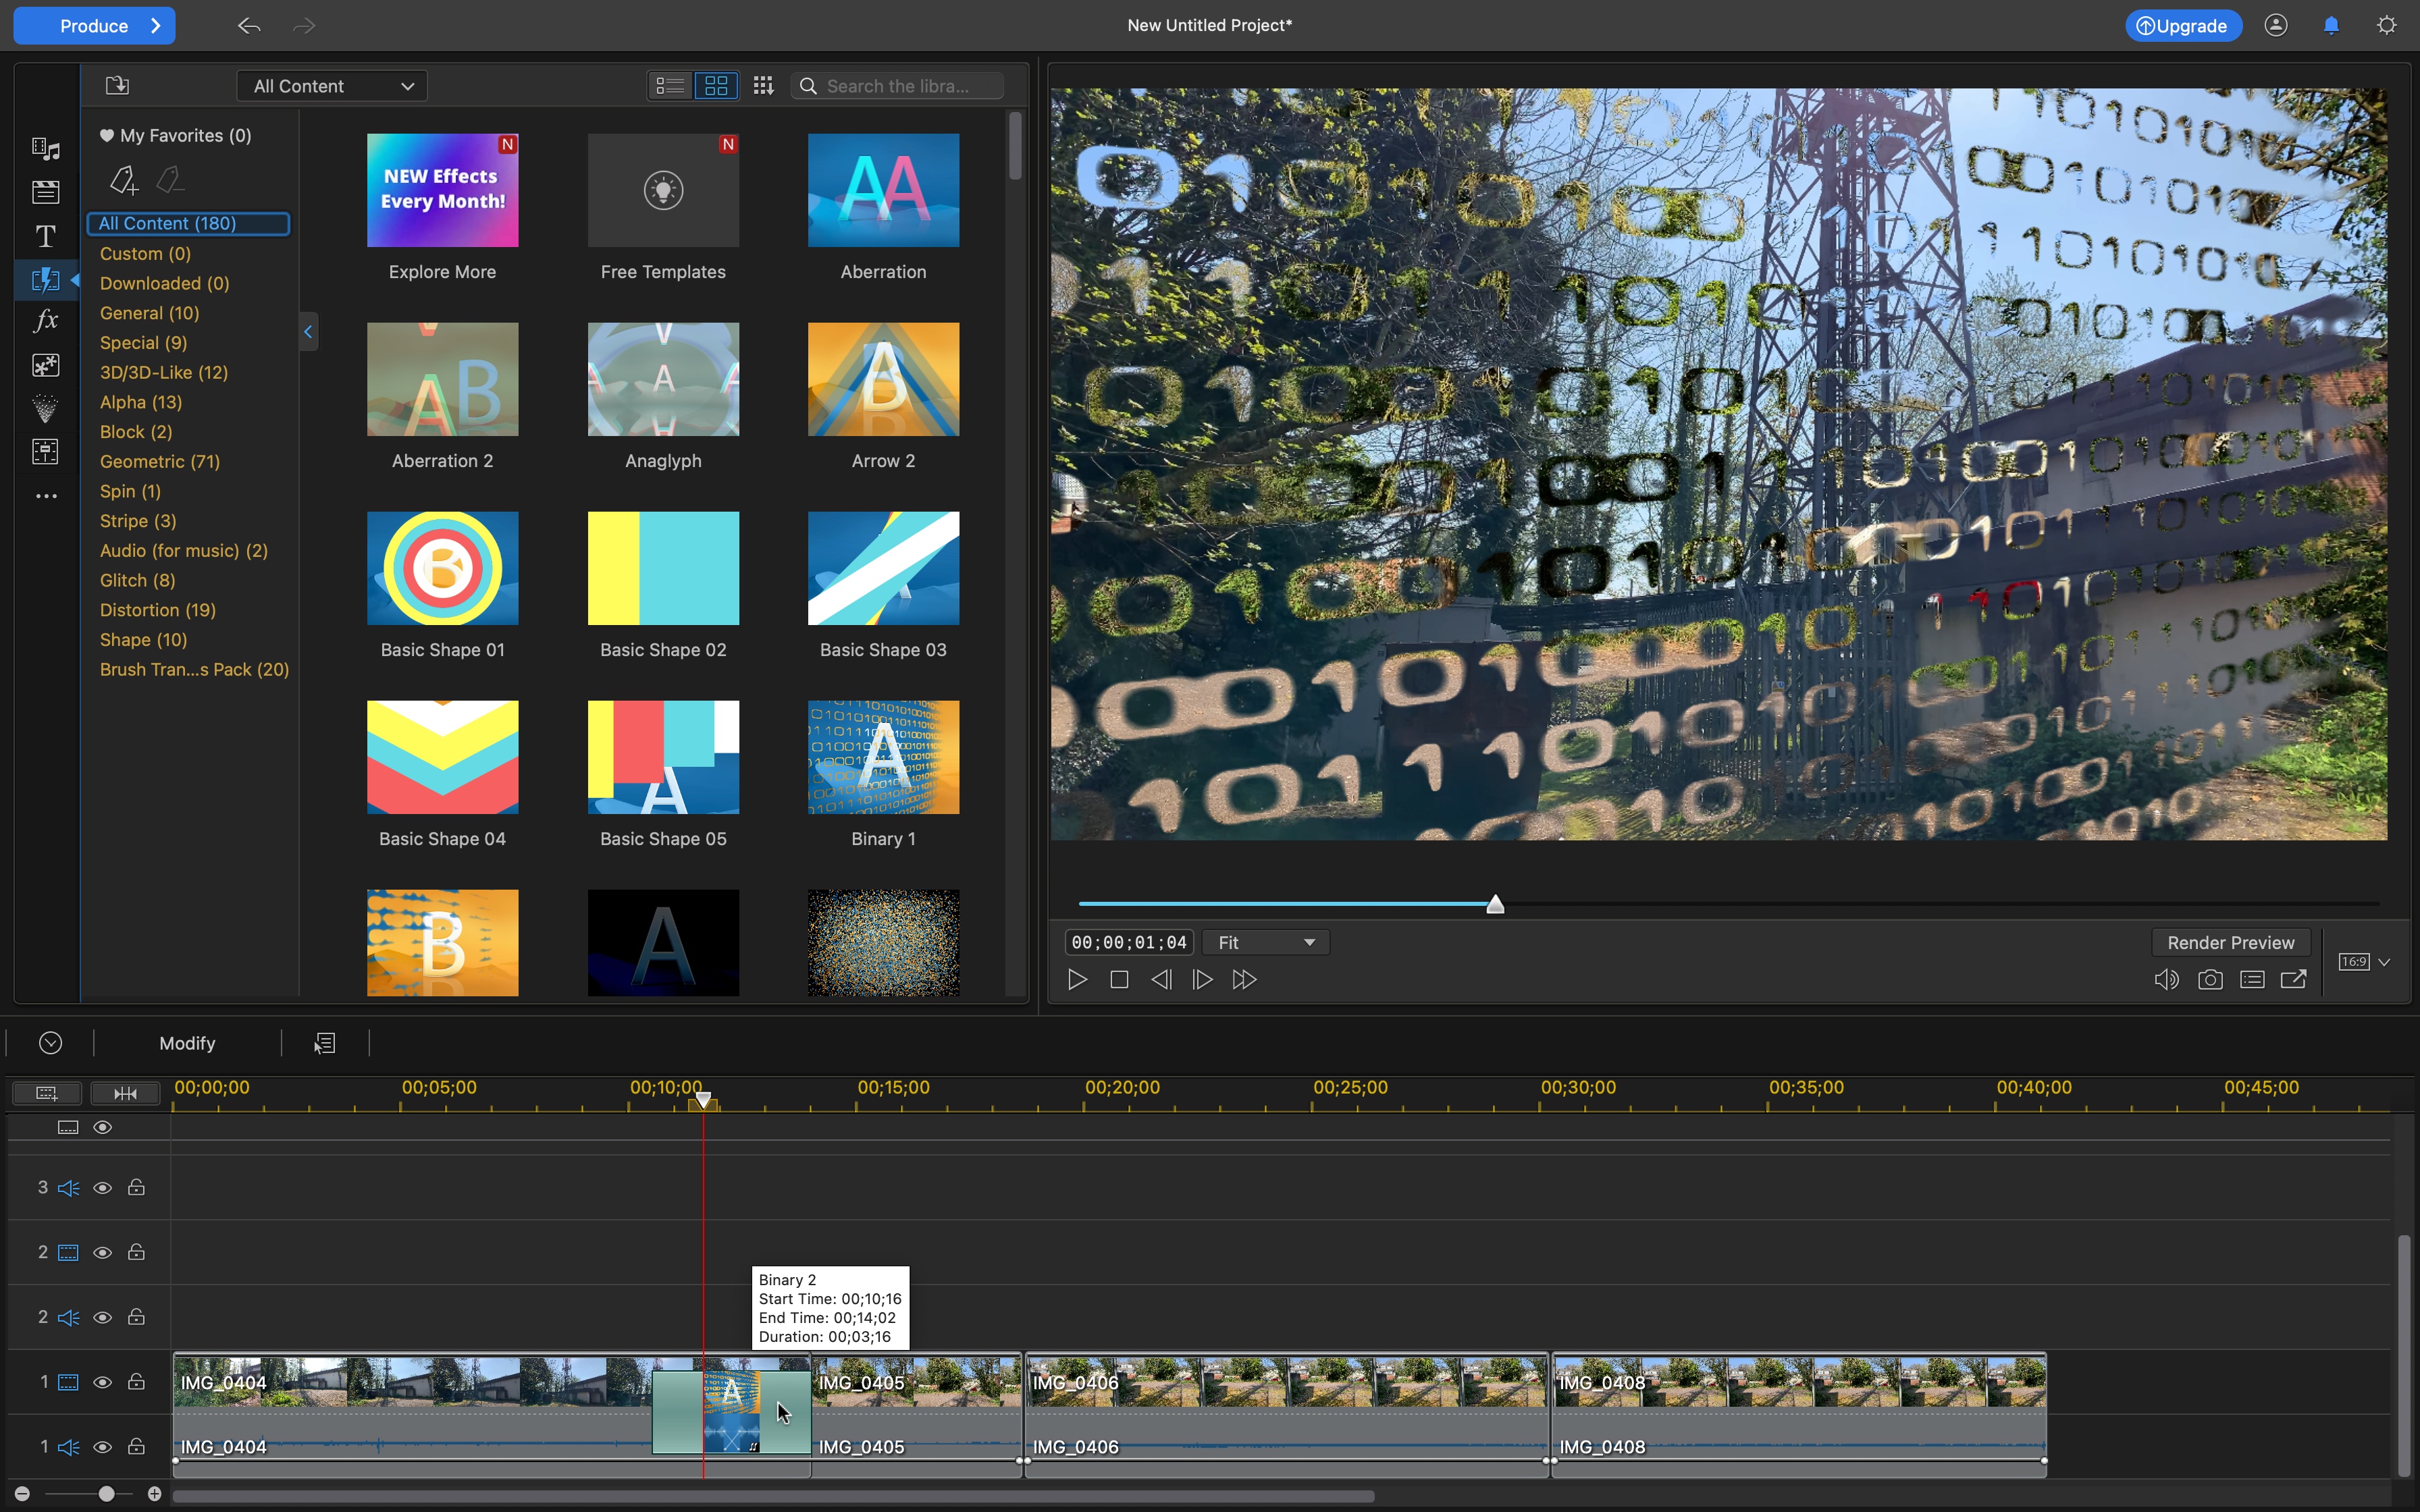
The CyberLink PowerDirector transitions are located in the left sidebar, an icon represented by a rectangle with a lightning strike through its center.
Click on it and you’ll be presented with a wealth of effects, which you can browse all at once, or just select some based on predefined categories. Clicking on a transition will trigger an animation preview both within the thumbnail itself, and on the main preview section.
To add one to your project, drag its thumbnail to your project, and drop it in between two clips. You’re able to alter its duration by dragging either of its edges inwards or outwards to shorten or lengthen it respectively.
You can also choose from one of two behaviors - cross or overlap - by double-clicking the applied transition, and selecting your preference. This is also the place where you can alter its duration, only this time via an input field.
How to add transitions in Adobe Premiere Elements
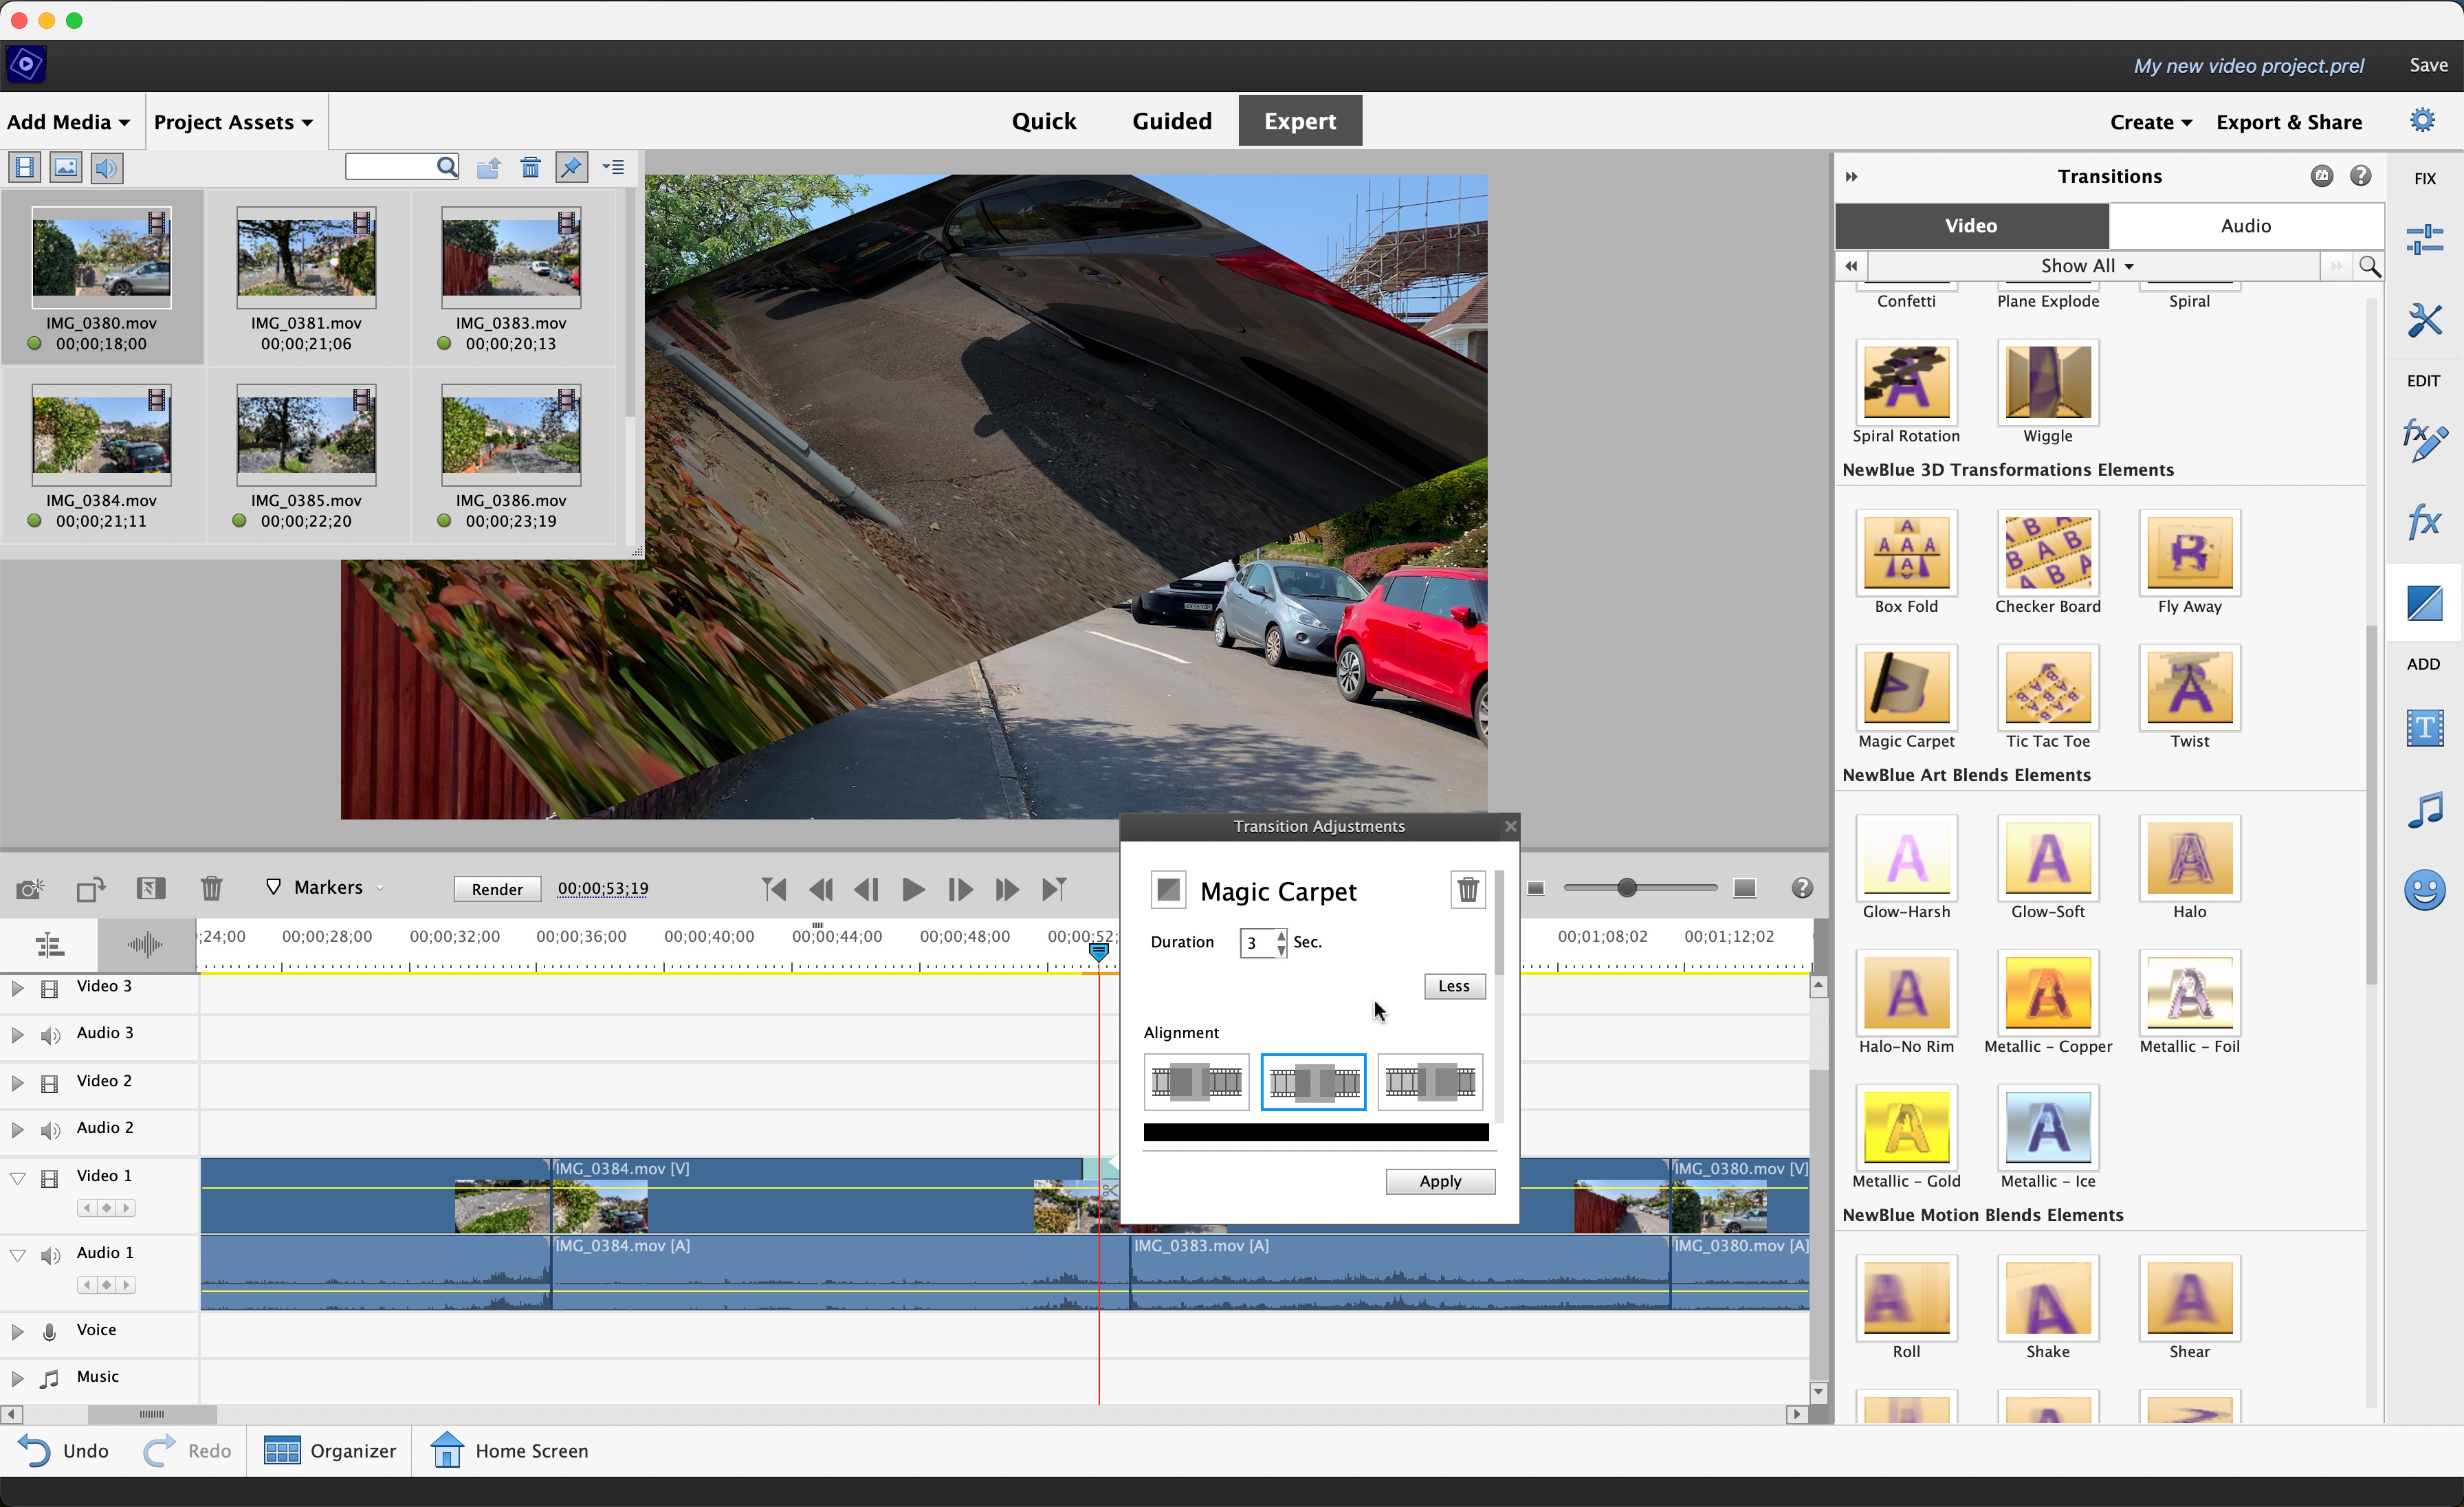
Whether you’re in Quick or Expert Mode, the principle is mostly the same in Adobe Premiere Elements - our top pick for best video editing software for beginners. But in this mini-tutorial, we’ll use Expert Mode as the example.
Transitions can be found in the right sidebar, represented by a square icon split diagonally. Click on it to reveal Premiere Elements’ available effects. Click on a thumbnail to get a quick preview of the effect.
Once you find the one you like, drag it in between two clips. A popup window will appear asking you how long you wish the transition to be (in seconds). Click on ‘more’ to choose whether you wish the transition to end, start, or be in the middle of that edit.
When you’re ready, click on ‘Apply’.
How to add transitions in Apple iMovie
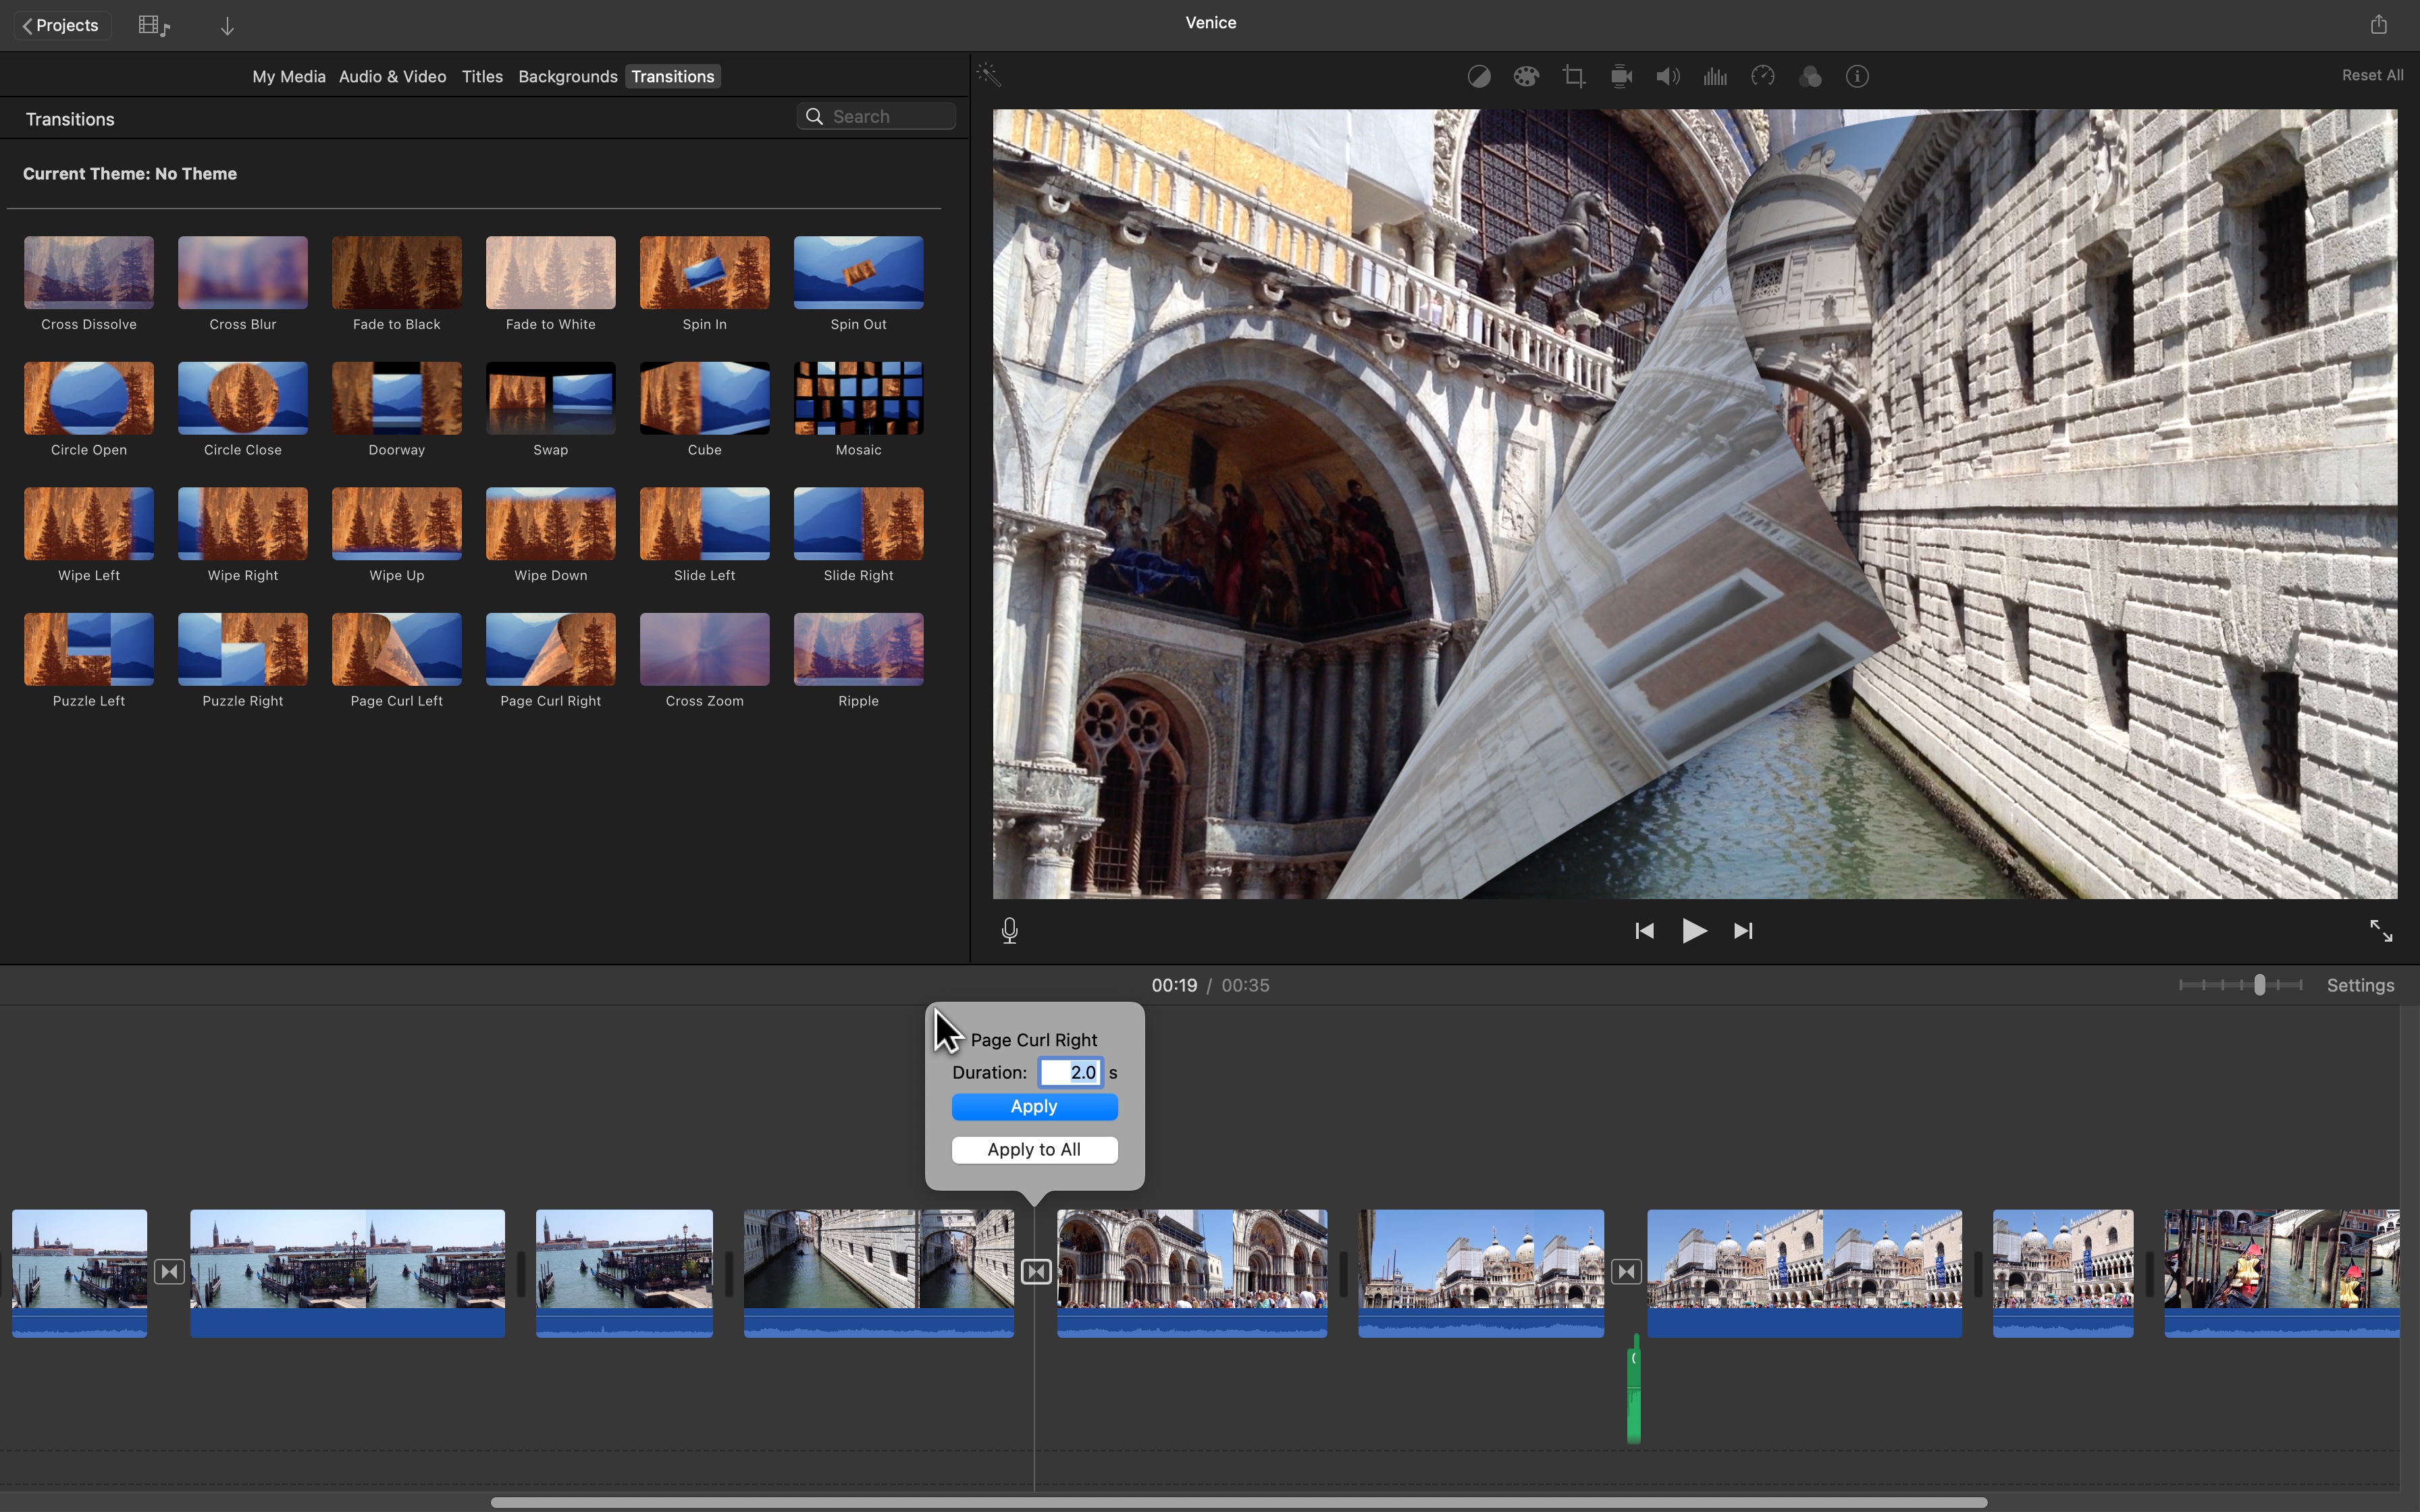
Apple iMovie is another free video editor that’s great if you’re new to video editing. Open a project and you’ll find ‘Transitions’ in the menu, top left of the interface. Click on it to reveal the twenty-four transitions available for you to use.
Mouse over them from left to right (or right to left - it works both ways), to see a preview of the effect, both within the thumbnail, and at the same time, in the interface’s main preview area.
Drag your preferred one in between two clips, and it’s added instantly. You have no customisation options, but you can change its duration: double-click on the transition in your project and a small popup window will appear, offering you the ability to alter the time it takes for the transition to occur.
How to add transitions in HitFilm
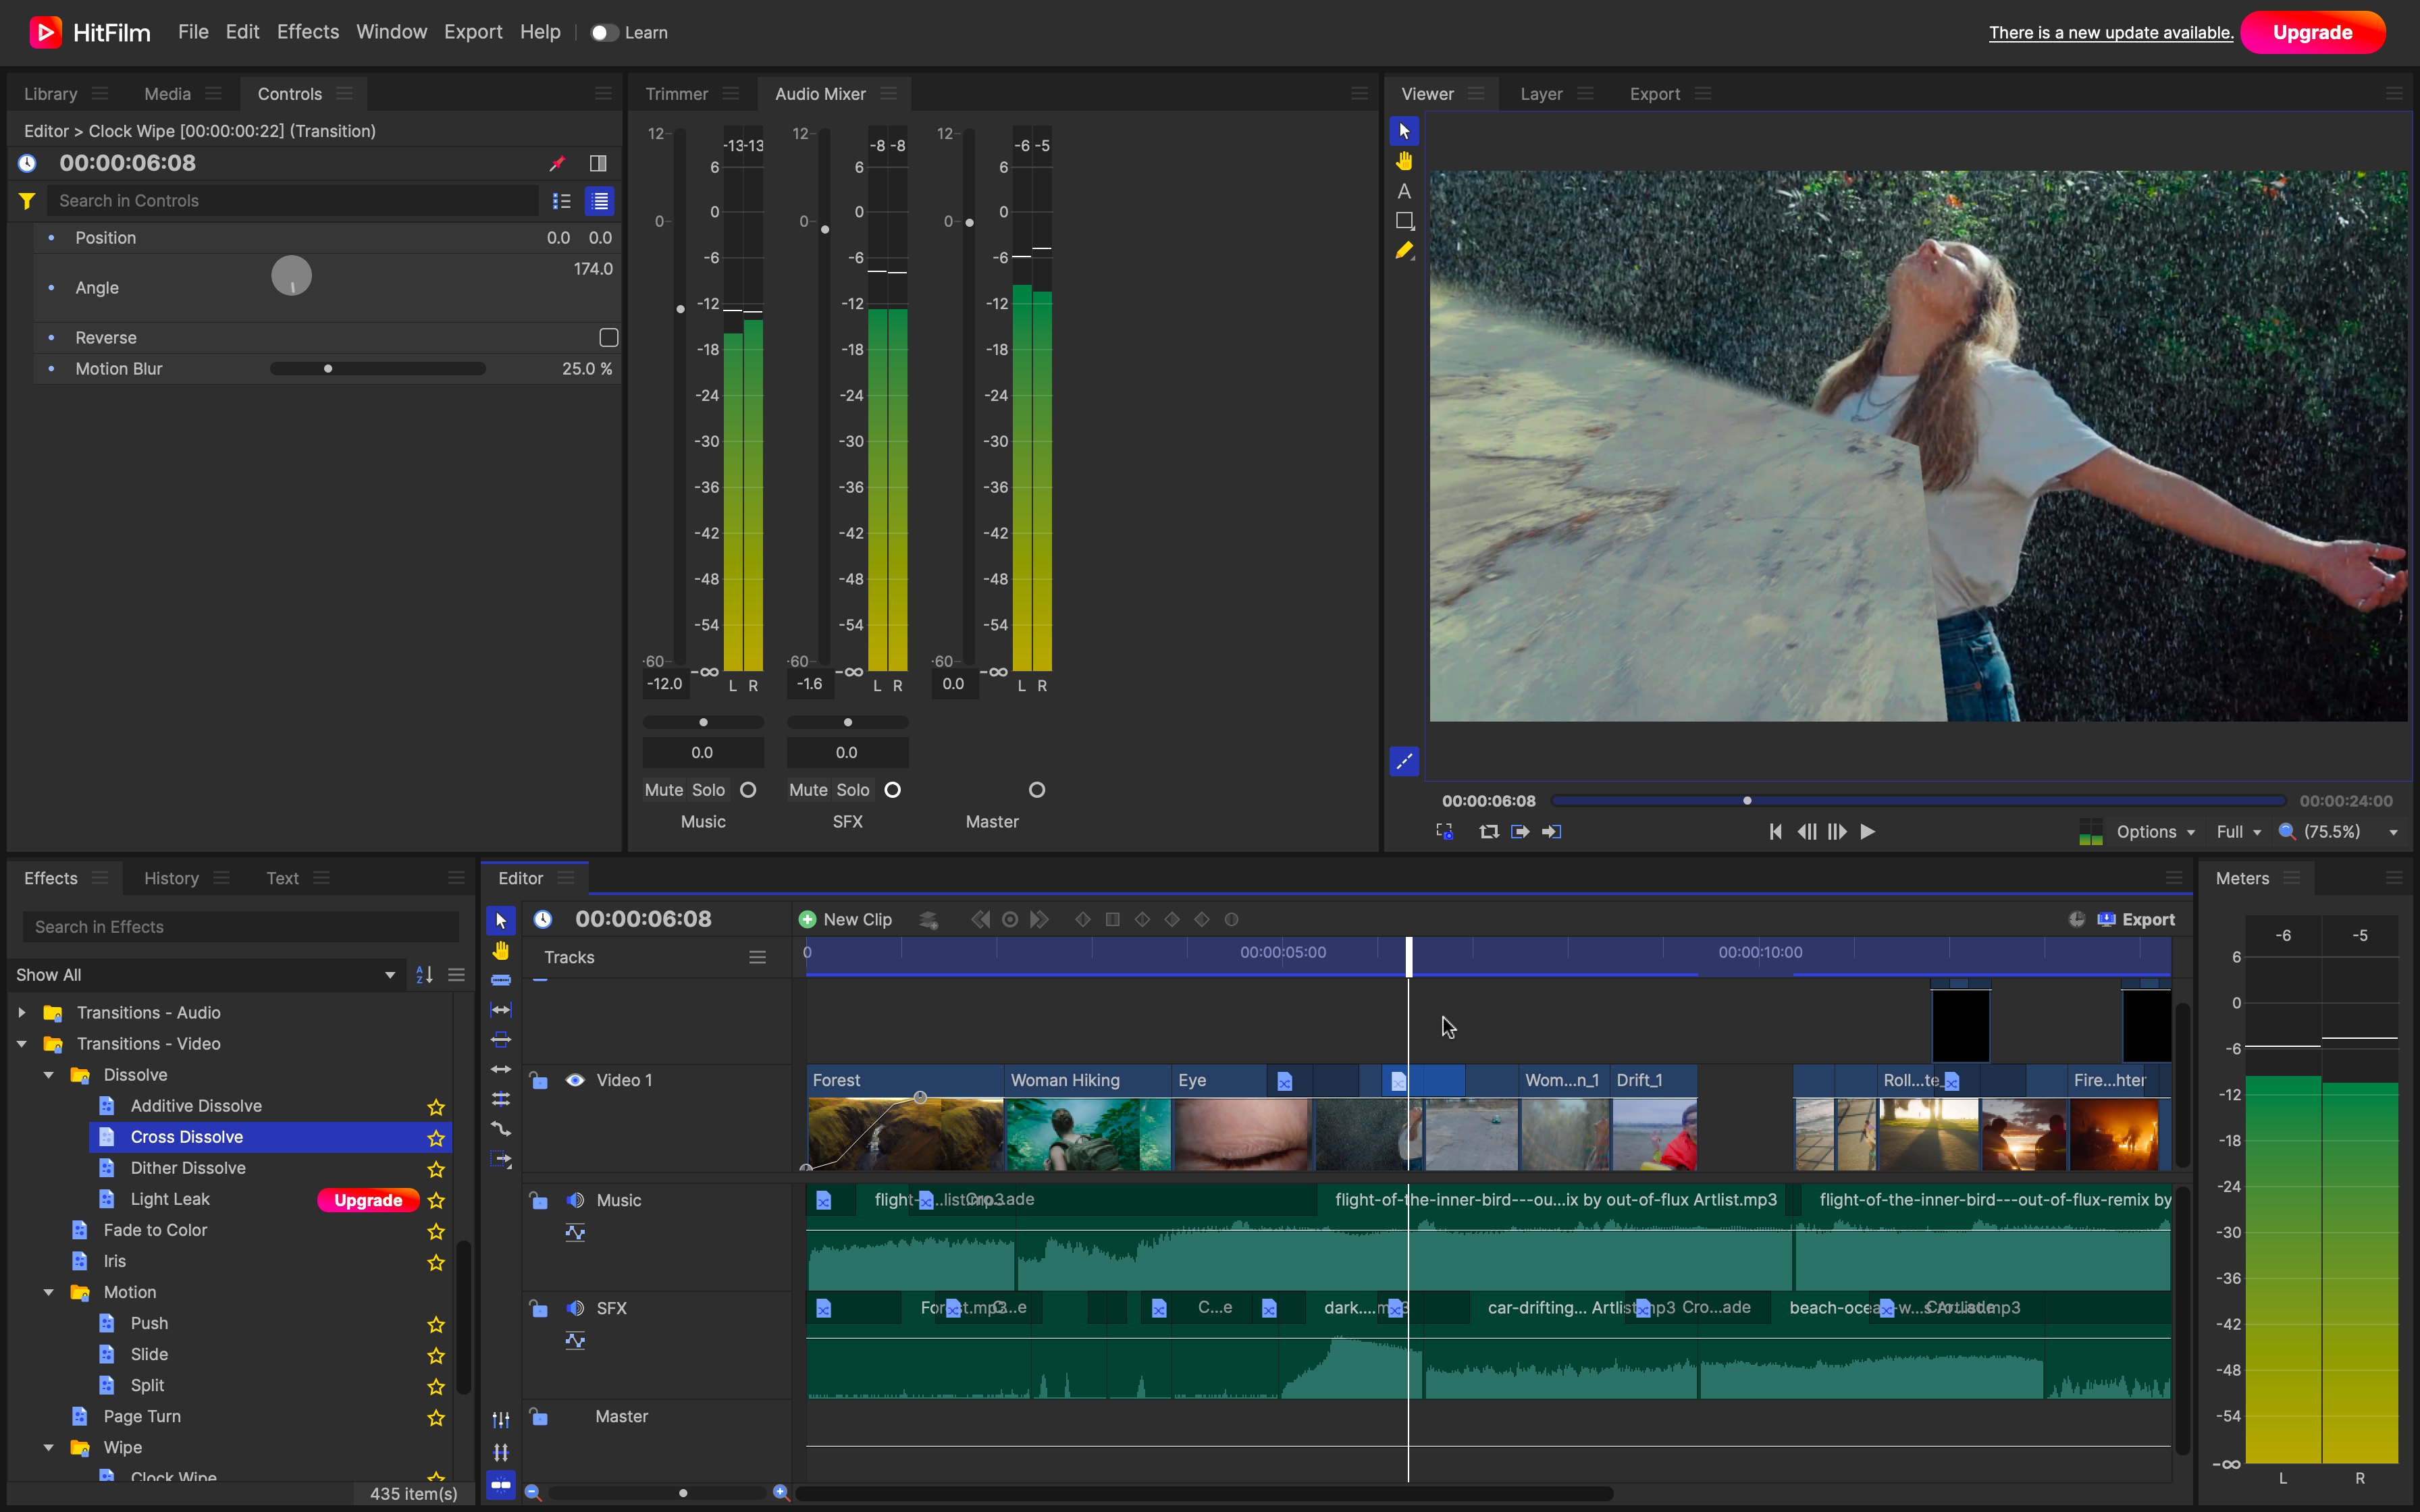
HitFilm, with its built-in VFX software, is an incredibly easy tool to use - whether you’re cutting clips or figuring out how to add transitions to your videos.
The software’s transitions are located lower left of the interface, in the Effects panel. Scroll down until you see ‘Transitions - Video’. Double-click on that folder to open it and reveal all available effects, broken down by categories.
There are no previews, so drag the one whose title appeals, on the gray-blue banner just above your clips.
To change its duration, mouse over to either of its edges, and drag it. Should you need to customize it, click on it to reveal all changeable parameters in the Controls panel, top left of the interface.
How to add transitions in Wondershare Filmora
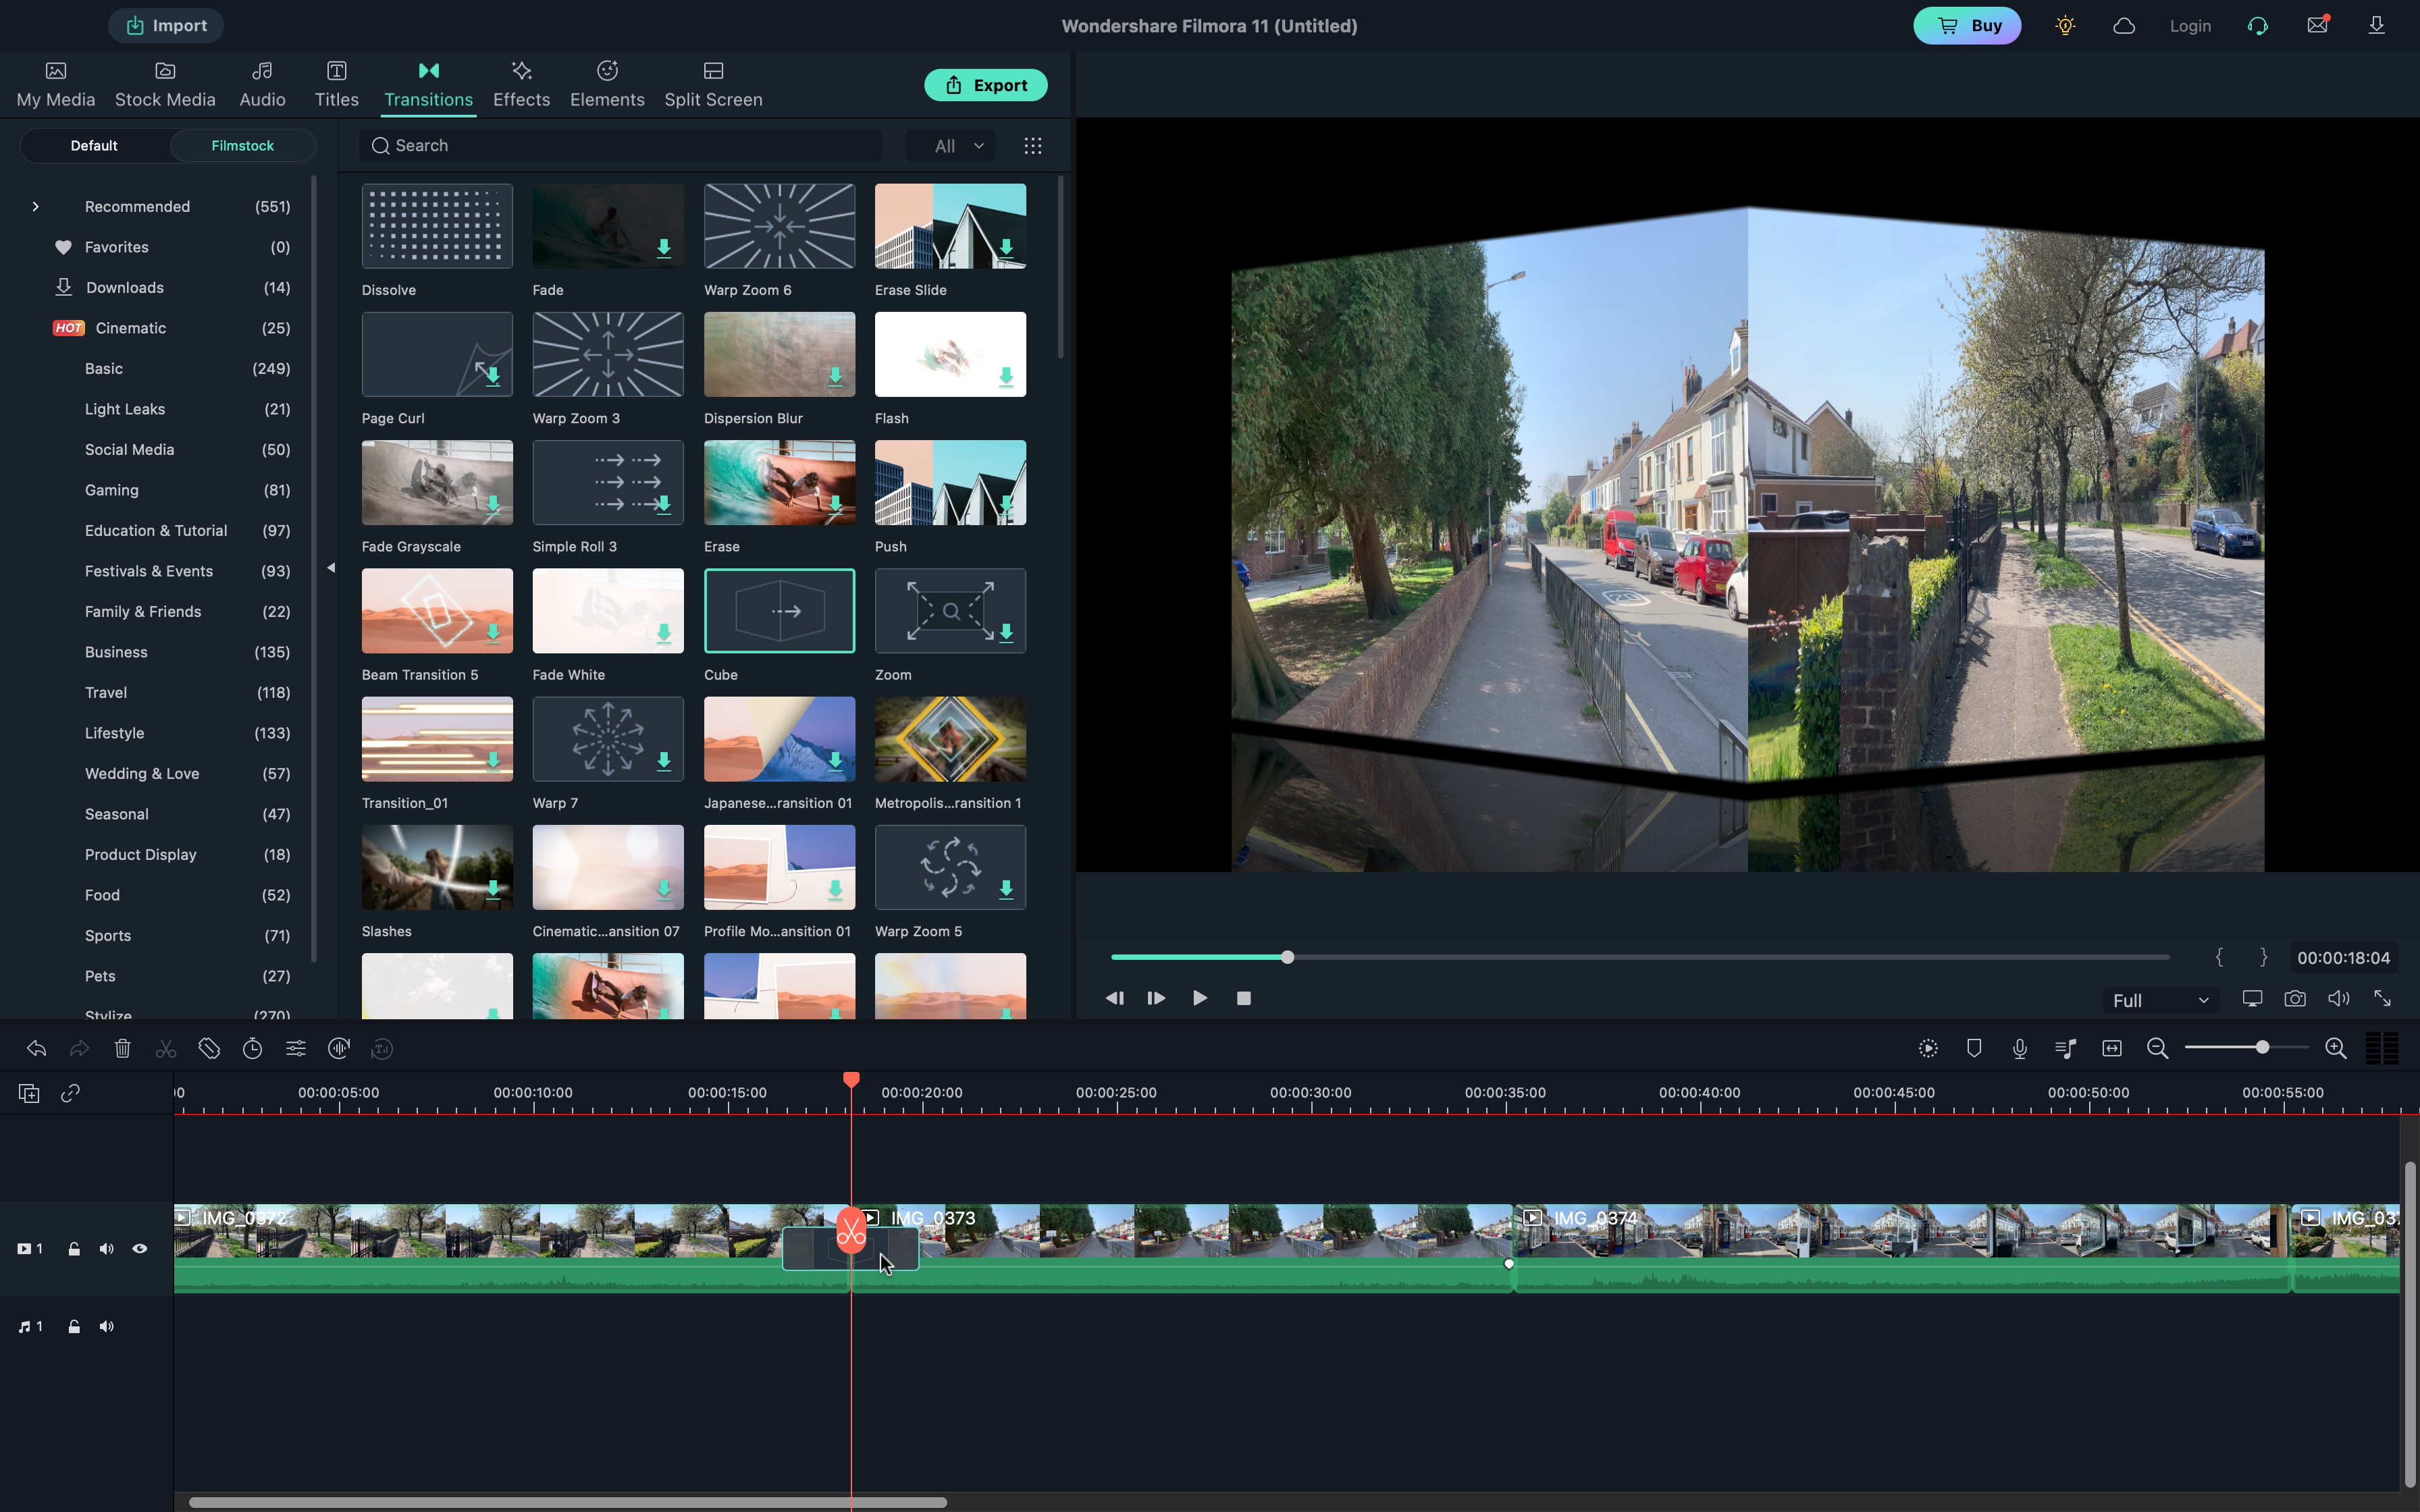
As a Wondershare Filmora user, you’ll find all the transitions you need by clicking on the ‘Transitions’ menu, located in the toolbar, top left of the interface. You’ll need an internet connected to load them all. Most are actual transitions, but some are folders, where yet more transitions are stored.
To preview one, simply click on it for the main preview section to be replaced with a default animation, giving you a good idea of what to expect.
Once you’ve found the one you like, drag it in between two clips in your timeline to apply it, then drag its edges to lengthen or shorten its duration (depending on whether you drag outwards or inwards respectively).
Double-clicking on the transition will reveal a small number of features top left of the interface. From there, you’re able to choose whether it starts at the edit point, ends once it reaches it, or is placed in the middle (the latter is the default). This is also the place where you can manually input its duration.
Power your performance with the best video editing laptops and best video editing computers
Steve has been writing about technology since 2003. Starting with Digital Creative Arts, he's since added his tech expertise at titles such as iCreate, MacFormat, MacWorld, MacLife, and TechRadar. His focus is on the creative arts, like website builders, image manipulation, and filmmaking software, but he hasn’t shied away from more business-oriented software either. He uses many of the apps he writes about in his personal and professional life. Steve loves how computers have enabled everyone to delve into creative possibilities, and is always delighted to share his knowledge, expertise, and experience with readers.
- Steve ClarkB2B Editor - Creative & Hardware

 Become a TechRadar Insider


