


We've covered all manner of hot mods and crazy cases: from coolers that look like Giger-esque phallus-filled artwork, to lighting that would put the Blackpool illuminations to shame. So when we came across not so much a mod as a new way of life - okay, a way of wall-mounting a PC - we were all on board.
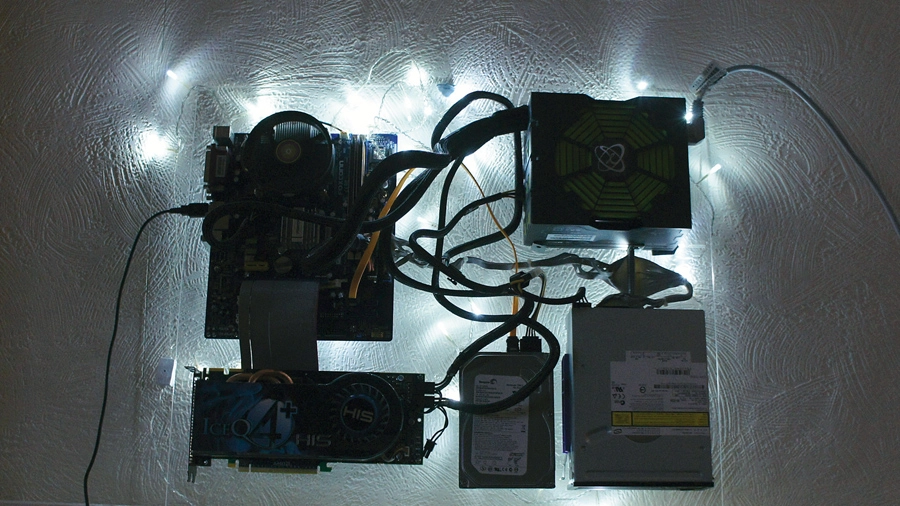
We stumbled across the original project when it was posted to Reddit back in 2011 - it simply showed a running PC hung up on a wall.
Sincere flattery
We felt a strong urge to try and emulate this trick and our slow-firing neurons took to calculating just how we could levitate such a contraption into the air using our pocket money.
While the original system seemed to be mounted on a metallic-style board, we decided to avoid anything metal-based. First for cost, second for weight, and last because we hear computers aren't too keen on short circuits.
Having played with Perspex/acrylic sheeting quite a lot, we knew it could be cheap enough and rigid enough, but would it take the temperatures that PC components throw out?
A quick scout around showed that Perspex starts to lose its mechanical rigidity between 95ºC and 120ºC - and starts to melt at 160ºC. As only top-end processors have thermal output of 135W, with the vast majority being 95W or far less, for most systems this should be absolutely fine. We wouldn't suggest you run overclocked systems on such a mounted system, again simply as a 95W TDP processor, such as the Core i5 2500K, can have its temperatures raised greatly.
Graphic cards are a different beast but again we'd be wary of mounting a graphics card with a TDP over 200W, as load temperatures can start reaching the 80ºC level. When it comes to the rest of the components, temperature won't be an issue.
The fact of the matter is we're also going to leave clear air between components and the Perspex, so there's no chance of the Perspex meeting this type of temperature. But it's best to play out the worse case scenario here.
We shouldn't also overlook that this is going to be mounted vertically, which we've been told is better for cooling as it encourages better convection.
Ideally, we'd suggest 5mm Perspex sheeting. You can get away with 4mm, but there's a little more flex to it with sheets this size.
To fit the various components to the sheet we're going to use 15mm M3 screws and a bunch of suitable bolts. We did consider using the standard brass motherboard stand-off posts. But fixing these to the Perspex would either be too elaborate, using multiple screws, or not secure enough, such as screwing them directly into the Perspex sheeting.
Silver friends

Just as a towel is essential for hitchhiking around the galaxy, the trusty M3 screw is the standard issue case fixing for most PC components. These little silver friends are going to be ideal for the hard drive, optical drive and the motherboard.
Both the drives provide alternative base fixing holes. You just add a spacing washer or bolt and these are simple things to attach.
The only curve ball is when you come to fixing the power supply. Through some oddity of design it's often the only part that requires the alternative US-based standard 6-32 UTS or Universal Thread Standard screws (you're not the only ones around here who read Wikipedia you know). These are the case screws with the coarser thread.
As these are only used on the power supply unit our plan is to use 90 degree brackets to fix the PSU in place. If long enough, these could be angled underneath the PSU to hide them from view.
The last confusion is the graphics card. You can't have this hanging out the side of the PCIe slot, it's just going to snap off. The solution is simple, get a PCIe riser extension ribbon cable. You might be worrying about latencies, but for a signal travelling near the speed of light a foot of extra cable is just a nanosecond. You'll find 15cm ones on eBay, but you'll need two for a long enough strip, otherwise the card would end up being mounted fan-side down.
As for fixing the thing to the wall, this is the only area that concerns us, as Perspex, while resilient to impact, can be brittle under the wrong circumstances, such as twisting and compression. Opting for a thicker, longer screw will help ensure it stays secured on the wall and using a large washer will help spread any load.
Alternatively you could use brackets to mount the board onto the wall and hold it in place, which would eliminate any chance of damaging the Perspex.
Part 1: I love a plan
Check your specific hardware will fit
1. A bit sketchy

Before we started buying anything, we first decided to see how much room all of our components would need. Grab a bit of graph paper or fire up Excel and plot a quick outline of the components over the area of Perspex you're thinking about. We used a spreadsheet set with square cells marking 1cm blocks. And remember to leave enough space for the cables.
2. Cable guy

Keep in mind where you're going to route cables around the board, coming out of the PSU to the motherboard. Very likely you'll need at least one to the graphics card and the usually easier-to-route power and data cables to the drives, too. Don't forget power, monitor, keyboard and other USB cables will need to come from your desk to the board as well.
3. Drilling holes

It's important to note that we're not anchoring screws to the Perspex itself as such - it's not strong enough in that way. We're slowly drilling holes through the Perspex and using the M3 screws to fix the components, with the stress spread out, using a washer at the back of the board. When drilling Perspex do make sure you go slowly to avoid potentially shattering it.
Part 2: Attached to you
How you can secure your PC to Perspex
1. Motherboard mounting

We're taking a simple approach with the motherboard. Lay it out on the Perspex and mark its mounting points. You should use at least six-points. Drill out 3mm holes in the Perspex so you can then push through the M3 screws with a washer. Ideally use three nuts as posts to raise the mobo off the Perspex and finally attach it in place with yet another bolt.
2. Hard and optical drives

Both hard drives - solid or spinning - and optical drives offer mounting points in the base of the drives. Luckily this means it's possible to screw your drives directly to the Perspex. However, you'll need to cut away part of the protective covering, but you'll be able to place the drive face down and mark off where it is that the fixing hole needs to go.
3. Space out man

We'd certainly recommend leaving similar space under each drive, just as we've done with the motherboard. If you're using longer M3 screws, you can add a nut to the outside of the board, plus a couple for raising the drive, along with a couple of washers, too. Most drives will happily accommodate 8mm of thread, so it's not hard to use up.
4. Flexible friend

Unless you're running on-board graphics you're going to run into an issue with the graphics card - they're simply too heavy to leave in the PCIe slot without additional support. Thankfully you can buy ribbon PCIe riser cables, which enable them to be installed away from the motherboard. You'll need around a 30cm one - alternatively here we've used two 15cm ones.
5. Vision on

You could use a single 15cm ribbon but this ends up with the graphics card being fan-side on the Perspex. Unless you can mount it off the board that's going to cause major cooling issues. Be careful when manipulating these as the solder points aren't the strongest things in the world - we managed to unseat one.
6. Mounting me

When fixing this to your wall it's obviously easier to do it with the heavy components removed. You'll need to use your common sense here, sourcing suitable fixings for your walls along with a spacer to lift the board off the wall. We'd drill holes at least 20mm in from the edge and we'd consider either a central fixture, or two central additional ones.