The easiest way to connect to any VPN is to use its own apps. There's no tricky setup required, or complicated settings to think about – typically you can just install and go.
But custom apps can have problems, too. Clumsy interfaces, annoying notifications, key features missing, barely any settings – there are some terrible products out there.
You may not have to live with this, as the VPN provider’s app isn’t necessarily your only option. If your VPN supports the OpenVPN protocol, there's a good chance you can also use the service with OpenVPN's free OpenVPN Connect client.
Article continues belowMost VPNs already use OpenVPN software to make and manage connections (in Windows, search your client folders for OpenVPN.exe), so you are most unlikely to run into any compatibility issues; set it up and you'll be ready to use the service within minutes.
This won't work for everyone. Switching to OpenVPN will probably mean you'll lose access to any advanced service extras. If your provider supports ad blocking, Tor over VPN or multi-hop VPN (connect to one VPN server, exit from another), for instance, these features may disappear if you switch to another client.
But on the plus side, you'll get a strong set of core features. On Windows, for instance, there's 'Seamless Tunnel' (which tries to keep the VPN tunnel active when pausing, resuming or reconnecting), automatic reconnection when your device starts, IPv6 control, TCP or UDP connections, a DNS fallback option, and more.
As OpenVPN Connect isn't tied to a specific VPN provider, you're able to import server profiles from anywhere. If you've signed up with two VPNs, or want to use one commercial and one free service, that's no problem – the server list can include locations from wherever you like.
Unsure? You can generally install OpenVPN Connect and your provider's client on the same system, without conflicts. Try your provider's client for one session, OpenVPN for the next, see which you like best.
However, you’ll still need a VPN provider, so users in the market for a VPN service should check out our list of the best VPNs.
It won't take long to get started. Most users should have OpenVPN up and running within 30 minutes, and it'll often take less time than this.
- It’s also worth bearing in mind the good reasons why a VPN isn't enough

Configuration files
OpenVPN Connect is a powerful package, but it won't be able to connect to your VPN until it has all the necessary configuration files, the settings which define how each connection should work. Some providers make these hard to find, others ask you to generate them manually, and a few don't give you any at all, so we would recommend checking your VPN's website before you do anything else.
The best VPN providers have OpenVPN setup tutorials which not only mention configuration files, but also show you how to use them. Good examples include ExpressVPN, IPVanish, IVPN, NordVPN and VyprVPN.
Others may not have any setup guides, but still provide the files for those who need to use them. Search the Support pages for references to OpenVPN or OVPN files.
A few services hide the files away in a web management console. If you've created an account with a VPN provider, log in and browse the pages for OpenVPN setup files, or tools to generate them.
When you're done, check your downloaded files and unzip any archives. You're looking for multiple OVPN files, one for every server you'd like to access. There may be other files, too, but as long as you've got the OVPN data, you should be ready for the next step.

First steps
The latest build of OpenVPN Connect is always available at the official website. Go to the VPN Server Resources page, click 'Connecting', and you'll find links explaining how to get connected on Windows, macOS, Android, iOS and Linux.
The Windows page has links for OpenVPN Connect, the older OpenVPN GUI and a handful of other alternative clients.
At the time of writing, the page includes links for the current version of OpenVPN Connect 2.7, and the beta of OpenVPN Connect 3. We're covering the beta here, so grab either the 32-bit or 64-bit version, depending on your Windows build. If you're unsure of what version you need, try 64-bit first. If you're wrong, you won't harm your system, the installer just won't run.
Although we're going to discuss Windows, the app works much the same with other operating systems. Check out the Android build and the iOS version for more.
Launching the installer displays a very standard setup wizard. Agree to the license, accept the default settings unless you need to do otherwise, and click 'Install' to complete the process.
- Check out the best free VPN services

Import VPN profiles
Launch OpenVPN Connect and it prompts you to import a profile containing information on the server you'd like to use (server name, username, password and maybe port).
The opening screen asks if you'd like to import data direct from OpenVPN Access Server. That's something a business might use to simplify managing its own server, for example, but it's not relevant to the average user.
Click 'Import from File' instead, then click 'Browse' and choose one of the OVPN configuration files you downloaded earlier. If all is well, OpenVPN Connect displays a message telling you the profile has been successfully imported.
OpenVPN Connect gives the profile a title based on the IP address and the name of your file. This is often less than readable – our first title was '198.50.134.146 [vpnbook-ovh-udp53-Canada]' – but you can freely edit this to make it simpler ('Canada', 'Montreal', 'VPNBook: Montreal', whatever you like.)
At a minimum, you must also enter the username you'll need to log in to this server. Some VPN providers generate a random username when you sign up, others accept your email address, but your provider's support pages should tell you more.
Check the 'Save password' box and you can optionally enter and save your password in the profile. That means you won’t have to enter it every time you log on, but of course is also less secure, as anyone with access to the device will also be able to use your VPN.
Once you've entered all the details you need, click 'Add' to import the profile.
If your provider's profiles have a certificate bundled with them, you're able to import that, too, by clicking the menu button top-left and selecting 'Import Certificates'.
And that's it, your first profile is imported and hopefully ready to go. But the chances are you'll want to add more, so click the orange '+' button (or Menu > Import Profile) to import as many other profiles as you're intending to use.

Getting connected
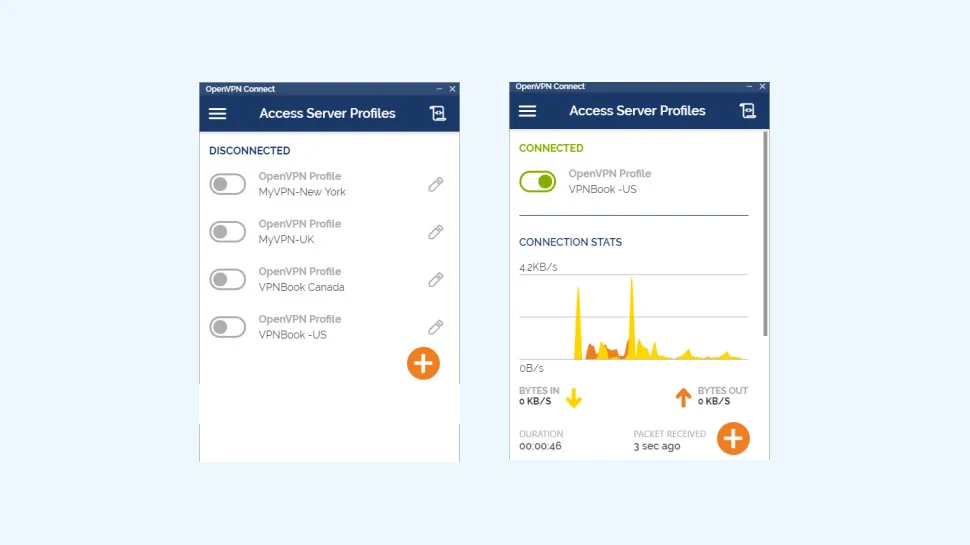
As you add profiles, they appear in a simple list on OpenVPN's Access Server Profiles page. Tap the profile name, you're prompted for your password (unless you've saved it in the profile), and the client should get connected within a few seconds.
OpenVPN Connect's simple but good-looking interface plots incoming and outgoing data on a real-time Connection Stats graph. It's not the most essential element you need from a VPN client, but it does at least confirm that the system is working as it should.
To verify the connection, point your browser at IPLocation.net, too. The site will display your new IP address and tell you where it thinks it's located.
When you've finished testing the profile, click the profile name to disconnect. By default, OpenVPN displays an 'are you sure?' dialog to reduce the chance of accidental disconnections, but if that seems like a hassle, checking the 'Don't show again' box ensures you won't see it in future.
If you're looking to switch to another profile, click that profile name instead and OpenVPN will automatically close the first connection, then initiate a new one.
Typically, all of this works just fine, first time, without you having to do anything else. But if you do run into problems – a server won't connect, for instance – tapping the Log icon top-right of the screen displays a record of all recent connection events.
This is highly technical and even experienced users won't necessarily understand a lot of it, but have a look, anyway. Errors are highlighted, so if there's an authentication problem or some other major issue, it'll generally be easy to spot.

Settings
OpenVPN Connect generally works well out of the box, but it also has some useful settings (Menu > Settings) which you might want to explore.
The client normally waits one minute for a server to connect, for instance. If you know that a server normally connects within a few seconds, or not at all, that's probably a bad idea. The Connection Timeout setting enables dropping the wait to just 10 seconds, or you could go the other way and increase it to two minutes, or tell the client to retry forever (you can still cancel the connection if you get bored).
Enable 'Reconnect on Reboot', for instance, and if a VPN connection was active when your device was last active, the client will try to connect. That's much smarter than competing apps, which often just connect you to a specific server, every time you boot. Instead, it allows you to carry on where you left off, either disconnected, or connected to the last server you were using. Easy.
The 'Seamless Tunnel' option tries to reduce packet leaks when the VPN is paused or reconnecting, perhaps when transitioning from Wi-Fi to a cellular network.
By default, OpenVPN Connect sets its VPN Protocol setting to adaptive, meaning it tries UDP first, then TCP if that fails. If that doesn't work for you, it's also possible to force use of UDP or TCP for all connections.
This is just scratching the surface, and the Settings box also has tweaks for IPv6 handling, compression, the minimum TLS version and more. That's handy if you know what you're doing, but if you don't, beware – you could be compromising your security. If you're unsure about the impact of a setting, leave it alone: the default settings are well chosen, and generally work just fine.
- Check out our best VPN service countdown
