How to maximise your PC processor's efficiency

Windows is very democratic in its allocation of CPU time - just about any program you run gets full access to every processor core by default. This sounds like a good idea at first, but it isn't.
Yes, some of the programs you run need to consume all the CPU power you have available, but there are plenty of others that are less important. Many of those system tray icons represent tools that you need to run, but aren't exactly critical. There's no need for them to have the same level of access to your CPU as, say, that game you're going to play next.
Many PC users don't realise that there are several ways to make this happen. You don't have to put up with the standard Windows CPU scheduling strategy - you can easily change it, ensuring less important programs make less use of your resources and leaving more power available for the applications that matter. Any resulting speed boost will be small - it's more likely to be 5 per cent than 50 per cent - but it can still help your system run more smoothly.
The techniques involved are so simple and easy to apply, they're well worth the effort. Follow our instructions, and in just an hour or two, Windows will be making optimum use of your processor.
Process affinity

Windows normally allows any process to run multiple threads on any of your CPU cores. This is great for letting processes run at their maximum speed, but it also means that a poorly behaved program can hog CPU time to the detriment of everything else unless you do something about it.
The solution is surprisingly simple. If you have a program that tends to use more CPU time than you'd like, all you have to do is tell Windows to run it on a specific CPU core, rather than all of them.
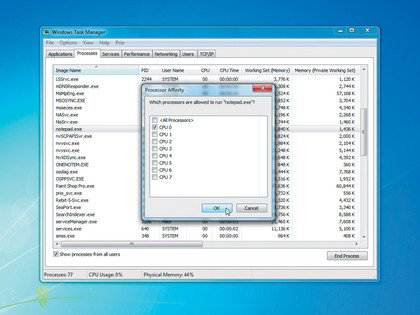
This is called the process affinity. You can set the affinity from the Task Manager in Windows Vista and 7, which is often a good idea if a runaway process has grabbed 100 per cent of your CPU time.
Sign up for breaking news, reviews, opinion, top tech deals, and more.
Press [Ctrl]+[Shift]+[Esc] to launch Task Manager, click the 'Processes' tab, then find and right-click the troublesome process. Select 'Set affinity' and you'll see a list of your cores, each represented by a single checkbox. Clear all but 'CPU 0', then click 'OK'. That process is now able to run on your first CPU core only. All the other cores will become available to other applications, which should make your system more responsive instantly.
The affinity setting isn't just for controlling rogue processes. You could also use it to move all non-essential background programs on your PC to CPU 0, for example. These programs will become slower because they'll be fighting for CPU time, but you'll have freed up the other cores for your more important applications, which may become a little faster.
This wouldn't be practical if you had to tweak Task Manager manually for every single process, but if you know that you want to use affinity in advance, there are easier options available.
The Windows Start tool is normally used to launch a program or command in a separate window, but it can also launch your application with a specific affinity setting. This makes it very easy to restrict your less important applications.
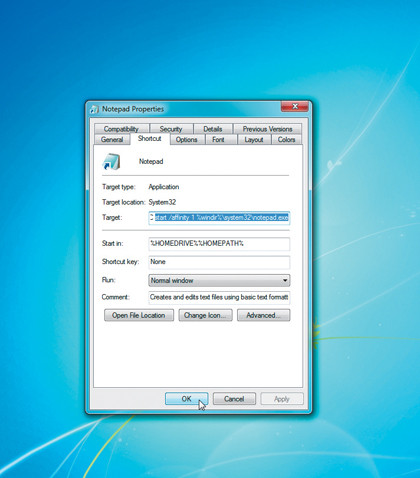
Take Notepad for example. click 'Start | All Programs | Accessories', right-click 'Notepad' and select 'Properties'. The 'Target' box will read something like '%windir%\system32\ notepad.exe'.
Make a note of this, and change it to "c:\windows\system32\cmd.exe" /C start /affinity 1 %windir%\system32\notepad.exe.
Change 'c:\windows' to the path of the Windows folder on your PC if it's different.
Start command

This shortcut will now launch a command shell, which runs the 'Start' command. This accepts the /affinity switch, which tells it to run on the first processor (which is the same as 'CPU 0' in Task Manager), and finally points Windows at the program we want to launch: Notepad. Click 'OK' to save the new shortcut, then use it to launch Notepad.
There won't be any visible difference, so to see what's changed, launch Task Manager, click the 'Processes' tab, right-click 'Notepad.exe' and select 'Set affinity'. Now you should see that only CPU 0 is checked - the process can't run on any other cores. If not, check the shortcut properties, and ensure you launch Notepad from the shortcut, not a pinned taskbar icon, or by double-clicking a text file.
Once you've got this working then you could transplant the idea to any other shortcut; just check the properties, and add "c:\ windows\system32\cmd.exe" /C start /affinity 1 in front of whatever's already in the 'Target' box (making sure there's a space after '/affinity 1').
But don't start yet - there's an even easier option.
RunWithAffinity

RunWithAffinity is an easy to use tool that will quickly create the shortcuts you need to run particular applications on a single CPU core.
To begin, create a folder for the program - C:\Program Files\RunWithAffinity will be fine - then copy the executable file there from the SuperDisc, or download it from the author's site.
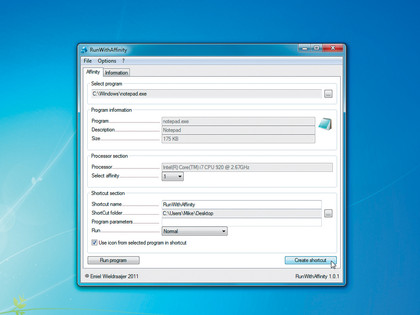
Next, double-click the file 'RunWithAffinity.exe' to launch the program, click the 'Browse' button (labelled '…' at the top right) and choose an application that you'd like to run on a single core. If you're unsure, just browse to the \Windows folder and select 'Notepad.exe', as before.
The RunWithAffinity dialog should be populated with information from the program you've chosen, including its name, description, size and so on. All you have to do is choose the core you'd like the program to use.
In the 'Select affinity' box, pick '#1' for the time being. Click the 'Browse' button next to 'ShortCut folder', and choose where you'd like the shortcut to be saved. The desktop will be fine for now. Now click 'Create shortcut' and you'll have a desktop shortcut that launches your chosen application, but also restricts it to a single processor core.
Repeat this with other applications that don't need your CPU's full attention and it will be very easy to run them in future. You can drag and drop shortcuts elsewhere if you like - perhaps your 'Startup' folder, or some other part of the Start menu.
Process affinity is probably the most effective way to control how much access a program has to your CPU, but there are other options. The most significant of these is the process priority.
Priority programs
You may have 30, 40, 50 or more processes running on your PC at one time, and deciding which one gets the CPU's attention next is a complicated business. Windows could divide available processor time up evenly, but as we've pointed out already, that's a bad idea: some programs are much more important than others and therefore need more CPU time.
To solve the problem, every running process has a priority assigned to it (Low, Below Normal, Normal, Above Normal, High, or Realtime). When processes all want to run simultaneously, the one with the highest priority is more likely to get the next slice of CPU time. Most processes are given the Normal priority by default, but you can change this yourself.
This works in a very similar way to affinity. You could change a priority from Task Manager, for instance: press [Ctrl]+[Shift]+ [Esc], click the 'Processes' tab, right-click a process you'd like to change, and select a new priority.
Choose 'Below normal' or 'Low' to ensure a background program gets less CPU attention, or select 'Above normal' if you'd like a process to have more CPU time. Don't choose either 'High' or 'Realtime', or you may block system processes from running, which can crash your PC.
This is easy enough, but suffers from the same problem as setting affinity this way: you have to do it manually every time you run a particular application.
Fortunately there's an easy solution, which is based on the same command line tool that helped us out with the /affinity switch: start.
To try this, right-click the shortcut to Notepad again, select 'Properties' and make a note of the contents of the 'Target' box, before changing them to "c:\windows\system32\ cmd.exe" /C start /belownormal /affinity 1 %windir%\system32\ notepad.exe or "c:\windows\system32\cmd.exe" /C start/ abovenormal %windir%\ system32\notepad.exe.
The first uses an 'affinity' switch and a '/belownormal' switch, which tells Windows to run Notepad at a lower priority. You don't have to combine affinity and priority settings, as the second option shows. If this application is something that needs more CPU time - a game, for example - then you can simply launch it with the /abovenormal switch, and Windows should allocate it more resources.
Don't try to tweak every application to run with a certain affinity or priority, otherwise Windows will have very little CPU scheduling freedom and your PC's performance may suffer. Apply these tweaks to as few programs as you can for the best results.
If you're cautious though, there's little to worry about. Customising the priority and affinity is an easy way to reallocate CPU resources as you'd like, and in just a couple of hours you can ensure that your applications make the best possible use of your system.