Fusion drive: what it is and how it speeds up your Mac
The advantage of your Mac's hybrid drive
The graphical version of Disk Utility doesn't provide the capability, but the command-line version accessed in Terminal does. On the next page we'll show you just what you need to roll your own Fusion Drive.
However, you won't get all the benefits of an Apple-provided Fusion Drive. TRIM is technology that prevents degradation in an SSD's performance over time as it's repeatedly overwritten. It's normally enabled only for flash storage provided by Apple, but TRIM Enabler (groths.org/trim-enabler) turns it on for other drives. We installed TRIM Enabler on our Mac's homemade Fusion Drive and encountered no issues.
However, doing so means you will be running OS X with low-level modifications that take you further away from configurations that are tested and approved by Apple.
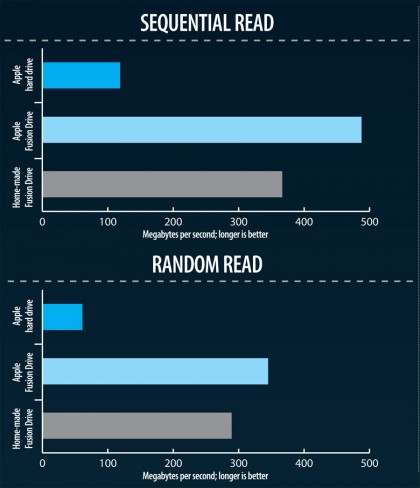
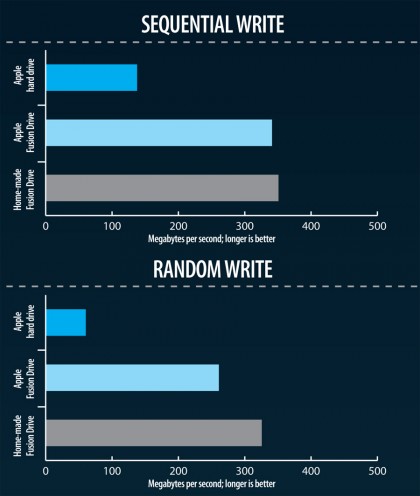
Fusion Drive benchmarks
We measured these peak speeds from three storage options. Sequential data transfer is the best case scenario. Random transfers involve accessing locations spread around a drive. Hard drives suffer most because of their moving parts.


Make your own Fusion Drive
Adding a Fusion Drive to a Thunderbolt Mac isn't cheap, but it's less costly than replacing your existing Mac If you run into a software problem on your Mac while running a homemade Fusion Drive, support might be refused at a Genius Bar or a service provider until your Mac is restored to a regular configuration. Use Time Machine for protection.
With your backup drive attached, start your Mac in the Recovery System by holding Command+R at the startup chime. In the option that restores from Time Machine, verify the most recent backup is listed. Backing up OS X this way gives a straightforward recovery if needed. A Boot Camp partition can be preserved during the process, but back it up for safety.
Windows Vista and later OSes have a backup feature, but require an external drive formatted for Windows. Alternatively, Winclone ($20, about £14, twocanoes.com) backs up Boot Camp from within OS X. It's possible to remove the Recovery System when setting up Fusion Drive, but that can be avoided by specifically targeting a partition.
Sign up for breaking news, reviews, opinion, top tech deals, and more.
When creating a Mountain Lion install disk, take a USB flash drive you don't need to re-use, so the OS X installer, Terminal and Disk Utility are always to hand. Installing Mountain Lion to a drive from scratch will recreate a Recovery System on it.
Removing a Fusion Drive configuration requires starting from an install disk, opening Terminal. Use the command diskutil cs list and copy the code listed next to Logical Volume Group to the Clipboard. Type diskutil cs delete tap space, then paste the code and press Return. The internal hard drive is then independent of the SSD.
Get ready for Fusion Drive
Some essential steps before you start to build your own Fusion Drive
1. Back up your Mac
Open the Mac App Store. You'll need to purchase and install Mountain Lion if you don't already have it. Otherwise, click Purchases at the top of the window, locate Mountain Lion in the list and click its Download button.
Once complete, the Applications folder will contain a file named 'Install OS X Mountain Lion'. If you already use Time Machine, open its System Preferences pane, click the Options button and check that you haven't excluded system files, your user account, or any other folders from the top level of the hard drive from its backups.
If you don't already use Time Machine, connect a Mac-formatted drive, flick the switch in Time Machine's preferences to On and choose the drive. Click the Time Machine icon in the menu bar, choose Back Up Now and wait until the backup is complete.
2. Prepare a USB flash drive
You'll need a USB flash drive with a capacity of at least 8GB, whose contents can be erased. Connect it and open Disk Utility. Select the drive in the left pane - that's the row that shows its capacity and model, not a partition already on the drive - then click the Partition tab. Set the Partition Layout item to '1 Partition'.