In a world full of hazards, your iPhone is vulnerable. It’s susceptible to hacking, sure, but more commonly, it can be dropped and damaged or otherwise locked behind a password that you probably don’t remember.
At any rate, one way to circumvent the concern of losing all the pictures, texts and memories stored on your phone is to use Apple’s built-in iCloud technology. This makes backups and restores easy by merely asking your permission to handle everything on its own.
On the other hand, we don’t always think ahead in these situations. Sometimes we lose data because we were careless and didn’t do any backups, so we need a contingency plan in place to mitigate the problem at hand: the fact that your data has been lost or deleted.
Admittedly, there’s a lot of iPhone recovery software you could comb through on the internet. Chances are, though, you still won’t end up with the best option around for your dire predicament. That’s where iMyFone D-Back iPhone Data Recovery comes in handy.

Complete with an easy-to-use interface and cross-platform compatibility, iMyFone D-Back iPhone Data Recovery aims to be the all-in-one solution for bringing back your compromised and confidential information back from the grave.
Available for Windows 7/8/10 in addition to Mac OS X 10.7 and later, iMyFone D-Back iPhone Data Recovery can restore the deleted and lost data of virtually any iPhone, iPad and iPod Touch donning iOS 7.0 or newer. Because it’s so ubiquitous, let’s take a look at how it’s used.
How to use iMyFone D-Back with macOS or Windows
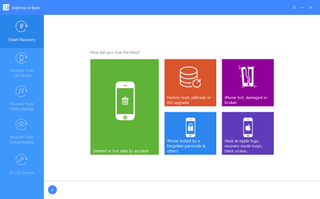
After you download iMyFone D-Back iPhone Data Recovery for Mac, either from the buy link or the free trial link, using both the Mac and Windows versions of the software is as simple as clicking ‘Start’. Located under the ‘Smart Recovery’ tab on the left-hand side of the interface, that’s your first step.
Get daily insight, inspiration and deals in your inbox
Get the hottest deals available in your inbox plus news, reviews, opinion, analysis and more from the TechRadar team.
You’ll then want to tell the software how the data was lost. There are five options on this page, ranging from ‘Lost or deleted data by accident’ to ‘Stuck at Apple logo, recovery mode loops, black screen…’
Answer honestly, and iMyFone D-Back iPhone Data Recovery will handle the rest by searching and scanning data stored directly on your iOS device or an iTunes/iCloud backup stored on your computer.
Aside from Smart Recovery, there are four other modes in iMyFone D-Back iPhone Data Recovery that aren’t quite as straightforward as our go-to. Unfortunately, in some cases, getting back your data isn’t going to be an effortless undertaking.
The second mode featured in iMyFone D-Back iPhone Data Recovery is called ‘Recover from iOS Device’, which scans your iPhone for certain file types of your choosing, then lets you preview the documents it discovers prior to a full-on recovery.

Meanwhile, the third mode, dubbed ‘Recover from iTunes Backup’, is exactly what it sounds like. It scans the iTunes desktop client installed on your computer for potential iPhone backups you may not have known you created. Naturally, the fourth mode is similar, but involves recovering data from an iCloud backup.
The best part about iMyFone D-Back iPhone Data Recovery is that all of its functions are as intuitive as their names suggest. The steps in all of these modes consist of hitting ‘Start’, selecting the data you want to recover, clicking ‘Next’, previewing that data and – voilà – your data is recovered with the finesse and velocity of a peregrine falcon.
The fifth and final mode in iMyFone D-Back iPhone Data Recovery is labeled ‘Fix iOS System’. It’s intended for those users encountering glaring issues with the iOS software that prohibit recovery through other means.
Especially if you’ve tried to jailbreak your iPhone and it’s now stuck on the Apple logo screen, this is the mode you’ll want to pursue. It starts by telling you to press and hold the Sleep/Wake button and Home button at the same time for eight to 10 seconds. Then it will ask you to release the Sleep/Wake button, but continue holding the home button for another five seconds.
That should put your device into DFU mode, meaning you’ll see the Apple logo on-screen, presumably followed by a conventional bootup.
Otherwise, you can press and hold the Sleep/Wake buttons and Home button at the same time and keep holding them until you see the ‘Connect to iTunes’ prompt. The iMyFone D-Back iPhone Data Recovery software will take it from there.
Most Popular


