
 Become a TechRadar Insider


Picking from one of the best website builder platforms is the simplest way to create a website from scratch, but they seldom get simpler than Wix.
Wix is an easy-to-use, budget-friendly, yet feature-rich site builder that will make sure that the lack of technical know-how won’t stop you from building a professional-looking site. With hundreds of stunning templates, tons of widgets for integrating third-party sites and services, and a user-friendly, drag-and-drop editor you can truly tailor your site’s appearance to your heart’s content.
Article continues belowHowever, Wix can still seem overwhelming for first-time users, especially if you haven't used no-code drag-and-drop tools before. So to help you out, here's a step-by-step guide covering all the critical things you should know before starting to build your own site with Wix. Let’s jump right into it.
Steps to creating a website with Wix

Before you start with the first steps, you’ll want to figure out your site’s purpose and secure some ideas for a catchy domain name. Once you’ve got this covered, continue with the following steps.
1. Create an account with Wix

To get started with Wix, go to its official site and click on the button in the center of the home page called “Get Started” – it’s as straightforward as it gets. After this, you’ll be asked to submit your e-mail address and come up with a strong password – alternatively, you can sign up with your Facebook or Google accounts.
Once it’s done, you’ll be invited to answer a couple of questions about your soon-to-be-created site such as its type, name of your business, your main goal, and features you want to have (such as ecommerce tools, live chat, and blog). That’s it, now you can continue to your site management dashboard.
2. Choose a template for your site

The simplest way to start designing your site is to click on “Customize Site” and look carefully through available templates for the right one – or the one that comes closest to it. There’s a wide variety of pre-designed templates sorted into six categories (Minimal, Indie, Precious, Retro, Soho, and Classic), and once you pick out the one you like the most you’ll be able to continue customizing the colors, images, text fonts, and more.
Once you find the template you can work with, click the “Go to Editor” button and continue to the next step.
3. Customize your site with Wix Editor

This is where your dream sites turn to reality, so let’s get to work. At the top bar of the Wix Editor you’ll notice an option to switch between mobile and desktop versions, so be sure to check how everything looks after making any major changes.
Right next to it is an option to connect your domain to Wix, but you can skip this step for now. If you continue to the left and you’ll notice the undo/redo and zoom in/out buttons, tools section, search box, and options to save and preview your site – note that auto-save is on by default, but you can easily turn it off (just press Ctrl + Alt + A).
On the left sidebar menu you’ll see all the main functions you’ll be using to edit your site, from adding pages, media, sections (like welcome, about, contact, and more), elements (text, images, buttons, stripes, lists, and so forth), applications (via the Wix App Market), to advanced business tools (such as SEO tools, video maker, and marketing integrations).
To change anything about an element you’ve added just click on that element and select the appropriate option on the popup menu (change background, layout, design, and such).
At any time, you’re free to switch between templates and the editor to customize your site design and content, to make your site truly your own. Thanks to drag-and-drop functionality, adding all sorts of elements to your site is beyond simple — anything can be added to your site with a single click.
4. Don’t forget to preview and save your site

Since many users will be browsing your site from their smartphones, you’ll want to make sure your site looks as stunning on a mobile device. So, before publishing your site go to the mobile phone icon (at the top bar) and make your site as mobile-friendly as you can.
A poor mobile site design will be very poorly received, resulting in more visitors leaving your site before giving your business a chance.
After you’ve previewed your site numerous times and made sure everything works correctly, go and save your site . While there is an auto-save, it may not be as agile as you might imagine.
5. Publish your site

By now, your newly-created Wix site should be ready to go and conquer cyberspace. So, click on the “Publish” button and let your site go live.
Fortunately, you’ll always have an option to re-edit your Wix site after publishing, so if you’ve made a mistake or changed your mind about something you can always make it right. Just go to your dashboard, select “Manage Site”, then “Edit” and there you go.
However, this isn’t true if you’ve had a change of heart about the template you’ve selected – once your site is published the only way to change the template is to create a site from scratch.
How to create a blog on Wix

To add a blog to your Wix site, go to the left sidebar menu in Wix Editor and select “Add Blog” which will create a blog for you, but not before asking a few questions.
This should take no more than a couple of seconds and once the blog is created you’ll be able to create blog posts and manage them from both the editor and the dashboard. The editor works much the same as with your Wix site - you can create new posts, manage existing ones, edit blog pages, add blog elements (such as sidebars, lists, tags, and so on), and get support if you get stuck somewhere during the process.
Also, you’ll have some SEO features, categories, and tags to help you polish up your blog posts before publishing them – all for the purpose of SEO, of course.
If you wish to boost your blog with more apps, you can do it easily from your dashboard.
Jump-start your website creation with Wix AI
But, you don't necessarily need to browse through endless templates if it's your first time building with Wix. Wix AI takes a completely different approach that's great for no-code beginners. Simply chat with the AI about your business and goals. Then watch it create a custom website in minutes.
The process starts with a brief conversation. Wix's AI asks about your business type and what you want your site to achieve. It then generates a complete website with pages, content, and even business apps automatically added. Everything matches your brand messaging and visual style.
You can refine the design as you go. Don't like the color scheme? Ask the AI to change it. Want a different layout? Request adjustments through the chat interface. The AI responds instantly, making real-time changes to your site. This beats the old method of starting from scratch with pre-made templates.
The best part? You get more than just a pretty website. Wix AI automatically includes business tools like scheduling, online stores, and event management. These features are ready to use from day one. No manual setup required. You also get a selection of other AI tools to customize your website past the initial design:
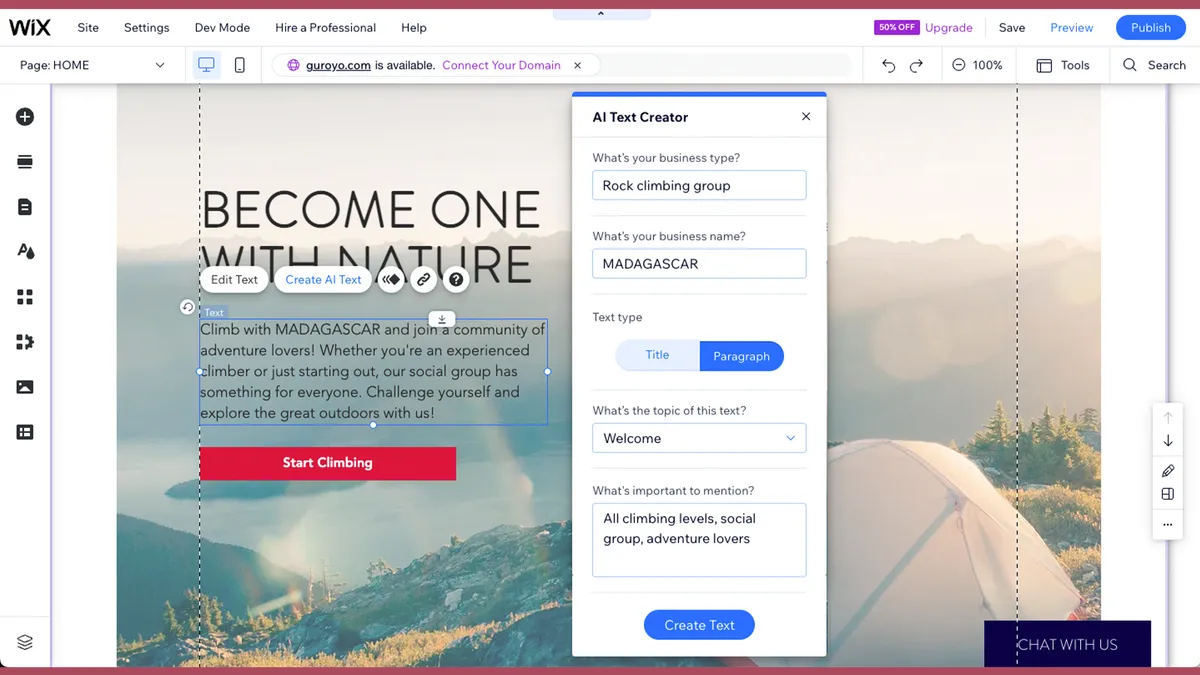
AI text creator
Need compelling copy for your site? The AI text creator handles all your writing needs. It generates headlines, product descriptions, and full page content. You specify the tone and audience, then receive custom text optimized for your brand. The tool can create anything from catchy titles to detailed SEO-friendly content. Perfect for beating writer's block.
Image generator
Generate custom images that match your site's style perfectly. Describe what you need and choose from styles like "illustration" or "cartoon". The AI creates unique visuals tailored to your content. You can also enhance existing images automatically or remove backgrounds with one click. This saves you from searching stock photo libraries.
AI section builder
Want to add new sections to your site quickly? The AI section creator builds complete page sections for you. Tell it you need an "About Us" section, for example. It generates the layout, text, and images that match your site's design. You can then edit elements directly until everything looks perfect.
Theme assistant
Get design guidance right inside the Wix editor. The Theme Assistant helps you pick fonts, colors, and overall visual styles. It offers suggestions based on your site's content and purpose. Think of it as having a designer on call whenever you need creative advice.
Gear up for agency use with Wix Studio

Wix Studio turns web design into a professional powerhouse. It's built for agencies and enterprises who need serious tools. Think of it as the advanced sibling of regular Wix.
This platform combines every feature that agencies crave. Advanced design capabilities. Streamlined workflows. Custom code integration. While regular Wix focuses on simplicity, Studio embraces complexity for power users. You get pixel-perfect control over every element.
Studio also offers an abundance of something regular Wix doesn't. Code freedom. You can add HTML, CSS, and JavaScript. Build custom widgets and sell them in the app market. Connect hundreds of APIs for any client need.
Team collaboration happens right on the canvas. Multiple people can work simultaneously. Project management tools keep everything organized. You can even transfer completed projects to clients seamlessly.
Strangely enough, Studio doesn't cost more than regular Wix. And you're getting enterprise-grade features. Custom databases. Advanced animations without coding. Figma integrations.
With Studio, uour clients get websites that feel custom-built, not template-based. Whether you're building e-commerce sites or complex business platforms, it handles the heavy lifting. But the downside is the added complexity, since you'll need to be much more familiar with no-code tools and web design principles to use the platform.
How much does it cost to create a website on Wix?

While Wix offers 14-day free trials to everyone, their forever-free plan is extremely limited and won't be enough for most production-ready websites.
At the minimum, you’ll have to purchase a “Light” plan which will cost you $17 per month when billed annually. That will get you 2GB of storage space and a free domain for 1 year. Premium plans go all the way up to $159/month for unlimited storage and bandwidth.
All paid plans come with a 14-day money-back guarantee. Also, App Market add-ons are billed separately and you'll need a separate subscription for Wix Studio. You can take a look at our Wix pricing guide for more details.
Wrapping it up
Now that you’ve entered the realm of do-it-yourself site builders and acquired some Wix site-building skills, you can start building an online presence worthy of your business or career.
Wix is one of the simplest yet most powerful site-building tools available today and you can try it for free straight away. But if you want, feel free to look at the other options on our best small business website builder list to see what else is available.