How to create mist: Photoshop effects for atmospheric landscapes
Create mist to add drama to landscapes
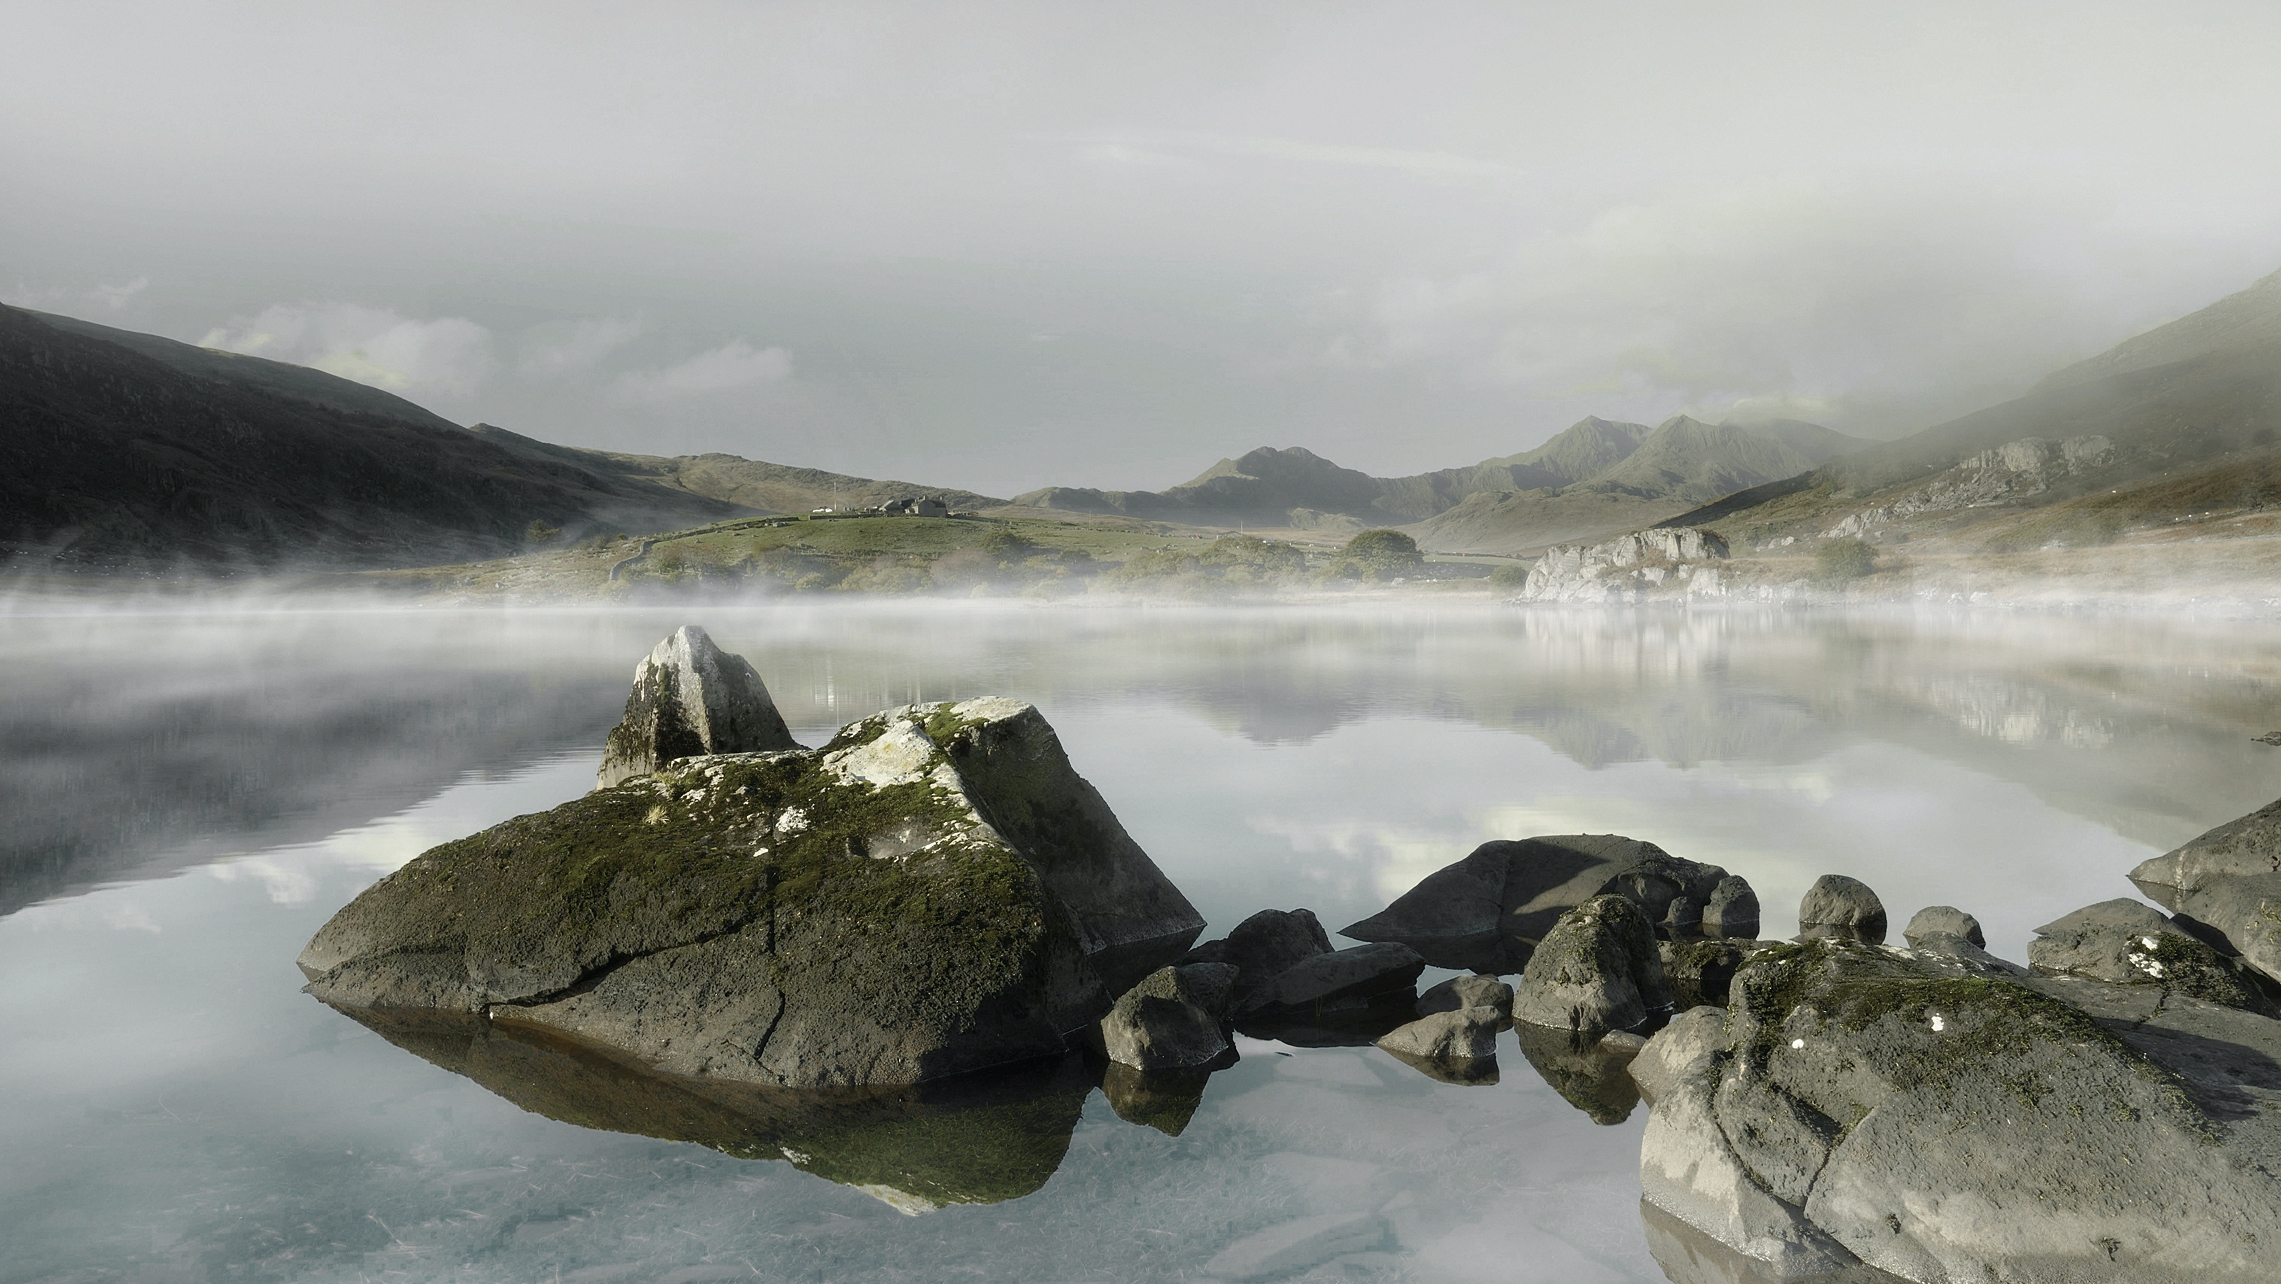
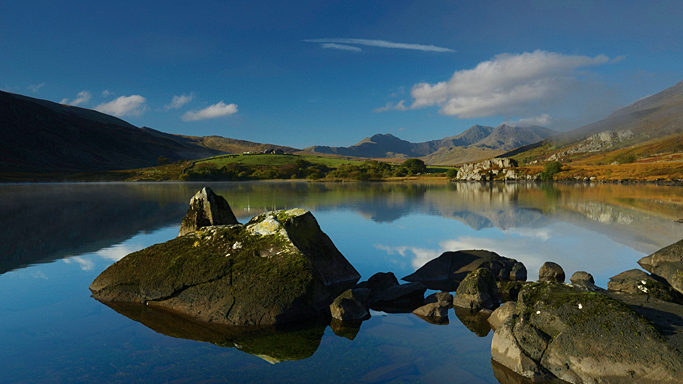
There's always something to complain about when it comes to the weather. If it's raining we want it to be sunny, and when it's sunny we moan it's too hot! While we may not be able to change the weather outside, these grumbles can inspire a great Photoshop project.
In this tutorial we'll show you how to transform a warm sunny scene into a moody, misty landscape. To start you'll need to cool down the tones and selectively tweak the color saturation to replace the summer hues with a cooler color palette.
This is best done with a combination of Adjustment Layers, which gives you ultimate control over the image's tones.
Article continues belowRather than slap on a few filters and effects, we'll build up the mist gradually
Once the image is properly toned we'll add mist. Rather than slap on a few filters and effects, we'll build up the mist gradually using layers and masks to give it depth.
The key is to make the mist look random, and shape it to follow the perspective of the scene. We can achieve randomness with the Clouds filter - which fills a layer with jumbled clouds - and then blend the effect effortlessly with the image using the Screen Blending Mode.
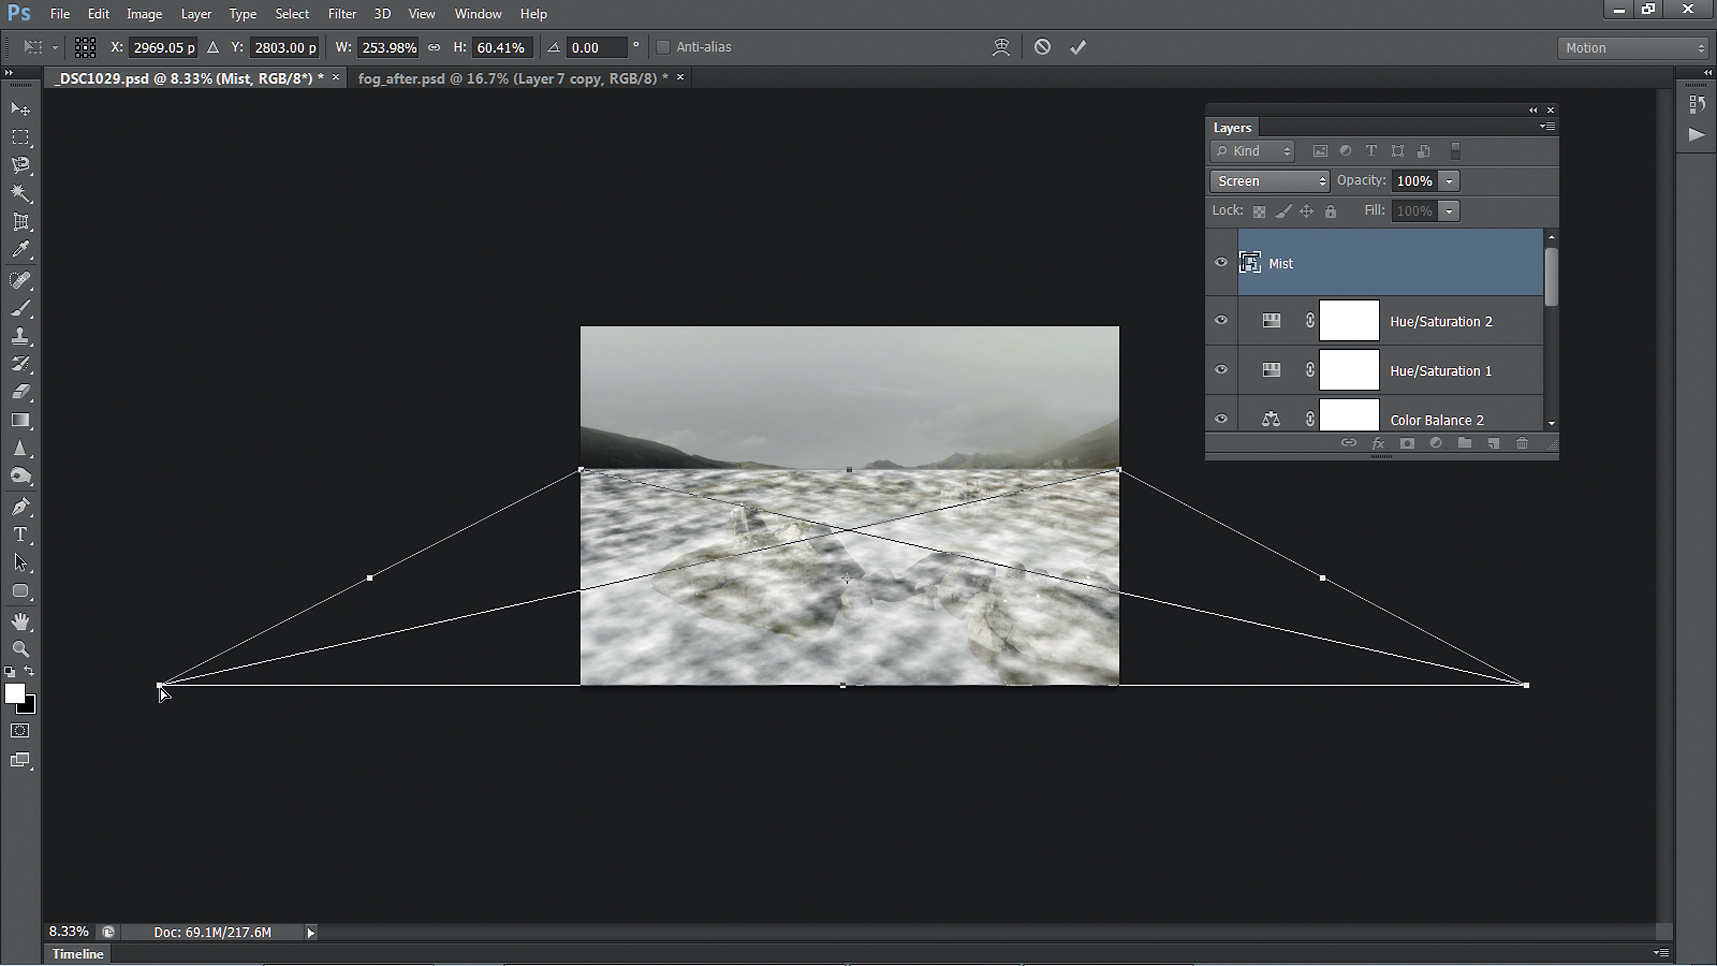
Real mist would naturally appear thicker as it recedes into the distance along the waterline. We can use the Transform command to make our digital mist follow a similar perspective.
We'll also use the Brush and Smudge tools to create a few subtle swirls that rise upwards from the water.
Sign up for breaking news, reviews, opinion, top tech deals, and more.
Step-by-step: how to create mist in Photoshop
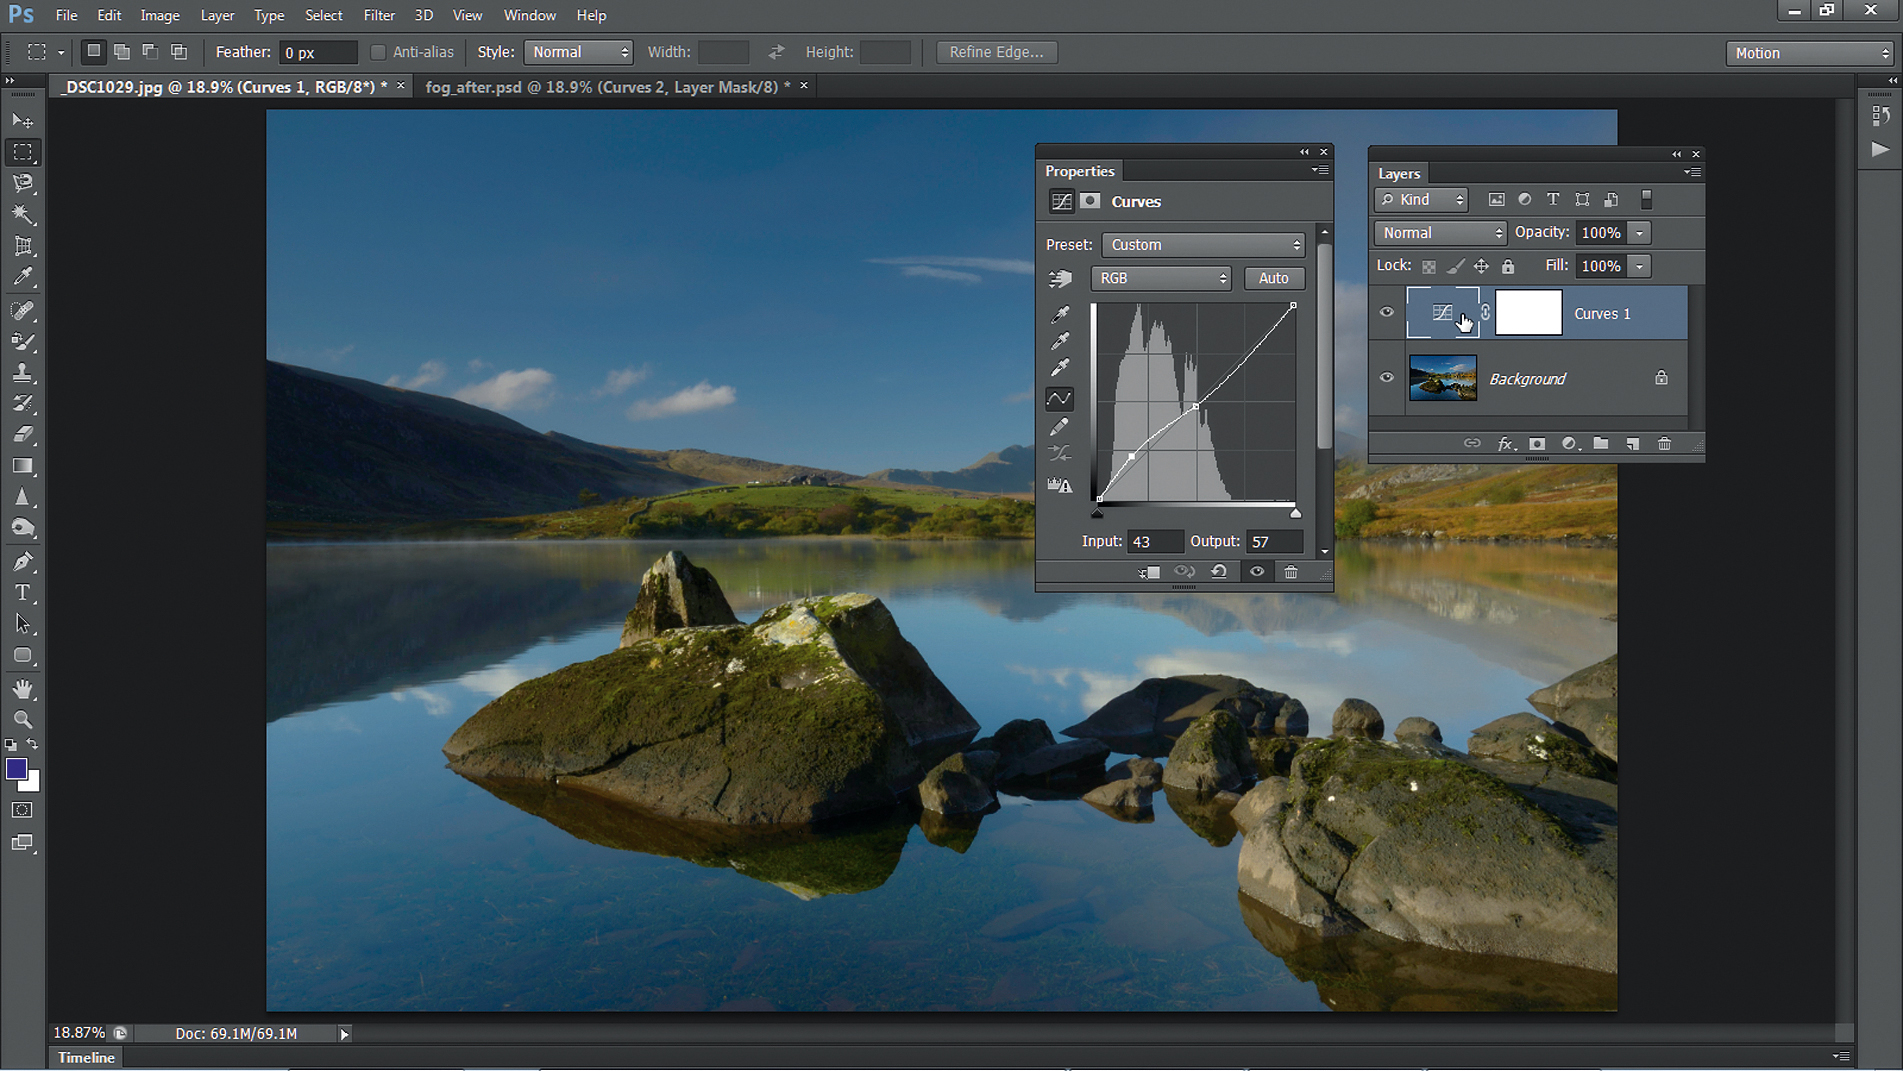
1. Adjust the contrast
Open your image in Photoshop, then go to Window > Layers. Click Create Adjustment Layer and choose Curves. Click halfway up the diagonal Curves line to place an anchor point, then drag a second point up in the lower-left half to make an inverted S shape.
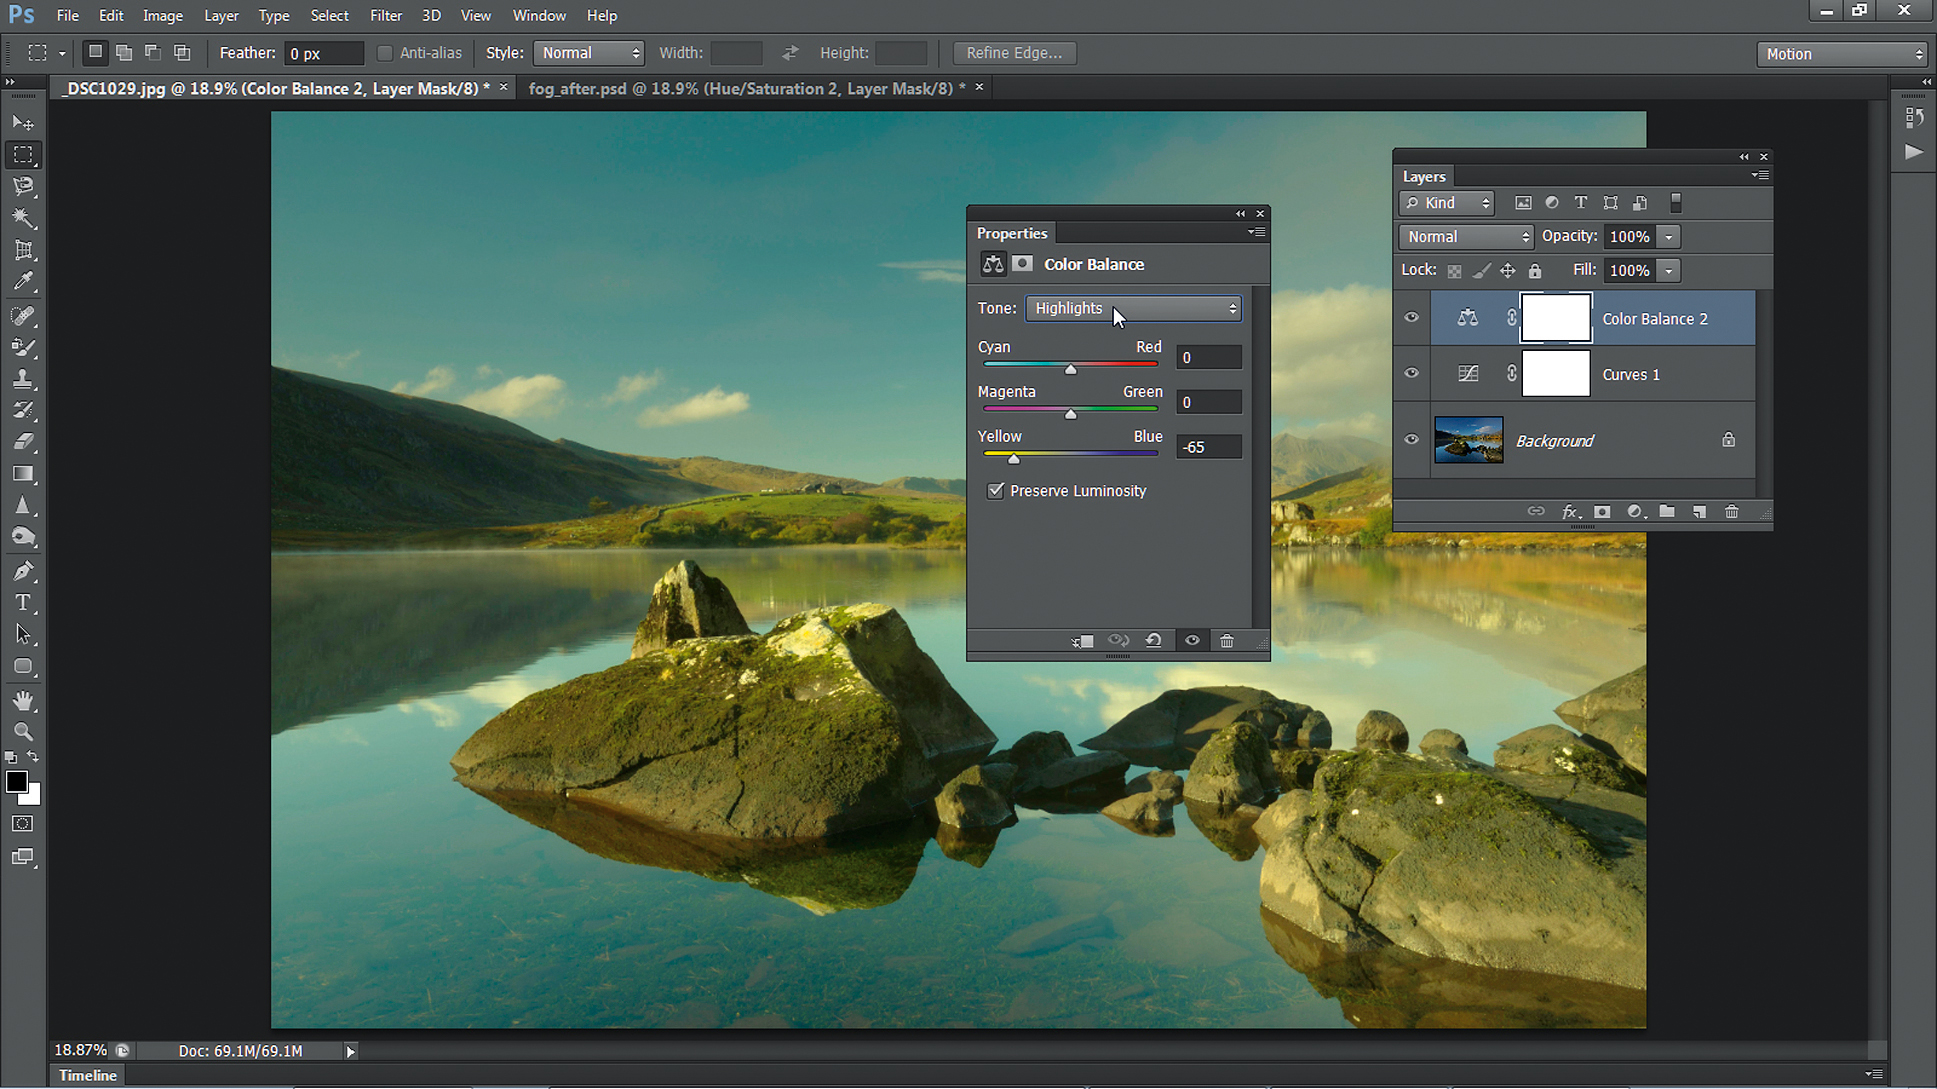
2. Lower the blues
Click on Create Adjustment Layer and choose Color Balance. By default the settings affect the Midtones, but you can shift colors in the highlights and shadows. Go to the drop-down menu and choose Highlights, then drag the Yellow/Blue slider back to -65.
3. Reduce saturation
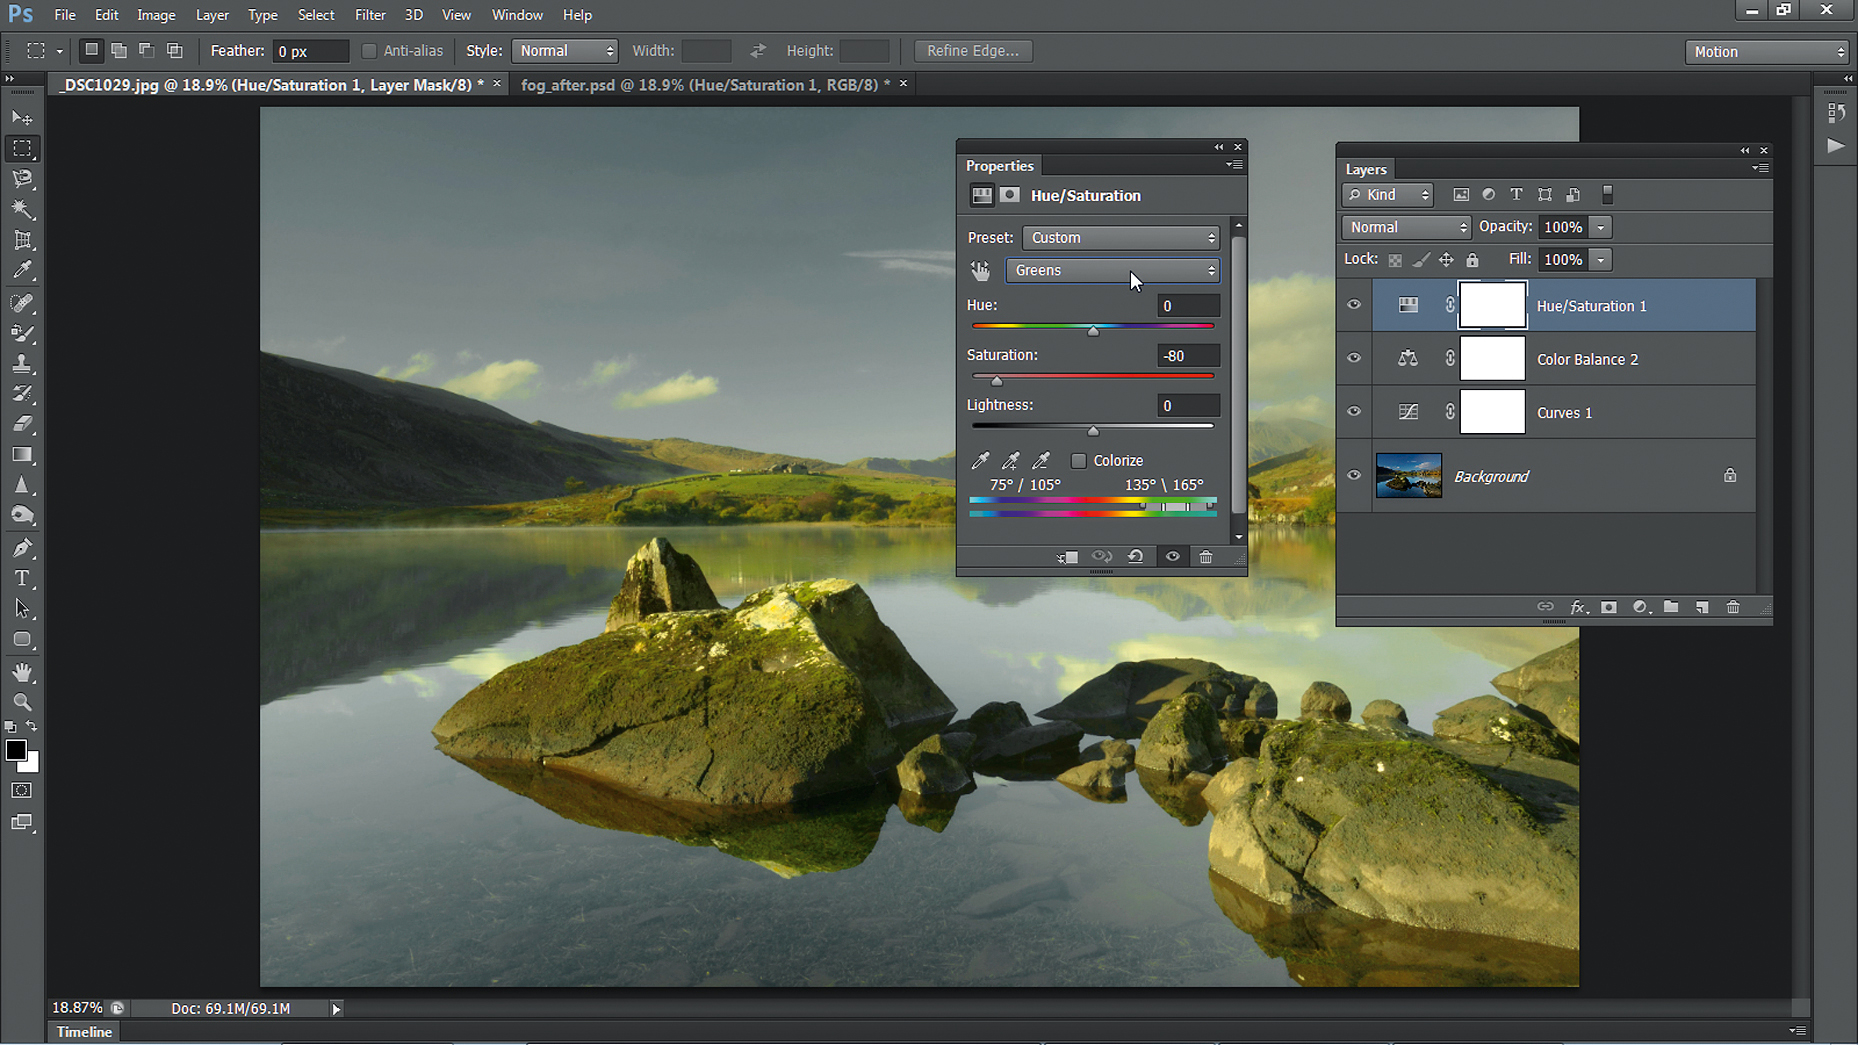
Add a Hue/Saturation Adjustment Layer. Target and adjust different colors by selecting them from the Master drop-down, or click on the Hand and drag left or right over colors. Select Greens and set Saturation to -80, then Cyans and set Saturation to -80.
4. Add some grey
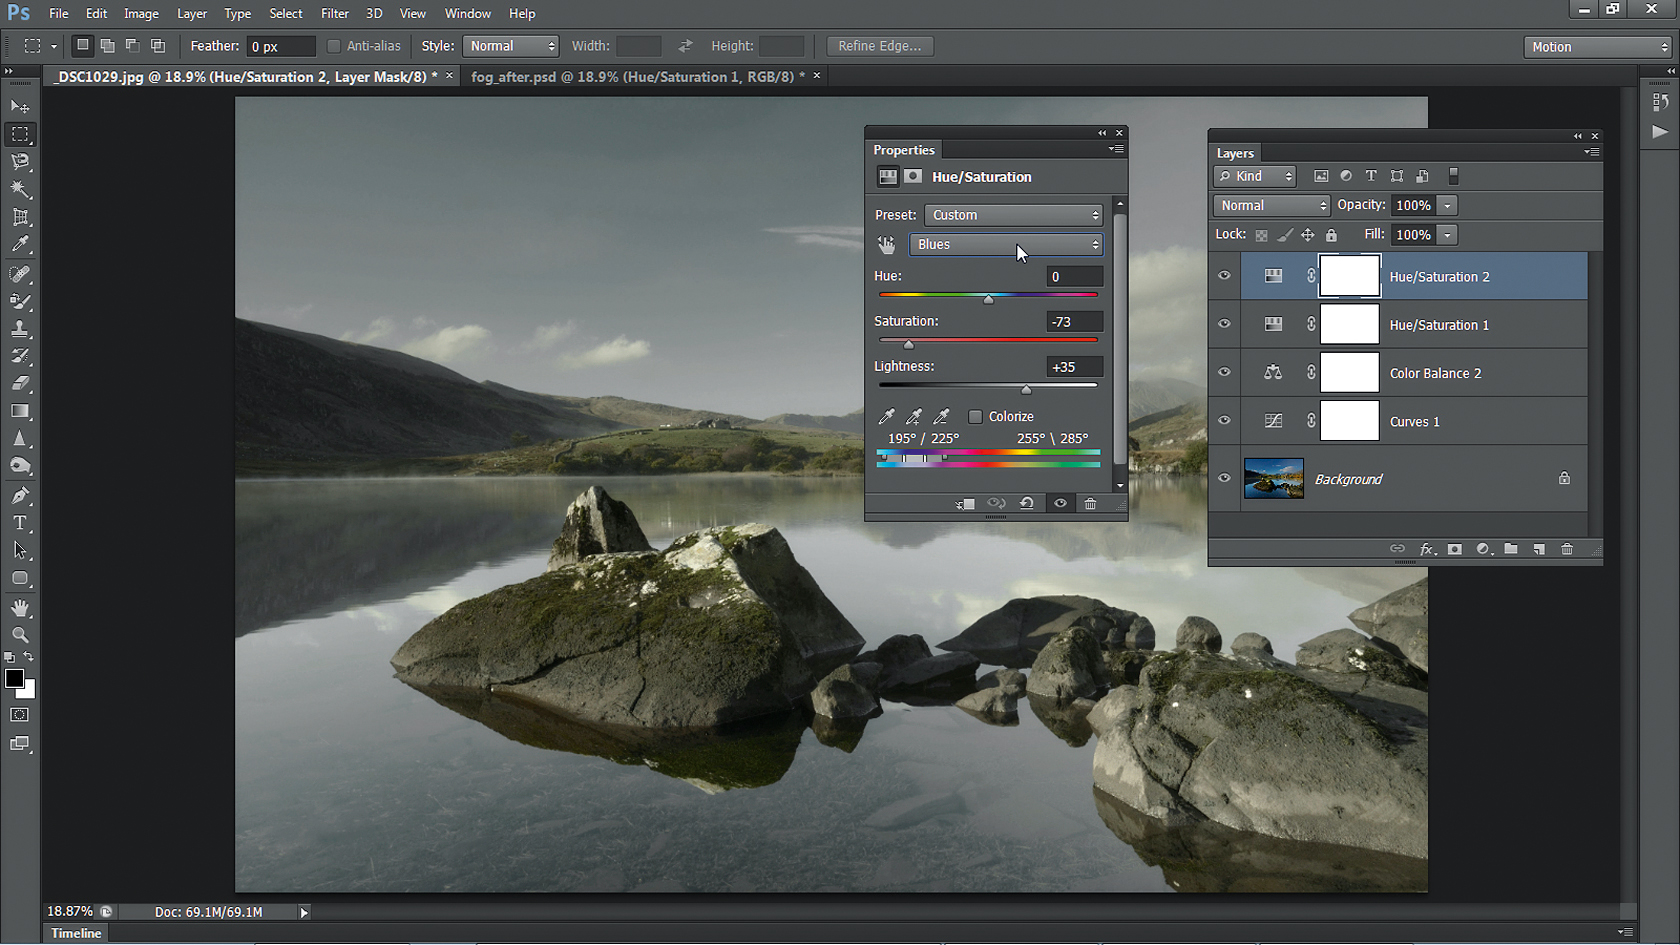
Add a second Hue/Saturation Adjustment Layer, setting Master Saturation to -31. Click the Master drop-down and select Blues. Set Saturation to -73 and Lightness to +35. Choose Greens and set Saturation to -64, then choose Yellows and set Saturation to -59.
5. Remove the clouds
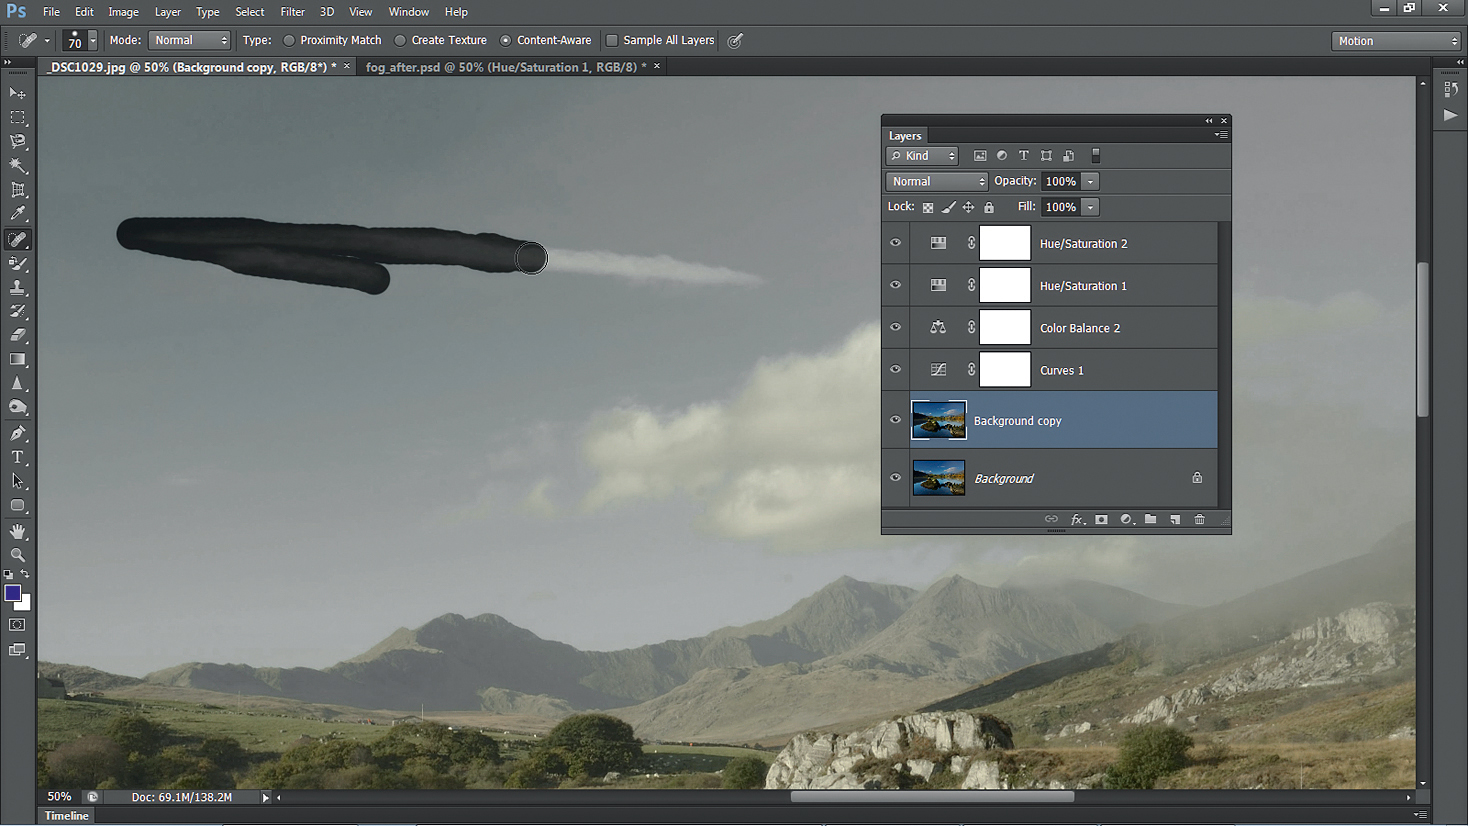
Click on the Background Layer, then go to Layer > Duplicate Layer to copy it. Grab the Spot Healing Brush, then zoom in closer to the clouds. Ensure Sample All Layers is unchecked, then use the Spot Healing Brush to paint over and remove the clouds.
6. Clone to tidy
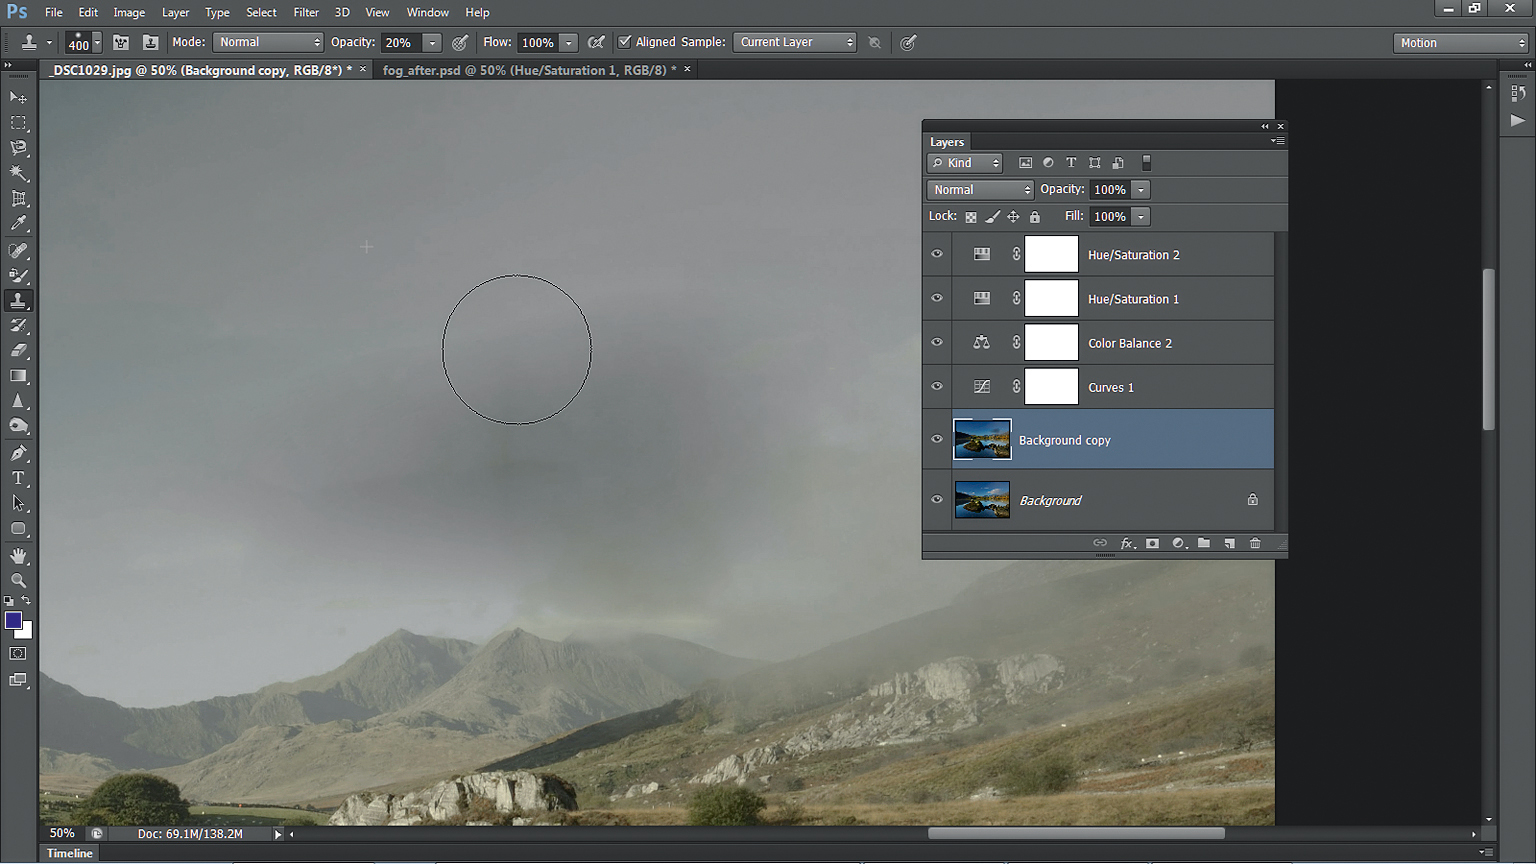
If the Spot Healing Brush tool has left some rough patches, grab the Clone tool and set Opacity to 20%. Hold Alt and click to sample from a clean area of sky, then clone over the patches to blend tones. Set the Opacity of the layer to 74% for a hint of original clouds.
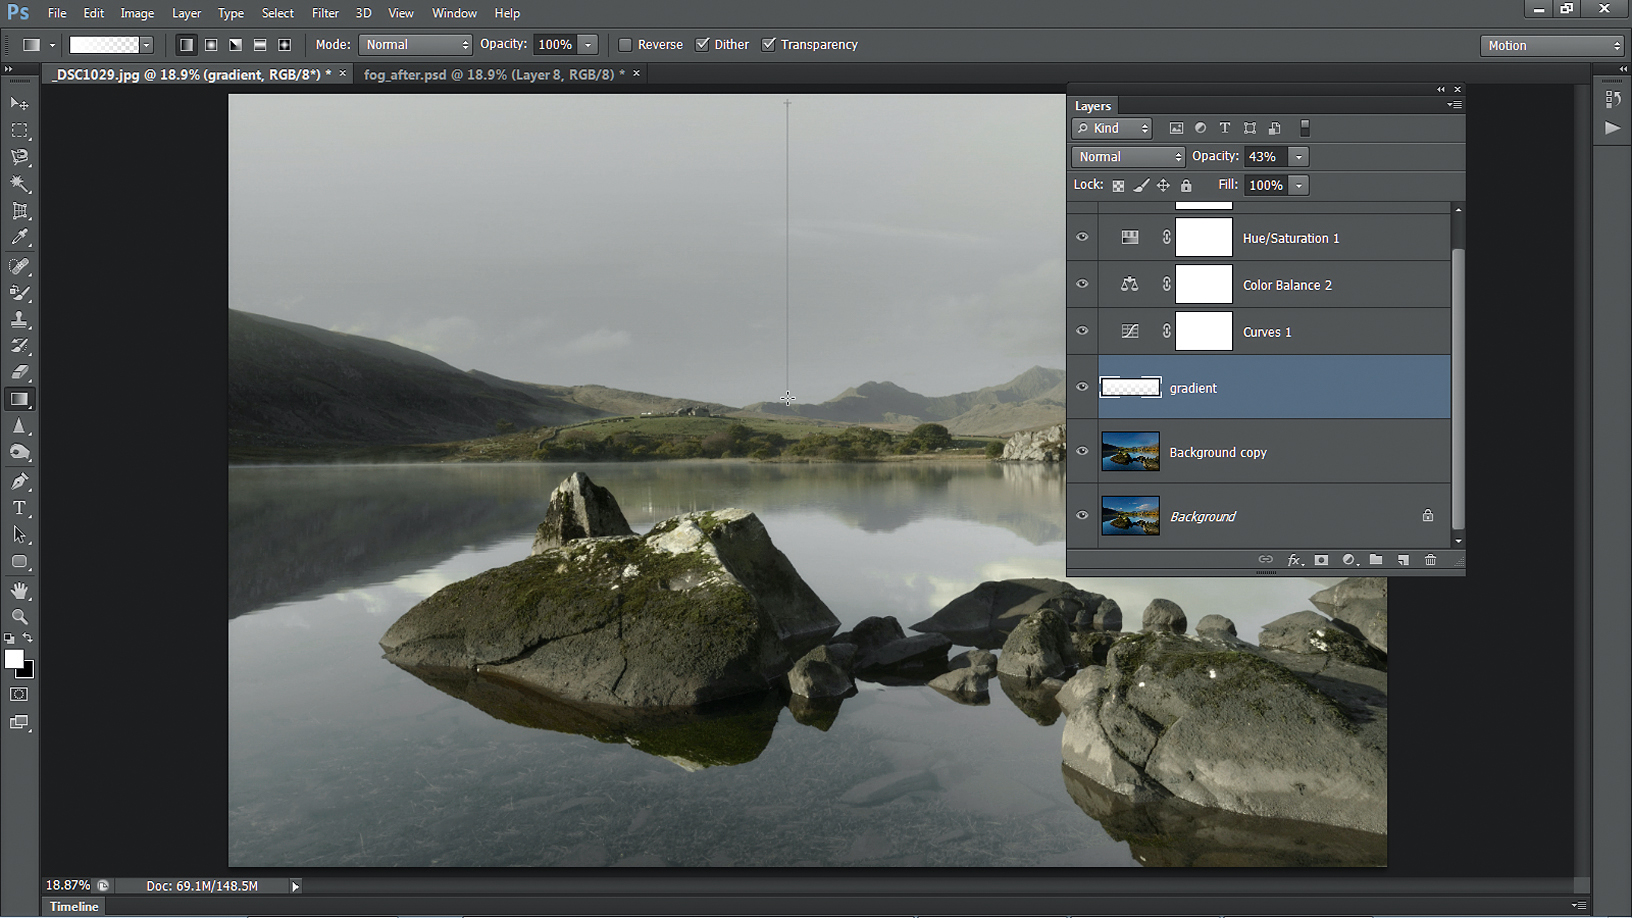
7. Whiten the sky
Create a layer called Gradient. Grab the Gradient tool and choose the Linear Gradient Style. Click on the Gradient Picker and select Foreground to Transparent. Hit D then X to set the color to white. Hold Shift and drag a line as above. Set Opacity to 43%.
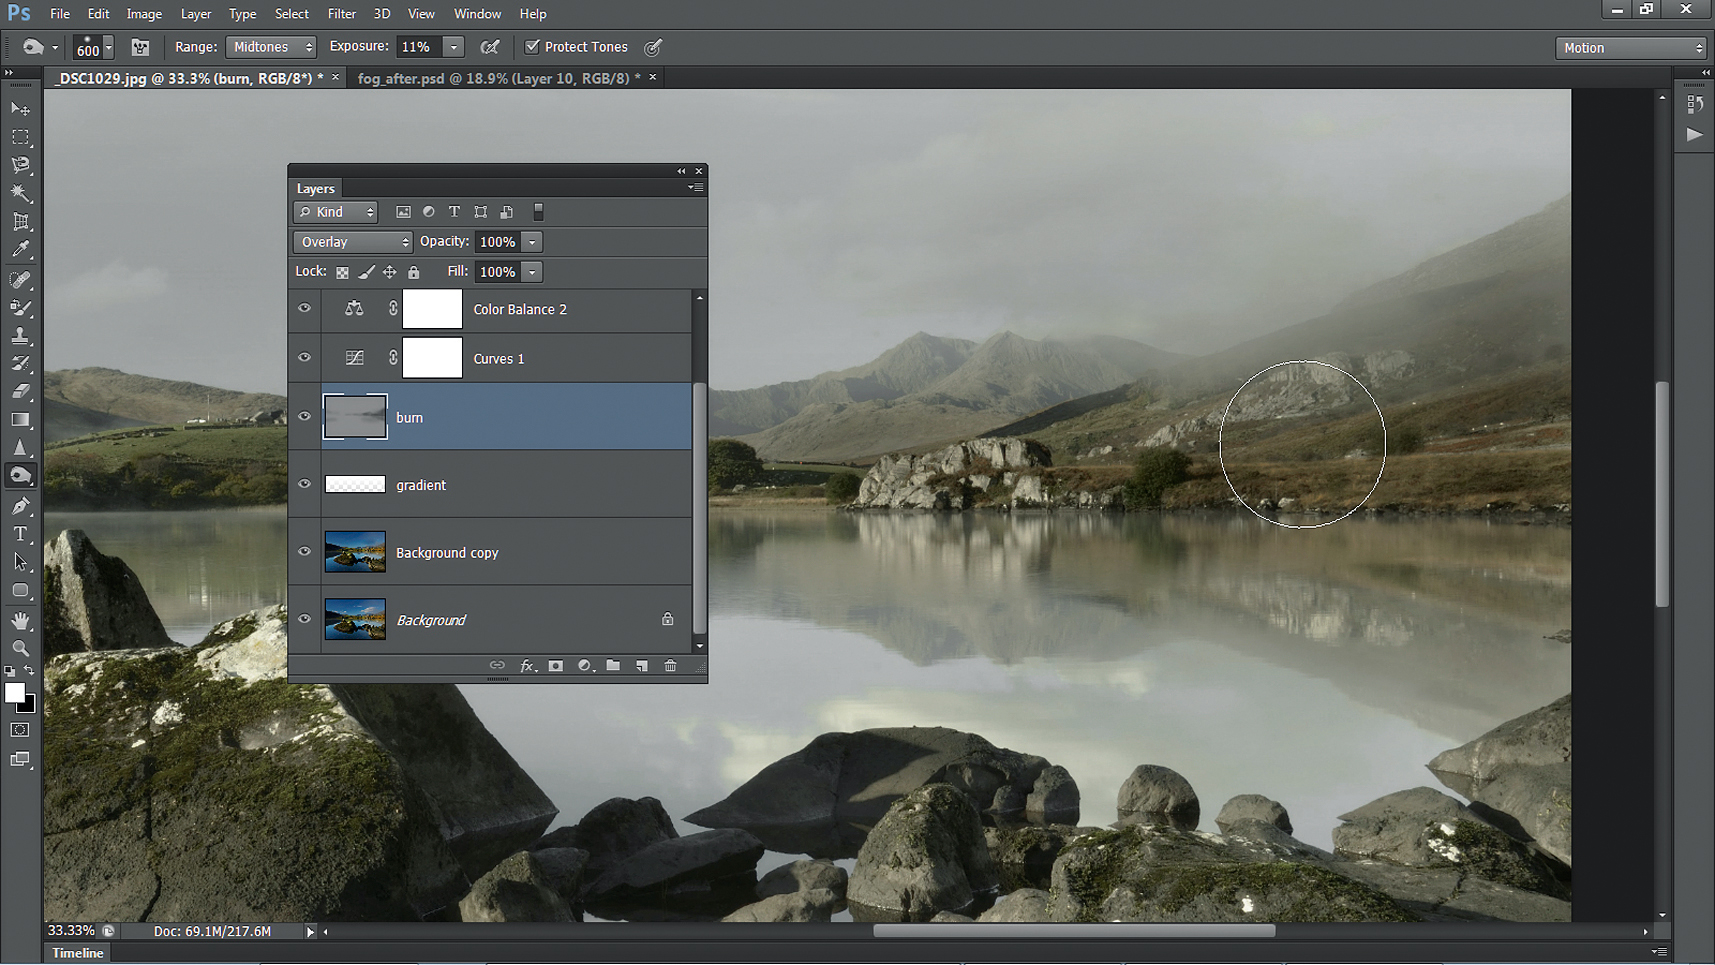
8. Darken the hills
Hold Alt and click Create New Layer. In the New Layer box choose Mode: Overlay, then check 'Fill with Overlay-neutral color'. Hit OK. Grab the Burn tool and set Range to Midtones and Exposure to 20%. Paint with the tool to burn (darken) the land on the right.
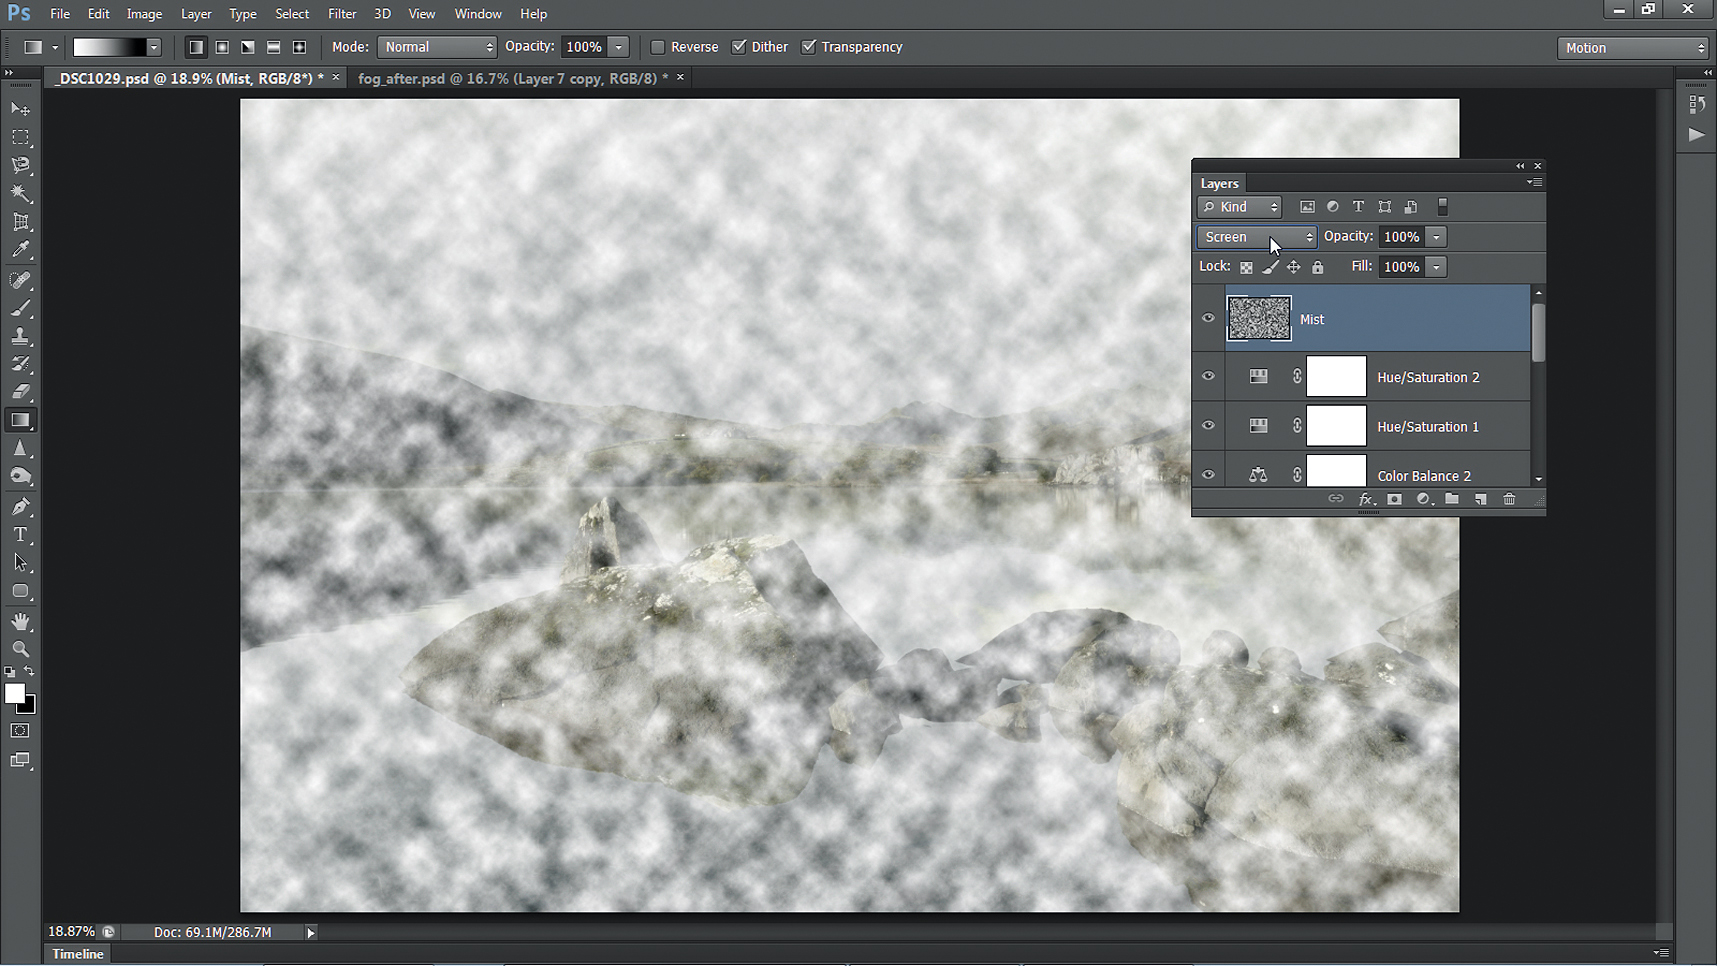
9. Apply a Clouds filter
Highlight the top layer, then click Create New Layer and name the layer Mist. Hit D to reset the colors, then go to Filter > Render Clouds to fill the layer with random clouds. Click the Blending Mode drop-down and choose Screen, so only the lighter tones appear.
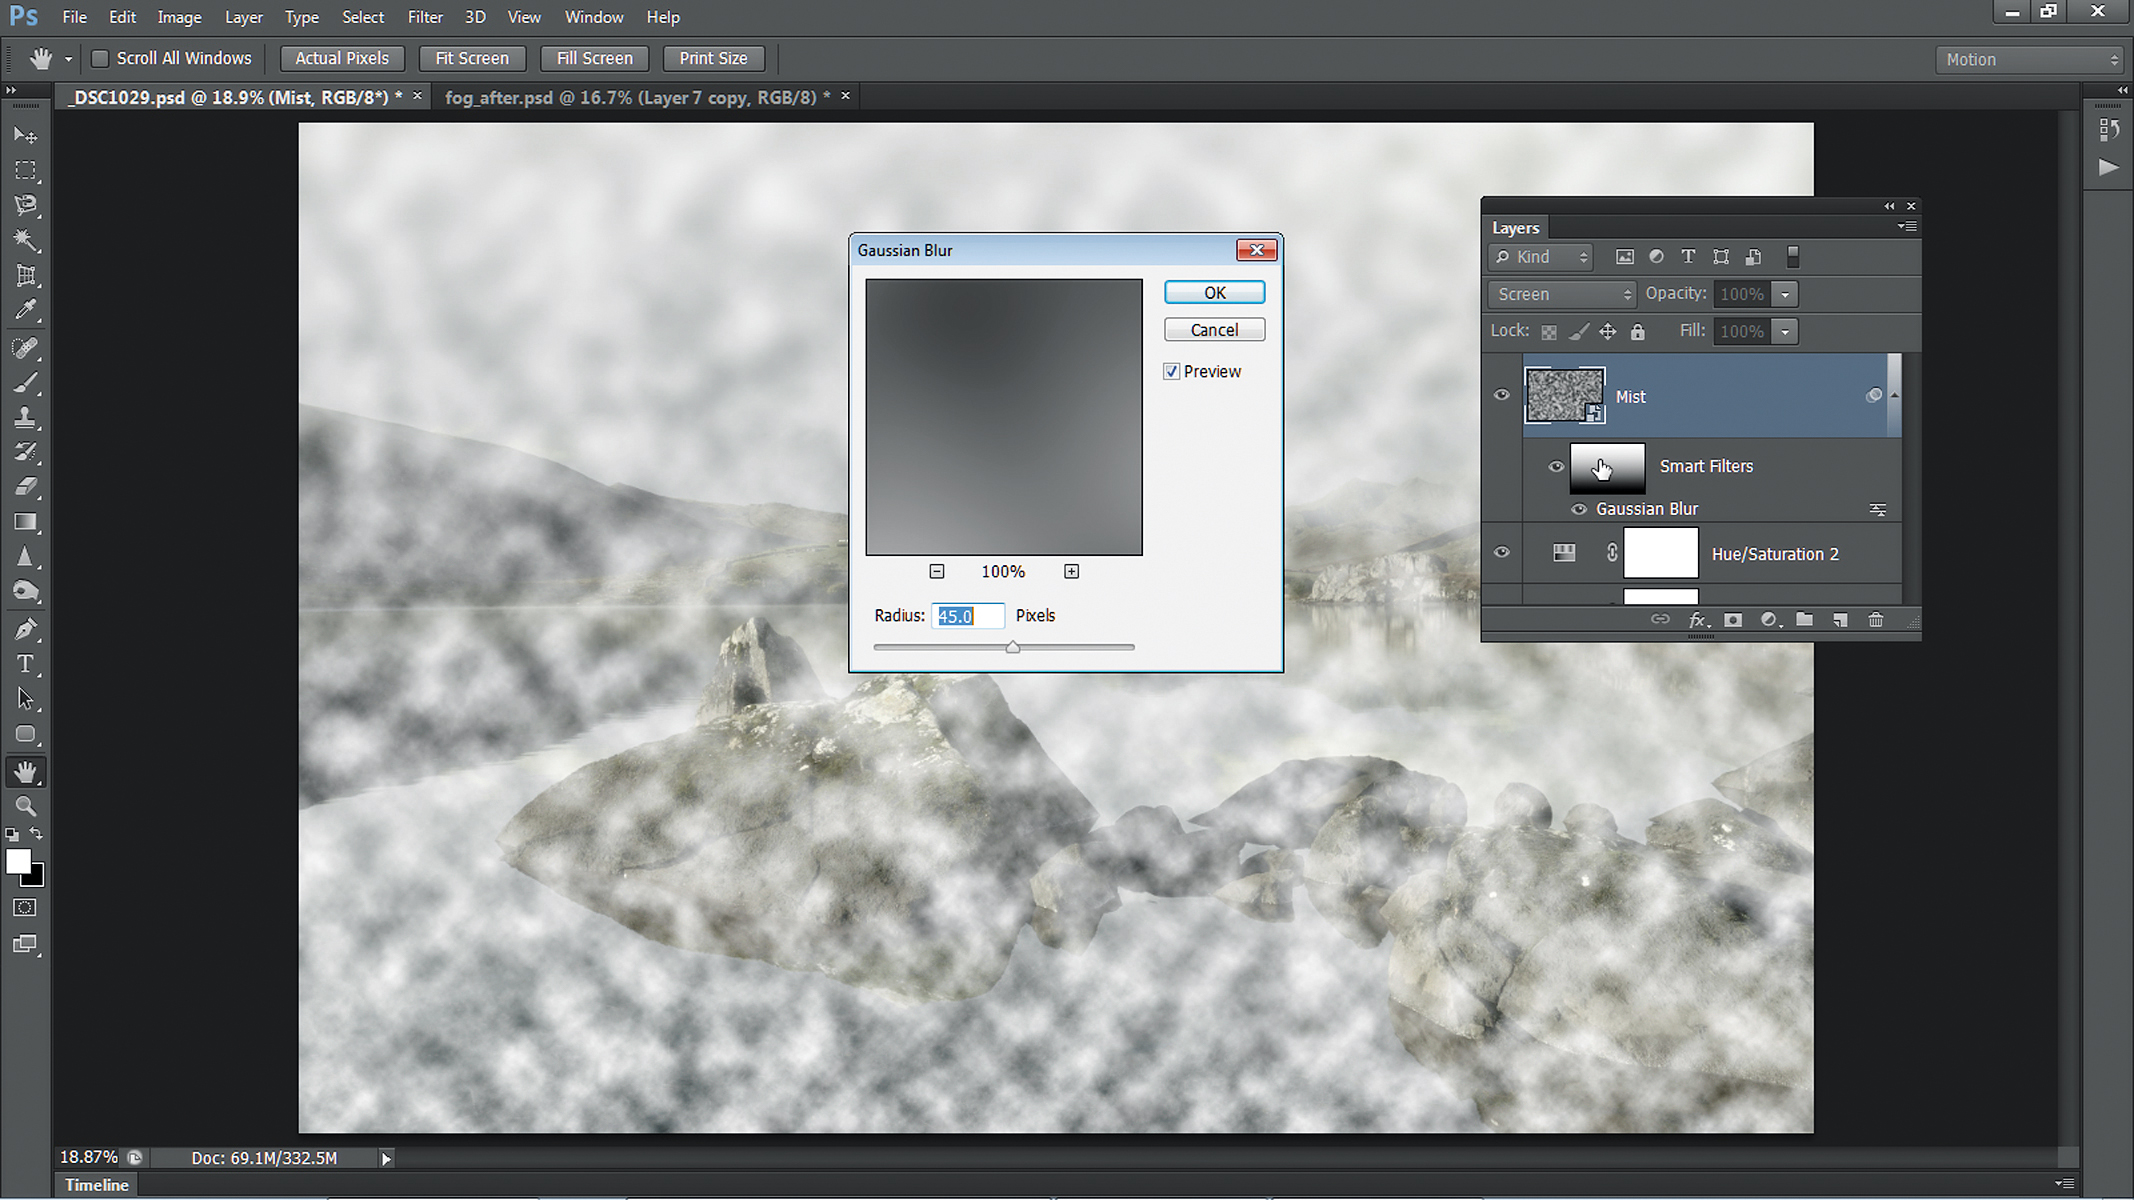
10. Add a graduated mask
Go to Filter > Convert for Smart Filters, then to Filter > Blur > Gaussian Blur. Set Radius to 45px and hit OK. Click on the Smart Filter mask thumbnail, then grab the Gradient tool. Hit D then X to set color to black. Hold Shift and drag a line from bottom to top.
11. Mimic the perspective
Click on the top layer, then go to Edit > Transform > Distort. Hit Cmd/Ctrl and the - key a few times to zoom out, then drag the bottom right and left corners outwards and the top right and left corners downwards until they meet the skyline. Hit Enter to apply.
12. Paint a mask
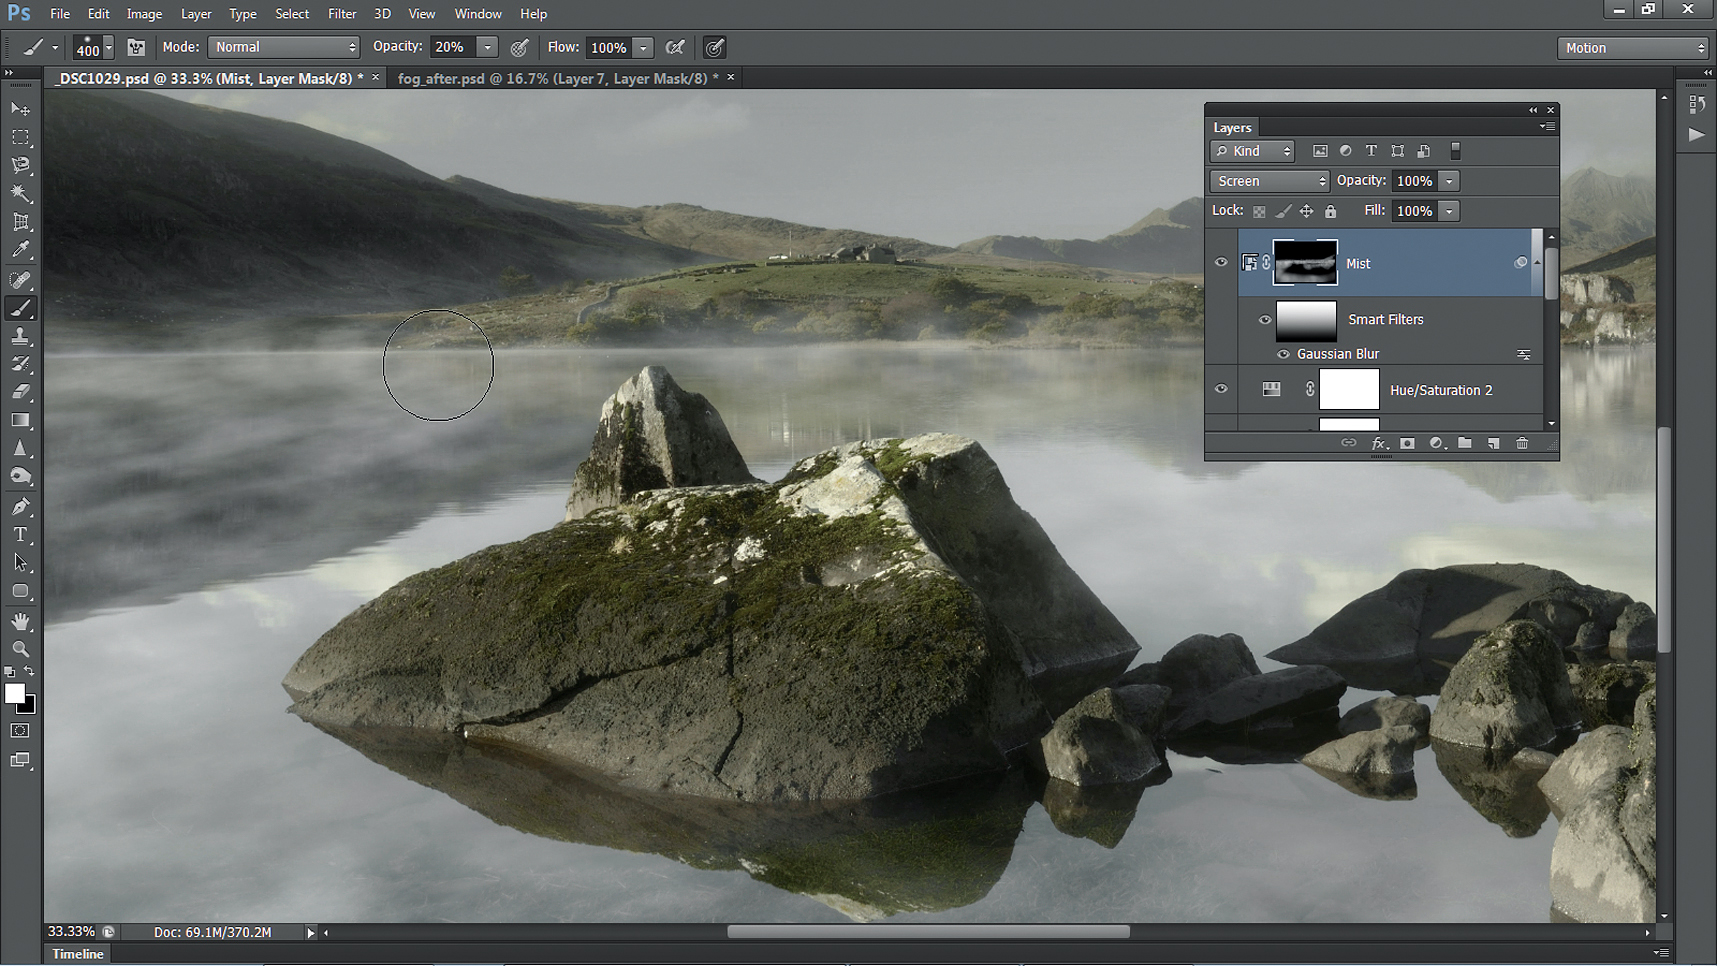
Hold Alt and click Add Layer Mask to add a full mask that hides the clouds. Grab the Brush tool, choose a soft-edged circular brush tip and set the brush opacity to 20%. Set the foreground color to white, then paint over the water to reveal the mist.
13. Copy and transform
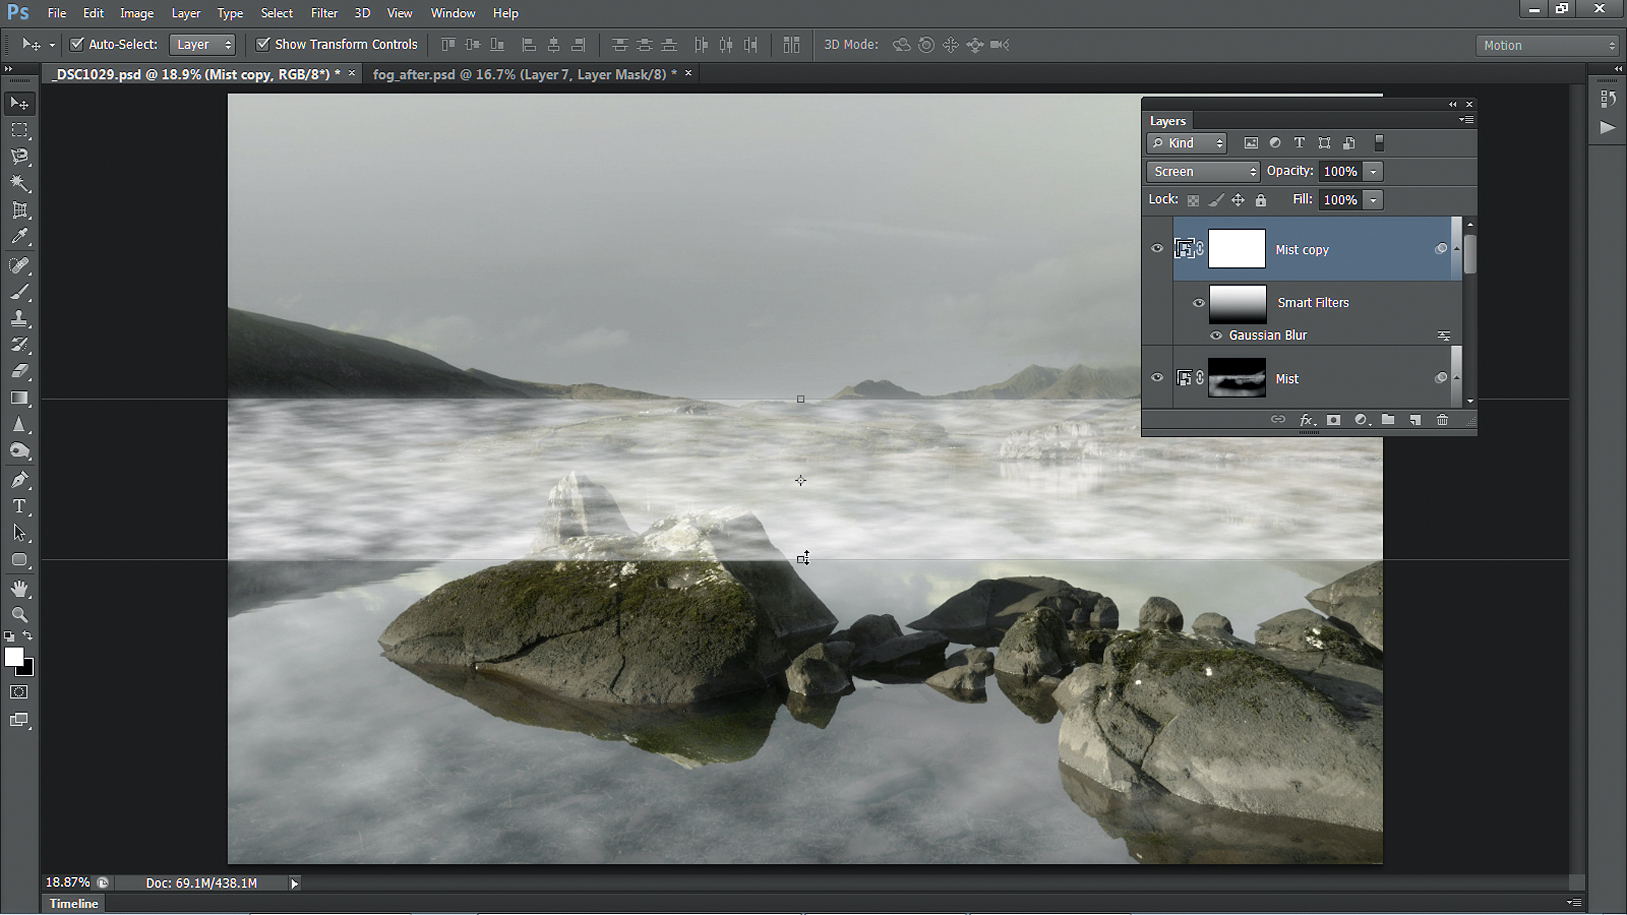
Hit Cmd/Ctrl + J to make a duplicate layer, then right-click the Layer Mask (not the Smart Filter mask) and choose Delete Layer Mask. Hit Cmd/Ctrl + T, then drag the bottom middle points upwards. Hit Enter, then click Add Layer Mask to add a new empty mask.
14. Mask the mist
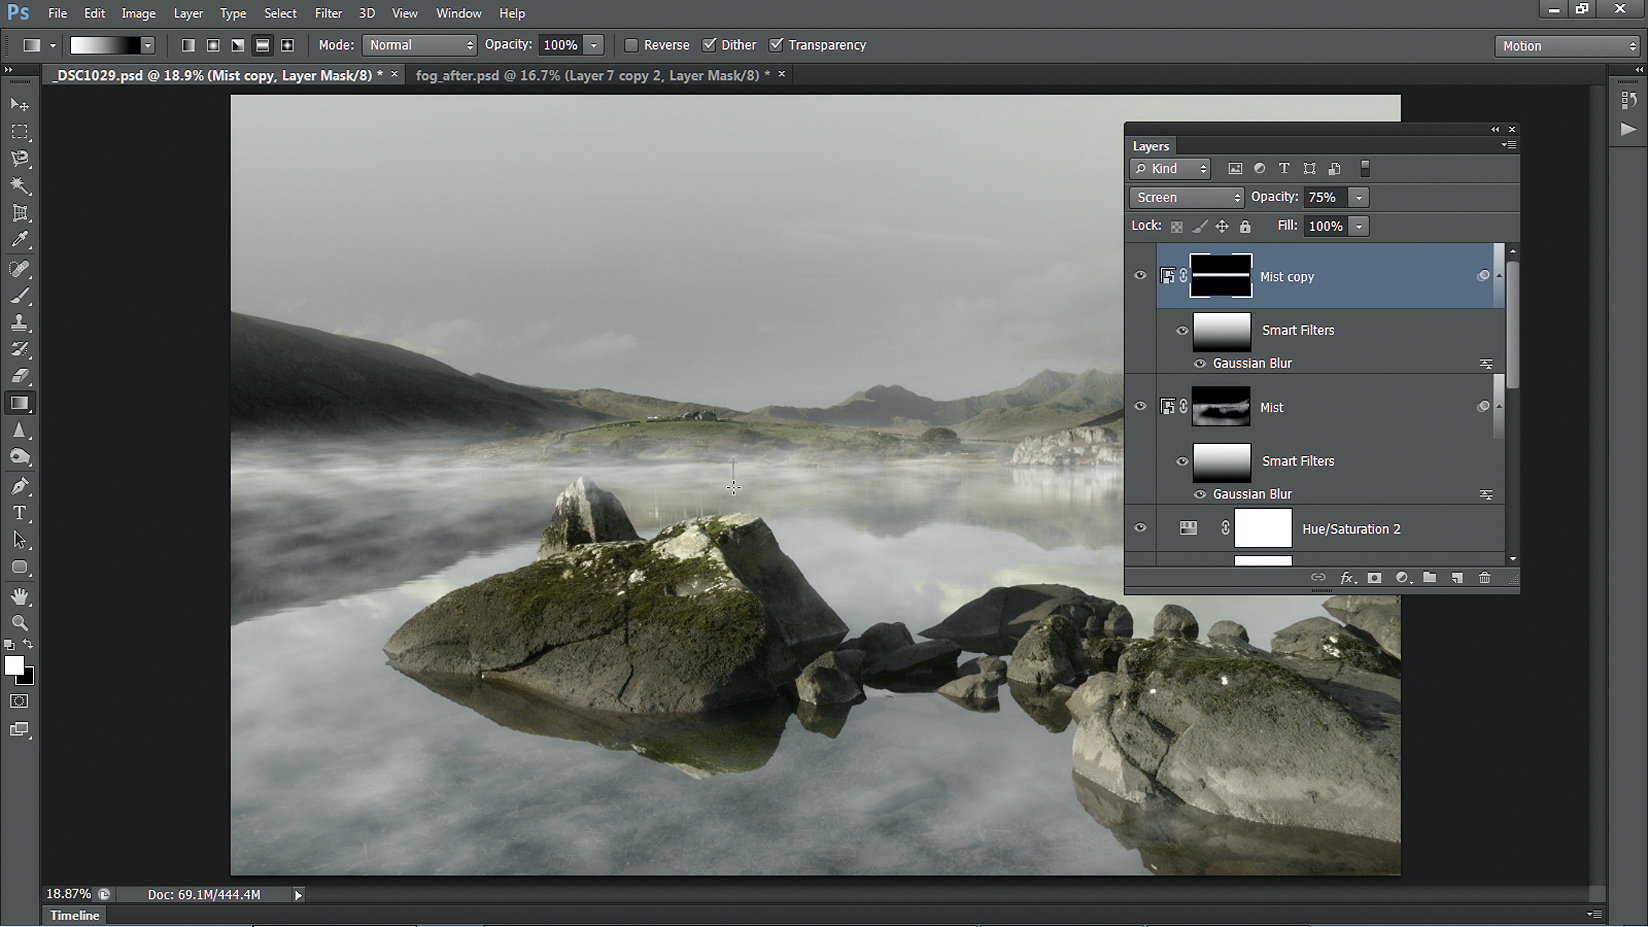
Grab the Gradient tool, go to the options at the top and choose Reflected Gradient. Select Foreground to Background and hit D to set the color to white. Drag a short line down from the water line so only a thin strip is visible. Set the layer Opacity to 75%.
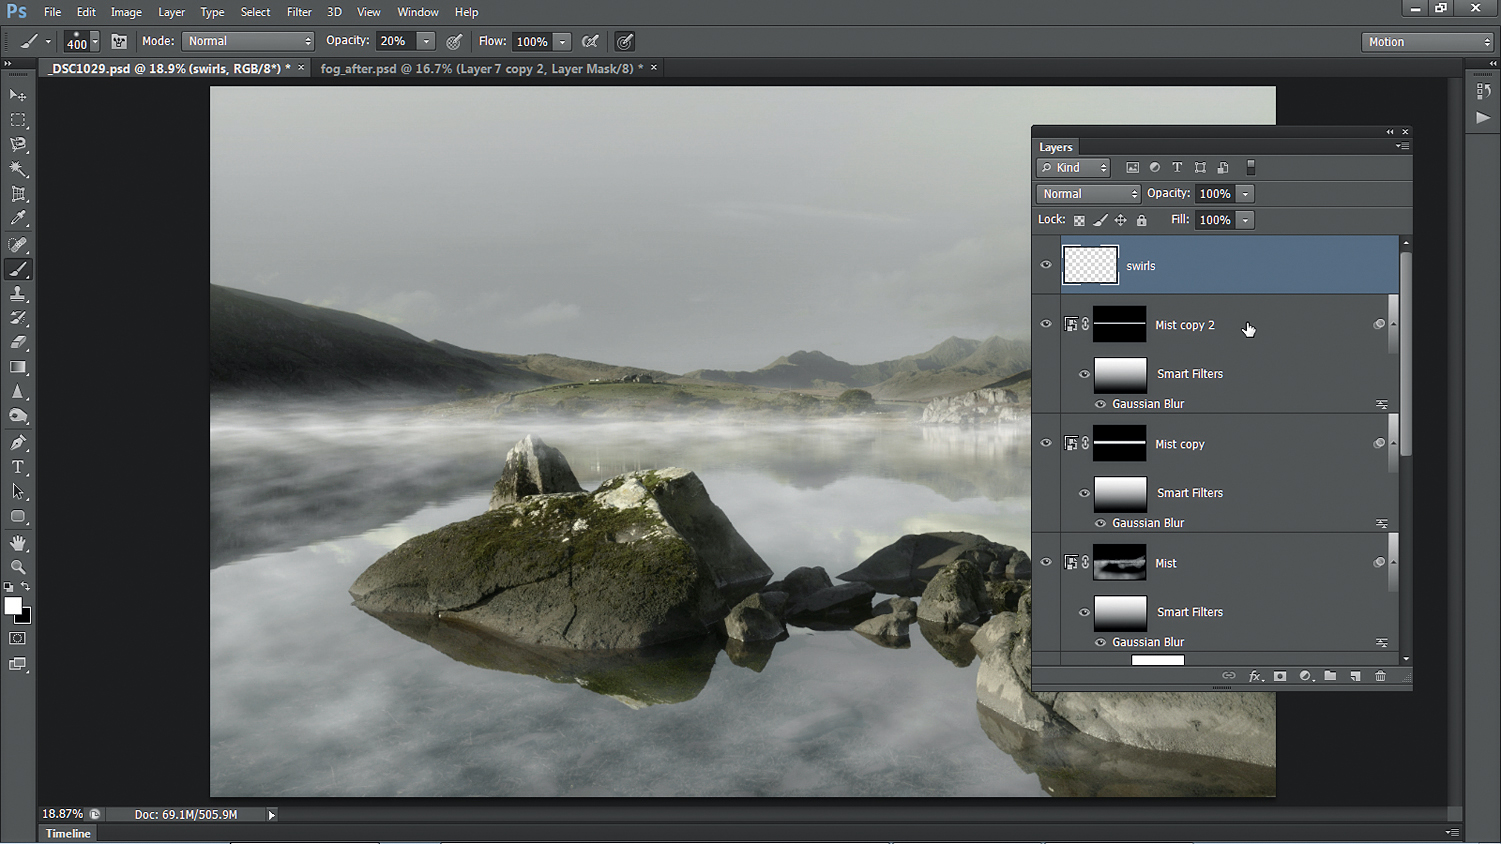
15. Make another copy
Hit Cmd/Ctrl + J. Delete the Layer Mask and transform it to make it thinner. Add a reflected gradient on a Layer Mask to make a smaller strip. Set Opacity to 45%. On a new Swirls layer, grab the Brush tool set to white with an Opacity of 20% and Flow of 35%.
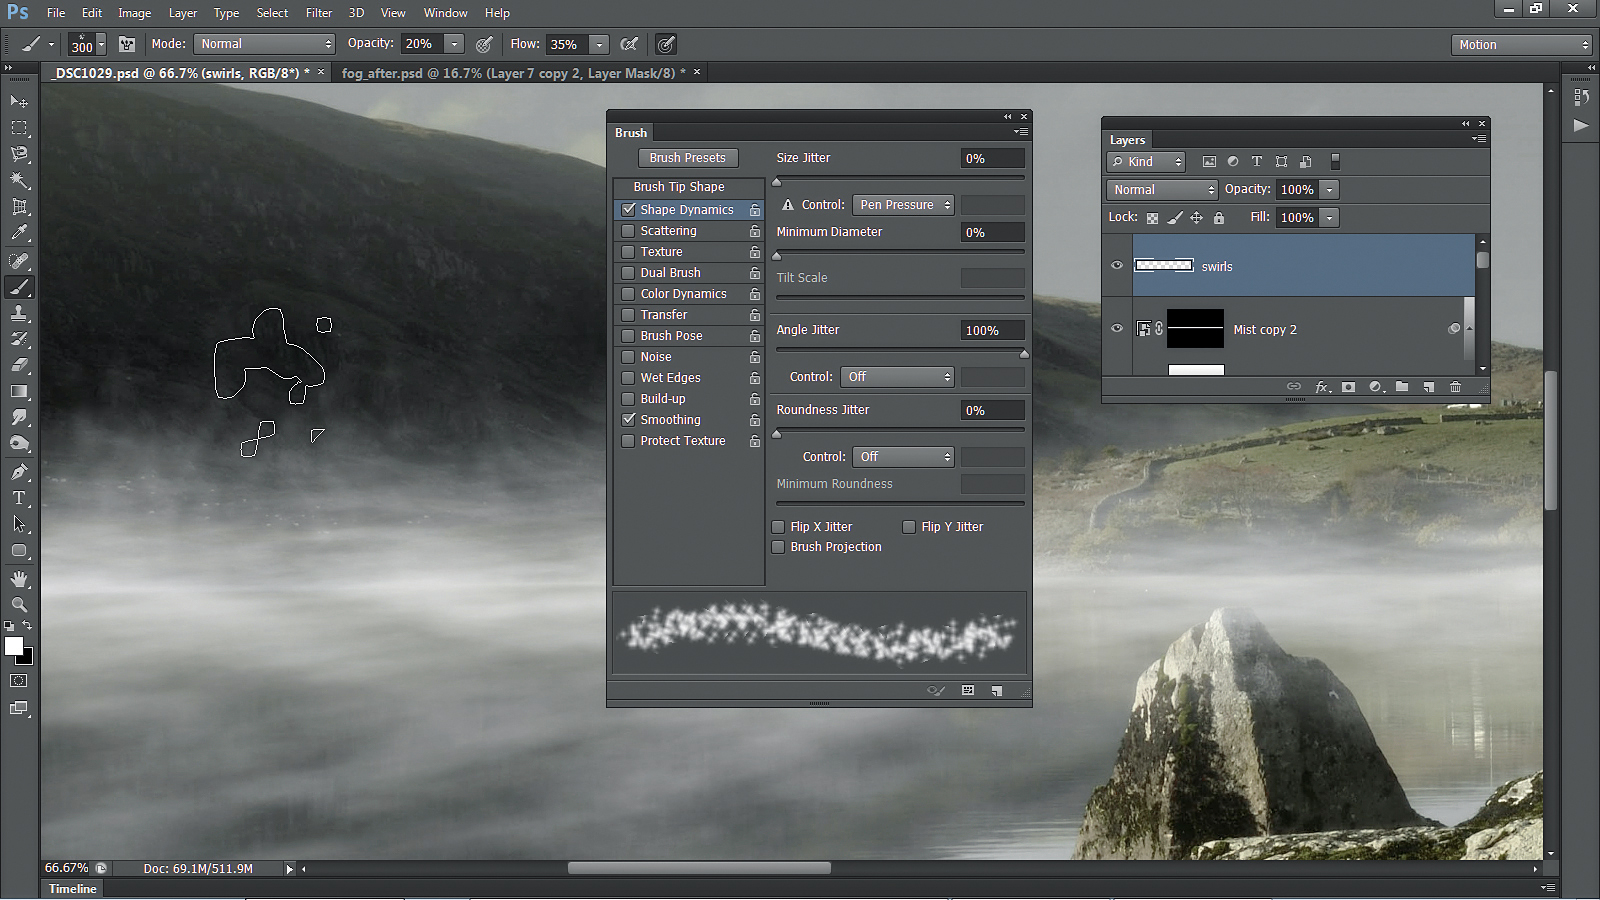
16. Paint random mist
In the Brush Preset Picker, select Spatter 14 (if you can't see it, go to Reset Brushes). Go to Window > Brush > Brush Tip Shape. Set Size to 300px and Spacing to 50%. Click Shape Dynamics and set Angle Jitter to 100%. Paint to add mist on the water line.
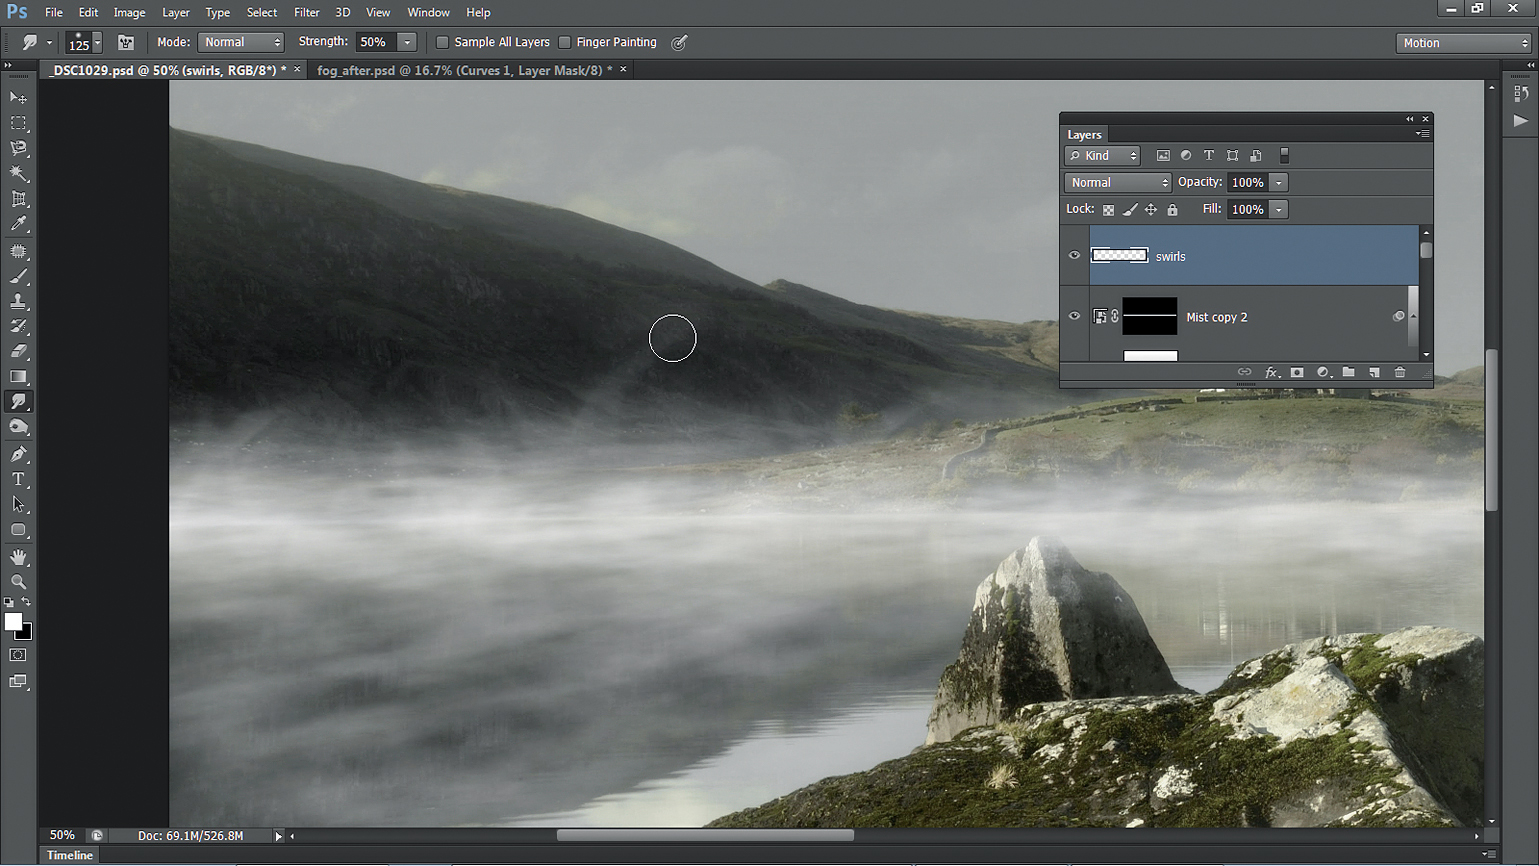
17. Use the Smudge tool
Grab the Smudge tool, then go to the options bar and set Strength to 50%. Make sure both Finger Painting and Sample All Layers are unchecked, then use the tool to smudge the white brush strokes into swirls of mist that rise up from the lake.
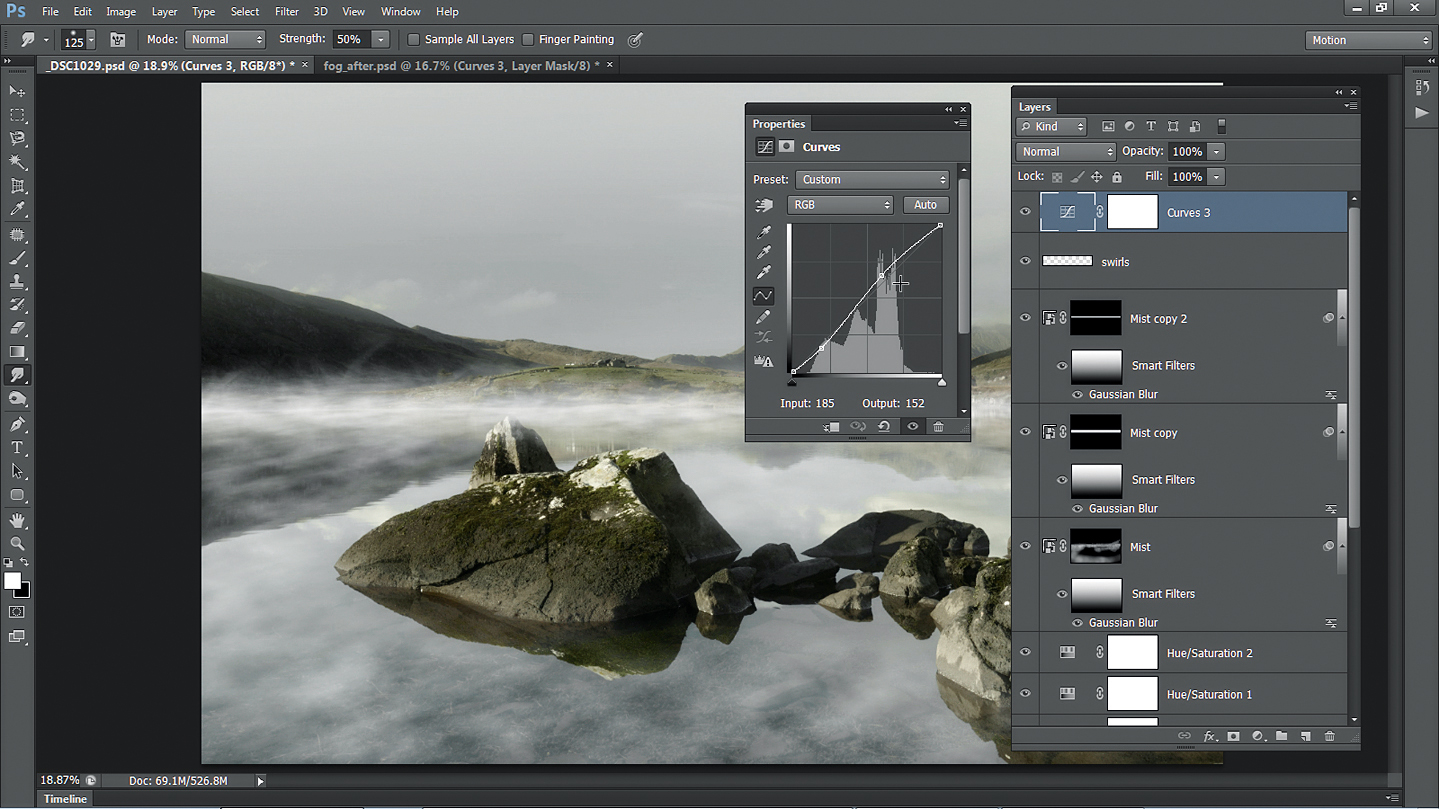
18. Final tonal tweaks
Ensure the top layer is highlighted, then add a Curves Adjustment Layer. Make a shallow S-shaped curve by dragging one point upwards, and a second downwards to boost contrast slightly. Make any other tonal tweaks with further Adjustment Layers.
Join Adobe Creative Cloud and save 15% on your first year
TechRadar has teamed up with Adobe to offer a special discount on Creative Cloud All Apps membership. For the first year, you'll pay just $45.04/£42.46 per month – down from the regular price of $52.99/£49.94. You'll get access to Adobe's full suite of creative apps, including Photoshop, Lightroom and Illustrator, plus 100GB cloud storage for your projects. Offer ends August 26 2018.

 Become a TechRadar Insider


