
This guide will show you how to set up a safe environment in which you can anonymously communicate, browse the web, and send and receive bitcoins. You will start by setting up a separate operating system equipped with privacy software that is easy to set up. You will then set up encryption keys and a Bitcoin wallet to communicate and transact in private.
Set Yourself Up
Step 1: Get Tails
Tails is a Linux operating system that you run from a DVD or USB stick. You do not need to install it on your computer. It comes with all important software pre-installed and routes all your traffic through the Tor network.
The easiest way to get Tails is to ask somebody who already has it to write a copy onto your USB stick using the Tails Installer program found inside the operating system.
Another option is to download Tails from their official website, verify it, and install it manually using their step-by-step instructions. While the instructions on the Tails website may seem confusing at first, they’re well written and not difficult if you follow them carefully.
Step 2: Start Tails
Find a computer, plug your USB stick into it or put the DVD into the drive, and start up the computer. Some computers will automatically detect the drive and start running Tails, but in most cases you will have to enter the BIOS setup. If you run into any trouble, try searching online to find out how to enter the BIOS for your particular computer.
Sign up to the TechRadar Pro newsletter to get all the top news, opinion, features and guidance your business needs to succeed!
Everything you do around a particular identity should be done within Tails, whether you’re browsing, chatting, making Bitcoin transactions, or typing documents. Keep your browsing focused, and do not log into your private Facebook or the blog associated with another one of your identities at the same time.
Step 3: Enable persistence
Without having persistence enabled, you won’t be able to save any data in Tails.
Under Applications > Tails, select Configure persistent volume. To use this option, your USB stick must have been created using the Tails Installer program. If you created your USB stick manually (as described above), you need to copy Tails over using another USB stick. The Tails installer is under Applications > Tails > Tails installer.
You will be asked to create a passphrase. Check out our guide on how to create secure passwords with Diceware in this book. Length is more important than complexity. You will be asked for this passphrase every time you start Tails.
You will also have to select which information you want Tails to remember. The less Tails remembers, the more secure you are, but you’ll have to remember more things yourself and set them up again each time you start Tails.
To seamlessly run all the features you will need in this guide we recommend selecting Personal Data, GnuPG, Pidgin, Network Connections, Browser Bookmarks, Bitcoin client, and Icedove.
Restart Tails with persistence and enter your passphrase. Remember that only the files in the folder named “Persistence” will be saved when you shut down your computer.
Step 4: Set up KeePassX
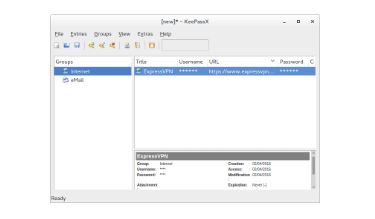
KeePassX is a password manager that requires you to remember only a few passwords and still have secure unique passwords. Access KeePassX under Applications > Accessories > KeePassX. Create a new password database by selecting File > Create New Database.
Use Diceware to set a long but memorable password to access KeePassX. This will be the second of maximally two or three passwords you need to remember. All other passwords can be created and accessed with KeePassX.
Save your database in the “Persistent” folder in your home folder.
To create a new password, click on the button with the yellow key called Add New Entry.
Give it a title and fill in the other information as well if you like. The most important button is labelled Gen. You find it right of the field “Repeat.”
Click the button Gen to the right of the field “Repeat.” This will generate a random password. You can define its length and whether it should contain numbers or special characters. For maximum security, don’t even look at it. There is no need for you to see it. And, in the unlikely event that something or someone is capturing your screen, all they will see are stars instead of the password. Just generate it and copy and paste it over to the site you need it for.
Step 5: Get a PGP key
Once you are inside Tails you can create a new PGP key under Applications > Utilities > Passwords and Keys.
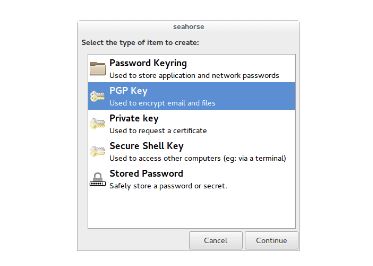
Click on the blue “+” symbol under GnuPG keys and enter a name and email address. You can make this information up, but if you plan to use this key later to send and receive encrypted emails, you should enter an email address that you control.
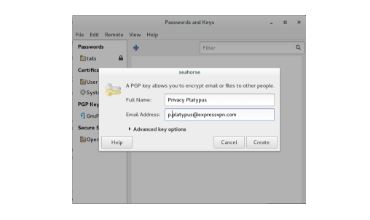
Enter a password for your PGP key. You can create a password using Diceware or KeePassX. You will need this password every time you send an email or decrypt a file.
After a few seconds, your PGP key will appear in the GnuPG keys list. Congratulations! You can now use it to backup your own data or securely send yourself files that only you can access. More on this in Step 8: Back Everything Up With PGP.
Step 6: Set Up Electrum
The Bitcoin wallet is under Applications > Internet > Bitcoin Wallet.
Electrum is a lightweight Bitcoin wallet. That means it does not rely on its own copy of the blockchain (the immutable record of all Bitcoin transactions that ever took place), but instead relies on several other nodes.
To find out your balance, enter your Bitcoin address into a Blockexplorer.
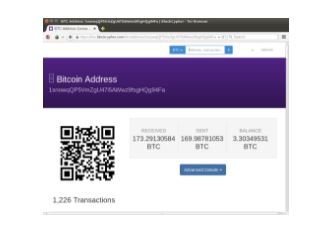
For example, this is the Bitcoin address of the Edward Snowden Defense Fund:
1snowqQP5VmZgU47i5AWwz9fsgHQg94Fa
You can enter it into a Blockexplorer like Blockcypher (many more exist) to see its balance and all transactions associated with it.
Create a new wallet by opening Electrum. A “standard wallet” will do fine. You will see 13 English words, which represent your wallet seed. This seed is more than just a password to your wallet. Anybody who has this seed can take your Bitcoins, so be careful about where you store these words.
To store your wallet seed words safely, you can create a new entry in your KeePassX database and paste them into the comment field, or you can write them on a piece of paper and lock it away. Either way, do not save it in a text file anywhere on an unencrypted drive.
Press proceed and enter your wallet seed into the next window, then choose a password, ideally by creating one with KeePassX. You will need this password every time you make a transaction.
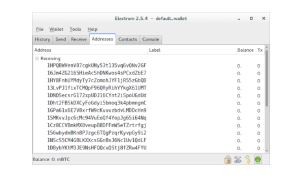
Great! You can now receive and make Bitcoin payments. You can find your Bitcoin addresses and their balances under “Addresses.”
You can set up multiple wallets for your identity. You can create a new wallet for a single transaction if you so wish. Having separate wallets makes it easier to keep funds separate for accounting or privacy purposes.
Step 7: Communicate via XMPP and OTR
Pidgin is a chat program. As anonymous email accounts are hard to come by, it might be easier to chat with your contacts using this tool. The only downside is that you cannot receive messages when you’re offline.
Pidgin is under Applications > Internet > Pidgin.
Launch Pidgin. Add an account and choose XMPP as your protocol.
Pick a username, enter dukgo.com as the domain and pick a password, then tick the box Create this new account on the server. Close the window and connect to enable the new chat account in Pidgin. You may be prompted again to enter your username and password. Use KeePassX to create a secure and unique password.
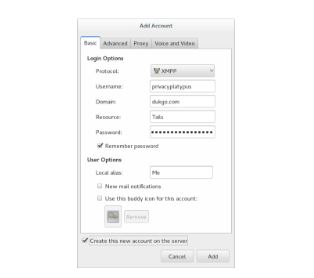
Your username@dukgo.com address can now be given out to your contacts. You will need to approve each individual contact before you can initiate a conversation with them.You have now set up XMPP chat (also called Jabber). Note: Even though username@dukgo.com looks like an email address, it is not an email address and cannot be used to receive messages while offline.
To chat securely, you need to use OTR encryption. Click on OTR > Start private conversation.
You can verify the integrity of the conversation by clicking on OTR > Authenticate Buddy.
The easiest way to reliably verify each other is to exchange each other’s fingerprints outside the chat. which you can see under Manual authentication. To share your fingerprint with other individuals, you can paste it into the signature on a message board, or publish it on your website.
Step 8: Back Everything Up With PGP
The trickiest part of a secure and yet private backup process is to back up the PGP Key. The more effort you undertake to lock your key away, the less accessible the key becomes to you in case you need it.
We recommend the following: Choose a very strong password with Diceware when you create your PGP Key. Load the key onto a USB stick and leave the stick with your family, friends, or a lawyer.
You can also make more than one copy of the backup if you fear your first copy could get damaged or lost.
If your password is long enough (more than 25 characters), it should not be possible for anybody to read your communications or access your backups even in case they get a hold of the key, because the key is still encrypted with your password.
We highly recommend making regular backups of the documents that you cannot afford to lose, as well as your KeePassX password database and Bitcoin wallets.
Select all the files and folders that you want to back up. You can, for example, select the entire “Persistence” folder. Right-click the selection and select Encrypt. A window will ask you which keys you want to encrypt your selection with. Select only your own PGP key. Do not tick the sign option unless you want it to be verifiable that this backup was made by you. If you don’t sign it and somebody finds the backup, they will only know that this backup was made for you, not by you.
If you selected multiple files, you will be asked how you want them packaged. We recommend encrypting them packed together because this leaves the least metadata and creates one single file that will be easy to keep track of, instead of multiple small files. The process might take a while. After they’ve been packaged, you will have two files: one ending in .tar.gz (the unencrypted package)and the other in .tar.gz.gpg (the encrypted backup). The .gpg file is the file you are interested in. Load it onto a CD or USB and store it away.
When it comes time to decrypt the file, just double-click on the .gpg file, enter the password to your PGP key, and let the computer do its work. It is wise to test this process out before you rely on it for restoring your backups.
Step 9: Repeat the Above Steps for Each Identity You Have
Repeat steps 1 to 8 for each of the identities that you have. You should have a separate USB stick with Tails for each pseudonym, company, activity that you control and want to keep separate. Each of these sticks should have its own passwords, PGP keys, and KeePassX databases.
Keep all your identities separate! Don’t label all of this too obviously, and consider keeping everything in separate locations.
Lexie M writes about information security, bitcoin, and privacy. She is excited about empowerment through technology, space travel, and pancakes with blueberries and blogs for ExpressVPN who is TechRadar’s number one VPN provider. This is an excerpt from Lexie’s eBook called “Bitcoin Security and Privacy : A Practical Guide” which is free to download on iOS, Android, Kindle Kobo and Nook.