
One of the biggest draws of using a Mac is the fact that they're seen as much better protected than Windows devices - some argue that antivirus software is completely surplus to requirements.
However, while that's true to an extent, Apple PCs aren't immune, and that perceived safety also often leads users to take more risks and feel 'invincible'.
Whether your Mac's running suspiciously slowly or you've noticed strange tasks running in the background, using a malware removal tool or one of the best Mac antivirus to check and clean your Mac is the single best thing you can do to protect your device and your data.
Article continues belowHere, we'll be running down all the steps you should take if you're thinking about cleaning up malware on your Mac, and how to remedy the situation should you discover something malicious.

1. Back up your files
Before undertaking any sort of large task, like updating your OS or cleaning up malware, you should back up all of your essential files and data. It's advice that's often given and often ignored, but in this situation it's a crucial part of the process.
You may well have a regular Time Machine back up set up, so once you know that your irreplaceable files are safe and secure on an external drive or in the cloud, you're ready to get cleaning. If you're not sure how to back up or what to use, check out our guide to the best backup software.

2. Pick your weapon of choice
There's a huge range of malware removal software on the market, and while plenty can do the job, it's still a big choice to make.
Our top-rated tool is Malwarebytes, and you can get yourself a copy here. A big bonus is that apart from being supremely effective at detecting and destroying malware, new users get 14 days free of the full premium version. That includes on-demand scanning and well as always-on protection.
In this guide we're going to be focusing on the steps necessary for using Malwarebytes, so we recommend you grab yourself that 14-day trial follow along with our guide. However, the steps should be fairly similar if you've already got yourself a malware removal tool, or fancy using a different provider.

3. Download and run your tool
Head to the website, and click Free Download. Once you've done that, the PKG file will begin to download. On Chrome it'll show up bottom left, or on Safari, you'll see it in the download drop-down top right. Click on the downloaded file to begin the installation process.

4. Install your anti-malware tool
First, you'll have to agree to the licence and terms and conditions. Then you'll have to choose where on your hard drive to install the software. We'd recommend sticking to the default option unless you have a particular system in place.
You'll be prompted to enter your password to begin the process, and once you've done that, it'll install. This takes a few seconds, but may be slower on an older machine.
You'll also be asked to allow or deny notifications – this is entirely up to you!

5. Welcome choices
Once the software in installed, you'll be asked whether you're using a work or personal Mac. Select whichever is correct.
The next screen will ask you to activate your licence, buy a premium plan, or say 'Maybe Later'. You'll then be asked to enter an email address, but this is optional. If you want to hear marketing messages from Malwarebytes, enter your address – otherwise, leave it blank.
Finally, you'll be asked to give the software full disk access. This might sound scary, but to do its job, Malwarebytes needs to be able to scan all of your files. All malware detection software will need to do this, so to get the most out of it, follow the steps on screen to do so.

6. Scan for malware
You'll now be faced with the main screen of the software. There's a big ol' box in the middle called Scanner – click this to begin the system scan.
Scanning will now be underway, and as the software checks all of your files and folders, you'll see a tally going up on the right-hand side.

7. Scan summary
Once the software has finished the scan (it doesn't take long), it'll tell you what it's found. Discoveries are separated into threats, and PUPs – we'll expand on these in a second.
If you're clean, you're good to go – Malwarebytes has done its job and your conscience is clear.
However, if you still think something is awry with your Mac, it's definitely worth checking out the best antivirus software to ensure that you're totally clean.
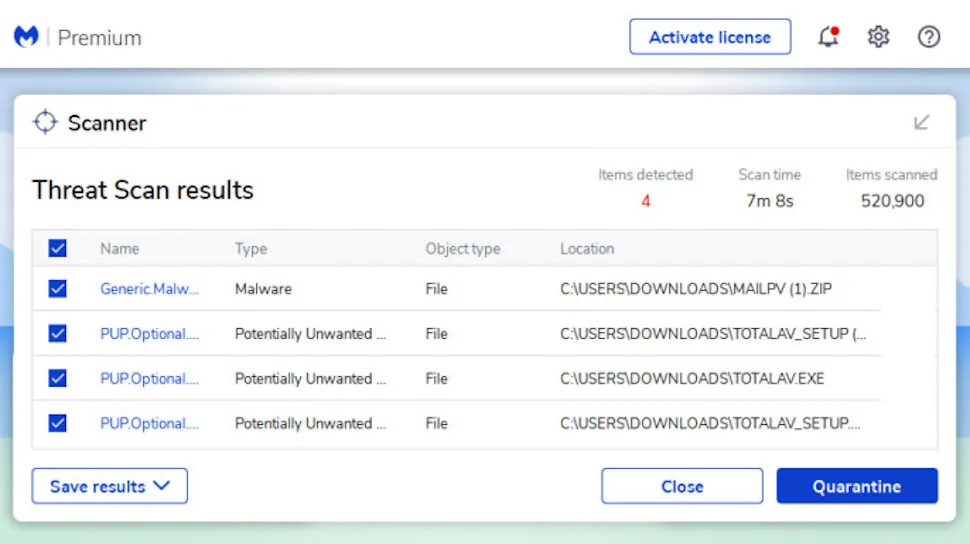
8. Threat detected
If Malwarebytes does find anything dodgy, it'll be highlighted in your scan report. This essentially means that those files need taking care of quick-sharp.
When malware is detected, you can choose to quarantine it with the click of a button. This doesn't delete the files, but it locks them away so that they can do no more harm until you decide what to do with them yourself.
If you've gone for the premium version, threats will be automatically quarantined, but if you're only using the free version, you'll have to do this yourself. To turn this feature on, click the cog button at the top-right of the app.

9. Uninvited guests
While Malwarebytes or your chosen tool detects true malware. it will also alert you to the presence of PUPs – Potentially Unwanted Programs. While a PUP might sound cute, they could be slowing down your system, extending your boot time, and generally making a nuisance of themselves.
However, these are only potentially harmful, and you may well be fully aware of these entities and have them installed by choice. If so, you can follow Malwarebytes' own walkthrough for whitelisting benign programs so that they don't show up in later further scans.
If you're not sure what to do with a certain PUP, the advised procedure is to quarantine it like you would true malware just to be safe. You can then click on the file in the Threats screen and see exactly why the tool considered it to be potentially harmful.

10. All done!
Now that the software has scanned each and every file on your Mac, you're good to go. Hopefully it didn't detect anything malicious, but if it did it's now quarantined and deleted if you wish.
It's worth noting that if something is quarantined, you can release it back out into the wild if you see fit. You might find that the PUP actually did a job you got used to, or that another application works better in tandem with it.
To do this, just click Detection History to see all your previously quarantined files. Select the one you want back, and click Restore to release it.
- Discover more in our independent Malwarebytes reviews
- Get backed up safely with secure cloud storage solutions
- The big question...Is free antivirus safe?
