How to make Android apps with Andromo
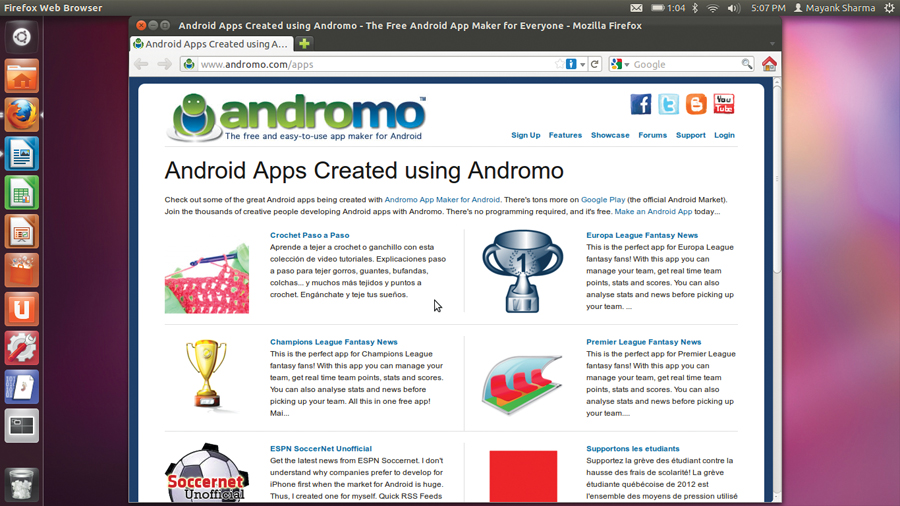
Think you need to be fluent in Java to write apps for Google's Android mobile OS? What if you could write an app simply by navigating through a bunch of menus, without installing any piece of software and, more importantly, without writing a single line of code? Thanks to Andromo, it isn't a question of what if' but what is.
Andromo's app-creation process is totally idiot-proof. If you have a mouse, a web browser and an imagination, the world's your oyster. Anyone, including someone who doesn't even have a whiff of programming knowledge, can whip up an Android app in a matter of minutes. Best of all, it costs nothing.
But don't let that fool you into thinking of Andromo as a tool only for newbies. It's also got lots for the seasoned app developer who likes to spend time customising their apps to the hilt. For a fee, pro app developers can resell Andromo-created apps and even list them on Google's Android Store, Google Play.
If you still aren't convinced to try Andromo, here's another gem: Andromo can help you generate revenue. That's right. To cover its costs while making the tool available for free, all Andromo apps display small non-intrusive strips of ads, 50 per cent of the revenue from which it'll share with you!
Click, click, done
Andromo runs completely inside a web browser, so you don't need to install any additional software, unless you want to test your Android app inside an emulator.
The Andromo interface is divided into tabs with each representing a step in the app-creation process. After making changes inside a step, remember to click the 'Save Changes' button at the bottom of the page, before moving on to another tab. You can also exit the process at any step and return to it later.
The first step is to describe the app. An important part of this step is to select an icon. You could go with Andromo's default icon, but it's best if you choose your own. If you're not familiar with creating icons, there's no dearth of royalty-free icons available on the web.
Sign up for breaking news, reviews, opinion, top tech deals, and more.
Dress it up
Then there are different steps for customising the various aspects of your app. For example, in the Styles tab you can select from one of the two predefined Android themes, depending on whether you want a light or a dark background colour.
From under the Action Bar tab you can customise the appearance of the bar that appears at the top of your app. Besides displaying your app's name, users will use the bar to navigate between the various components in your app.
The most important screen, which you need to spend time decorating, is the home screen. Head to the Dashboard tab to alter its look. Here you can choose to apply a variety of backgrounds. You can upload images, as well as fine tune their alignment.
Bring in content
The meat of the app-creation process lies in the Activities tab. This is where you select and define the capabilities of your app.
Andromo currently supports a total of 13 activities with 11 free activities, and a couple of Gold-only activities available to paying members. The tool supports two kinds of activities: one that pulls in data from external services, and others that display data bundled with your app.
The external services that Andromo can bring in data from include Facebook, Flickr, Twitter, YouTube and Google Maps. Additionally you can pull in a website, or an RSS/ Atom news feed, or stream audio over the internet using HTTP progressive and live streaming.
While all activities have similar configuration elements, such as a name and a custom icon, each has its own additional configuration options and nuances. So if you want to display a Facebook page with the social network's activity you only need to enter the name of the page as it appears in the URL.
Similarly, using the Flickr activity you can display images of a particular user by mentioning their Flickr User ID. Or you can display images from various sections of the website, such as the most popular photos on Flickr, or a user's favourite photos, by pointing to the relevant Flickr feed URL.
Bundle content
Then there are activities that let you bundle content along with the app. One you definitely need to use is the About activity. It's designed to include information that describes your app as well as yourself, thanks to optional URLs to your Facebook page, or your Twitter feed, or profiles on LinkedIn or Google+, or even your website.
If you need more flexibility you can use the Custom Page activity to create the About Us page or a Contact Us page. It includes a full-featured HTML editor to help you design the page.
With the Audio activity you can bundle normal audio tracks with the app that users can play with Andromo's customisable music player, which has visible media controls. Or you can include short sounds that are played back with the soundboard that lacks any media controls.
But be cautious while using this activity or else your app will become very bulky. Currently Andromo limits the size of each audio track to 6MB. Furthermore, if you wish to put your app on the Android Market, remember that only apps up to 50MB in size are permitted.
Testing the app
The only real shortcoming with the process is that you can't test your app before first building it. So double-check those colours! When you're done creating your app, Andromo will build it on its servers and email you a download link when it's ready.
After downloading your app, you can test it on an emulator or run it on your Android device. Read these instructions for setting up the Android emulator along with the Android Software Development Kit (SDK) and the Android Debug Bridge.
You can also download the app directly onto your Android handset and install it, after setting up the phone to install apps from other sources in addition to Google Play.
Step by step: create an Andromo app
1. Register with Andromo
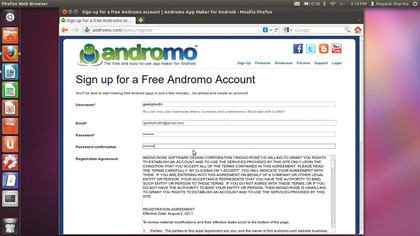
Before you can create an app you need to register with Andromo.com by picking a username and password, and providing an email address. After you've registered, log in and edit your public profile. You should also get a gravatar if you don't already have one. You can also change your password and email address from here.
2. Create new project
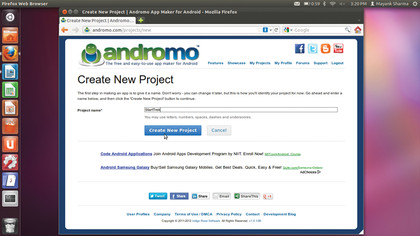
Once registered, you can start building your app. Begin by entering a name for your app, which you can change later. This lands you at Andromo's tabbed app creation control panel. The first step is to describe your app by editing its name, entering a description and a version number, and categorising it under one of the Google-approved categories.
3. Upload an icon
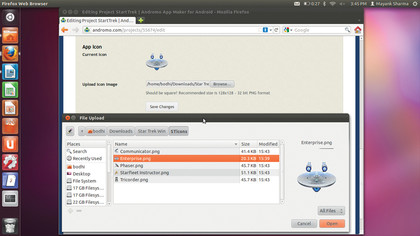
To help people find your app and to distinguish it from other apps, you can (and should) also upload a custom icon for your app in this tab, replacing Andromo's default icon. You can find lots of free icons on the web or you can create your own. Just make sure the icons are in the dimensions and file format mentioned on the website.
Customise the app
1. Pick a theme
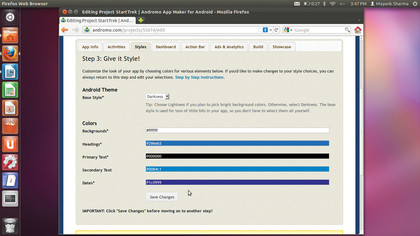
Andromo lets you customise various aspects of your app. Head to the Styles tab where you can choose the background colour of the app as well as the colour of the headings, date and various other pieces of text. You can either enter the hex colour code or pick it up from the colour picker. Make sure you click the 'Save Changes' button before moving on.
2. Action Bar
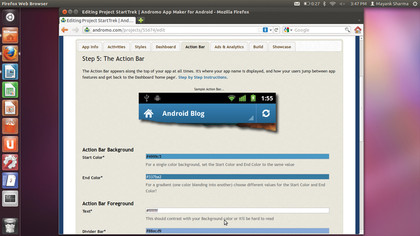
This is the bar at the top of your app. It requires four colour schemes for the four elements it displays. The first is the single colour or a two-colour gradient background. Then there's the font colour for the foreground text. Pressing the action bar will display a drop-down list of activities in your apps, and your can alter their colour schemes as well.
3. Dashboard
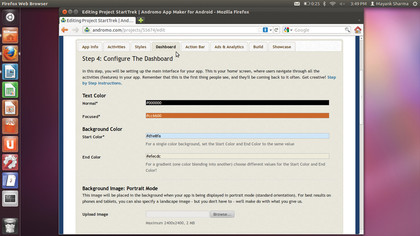
This is the main interface of your app and therefore has lots of customisable elements. You can select a single colour or a two-colour gradient for the background, or a textured image that will fill the screen irrespective of the phone's orientation. Additionally, you can upload images for the background – one for the portrait mode and one for landscape.
Add content to your app
1. My Projects
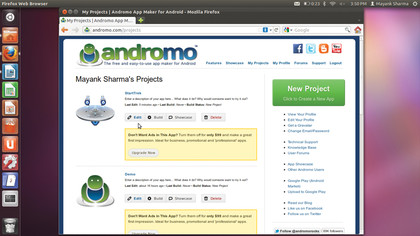
Log into your account and create an app if you haven't already done so. To continue working on an existing project, go to the My Projects section, which lists all your apps. Navigate to the app you want to edit and click on the 'Edit' button underneath it. This will bring you to the app-creation control panel where you can review your app's description.
2. Select an activity
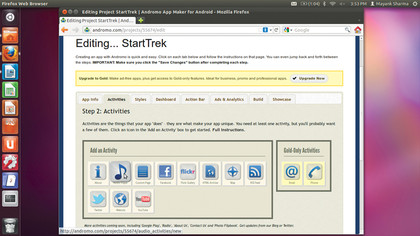
Next, define the functionality of your app by adding various activities from the Activities tab. So, if you're a Star Trek fan, your app can have the Facebook activity to point to your Star Trek fan page, and the website activity to point to the official website, as well as the Audio Player activity to play the theme music and different sounds from all the Star Trek series.
3. Customise the activity
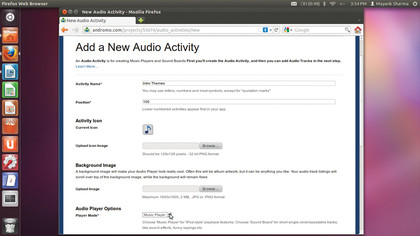
After you've picked up an activity, say Audio Player, customise it. That includes naming it, uploading an icon for it and selecting a background image. Since you need both an audio player (to play themes) and a music board (to play Klingon pronunciations), add multiple audio player activities, then upload the relevant audio files for each.
4. Arrange activities
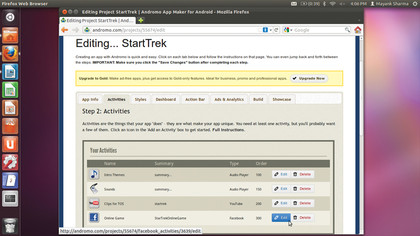
By default the activities appear in your app in the order in which you added them. To rearrange the order of the activities, modify their Order column value in the Activities tab. Activity with the lowest number is displayed first. Click on the 'Edit' button next to the activity you want to move and specify the new number in the Position field.
5. Advertising
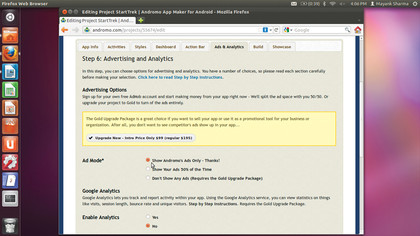
After you've added and arranged all the activities, head to the Ads and Analytics tab to customise the advertising options. You can choose from three ad modes. The first will show Andromo ads. The second option will split the ad space with ads served by your AdMob account. Or, you can turn off ads altogether by switching to the Gold Upgrade Package.
6. Build and showcase your app
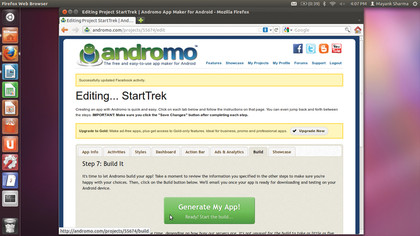
That's all there is to it. Now head to the Build tab and ask the service to turn your app into an Android app. When your app is built, you can download it from the emailed URL, then share it with others. You can also share the app with other Andromo users by adding it to the Andromo Showcase, from under the Showcase tab.
Share your app
After you've created your app, you need to ask the Andromo service to process it and generate an .apk file for you. Once it's done, it'll email you a link to download your app. The link is valid only for an hour, so if you need to distribute your app to other people, you need to download it from Andromo and host it elsewhere.
If you want to restrict the app to a small group of people, you can email the .apk file to your group, or host it on your own website. To install the app, others will have to tweak the settings in their phones to allow installation of apps from sources besides Google Play.
The other option is to upload the app to Google Play. But before you can upload your .apk file to Google Market, you need to register by paying a registration fee of $25 (about £16), even if you're going to distribute your app for free. After you've registered, you can upload your app along with a couple of screenshots, an application icon and app details.
Gold upgrade
For the most part the Andromo service doesn't cost you anything. But to keep it that way, the service displays ads in your apps. In fact, they'd even share half the ad revenue with you if you want (or you can let them have all of it).
You can also turn off the adverts altogether by subscribing to Andromo's Gold Upgrade Package. It costs $99 (about £63) per year per app. Besides giving you the ability to turn off in-app adverts, you get several other features with the upgrade.
For one, you can remove the Andromo branding from the About section of the app, which would be of use if you want to sell the app via Google Play or customise it for a client who wouldn't want third-party branding or advertising.
The upgraded apps are also placed higher in the build queue and get priority over non-Gold apps. Usage of Gold apps can also be tracked via Google Analytics. Finally, the Gold Upgrade enables business users to add activities so users of their apps can contact them straight from within the app itself, either via phone or email.