Best Raspberry Pi add-ons: the top extras for your Pi
Essential add-ons for your Raspberry Pi
Sign up for breaking news, reviews, opinion, top tech deals, and more.
You are now subscribed
Your newsletter sign-up was successful
This final mode takes a string of 126 1s and 0s, each of which represents a pixel, such as:
$F000000000000000000000111000011111110011111110111111111111101111
111101111011000110011000110000000000000000000000000000000000000
This final mode allows you to draw any images that you like, though it's probably most useful when used with scripts rather than through typing.
Since all communication to the Pi Lite goes through the serial port, you can access it using any language that supports serial communication. Python (using the serial module) is probably the easiest to try, and there are plenty of examples to get you started, again on Ciseco's Open Micros website.
Since the Pi Lite is driven from a serial port, it's actually quite portable, and can be run from any device with such capabilities, whether that's Raspberry Pi, Linux PC or almost any other computer (such as via a USB FTDI connection). Getting this set up will require a little soldering, but shouldn't be too complex.
Pi Lite emulator
If you're interested in seeing how the Pi Lite works, but aren't quite ready to part with any money, Ciseco has made an emulator so you can try out the hardware before you purchase it. This is available from (yes, you guessed it) Ciseco's Open Micros website.
The Pi Lite has one more trick up its sleeve: it uses an ATMEGA chip to drive the LEDs. This just happens to be the same family of chips that are used in the popular Arduino boards, and the Pi Lite comes with the Arduino bootloader installed. In other words, you can program the microcontroller on the board to do whatever you want. In fact, you could even run the Pi Lite board as a standalone unit without any other computer attached.
Sign up for breaking news, reviews, opinion, top tech deals, and more.
The board also exposes the five analogue inputs from the ATMEGA, which means that with a bit of programming, you can make those accessible for your project. This is a bit more complex than the standard use of the Pi Lite, but it is an excellent example of how a single piece of hardware can help you develop a wide range of technical skills.
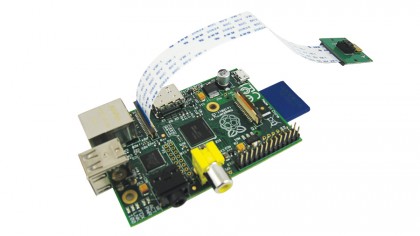
Camera module
Take pictures on your Pi.

Before we get on to what the camera module is, let's first clear up what it isn't. If you're looking for a cheap webcam to Skype with your family, the Raspberry Pi camera module isn't for you. Not least because Skype doesn't run on the device.
The Raspberry Pi camera is easy to use, but not in a plug-in-and-use-graphical-tools kind of way. Instead, it's designed to be scriptable. Now, with that cleared up, let's get started.
The camera module comes as a ribbon interface that slots into the vertical connector between the Ethernet port (or the Ethernet port-shaped gap on the model A) and the HDMI connector. Lift the top of the connector up, slot the ribbon in with the silver side facing the HDMI port, then push the top back down.
With this done, you'll need to make sure you've got the latest version of Raspbian with:
sudo apt-get update
sudo apt-get upgrade
sudo rpi-update
Then run raspi-config and make sure that the camera is enabled. Finally, restart and you should be ready to go.
All the magic is done with two commands: raspistill and raspivid. It should be pretty obvious which one takes still images and which takes videos. You can, of course, just run it like this, and type the command each time you want to use the camera. To capture a still image, it just takes:
raspistill -o image.jpg
However, that's not where the fun lies. Because you can run these from the command line, you have full power to include it in your programs. For example, if you never know what white balance to use, why not use all of them with the following Python script: