Best Raspberry Pi add-ons: the top extras for your Pi
Essential add-ons for your Raspberry Pi
Sign up for breaking news, reviews, opinion, top tech deals, and more.
You are now subscribed
Your newsletter sign-up was successful
from subprocess import call
for awb in ['off','auto','sun','cloud','shade','tungsten','fluoresce nt','incandescent','flash','horizon']:
call(["raspistill -n -awb " + awb + " -o image" + awb + ". jpg"], shell=True)
As you can see from the above, you can control the camera from Python, even though there aren't any Python bindings, by using a system call. You can do this in most languages, so hack away in your language of choice. Since all the options are available as command-line switches, you should easily be able to build the options you want into the system call.

Next, how about trying to make a stop-motion cartoon of your life?
raspistill -ifx cartoon -ISO 800 -t1 100 -t 10000 -w 300 -h 300 -o test_%04d.jpg
Here we're using quite a few of the command line options. -ifx is image effects, and it allows you to do all sorts of cool stuff. In this case, we're using it to render the pictures in a cartoon style. -ISO sets the ISO sensitivity. We've used a high one since image quality doesn't matter too much in this case. -t1 sets the timeout between the photos in milliseconds, while -t sets the total time for the timelapse capture, again in milliseconds. -w and -h are width and height in pixels. Finally, -o is the image filename (the _%04d is a number that's incremented with every picture).
These, of course, are just a few examples to get you started. For a full list of options for the camera, just run raspistill from the command line (with no options). Some of them won't make any sense unless you've got some photography experience, but with a bit of fiddling, you should get the hang of things.
As we mentioned before, raspivid can be used in a similar way to capture videos. To capture a simple video, run:
Sign up for breaking news, reviews, opinion, top tech deals, and more.
raspivid -t 5000 -o video.h264
and the more advanced options are similar to raspistill. Once you've mastered the basics, you can try out some more advanced projects. How about facial recognition using OpenCV? There's a OpenCV tutorial from the Think RPI blog to get you started.
Quick2Wire GPIO expansions
Extra ports to improve your Pi's connectivity.

One of the best features of the Raspberry Pi is the exposed GPIO pins. These allow you to add whatever circuitry that you want to your Raspberry Pi. They're both easy to use and easy to understand; with a single line of Python or Bash, you can turn them on or off, or read their input.
While they're good, though, they're not perfect. You can see a lot of pins, but not all of them are available to use, and there's no analogue input or output. They also have very little protection, and if you apply the wrong voltage (or even if you accidentally link the wrong two pins together) you can fry your Raspberry Pi a little too easily.
Several companies have developed products to help simplify the process and each works better in different situations. For example, Ciseco's Slice of Pi gives access to 16 GPIOs that are protected to work at both 3V and 5V; the Pi Face adds some useful features, such as buttons, LEDs and relays (to control motors etc); and the Gertboard adds a wide range of input and output features that are useful for learning about the various applications.
You can even hook up an Arduino and use this to control input and output, although this will require programming in C. However, we're going to look at Quick2Wire's I2C and SPI board.
GPIO expanders
SPI and I2C are both Serial Peripheral Interface and Inter-Intergrated Circuits (often written I2C and pronounced 'eyesquared-C').
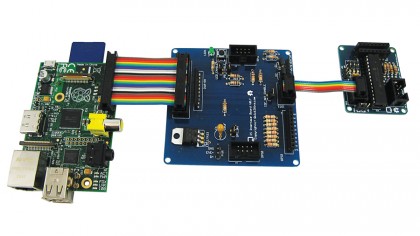
In its basic usage, the Quick2Wire setup comes in two parts: the main board breaks out the I2C and SPI ports as well as adding protection for the Pi and voltage selectors. The company also makes I2C boards that add GPIO ports and analogue input and output to your device. These boards can also be daisy-chained to add even more ports to the Pi. You will have to do plenty of work yourself and solder the boards on your own but, once done, connecting them is simply a case of plugging in the ribbon cables.
There's quite a bit of setup to get a Quick2Wire board up and running. Not least the need to configure kernel modules. You will find an online guide on the Quick2Wire website, though it did miss a few things, such as the location of the Python library.
We also found that we needed to install the python3-setuptools package. Once up and running, though, it was straightforward to program the board with Python.
Right now, it's not a question of which Raspberry Pi GPIO board is best, but which is most suitable for your project: Ciseco's Slice of Pi is a great, low-cost device to make Pi GPIO use a bit safer; the Pi Face is a really good board for experimenting with physical computing, especially if you don't have a specific use in mind; while the Quick2Wire boards are incredibly useful if you need the power of SPI or I2C to daisy-chain peripherals and port expanders.
- Now why not read Raspberry Pi operating systems: 5 reviewed and rated