How to post a YouTube video
Find out how to get your video uploaded onto YouTube the easy way
So, you’ve been wondering how to post a YouTube video. Great! We don’t need to tell you what a fantastic platform it is to share your videos with others. And it’s most definitely not solely for those who wish to become the next ambitious YouTuber to amass a million subscribers. You might just want to create a private account, limiting access to only family members, for instance.
Whatever your goal, the process of uploading your work will be pretty much identical, and despite increasing competition from other platforms, it’s still the most popular place to go when it comes to watching videos online, especially long-form ones. We look at all your options for the best way to post a video to YouTube from a laptop or desktop computer.
For more tips, we’ve also explored how to make a YouTube video using some of the best video editing software you can download and use for free.
How to post a YouTube video: Basic steps
What to do
- Drag a file from your desktop onto YouTube’s Upload section
- Fill in various information, like its title and description
- Choose to make the video public (viewable by all), unlisted (only those who know the URL can see it), or private (by invitation only), and hit that ‘Publish’ button
What you'll need
- An internet connection
- A YouTube account
- A ready-made video to upload.
- Skill level - Beginner
Step 1: Upload
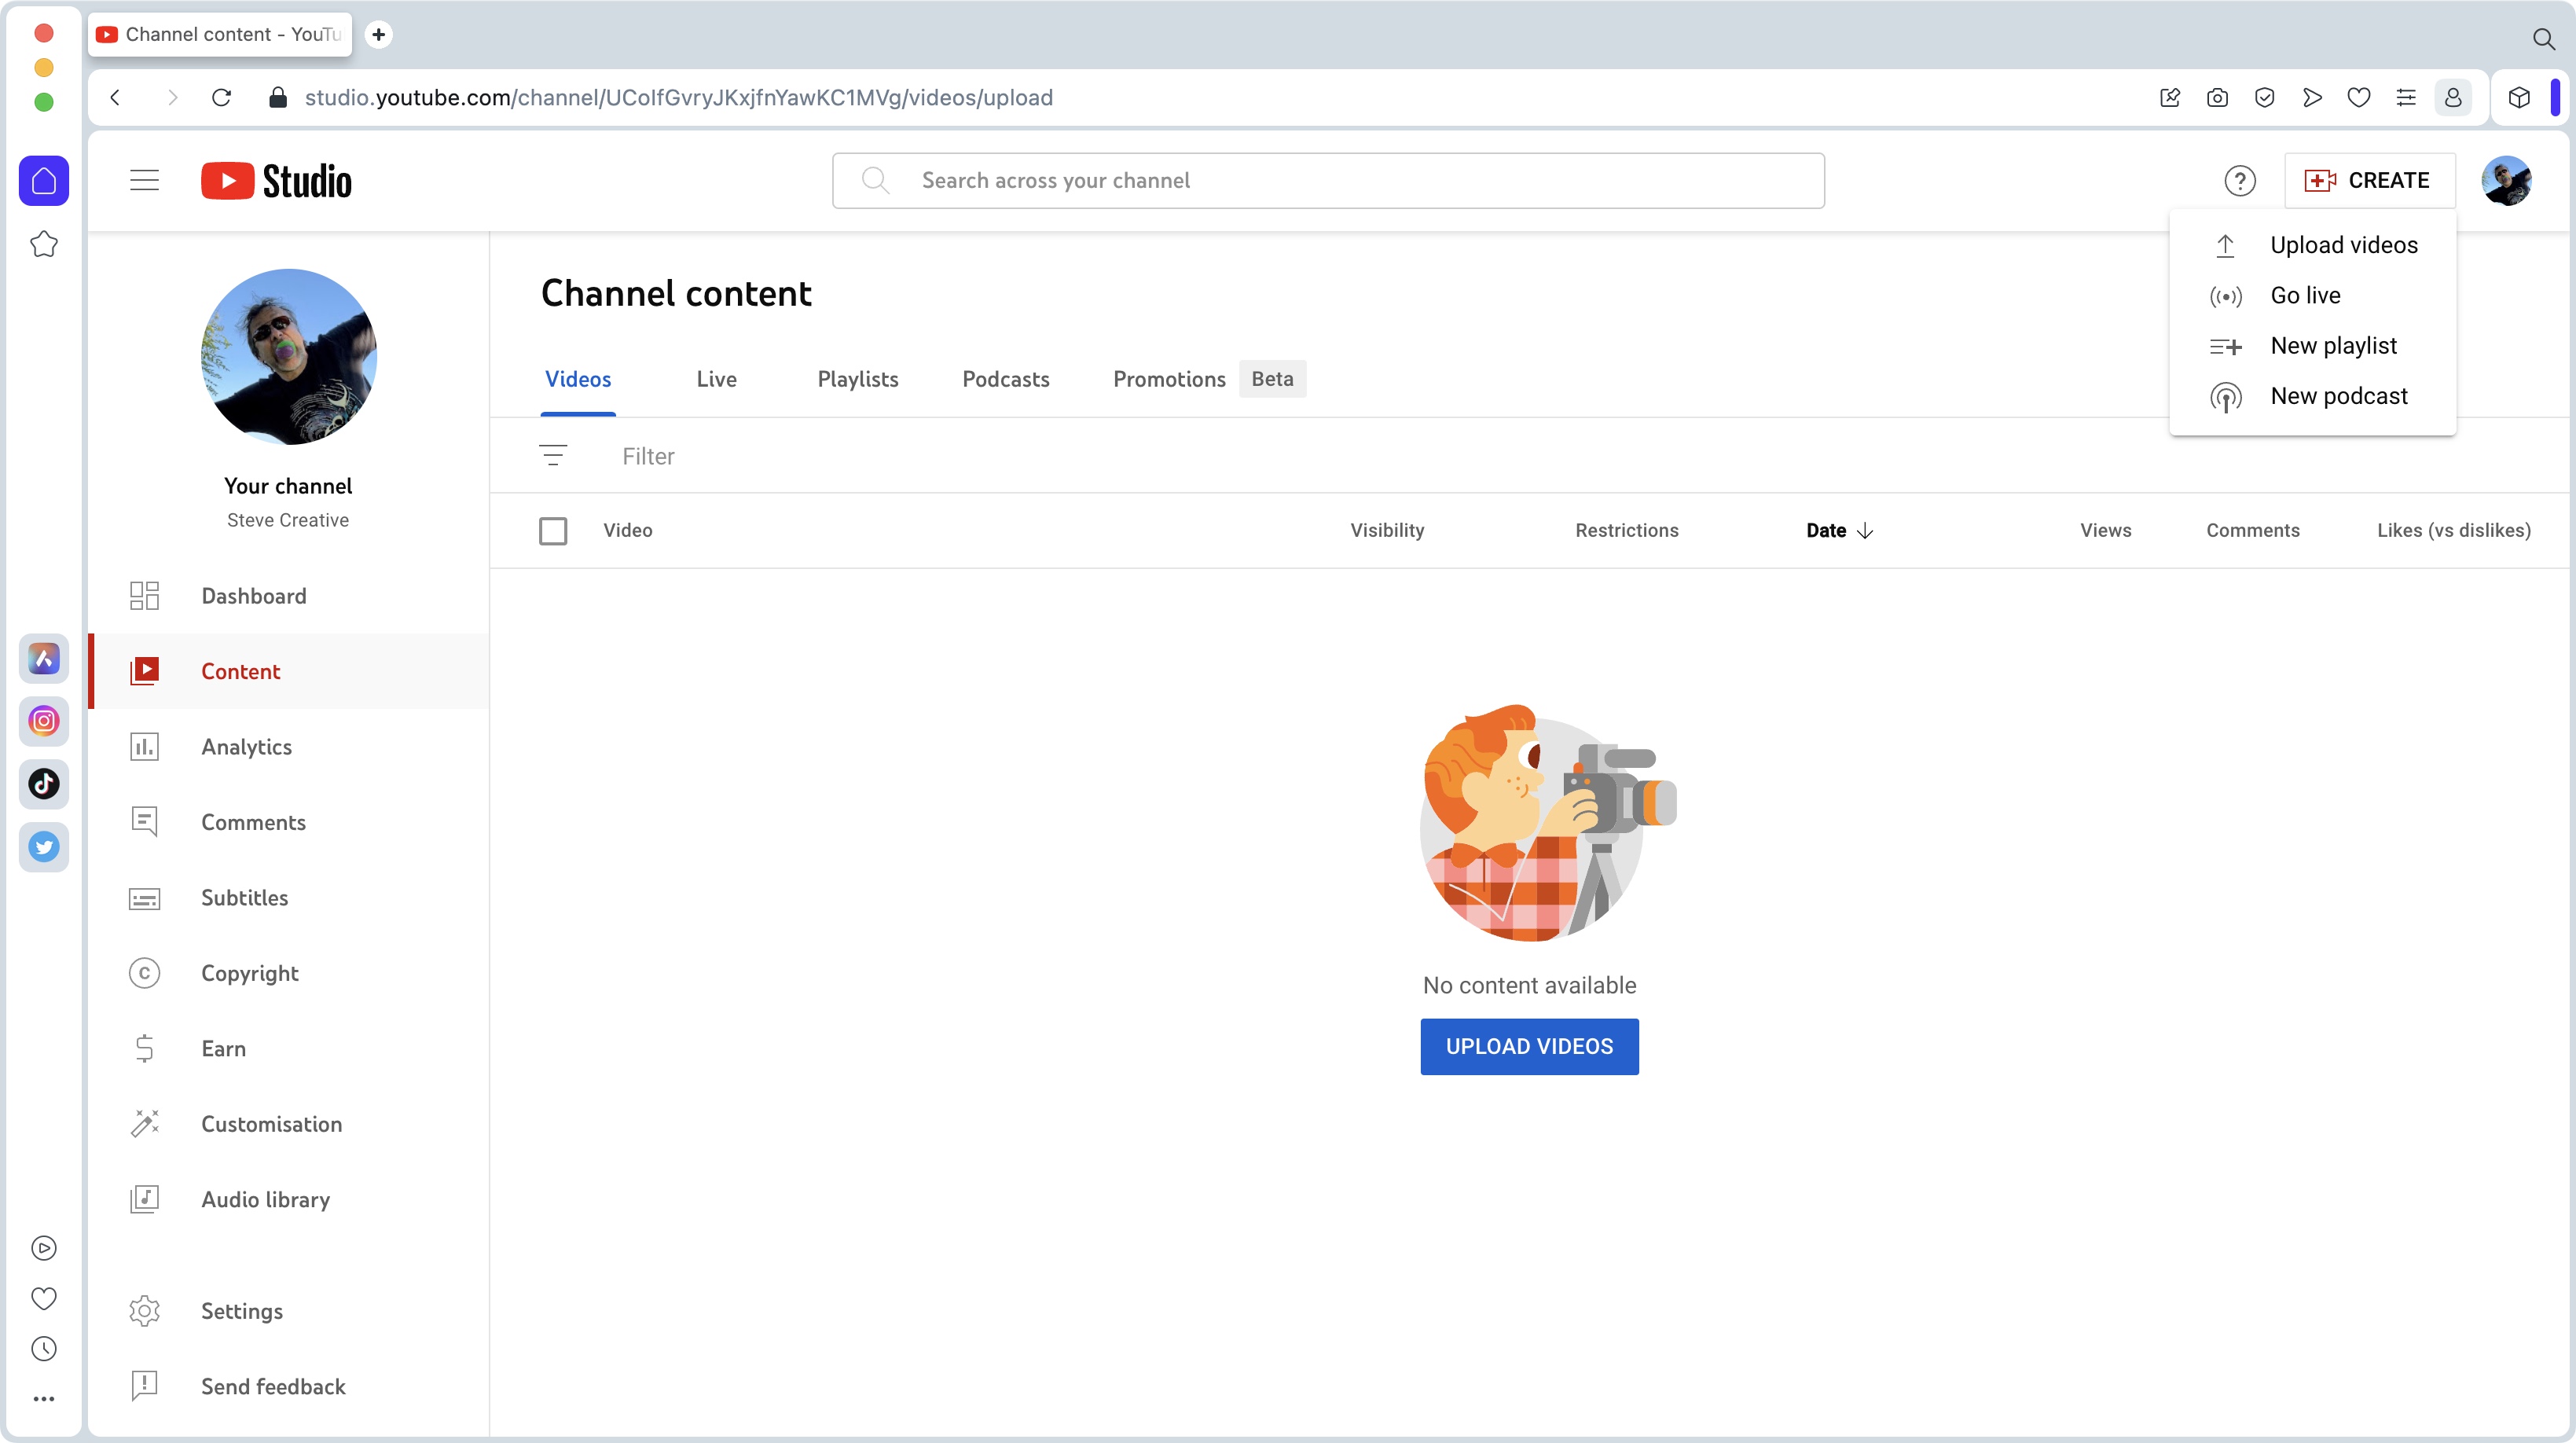
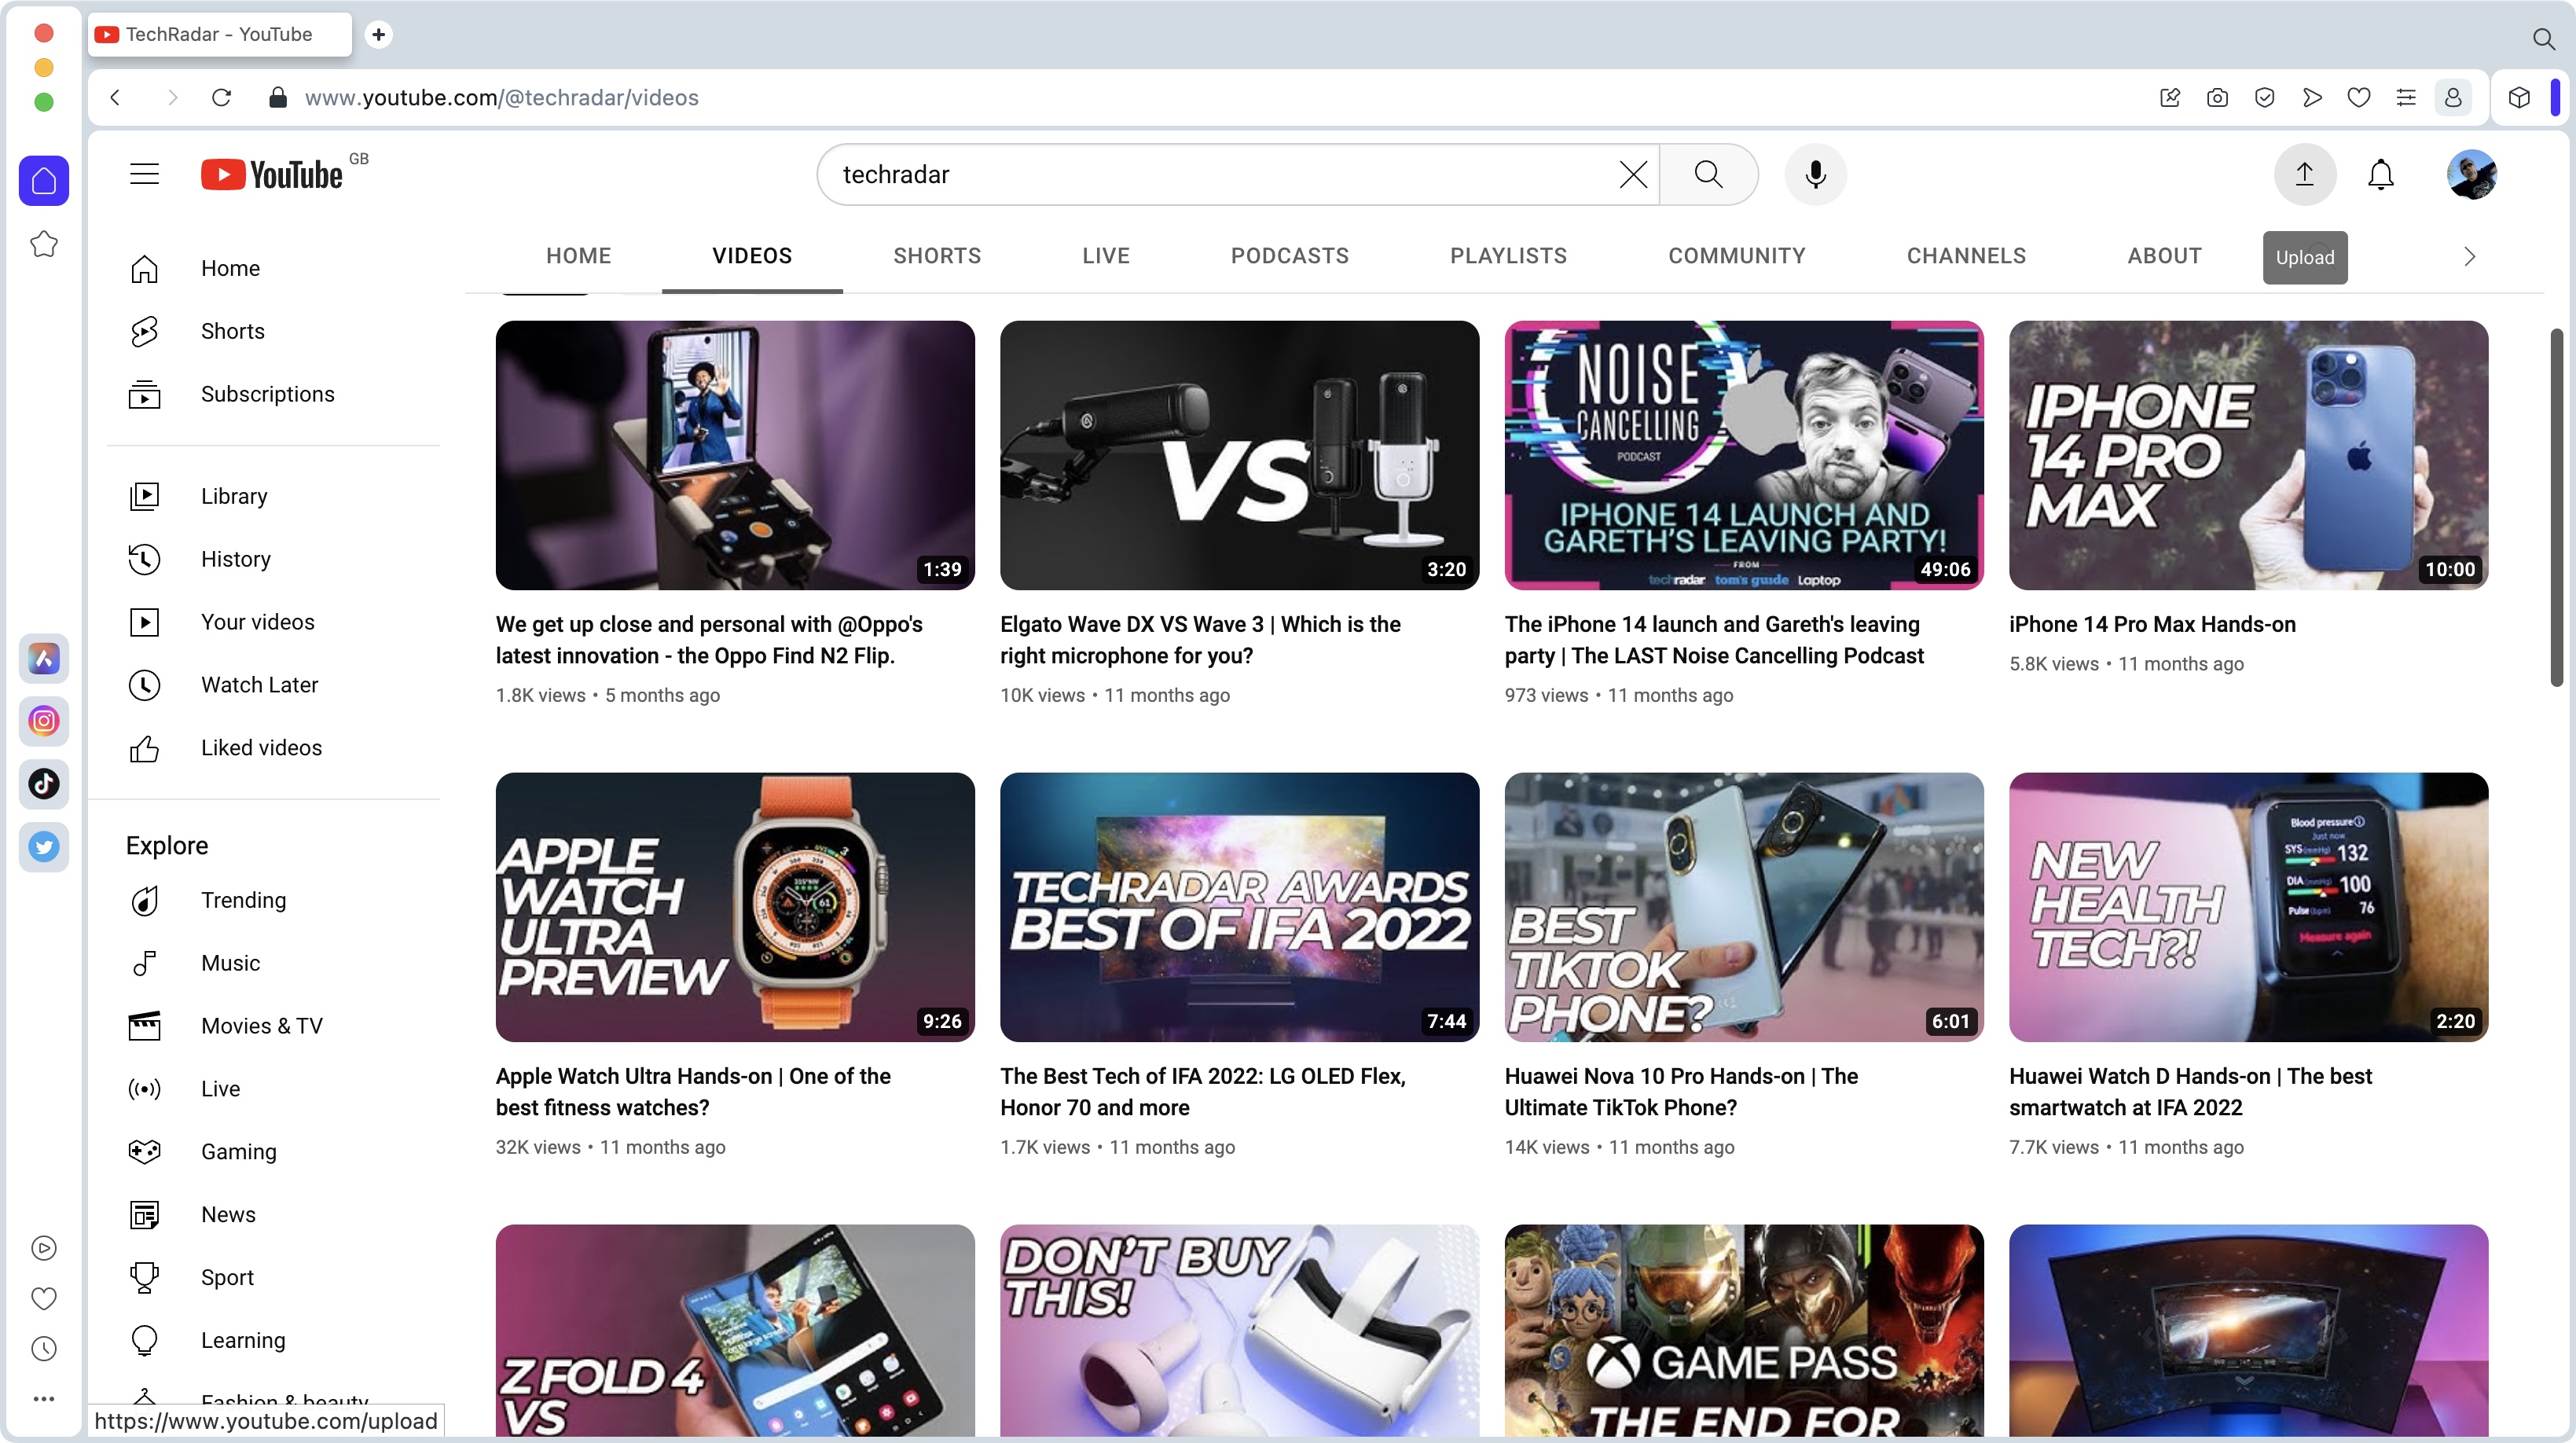
As long as you’re logged in to your YouTube account, you’ll see an Upload button top right of the page. If you’re just browsing YouTube’s gargantuan library, or viewing your own channel, it’ll be represented by an arrow pointing up.
If however, you’re in YouTube Studio (the place where you manage your account, and organize your videos), you’ll see a big ‘Create’ button in the same general area instead. The latter offers you a few more choices, but just click on ‘Upload videos’ from that menu to end up in the same place.
Step 2: Choosing a title
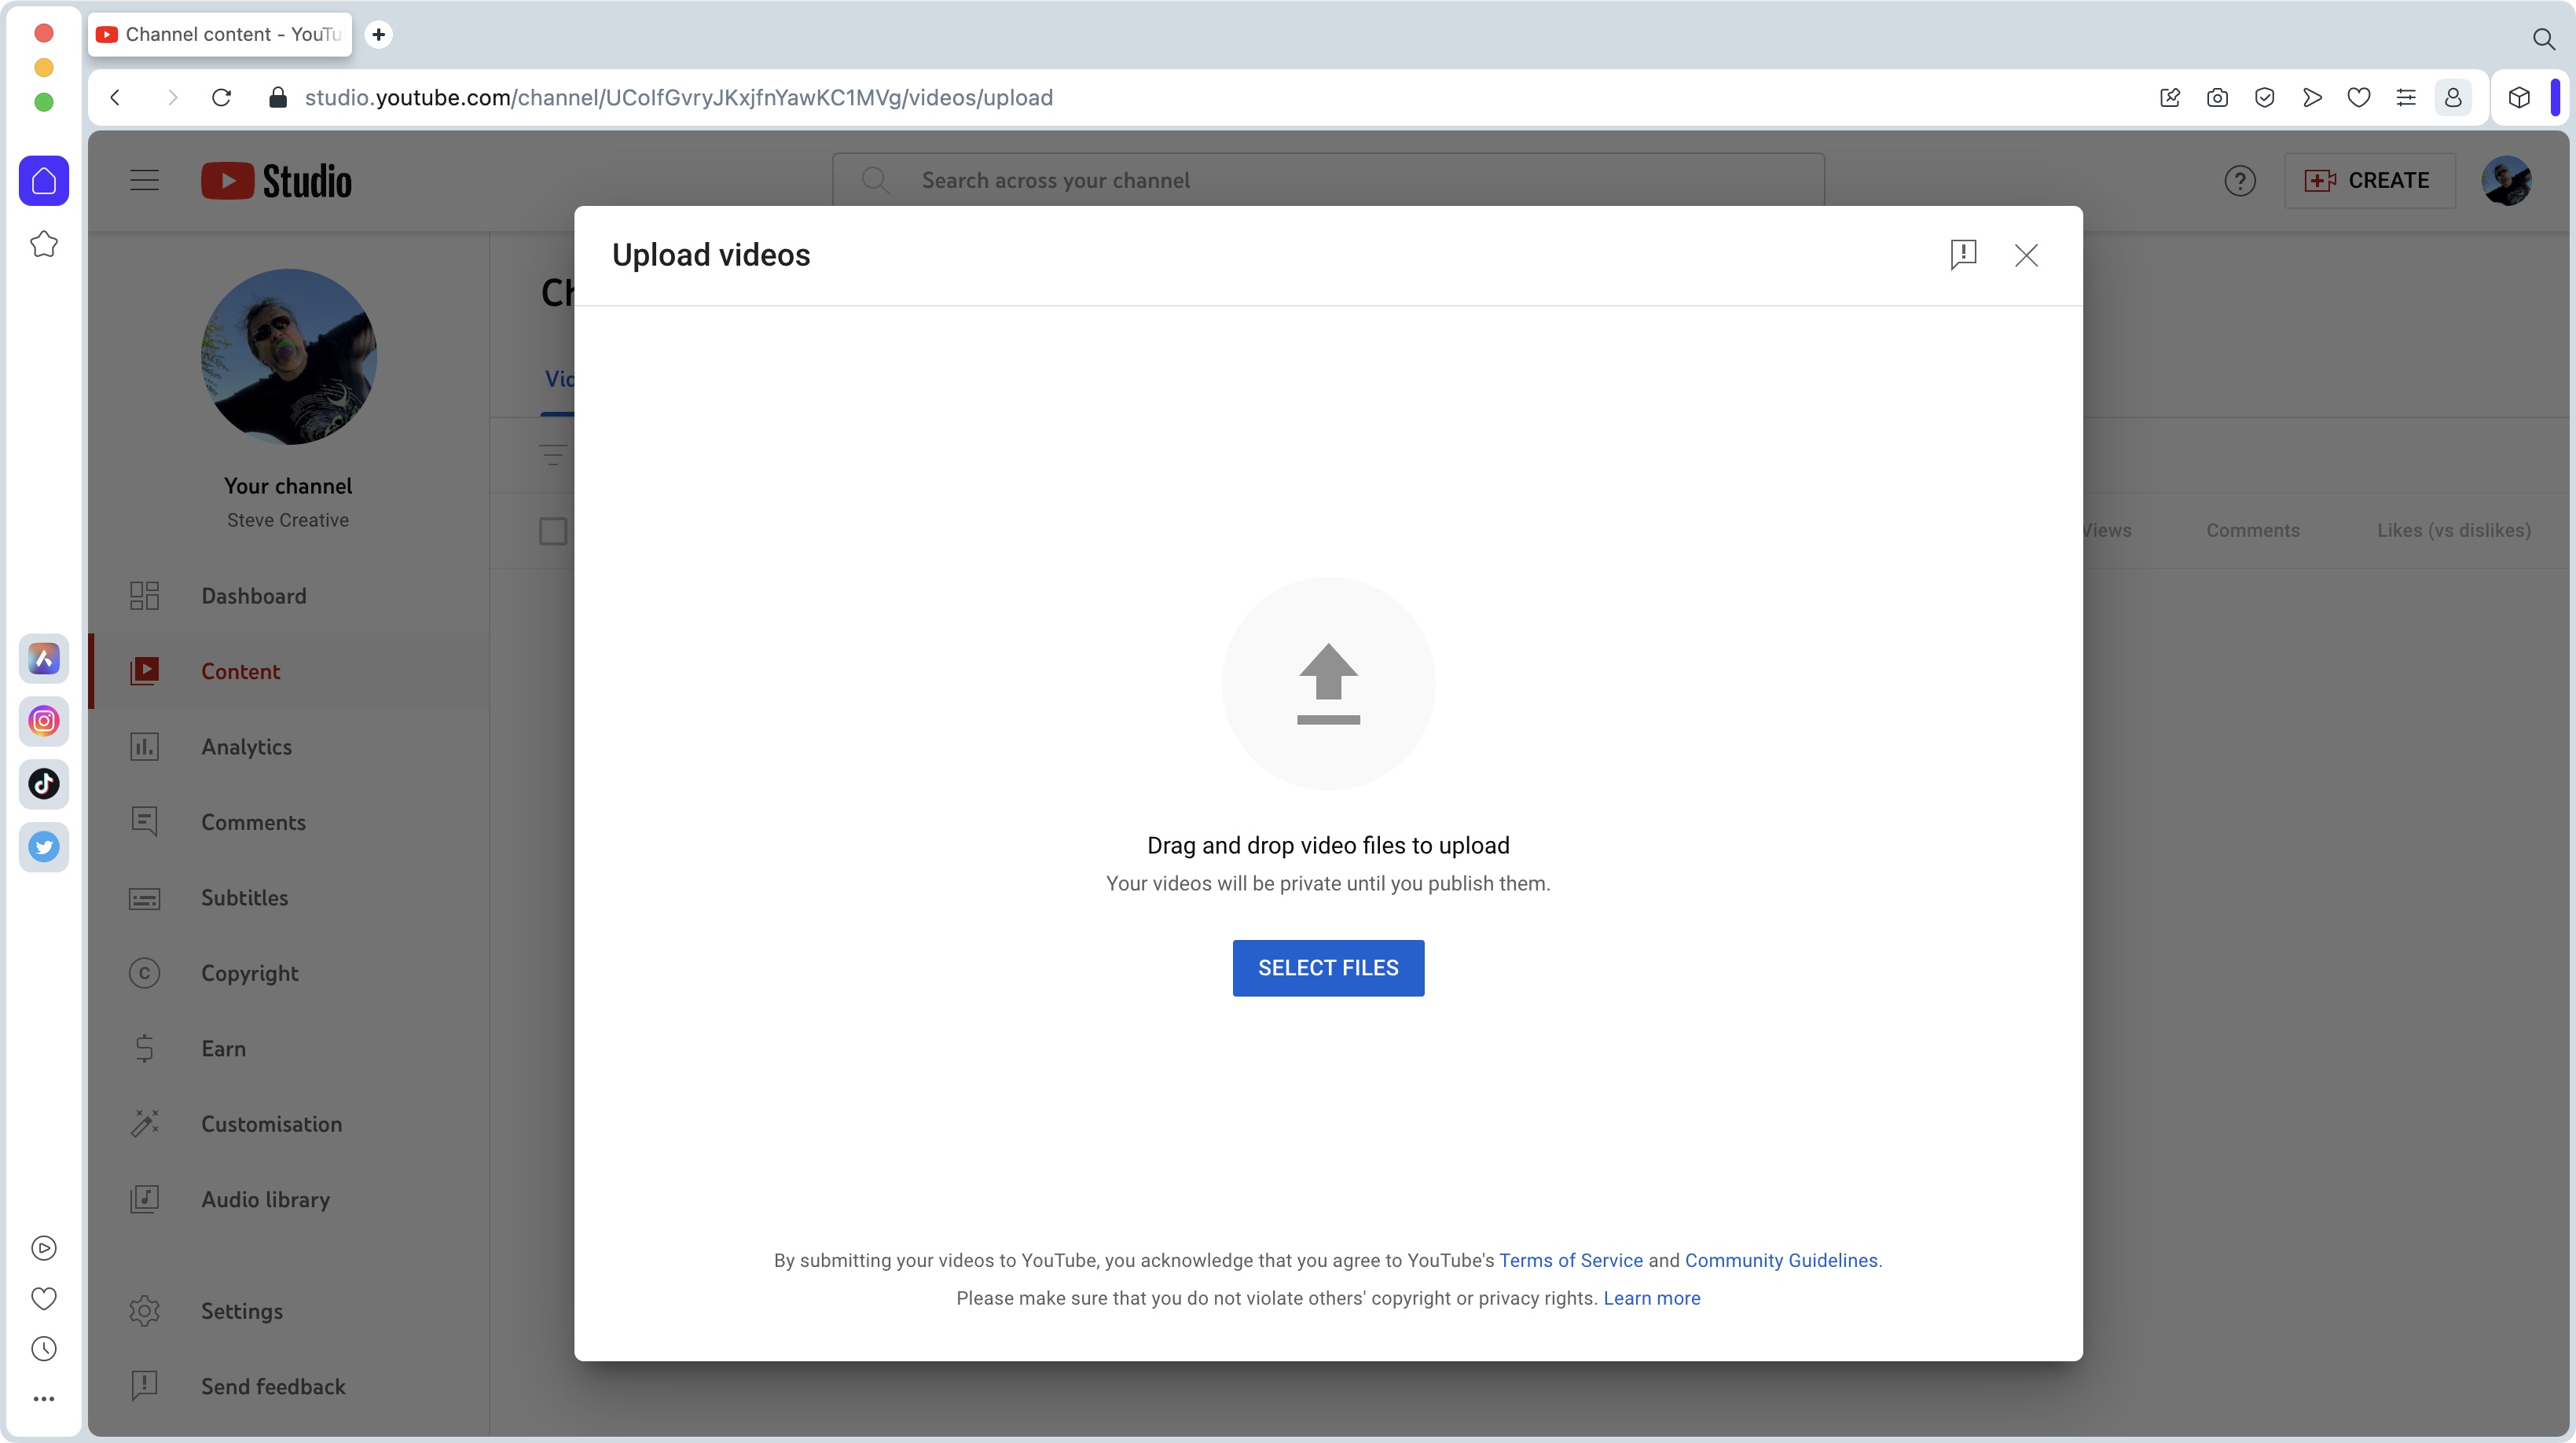
By following the above, this will open up the upload window directly inside your browser’s page. From there, click on ‘Select Files’ to navigate through your computer’s file system until you’ve located the video you wish to use.
Alternatively, just drag it straight from your Desktop, right onto that section within the page (should you drag it outside that space, you’ll actually replace the current page with your video file, which you’ll be able to play right from inside your browser. Fun though this may be, it won’t upload to YouTube, so make sure you keep to the boundaries for a successful operation).
Sign up to the TechRadar Pro newsletter to get all the top news, opinion, features and guidance your business needs to succeed!
Step 3: Fill in information
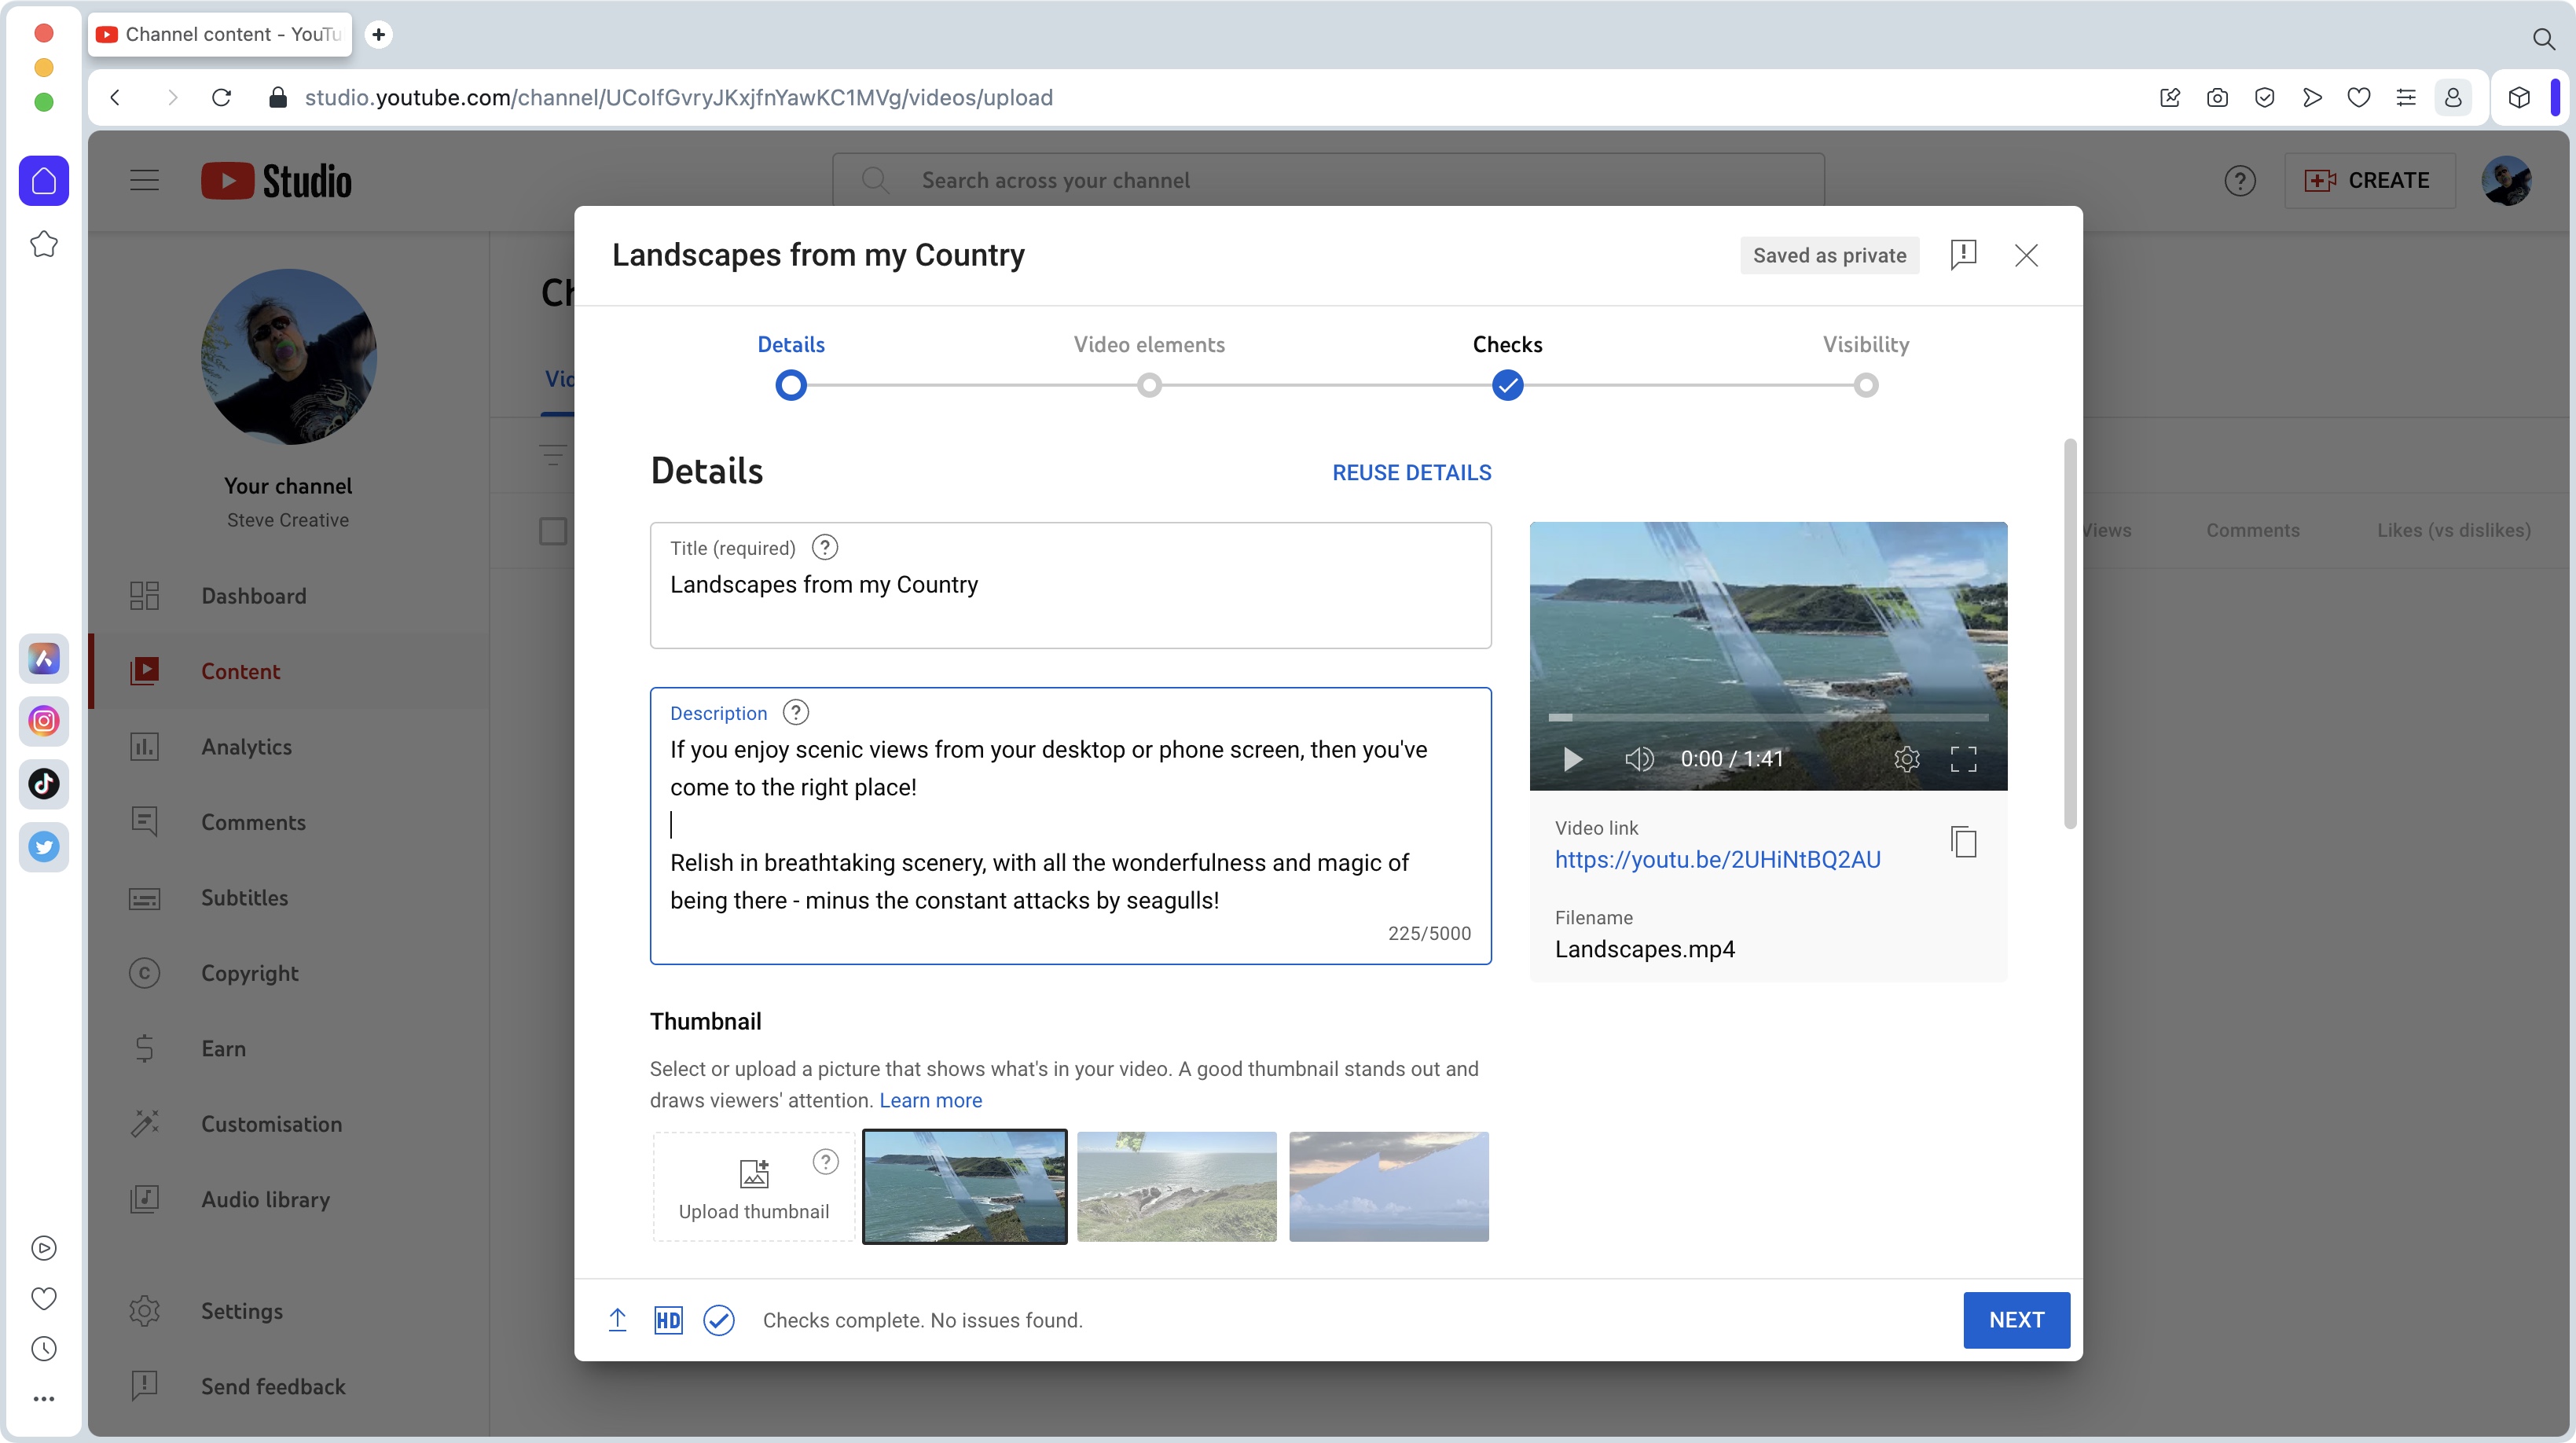
As the video uploads, you have time to fill in the information that will help make your work stand out. Give it a catchy title, put in the relevant information in the description, including relevant hashtags. There’s a section to a specialized thumbnail, or choose from one of three frames from your film, which YouTube will have pre-selected for you… We would strongly advise you to always make a custom one.
It’s worth noting that if you’re uploading a ‘short’ (a video rendered as a square, or in the mobile-friendly vertical orientation, and is shorter than a minute), you will not be able to add a custom thumbnail or even have a selection of options to choose from: YouTube will select one for you, and you’ll have to contend yourself with that.
Step 4: Restrictions
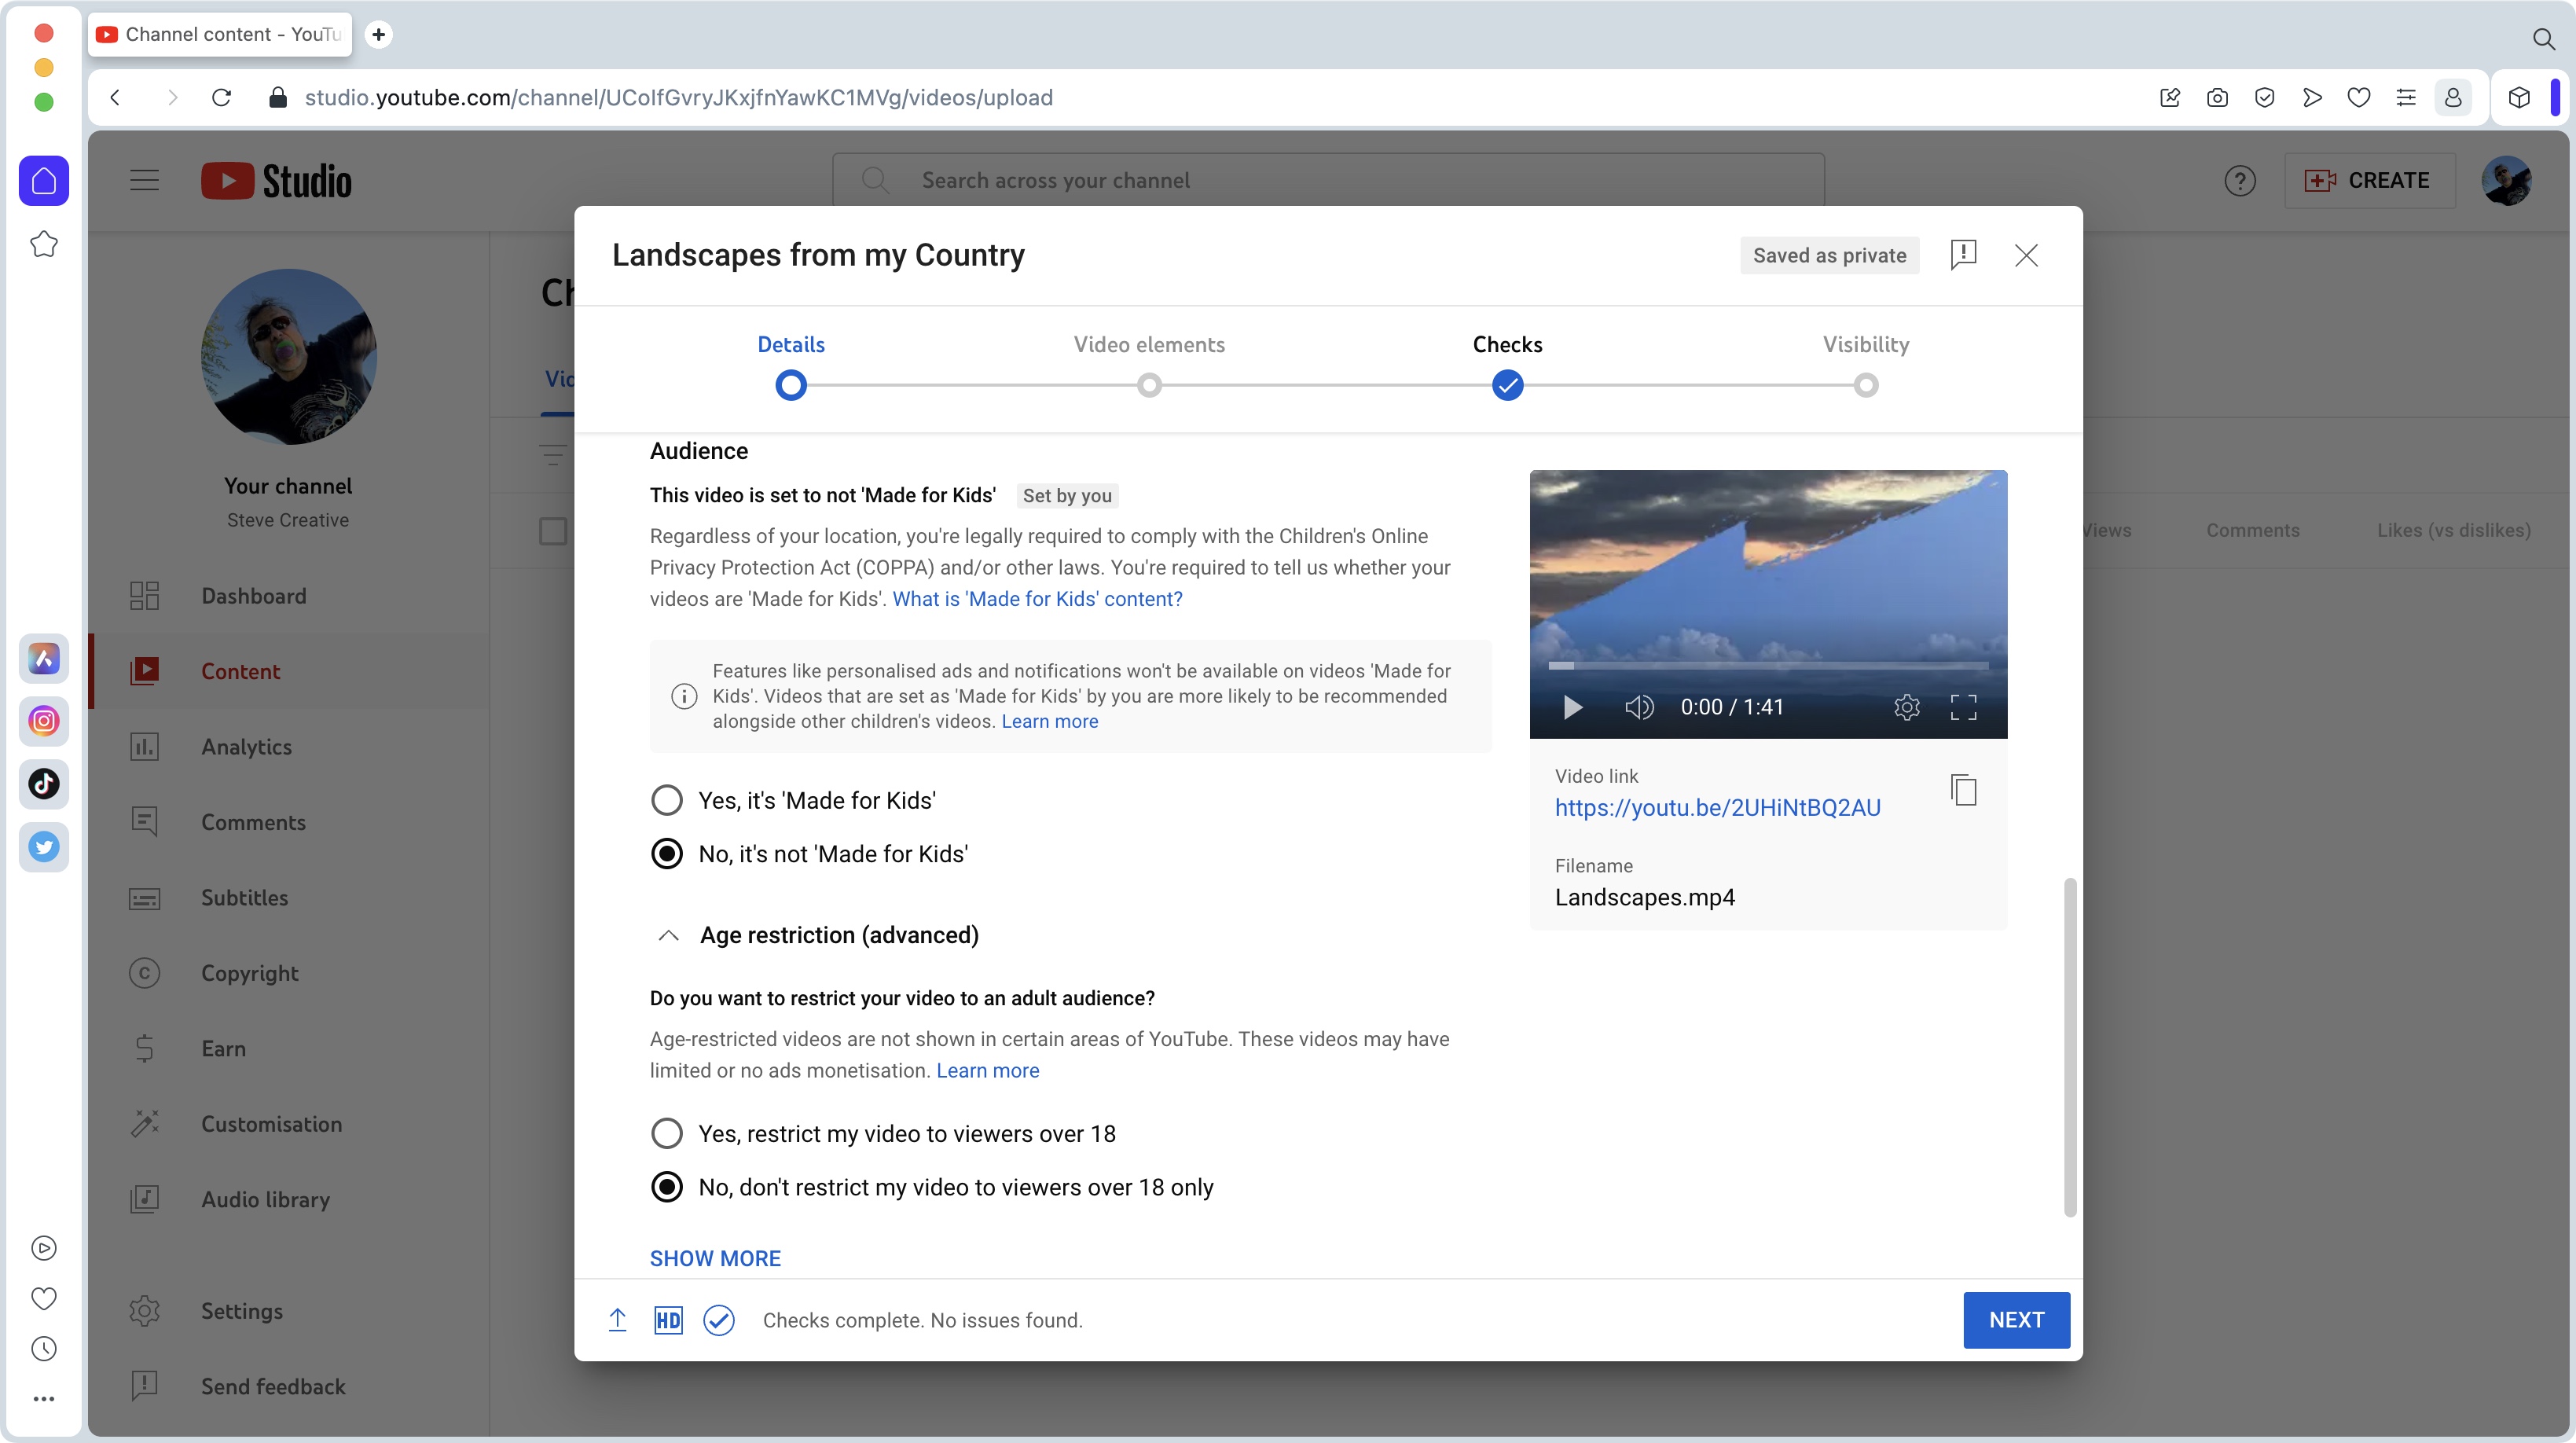
Scroll down the ‘Audience’ section where you get to inform YouTube that your video is ‘Made for Kids’. If it is, you won’t be able to monetise it, and comments will be disabled. Not the best way to nurture a community, so only choose that option if your work really is solely aimed at children 13 and under (this is the result of a complex legal action against YouTube which they - rightfully - lost).
Further down, you get to restrict your video to those aged 18 or above. That’s the other end of the spectrum, and again, if your video meets that criteria it will have limited reach, but it’s always best to label it as such should it be, lest a ‘shocked’ viewer reports you and your channel gets a strike. Behave like a model citizen and there will be no issues.
Step 5: Additional information
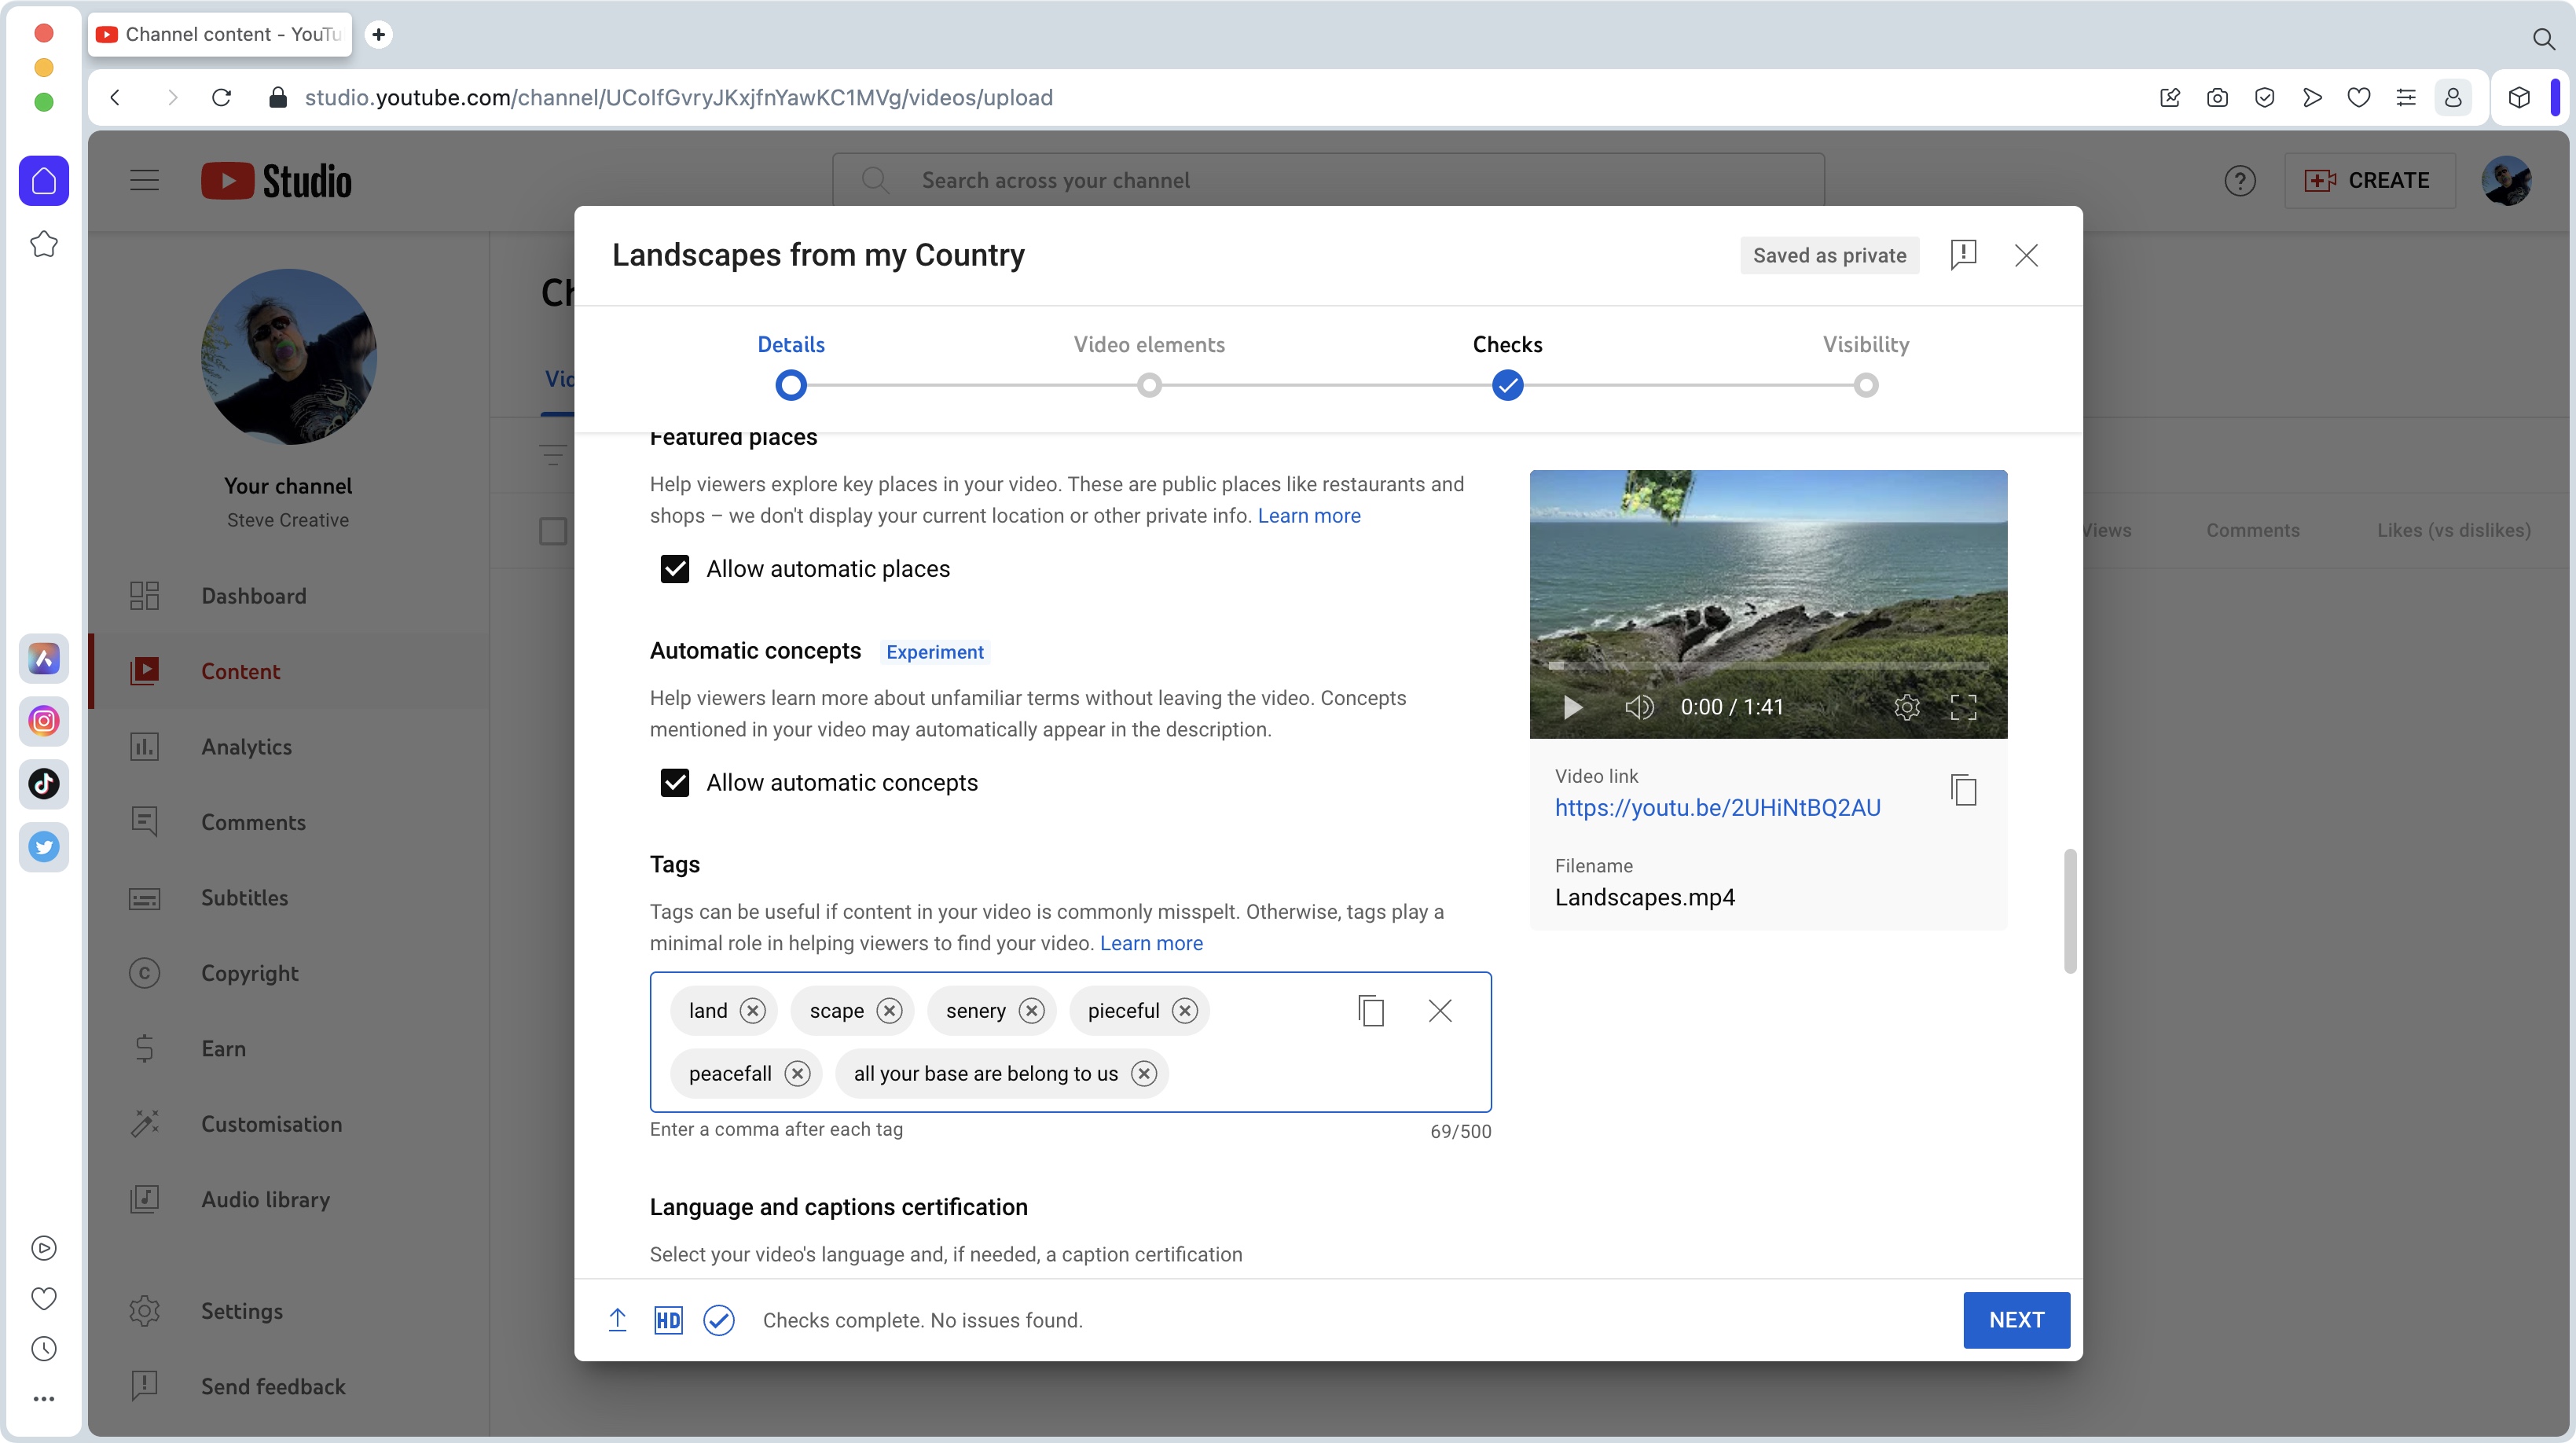
Right after the Audience section, there’s a ‘Show More’ button. Click on it to reveal a lot of additional information. Perhaps the most useful is the ‘Tag’ field. It used to be a much more integral part of uploading a video, but these days its use is more for catching common - and maybe not so common - misspellings.
Populate this section with as many related and relevant typos as you can think of - up to the limit of 500 characters - in the hopes that this will help your video be found by more potential viewers.
Step 6: Elements
One of these gives you the ability to add subtitles to your video, either manually, or by uploading your script saved as a .txt file.
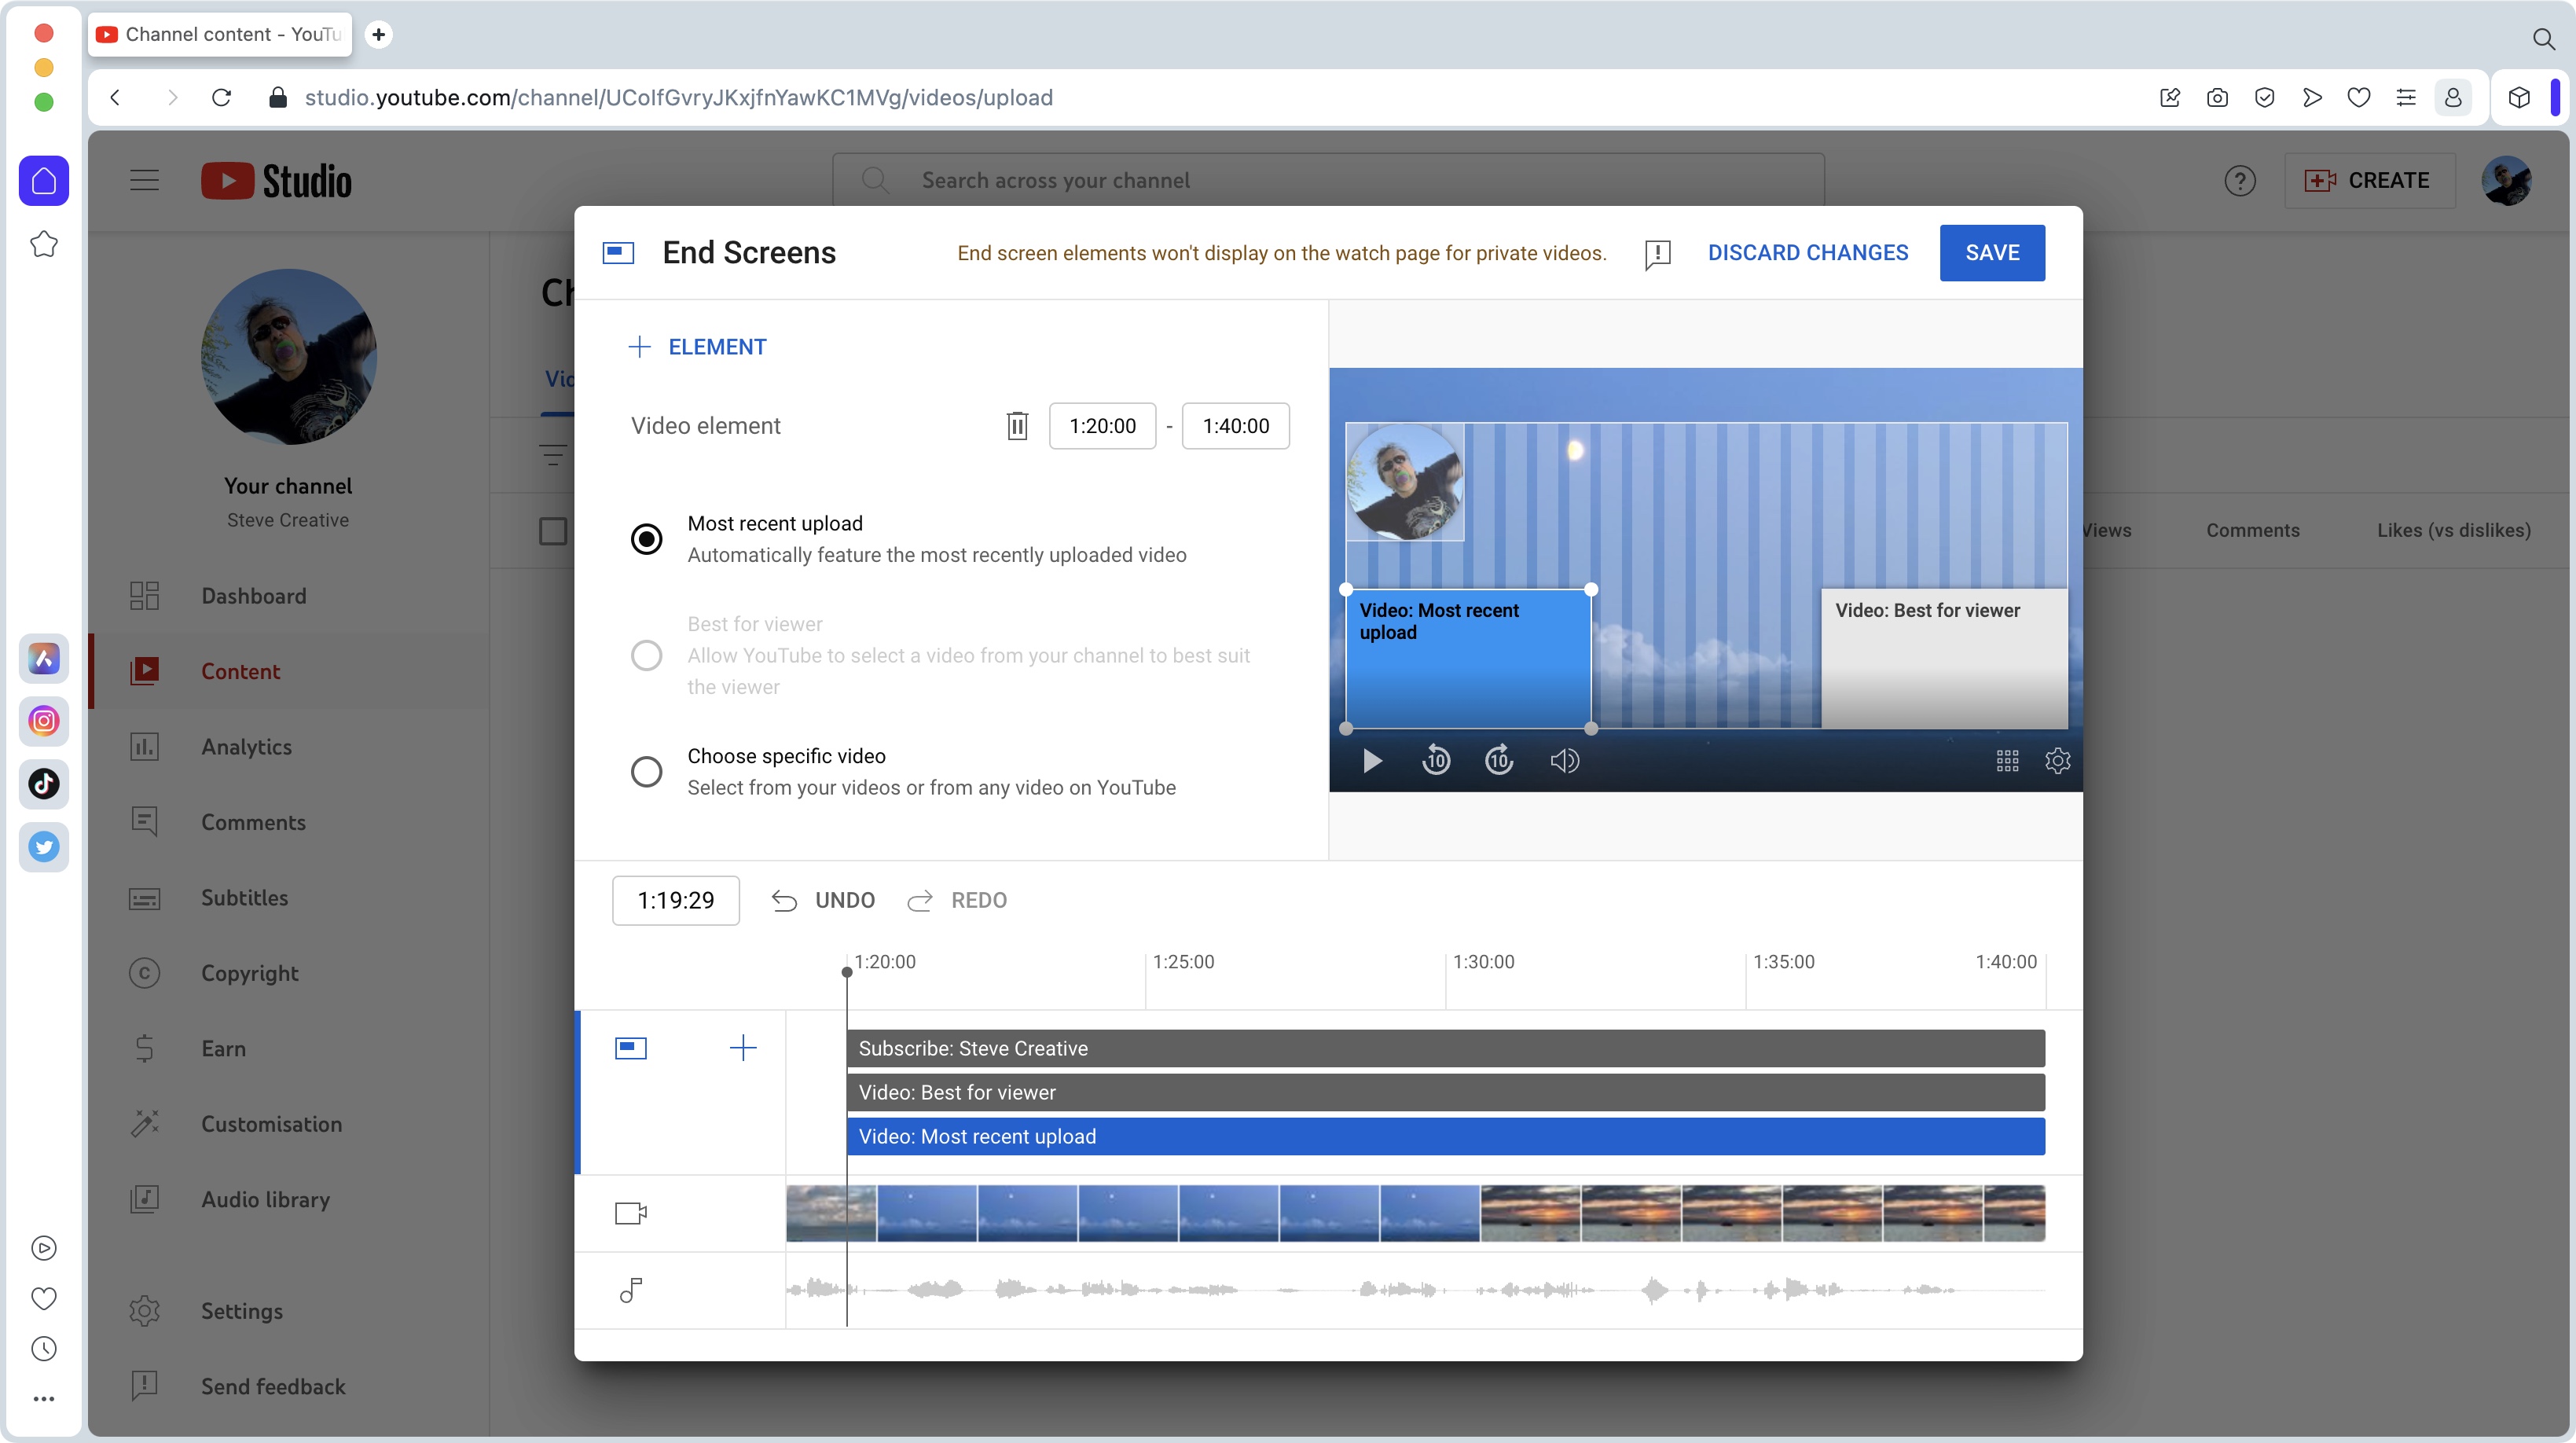
You also have the option to add an ‘End Screen’, which is where you get little popups at the end of a video to encourage the viewer to subscribe, or click on another one of your videos of your choosing.
And finally, there’s ‘Cards’ which provides links to other videos as the current one is playing, allowing the viewer to explore your portfolio further.
Step 7: Publish or schedule
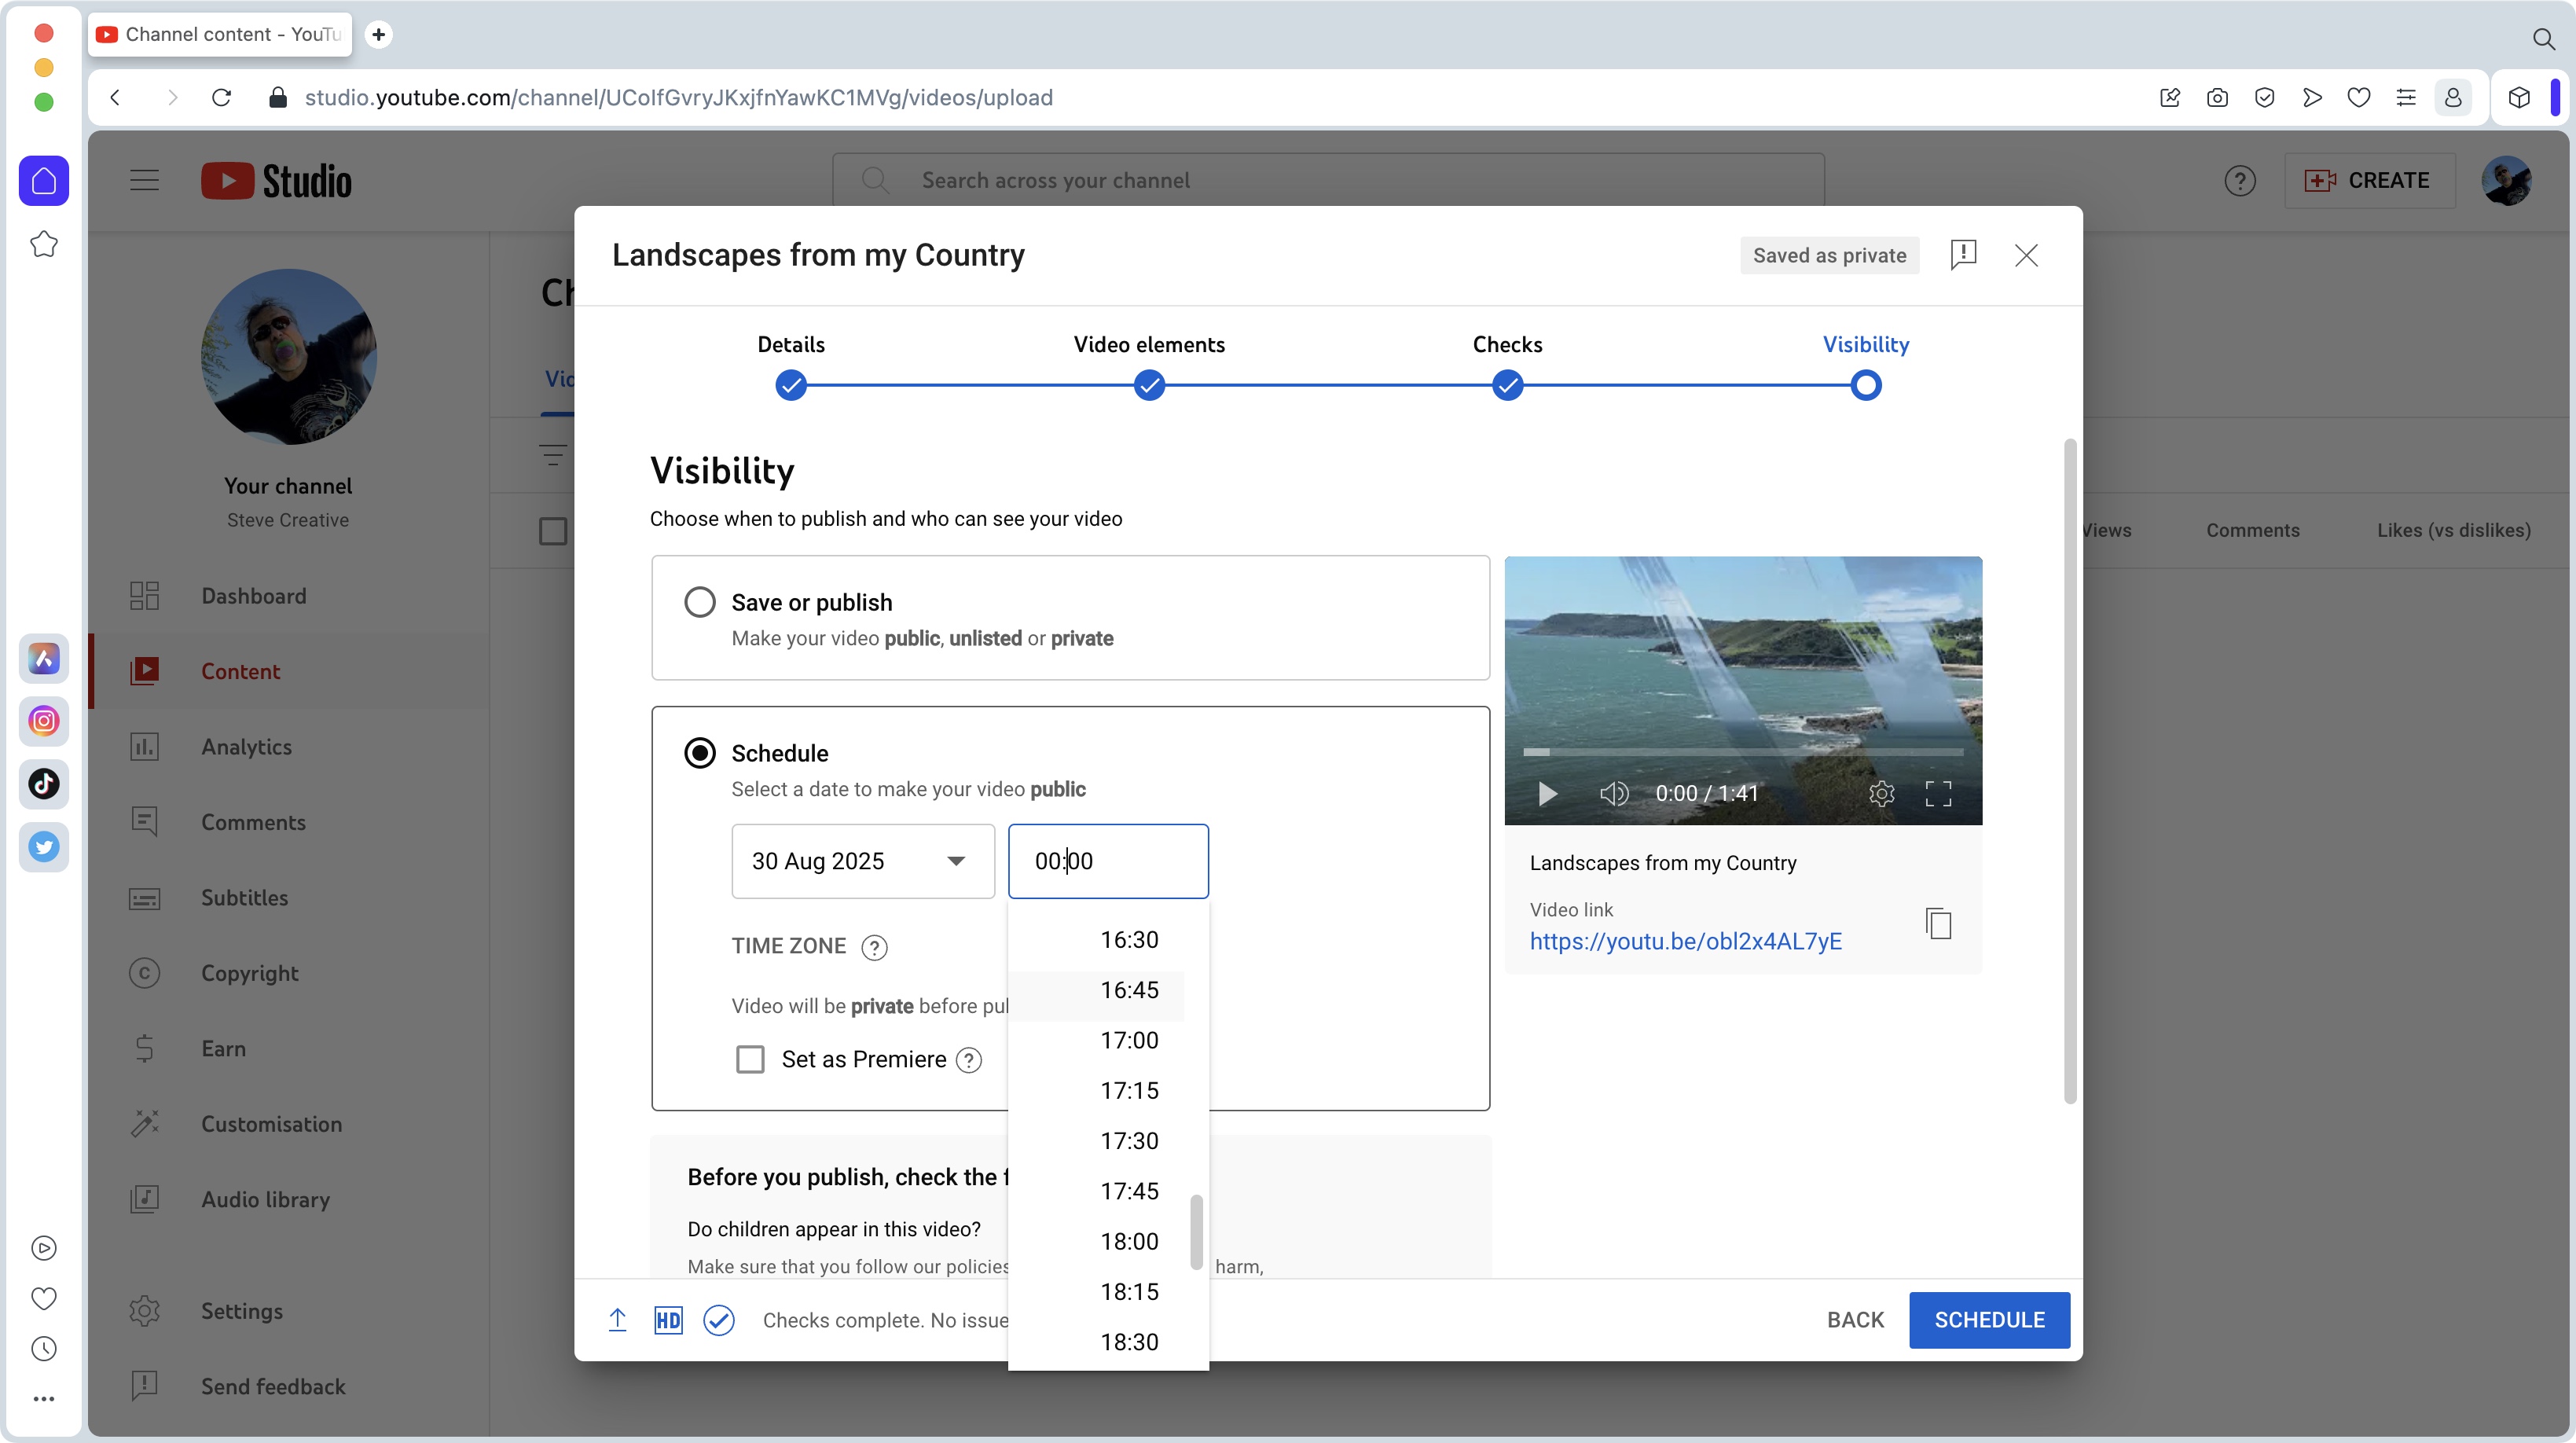
The last section, known as ‘Visibility’, is the one that sets how and when your video will be published. In order of appearance, these are:
Private, which makes sure only those you choose can watch the video - even if others know the link, they won’t be able to view it.
Unlisted is more flexible. Your video will not appear in any search results, nor on your channel, but anyone who has the link will be able to watch it. It’s more flexible than Private as you don’t need to invite anyone, just hand the URL to whomever you wish, knowing they in turn will be able to pass it on to others. It’s worth noting that if you put an unlisted video in a playlist, it will then be fully visible inside it.
Public is the traditional publishing option: it’s live, it’ll appear in search results, and anyone can watch it.
Finally, Schedule, allows you to set a date and time when your video will be released. Once you’re happy with your selection, click on the button lower right of the screen (labeled either Publish or Schedule), and you’re good to go.
Final thoughts
Don’t worry if you feel overwhelmed by all there is to do. If you’re only starting out or just wish to upload a video for friends and family, aside from choosing its ‘Visibility’, every other step is totally optional.
Add as much or as little info as you’re comfortable with. Especially if you’re new to the platform. After all, it’s already a pretty big step to have a video ready to upload - if you're not at that step yet, it's worth checking out the best video editing apps and best video editing software for beginners to polish up your raw footage.
As you get more comfortable, you can explore the various options we’ve listed here, maybe even venture into even more in-depth options. Slowly but surely, you’ll become proficient with the tools at your disposal, and you’ll make YouTube your own in no time.
Steve has been writing about technology since 2003. Starting with Digital Creative Arts, he's since added his tech expertise at titles such as iCreate, MacFormat, MacWorld, MacLife, and TechRadar. His focus is on the creative arts, like website builders, image manipulation, and filmmaking software, but he hasn’t shied away from more business-oriented software either. He uses many of the apps he writes about in his personal and professional life. Steve loves how computers have enabled everyone to delve into creative possibilities, and is always delighted to share his knowledge, expertise, and experience with readers.
