How to fix white balance in your photos

Sign up for breaking news, reviews, opinion, top tech deals, and more.
You are now subscribed
Your newsletter sign-up was successful
For all the things your camera can manage effectively without any human input - focusing and metering, for instance - there's still a lot it can't do. This is never clearer than when a set of pictures you felt great about at the time turn up on your computer looking indisputably wrong.
White balance is one such area - it's something photographers have grappled with since the days of film. At its most basic, white balance is when your camera decides what light temperature it's working with (which varies depending on your light source) and attempts to compensate for it.
Even apparently consistent environments, like outdoor locations, can vary depending on factors like cloud cover and whether you're using a flash. If your camera gets white balance right, you won't notice it at all. If it goes wrong, you could get anything from a very slightly wrong photo to an image that bears no resemblance whatsoever to what you saw when you pressed the shutter button.
Incorrect colours, strange looking skin tones - even if the rest of your photograph is technically perfect, with the wrong white balance it will never look quite right.
Luckily, although the concept of white balance may be difficult to grasp, the ability to spot when it's wrong is a knack you'll pick up quickly, and you can correct it in seconds. Keep reading to find out how.
Choosing your shot

Unlike some editing techniques, changing incorrect white balance isn't something you can choose to opt out of. If it's wrong and you leave it that way, people looking at your images will notice that something's off, even if they lack the technical knowledge to describe it.
Sign up for breaking news, reviews, opinion, top tech deals, and more.
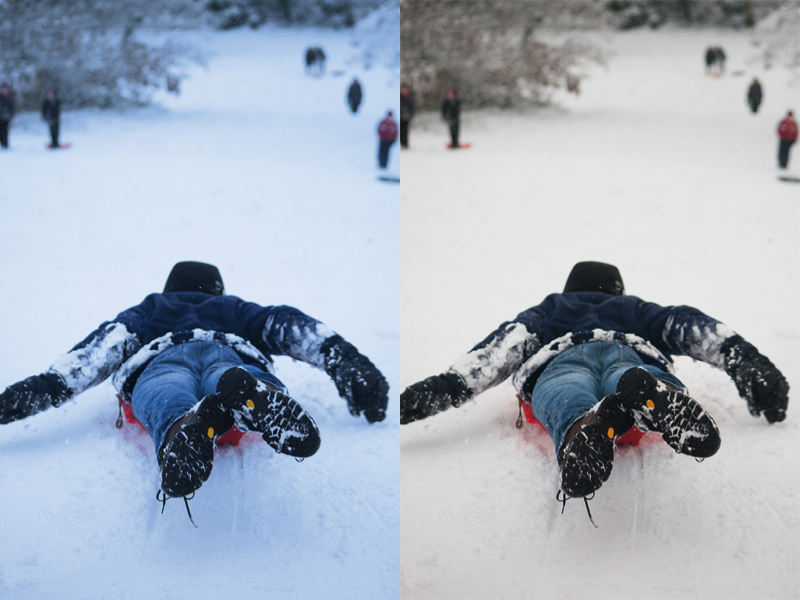
In the case of the shot above, the camera has chosen a white balance that is well wide of the mark, with the result that snow - which should, of course, be a neutral white colour - has turned light purple instead.
How much you notice incorrect white balance depends on your level of experience - you need to pay particular attention to images that contain people, because we're particularly sensitive to incorrect skin tones. Skin is something we see every day, so we notice very quickly when it's not quite right in onscreen photographs or prints.
That means looking for and correcting white balance should become part of your photographic workflow, in the same way as correcting colour curves or checking for sharpness.
If an image turns up with incorrect white balance, there are no two ways about it - you have to fix it, or people will notice.
What you'll need
Fixing white balance in your shots requires the use of a photo editor. The good news is that because cameras tend to get it wrong so often, virtually every photo editor can make the necessary corrections - often in just a few clicks.
In this instance we'll use Photoshop Elements, but the terminology and tools are standard: the colour picker tool also exists in Google Picasa, which is free and straightforward, as well as in GIMP, which is free, feature-packed and powerful.
Even online editors offer similar tools - Picnik.com, offered as part of Flickr accounts, has a white balance correction tool that takes seconds to apply. As ever, you'll get the greatest degree of flexibility from a tool like Photoshop or GIMP, but for simply correcting colour casts - where the whole image takes on an incorrect colour due to poor white balance - virtually any photo editor will do.
The only thing to remember is that the single-click approaches taken by free software need to be carefully monitored if you're intending to make expensive prints.