How to create a Facebook Business Page
One of the top platforms for building and growing businesses

- Why do you need a Facebook Page?
- Can I use a personal Facebook account for my business?
- Steps to create a Business Facebook Page
- What is on a Facebook Business Page?
- How much does a Facebook business page cost?
- Step-by-step tutorial using business settings
- To create Facebook account on your phone
- How to add an admin to a Facebook page
- How to delete a Facebook page
- How to easily manage Facebook Business Pages using Meta Business Suite
- Facebook Business Page tips
- Tips to maintain an engaging Facebook Business Page
- Basic tips to get more people to see your Facebook Page
- Facebook tricks for business
- Facebook tricks for publishing
- Facebook Messenger tricks
- Facebook tricks for advertising
- FAQs
Sign up for breaking news, reviews, opinion, top tech deals, and more.
You are now subscribed
Your newsletter sign-up was successful
Chapter 1
- What is a Facebook business page?
- Why do you need a Facebook Page?
- Can I use a personal Facebook account for my business?
- Steps to create a Business Facebook Page
- What is on a Facebook Business Page?
Chapter 2
- How much does a Facebook business page cost?
- Step-by-step tutorial using business settings
- To create Facebook account on your phone
Chapter 3
- How to add an admin to a Facebook page
- How to delete a Facebook page
- How to easily manage Facebook Business Pages using Meta Business Suite
Chapter 4
- Tips to maintain an engaging Facebook Business Page
- Basic tips to get more people to see your Facebook Page
- Facebook tricks for business
- Facebook tricks for publishing
- Facebook tricks for advertising
Conclusion
- FAQs
As a business owner, creating a business Facebook page is one crucial thing to do if you want to do business online. Facebook is one of the most popular and highly used social media platforms for marketers no matter what your brand does and what your marketing goals are. The fact that over 200 million businesses use Facebook business pages to reach their customers, Market their products, and increase brand awareness should be enough reason to invest in this platform.
With various popular social media platforms like TikTok, Instagram, etc. Setting up a Facebook Business Page might look as though you aren't following the trends, but it's worth it. With over 2.94 billion monthly users, Facebook is still the most used and popular social media platform.
No matter how old or new your brand is, setting up a Facebook Business Page for your brand is a smart move. I have put together a guide on how to create a Facebook Business Page and
Chapter 1
What is a Facebook Business Page?
A Facebook Business Page is a public business profile on Facebook made for brands/ businesses to connect with customers, build brand awareness and promote their products. Here customers can follow or like the page to see posts from their favorite brands.
A Facebook Business Page is also a free way for organizations, celebrities, and brands to reach their audience and keep in touch with them. However, to make it easier for people to find your page Google also index it to make it easier for people to find you easily.
Here companies build strong relationships with their customers by creating engaging content or conversations. One difference between a Facebook Business Page and a Facebook profile is that a Facebook Business Page offers your brand more opportunities than a business profile will.
Why do you need a Facebook Page?
Do you still think that a Facebook Business Page isn't for you? Sit tight, let's clear the dark clouds in your mind.
Sign up to the TechRadar Pro newsletter to get all the top news, opinion, features and guidance your business needs to succeed!
As a small business owner, there are over a million reasons why your business needs a Facebook Business Page. Come to think of it, there's no doubt that Facebook is the largest social media network. It is a powerful tool that not only connects you with customers but also offers them detailed information about your products, services, and business thereby driving leads. Its biggest advantage is providing opportunities for your brand's content to reach a wider audience, but if you are still making use of a Facebook profile, only your friends can see your posts thereby limiting your audience reach.
Unlike a normal Facebook profile, a page offers you tools that let you manage and track your engagements, it's an excellent way to connect with both current and future customers, and promote products and events. I would love for you to please not make the mistake of using a Facebook profile to grow your brand. It's one of the biggest mistakes you can make as a business owner.
Growing followers is much more possible with a Facebook page than with a Facebook profile. This is because Facebook allows you to run paid ads to gain followers as much as you want but with just a Facebook profile, you will have to depend on the Facebook algorithm to be able to boost your following. Facebook ads are a great way to boost your visibility and reach, you can also decide who will see your ads based on age, gender, location, and interest, and a major benefit is that you can track the results.
Have you ever thought of a CTA button (Call To Action), I guess you have seen them on Facebook. CTA buttons are a path created to lead your followers to your desired destination whether it be a website, landing page, etc. With a Facebook Business Page, you can add a CTA button to your page but that isn't possible with a Facebook profile. This call to action can vary from;
- Learn More
- Buy Now
- Sign Up etc.
A Facebook business page is easier to handle than a Facebook profile, it gives you a detailed review of how your brand is doing. It lets you monitor your page performance, audience reach and insights, the performance of content, and demographic data. Your page helps you grow your brand and also advertise your products, it comes with lots of free tools that let you achieve your goals.
Can I use a personal Facebook account for my business?
Yes, you can use your account for your business, but you should also note that Facebook prohibits the use of personal accounts for business or commercial gain. In case you want to use your personal Facebook account for business here's how you can do that:
Before Getting Started you have to make sure you read Facebook's Terms of Service to make sure you don't go against them, going against them will lead to having your account shut down.
Steps to create a Business Facebook Page
Step 1: Adjust your Settings
For professional exposure of your business on your personal account, you need to adjust your settings. To do this Go to your Facebook homepage, then click the drop-down arrow on the top left side of the navigation bar.
As you scroll down you will see the setting area where you'll have to make changes like; how your name appears on your Facebook profile, add your email address, and phone number and even update your password if you want to.
Next, you might want to enable a two-factor authentication setting because this enables you to identify trusted contacts and it might help you get back your account if you are locked out.
To control who sees your post, head over to the privacy button on the drop-down menu, this helps you control who sees your post, who can send your friend request, etc. For example, if you might want lots of people to see your posts whenever you make them, then you should set that to public. Consider changing the setting to receive friend requests from everyone, you can expand your reach by doing so.
Also, the Timeline and Tagging settings area helps you protect yourself from sharing too much of your personal life in your Facebook profile and also who writes on your timeline, this is the fun of Facebook, after all. But your friends and family won't always be in a business-like state of mind like you would. To ensure you can control what appears on your timeline, enable features that will allow you to review any posts or tags in the timeline before they appear on your timeline.
Step 2: Profile picture and Cover photo
You should choose a photo you would be happy to share with customers. To change your profile picture and Cover photo, head over to the current photo you had on, and click on update photo, you can choose to take a photo or update from your computer or file. Your cover photo should be something that talks more about your business, when choosing a cover photo make sure it's something that conveys information about your business.
Step 3: Update your Profile
It's a good idea to properly fill out all the boxes with information related to your business if you want to increase brand awareness. Choose carefully what you want to include in those boxes.
Click on the Edit Profile icon located in the bottom-right corner of your cover photo to make some necessary professional changes.
Your bio, which appears at the top of the Intro section of your profile, right beneath your profile photo, has a character limit of 101. Underneath the Edit Bio section, you will find the Edit featured photos, here you can add two more photos that convey your business information, it can be a photo with your co-workers or an event.
As you scroll down by selecting and unchecking the boxes next to each entry, you may modify what appears in your Intro as you scroll down the popup. You can decide whether to include information about your home address, employment background, and other factors.
Next thing is to Modify Your About Info by clicking on the about info button at the bottom of the pop-up window. Fill out the Employment and Education sections completely with the necessary details that support your business.
Keep in mind that when potential customers visit your profile, they may want to see the information you enter in the remaining fields like "Places You've Lived, Contact and Basic Data, Family and Relationships, Information About You, Life Events." So make sure you fill those areas correctly with the necessary information that supports your business.
After filling out this information, you might want to view how your profile looks like; you can access it by clicking on the three-dot button in the lower-right corner of your cover photo or clicking on View As in the Review What Other People See on Your Timeline row of Who Can See Things on My Timeline.
What is on a Facebook Business Page?
Here are some features that make up a Facebook Business Page.
Messaging: Your Facebook business page comes with an inbox to let you Communicate with your customers on Facebook, WhatsApp, and Instagram, you can also create automated messages.
Business Information: Facebook business page holds and shows information about your business such as location, website, Opening and closing time, categories, phone number, etc.
Tools: There are many free tools to use to help you expand your business. They range from Events and Appointments which help you grow your customer base to Jobs that can help you find the right, qualified candidate.
Insights: This feature enables you to find customers who are interested in what you offer, and understand the actions they take on your page. You can also see what your competitors are doing on their page and also learn more about your industry.
Posting: Using the publishing tool you can create and manage your posting schedule.
Call-To-Action: This was created in December 2014. It enables you to drive business objectives by including a Call To Action on your page.
Schedule Posts: You can schedule your post in advance to save time and be more efficient. Some social media managers use Hootsuite to schedule and share their posts, forgetting they can schedule Posts on Facebook instead of clicking the "POST" button.
Page Moderation: This can be found under the "General Tab", it gives admins the option to block certain words from appearing on the page.
Events App: this is a useful app you can add to your page, it gives you the ability to drive traffic to your page or to an event you might be hosting in your company or community. To add this app; visit the " Apps" tab under the "Settings" menu, from there, you can select the "Add App" CTA next to the event app option. Next, you can now create an event by filling out the event form provided which includes details like event name, date, audience targeting options, ticket URL location, and category.
Tip: You can add more features to your events by featuring the app on the menu bar directly below their Page's cover photo. To achieve this you should start by clicking the "More" option on the menu and choosing "Manage Tabs."
Pages to Watch: This is one of the most useful features on Facebook business pages. Imagine having to monitor the performance of competitors including Total page likes, overall engagement, new posts, etc. To access this feature you will have more than 100 likes on your business page. This can be found at the bottom of the "Insights Overview" section.
When Your Fans Are Online: Isn't this Great? Knowing when your fans online let you know when to post for better engagement, it also lets you know the overall activity of a Page's audience base. This can be found under the "Posts" tab in the Insights menu.
Post Types: This gives you insights into the success of different post types based on average reach and engagement. By reviewing this section, you can identify what content has the best performance or engagement and then optimize content to increase page engagement. This feature can be found under the "Posts" tab in the "Post Types" section.
Facebook Response Assistant: A recent study stated that 44% of consumers expect to get a response after messaging a Facebook Business Page. This tool helps you to do that, it responds to your customers when you don't have a 24-hour social marketing team to do that. For eg, this is how the tool replies to your customers;
‘Hi Bob, thanks for your message. We are not here right now, but we will get back to you soon!’
‘Thanks for Contacting us. We try to be as responsive as possible. We’ll get back to you soon.
This tool helps you with things like:
- To stay responsive when you aren't available.
- Show a Welcome message to a messenger.
- Send instant replies to anyone who messages your page.
Chapter 2
How much does a Facebook business page cost?
Just like you set up your Facebook profile, setting up a Facebook business page is free. No matter how many followers or fan base you have, Facebook won't charge you for that. It won't charge you for the organic aspect of your page, it will only charge you money to run ads, which we will still talk about later in this article.
Why does Facebook not charge anything?
This is because by using Facebook, you are helping it acquire more information, and attention about your audience, which it in turn sells this attention to advertisers in the form of Facebook Ads.
Step-by-step tutorial using business settings
Choose or create a personal Facebook account
To create a Facebook Business Page you need to start by creating a personal Facebook account, if you already have a Facebook personal account, then you don't need to worry about creating a Facebook account.
In case you don't have a Facebook account to create one follow these steps:
To create a Facebook account from your computer
First, visit www.facebook.com
Click on the ‘Create New Account
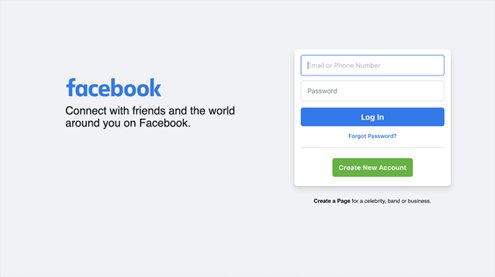
Next Fill in the necessary details such as Name, Email or Phone number, Password (I recommend you use a strong password to open a Facebook account and also one you can remember), Date of Birth, and Gender.
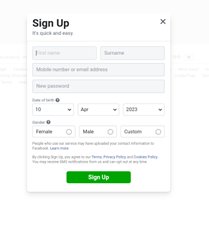
Click on the sign-up button below to create a Facebook account (Remember you must be at least 14 years old to create a Facebook account).
The next thing to do is to confirm your email address or phone number. To do this, if you opened the account with your email address, Facebook will send a confirmation link to your email, head over to your email and click on the link to confirm your email address. If you opened the account with your phone number, you will see a confirmation code sent as an SMS, enter it in the confirm box.
After this, you need to personalize your profile, Set up privacy, etc.
To Set Up your Privacy
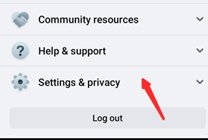
Go to the downward arrow located at the top right corner of the navigation bar, scroll down, and click on the ‘Setting and Privacy' button. Here you can select if you want only friends or the public to see your posts.
To personalize your profile
You need to add a profile photo, and cover photo and update your profile.
To do this, go to your profile and click on the profile picture, then you can choose to upload from your computer or take a photo. Next, you need to add a cover photo to do this, click on the camera button on your cover photo, which is on your profile.
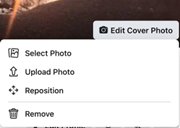
Then choose your cover photo, you can choose a photo from your Facebook profile, create a collage, upload a photo or you can still choose from a selection of Facebook’s cover artwork. You can also reposition or delete your current cover photo.
To update your profile
Click on the ‘About' section on your profile. Here you can fill in information about yourself such as; work and education, the places you’ve lived, contact and basic info, family and relationships, details about you, and life events.
After these steps, you can now add friends. To do this you can either search for them in the search bar provided, find them in the Find Friends tab, or import a list of contacts from your email, iCloud, or phone.
To create Facebook account on your phone
Go to Google play store and search for ‘Facebook' using the search bar provided.
Download and install the app on your phone.
Once installed open the app on the home screen and click on ‘Create New Account
Click Next, and fill in your information by providing the necessary details after that you click on Register. And that's it! You have successfully created a Facebook account using your mobile phone.
After you are done creating your Facebook account it's time to create a Facebook Business Page for your brand.
Log in to your Facebook account, either with your computer or mobile phone.
Click on the menu icon on the left, click ‘Page', and then the ‘Create' button.
Then click on the 'Getting Started' button as shown below.
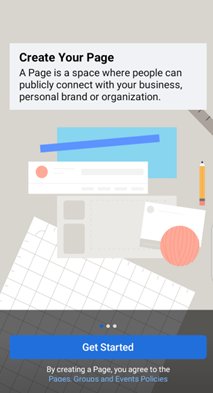
This will take you to another screen where you need to Add the name of your page. This should be your brand/business name. If another business or brand is already answering your name on Facebook then you should consider making yours more descriptive for example; Instead of using "Bakery shop" you should consider making use of ‘Debby's Bakery Shop '
Next is to add Categories. You can do this by typing words that best describe your business. You will see a drop-down of some suggestions, choose from there the categories or option that best describes your business. You can choose up to three categories.
Brands Description/Bio: Here you should write a summary of your business. This should be a few sentences like about 255 characters Max.
Complete Information: You have to enter more details about your business like Website, business hours, phone number, business email, etc. You can choose not to fill in these forms or to leave this section blank if you don't want your customers to know your email, phone number, etc as it's optional.
Add Photo: High-quality photos help to create a good visual impression on your audience. Upload your profile picture, it's the image that stays beside your business name when interacting with the audience, it also stays beside your business name in search results.
You can. Decide to add your business logo as a profile picture, or anything that your customers will use to recognize your page immediately. Your profile photo image size should be 180×180 pixels. Choose an image and add it as your profile picture.
Next is to add a cover photo, this is the most noticeable image on your page, it conveys information about your business to your audience at first glance. Choose an age that shows your brand personality, products, or services, The cover image size should be 1640 ×856 pixels according to Facebook. Once you are done adding the photo, you can preview your page to see what it will look like to your audience, then click the 'Save' button to save the image if you are satisfied with what you see.
Connect your Business Page to WhatsApp: This is optional. It appears once you have added your business photo and cover photo. Add your phone number and click on the 'Send Code' button below. Once the code is sent, you can then add the code on the confirmation box provided to connect your Facebook business page to your WhatsApp. This action sends some potential customers from Facebook ads to your WhatsApp.
Edit Page Information: It's time to add your business details, this way potential customers can learn more about your page such as; your business address, website, opening hours, etc.
To Edit your page information, select the gray "Manage" button located toward the top of your Page. Then navigate to the "Set Your Page up for Success" menu. Expand the "Provide Info and Preferences" column to add more information.
Don't forget to add an action button, this enables customers to find it much simpler to contact you, place an order, schedule a service, know your address, or carry out any other task related to your company when you use action buttons. A Facebook Call-To-Action button encourages page visitors to learn more about your business.
Scroll to "Provide Info and Preferences" then select "Add Button." and then decide which course of action is best for your business.
You can always return to these steps if you're not prepared to finish them. Go down to Edit Page Info in the Manage Page menu on the left.
When completing these details, you can decide to unpublish your page if you wish to take your Facebook Business Page offline. To do so, select General from the Settings menu under the Manage Page heading. To set the status to "Page unpublished," click Page Visibility.
Invite your Friends to Like and Follow your Page: Begin by inviting your already existing friends to like and follow your page. To do this view a list of your existing Facebook friends, and click the Invite Friends button. Then Click Send Invites after selecting the friends you want to invite.
You can advertise your new Facebook page using your website and/or Twitter account if you have either of those. On your email signature and marketing materials, include "follow us" logos. Also, you can request reviews from your clients on your company page.
Create a custom URL: A custom Facebook Page URL or username gives your Page a more trustworthy appearance to customers. To create a custom URL or username, Settings -> General Page Settings then tap Edit next to the Username field then make the necessary edits.
Make your first post: Now your Page is all set up it's time to create a post, this might be a welcome post or anything that talks about your business.
Chapter 3
How to add an admin to a Facebook page
Making someone an admin of your Facebook business page gives them the equal right as you over the page, it gives the highest permission available.
You can choose to add an admin to your page or a team of people who will effectively manage your page, who can edit and publish content, look at information about your followers, and much more.
Here are steps to Add an admin to your page.
Go to your Facebook page. On the left sidebar menu, scroll down and click the "Settings" button:

This action will take you to the general Page Settings menu. On the left sidebar menu, scroll down and click "Page roles":

There you will see the "Assign a New Page Role" section, start by typing the name of the person you want to make an admin to the page. A drop-down menu will appear to offer you suggestions and you can choose the person you want from there.
Click the box next to their name to see a dropdown menu of role options. Then select the "Admin" option.
You will see a reminder that will pop up that reads: "If you're adding a new admin to your Page, please keep in mind that they'll have the same permission as you do to make changes to this Page."
Once you have chosen the right name, click "Add." Facebook will then request you to re-enter your password to confirm it's you that is making the change.
Under "Existing Page Roles," the person's name will now show up with a red "pending" message next to it.
You have to wait for the person to get the request once the person receives the notification, they can accept it and their role will show up under the "Existing Page Roles" section. This shows you each person on your page and their permissions.
How to delete a Facebook page
To delete a Facebook Business Page you must note that If you’re not 100% sure about deleting your page, then consider unpublishing it instead. You’ll be able to publish it again when you want to and no information will be lost.
If you have made up your mind To delete your page follow the steps below:
Via Desktop
- Log in to your Facebook page
- Open your Facebook feed and click on the 'Pages' button in the left menu
- Choose the page you want to delete
- On the bottom left of your dashboard, click Settings
- Navigate to the General tab and click Remove Page
- Click Delete [Your Page Name] and click OK
Note that once you have successfully removed your Facebook page, your Facebook page will not be deleted till after 14 days, it will remain visible in case you change your mind. After 14 days it will be permanently deleted. If you want to cancel deletion, you can do it within 14 days.
If you want to delete it permanently immediately, to remove it at this very minute from the public eye then you have to unpublish before deleting it.
Via Mobile phone
- To delete your page using a mobile phone
- Open your Facebook app
- In the top right corner, tap the menu on the left side of the navigation bar
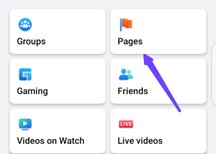
- Click on the page you want to delete
- Click 'Settings', and hover over 'General"
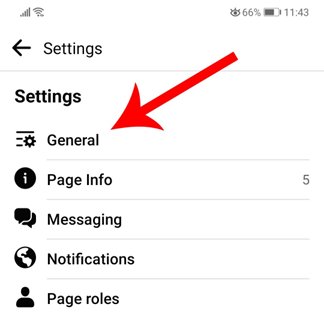
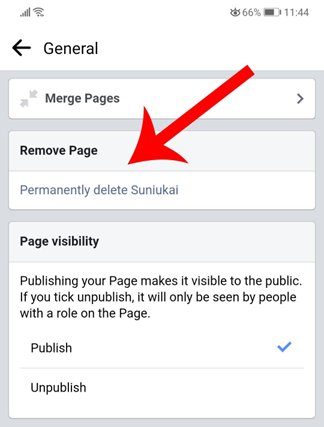
- Select Permanently delete [Your Page Name]
- You can also un-publish your Facebook page below in the Page Visibility section
How to easily manage Facebook Business Pages using Meta Business Suite
The Facebook page includes many useful tools that let you manage your pages effectively.
Here I'll walk you through ways you can easily manage Facebook pages.
Facebook offers a page management tool known as Facebook Business Suite which allows you to run multiple business pages.
Facebook business suite is a very powerful tool to effectively and easily manage your business. It also helps you more with the advertising side of your pages. Here you can view all your ad accounts, ads, invoices, and ad metrics.
The Creator Studio allows Page managers to create and schedule content and view analytics, either on the web or via a mobile app. It also includes the ability to go Live on your Page or post across multiple Facebook Pages simultaneously.
Before I walk you through How to easily manage Facebook Pages Using Meta Business Suite let's look at what is Meta Business Suite (Facebook Business Suite).
What is Meta Business Suite
Meta Business Suite (Facebook Business Suite) is a social media management tool launched in 2020 for Facebook and Instagram users to effectively manage their businesses. With this tool, you can schedule your post, create posts, run ads, plan organic campaigns, etc.
Here are steps to take to manage your pages easily.
First, you need to start by inviting people to the Business Suite, this can include colleagues or your team to work with you here.
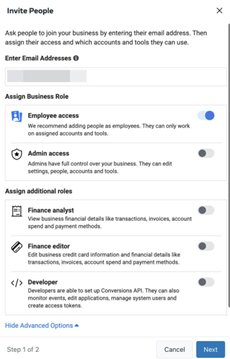
To invite "Open Meta Business Suite use the drop-down menu in the upper-left corner to select the account you want to work with. Then click the icon in the lower-left corner to open the account settings. Click the People tab to add people to your team. Also, keep in mind that every business account should have at least two admins.
Add Facebook Pages to the Business Suite
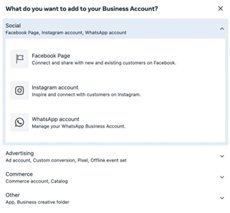
To start managing a Facebook business page in Meta Business Suite, Click the Business Assets tab. Then select Pages to review the pages your business account owns. To add another page to your account, click the Add Assets button in the upper-right corner. Then select Facebook Page. From here you can also create a new page for your business or move an existing page into your Meta business account.
Add Instagram accounts
If you have an Instagram account for your business, you should consider adding or linking your account to your business suite. To do this from the Business Assets tab, click the Add Assets button. Then select Instagram Account and agree to the terms:
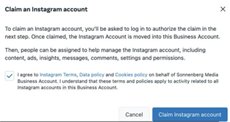
If you have an Instagram account you can click on the 'Claim Instagram account ' button. Here you will be prompted to log into the Instagram account you want to add. Then you'll be able to share access with team members.
Manage ad accounts
To Manage an Ad account, Click the Add Assets button and open the Advertising menu. Then select Ad Account and choose whether you want to claim, share, or create a new account as shown in the image below.
Assign roles and permissions
To assign roles and permissions to your team members go to the Business Assets tab of the Business Suite, and select the page or account you want to manage. Then select the Page Access tab and click the Add People button:
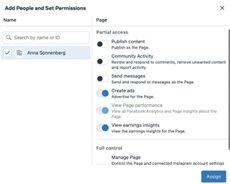
List services
Here you can list all of your services on your Facebook business page. You can drive consideration and attract more customers by listing your services.
To do this, open the All Tools menu and select Services. Then click the Add a Service button:
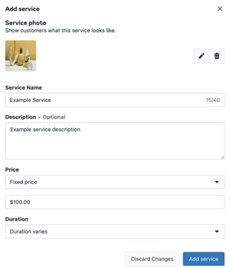
Then Add a name and a description, upload an image, and set the price and duration.
Configure business apps in Business Suite
There are many built-in tools for marketing your business. For example, you can use apps like Acuity for locking in time on your calendar or apps like Fresha to manage salon and spa appointments. You can also use apps like Reserveout and Resy for restaurant reservations.
Open the All Tools menu in Business Suite and select Business Apps.
Plan, drafted, publish, and schedule social media content in Business Suite
To plan, draft, and schedule content with your team, open the Planner tab in the Business Suite. Click the Create button in the upper right or select any day on the calendar. Then you can create Facebook and Instagram posts.
Review analytics in Business Suite
Click the Insights tab in the Business Suite. Use the Overview tab to get a view of your performance and spot also trends related to reaching and growth.
With these steps, you can manage multiple Facebook pages.
Here are tips and tricks to effectively manage your page:
1. Always Update your 'About' section
This is an easy approach to generating traffic to your website.
Important information such as your contact, Location, Email, and website also details like Services, products, Special offers, price should be shared.
2. Videos increase engagement
A study by Socialbakers posting videos yields a 135% increase in organic reach over photo posts. Posting videos in general typically reaches a greater audience.
Chapter 4
Facebook Business Page tips
To help you stay ahead on the course I've put together some tips to help you manage your Facebook business page effectively.
Engage with your audience
You can engage with your audience through direct messages, comments, or even reactions. Engagement with your audience increases brand awareness. Is all about building a relationship, by allowing your audience or followers to get to know the real person behind your posts, you're helping them associate with the real person.
When people know you they can connect with you as a person, and they'll be more likely to engage with your content online, giving your engagement rates a boost. Try to make sure you're keeping up with the people in your business. It’s better to be known as a helpful business owner who answers questions quickly and engages their followers than someone who never says anything at all!
Listen to your audience
You must communicate with your audience as well as hear their reactions. You should use social media listening tools and keep up with what people are saying if you want to effectively use Facebook for marketing. You may keep track of mentions of your business and follow hashtags to stay updated on what's popular and happening with your clients.
Promote your events
Facebook is a great place to promote your events because you can simply create an event from scratch and invite your followers. This is a great way to get the word out about your events.
Use Facebook Ads
Paid advertising is a way to reach more audiences and also create brand awareness. Facebook is known as the most popular platform for running ads. So, for you to promote your business page and reach, you need to learn how to use Facebook ads.
How to set up Facebook Ads
Before you set out to start creating Facebook Ads, it's important to consider your advertising goals.
For instance, 200 downloads in the first month can be your success rate if you're trying to increase mobile app downloads with Facebook ads. The point is that before you design a campaign, you should consider why you are advertising.
1. Create an ad account
When you signed up for Facebook, you were given a personal ad account ID by default. You view this ID by going to Ads Manager and looking in the upper left-hand corner.
To use Facebook Ads Manager, you need:
- A Facebook Page
- A verified payment method and
- To be an admin, editor, or advertiser on someone else’s page
2. Head over to Facebook Ads Manager
By clicking and saving this direct link, you may find Facebook Ads Manager quickly and easily. Your personal ad account's Facebook Ads Manager will be opened automatically for you. Use the account drop-down menu to select the appropriate account.
From your business page, click the "Ad Center" drop-down arrow in the left sidebar, select "All Ads" from the drop-down menu, and you will be sent directly to Ads Manager. There is a link to "Ads Manager" at the bottom of that page.
Your Facebook Ad Accounts page will open and provide you with a brief overview of your ad accounts. Choose the account where you want to run advertising if you have access to more than one ad account.
There is a Facebook Ads Manager app available for Apple and Android if you'd prefer to use a mobile device.
3. Choose your objectives
Click the green ‘Create Ad’ button to get started with your first ad.
Then you will be taken to a page where you are going to choose your campaign objective.
Based on what you want to achieve there are several categories which include:
i) Awareness
This category is made up of objectives that will be beneficial to your product or service.
- Increase brand awareness by displaying your advertisements to those who are most likely to remember them.
- Improve your reach: show your adverts to as many people as possible.
Moz found that spending $1 per day can increase your audience by 4,000 individuals. While this did not exactly match our experience, it is worth trying.
ii) Consideration
You might choose this category if you want people to start thinking about your business.
- Send people to a destination within or outside Facebook
- Get more Page likes, or post reactions, comments, or shares
- Promote app installation
- Get more views for your videos
- Increase lead generation
iii) Conversion
This is designed to get people to purchase products and services :
- It Increases engagement on your website
- It Gets people to claim your offer
- It Increases product or catalog sales
- It Gets people to visit your shops etc.
Make sure your campaign name is something recognizable.
vi) Set your campaign budget
Here you are going to choose how much you want to spend on the ad. You can set your budget as a total amount for the campaign.
We have a daily budget and a lifetime budget.
Daily: A daily budget set a limitation on how much money you spend on advertising each day. Facebook will utilize the information you specify to determine the best location and time to display your ad to your target audience. After your budget is met, the adverts are turned off for the day. The cycle begins again the next day.
Lifetime: A lifetime budget is a maximum amount you will spend during the duration of your ad campaign. You provide a number and an end date, and Facebook will spend the money based on ad performance. The campaign will finish after your budget has been met.
v) Customize your target audience
As I mentioned earlier, the audience for your ad can be customized based on the following:
- Location
- Age
- Gender
- Languages
- Interests
- Behaviors
Also, you can choose advanced targeting, which will let you include or exclude people who are connected to certain pages, apps, or events.
vi) Choose your ad placements
This defines where your ad appears for your audience. You may choose to show your ad on Facebook, Instagram, Messenger, or the Audience Network.
For the target you selected, Facebook suggests using automatic placements. This allows Facebook to optimize placements for you to achieve the greatest possible outcomes at the lowest total average cost.
Tips to maintain an engaging Facebook Business Page
Don't create a personal profile for your business
I once said earlier in this article, creating a personal profile for your business gives you a huge disadvantage, imagine missing out on all of the content creation tools, paid promotional opportunities, and analytics/insights that come with a Facebook Business Page.
Managing a business with a personal profile can be frustrating, I once had a business personal profile on Facebook. It requires having your customers send you a friend request to be able to connect with you and the last thing you would want to do is make it difficult for your customers.
Add a recognizable profile picture.
When creating a Facebook Business Page, don't make the mistake of adding an unrecognizable profile picture; you might lose most of your customers if you do so.
As a big brand, it's advisable to use your company logo as a profile picture, and as a Freelancer or consultant, a headshot of yourself is okay. Being recognized means being found by your customers or audience, especially in Facebook searches. Also keep in mind 'Page profile pictures display at 170x170 pixels on desktop, and 128x128 pixels on smartphones.'
Engaging Cover photo
Your cover photo is one thing that catches your visitors' attention as they visit your page, so you will have to make sure you put an attractive image there. Make sure it's of high quality, it can be anything like a company event or anything related to your business. Also note, Page cover photos display at 820 x 312 pixels on computers, and 640x360 pixels on smartphones.
Avoid publishing mishaps with Page roles
When I talk about publishing mishaps with Page roles I mean when a folk accidentally posts personal stuff on your social media page, this is a marketer's worst 'nightmare' or let me say 'horror story.'
Make sure you assign Page roles to employees who would effectively manage it and use it for work only. To assign Page roles check the previous heading above.
Remember, when sharing content on behalf of your brand, make sure you're posting it as your brand, and not as yourself. You can check that by clicking “Page Attribution” in your settings.
Post photos and videos to your Timeline
Videos and photos have proven to be an effective way to increase and boost engagement on your page, especially videos. Determine the ideal timing and frequency for your posts.
It's important to consider what your content strategy would be, and also your posting frequency. If you don’t post frequently, you won’t look reliable or authentic but also don't post too often people might get sick of having their feeds flooded with your content.
When you post is also important in determining your post engagement, according to Hootsuite The best overall time to post on Facebook is between 8 am and noon on Tuesdays and Thursdays.
The best days that make the most sense to post on your page according to research by Hootsuite social teams are Mondays through Wednesdays are the most effective days to post on Facebook
When it comes to the best time to post on Mondays, it's between 6 a.m. and 4 p.m. EST, and the worst time is between 9 p.m. and midnight.
The best time to post on Tuesday is between 7 a.m. and 4 p.m. EST, and the worst time is between 9 p.m. and midnight.
The best time to post on Wednesday is between 7 a.m. and 4 p.m. EST, and the worst time is between 8 p.m. and 1 a.m.
The best time to post on Thursday is between 6 a.m. and 4 p.m. EST, and the worst time is between 9 p.m. and 1 a.m.
The best time to post on Friday is between 7 a.m. and 4 p.m. EST, and the worst time is between 9 p.m. and 1 a.m.
The best time to post on Saturday is at 8 a.m. or from 10 to 3 p.m. EST, and the worst time is between 9 p.m. and 1 a.m.
The best time to post on Sunday is between 11 a.m. and 4 p.m. EST, and the worst time is between 8 p.m. and midnight.
Tips for finding your own best time to post on Facebook
You’ll get the best results if you focus your posting time on your specific audience.
Here are some tips to help you:
i. Use Meta Business Suite
Meta Business Suite shows you the best time and day to post on your page. This will help in Increasing your reach, building brand awareness, Increasing engagement, and driving traffic.
ii. Check your audience demographics
To find your audience demographics, open Meta Business Suite and click Insights, then Audience. This will give you an idea of the time zones that are important for you to consider when planning your posting times.
iii. Review past performance
This will help predict what will work best in the future. Take a time to look at the past posts and their performance to see which ones have the highest reach.
To evaluate your most recent post and see its reach, Open Meta Business Suite and select Facebook Insights from the left menu. Then select Content, choose a 90-day timeframe, and exclude Instagram posts from the study using the drop-down boxes in the top left. To view the posting with the highest reach, click on the Reach column heading after sorting posts by their highest reach.
iv. Be consistent
Once you get a good idea of what works best for your business, you should aim for consistency.
v. Pin important posts to the top of your page
You might want a particular post to stay on top of your page, you should consider pinning them. This is because the older a post gets, it gets pushed down your timeline.
You can use the pinned post as a way to promote some posts like; upcoming events, Offers, or important product announcements. Click on the drop-down arrow in the top-right corner of a post on your page, and click 'Pin to Top to pin a post.
vi. Monitor and respond to comments on your page
Social media is all about interacting with your audience. This should mean whenever your audience drops a comment you should respond to their comments. This helps you build connections with your audience and build your reputation. To monitor and respond to comments, hover over the 'Notifications' tab at the very top of your page.
vii. Promote your page to generate more followers
After adding content to your post, the first thing you should consider is running an ad to promote your page.
Here you can choose your target audience. To create an ad, click on the three dots at the top menu bar above your posts and select “Create Ad.” From there, Facebook will let you start creating an ad based on your goals.
Optimization tips for your new Facebook Business Page
- Your business profile picture should be at least 180 x 180 pixels and square. The profile picture should be readable when viewed at 36 x 36 pixels
- Your cover photo should display 820 x 312 pixels on a desktop and 640 x 360 pixels on mobile phones.
- Always try changing your cover photo seasonally or when your business has an important update.
- Your username should match the name of your Facebook business page as much as possible.
- Don't leave your “Description” field blank. Make sure you use all the allowed 255 characters for original content.
- Linking to your page from your website will get that page rank higher for your business name, helping you in your reputation management efforts.
- Select the best template. Facebook offers pre-made page templates to help you optimize your page based on the type of business you are running.
- Add Page Tabs to Promote Your Products or Services
Basic tips to get more people to see your Facebook Page
This section includes fundamental and advanced tips to help you be visible to your audience and potential customers.
According to research by Locowise Facebook Analyser, the average organic reach of Facebook page posts is currently 10.59%. It can be very sad knowing that you have up to 15000 followers but only 1000 people tend to see your post. The big question here is how to get more people to see your Facebook page and also your post.
Tell your fans
Many people find this uncomfortable but I'm going to show you a better way to encourage your fans to make sure they don't miss out on your Facebook page posts. You can do this in a variety of ways. One way is to create a post that tells your fans how to do it and pin that post to the top of your page.
Be online
Having a page posting every day isn't enough. You need to be active to respond to comments and reviews.
Reply to your tagged mentions
Watch the mentions on your page, then. Make sure to join in the conversation and bring up your page if it is discussed.
Start by switching over to your page, then click on the notification where your page was mentioned.
You can respond to any mentions of your page you get by clicking here and being directed to your notifications dashboard. even when personal accounts make public posts; such as your page.
Encourage people to mention you
Let your followers know they can mention you in their posts. Let them know that they should include @Your Business Name when they mention you to their Facebook friends in a public post.
This is known as word-of-mouth advertising, which will help you become more popular on Facebook as the brand that everyone must try!
And ideally, you ought to be keeping an eye on those mentions. Try dropping by, expressing your gratitude l any inquiries their friends may have about your company.
Post more interesting stuff
Posting interesting, and engaging content increases interaction and reach.
If you are curious about what to post here are some post ideas:
- Ask Questions. This is a great way to start a conversation with your audience
- Behind-the-Scene: this is another great content idea. To do this you can Show how products are made, introduce your employees, or include bloopers of other videos or campaign
- Trending topics: This is one great way to increase your reach and engagement and also people will be more likely to comment on and share your posts as well.
- Branded graphics: This is just perfect for any online presence. This involves creating graphics with your company logo.
- Here you can share quotes, memes, motivational sayings, relevant tips, and more.
- Tell stories: Here you can share your own story of how your company was founded, the challenging aspects of running a business, etc.
- Videos: Videos are great post ideas on Facebook, and creating and sharing them often.
Cross-Promote Across Social Media
You should cross-promote across other social media networks If you have got a large audience on them.
Facebook tricks for business
Identify Your Audience
You need to be certain of who your target audience is. To find your target audience, ask yourself these questions:
- What age range do your followers fall into?
- Which area do they reside in?
- What do they do for a living?
- What difficulties do they encounter?
- They use Facebook at what times, and how?
Also, you must be familiar with the typical demographics of Facebook users. See Facebook's audience insights for more information about your audience.
Define Goals
Know and define your business goals, because if you don't, it's just like a car going without any specific direction.
To create a successful Facebook marketing plan, you need a compelling purpose that is connected to your company's goals. You should focus on actions that will advance your primary objective.
Your goals can include, generating leads, increasing site conversions, etc. Once you have defined your goals you should come up with specific and quantifiable ways to attain them. Use a well-known framework for setting goals, such as SMART (Specific, Measurable, Achievable, Realistic, and Timely).
Make sure that every Facebook post and ad you publish ultimately aligns with your goals.
Plan the content mix
Choose your content mix based on various principles, such as the 80-20 Rule or the one-third rule. According to the 80-20 rule, 80% of your material should be informative, and 20% should include some advertising for your service or product. The one-third rule states that one-third of your content should be informative, one-third should be interactive, and the remaining one-third should contain promotional material for your business or product.
Use different Facebook tools
Here are some tools that will help you increase engagement.
Facebook Group:Facebook groups can help increase engagement. Create a Facebook group under your company name to spread useful information and promote your brand, various events, products, and services. According to research, 1.4 billion people use Facebook groups each month. Undoubtedly a sizable readership, then.
- Facebook Business Manager: This tool helps you manage your post effectively and also makes your work with other team members smooth.
- Facebook Chatbot: This tool is designed to help you to communicate effectively with customers especially when you aren't online.
- Facebook Pixel and Facebook ads: Facebook ads is a sure way to increase your reach. Facebook Advertising allows you to pay to get content shared with a particular audience. Whether you want to increase brand exposure, traffic, or engagement, the goal is to reach the proper people with your message. Apply a Facebook pixel for free if you don't want to spend on Facebook Ads. It is merely a piece of code that you put on your website to track conversions from Facebook, market to recent site visitors, or create precisely targeted audiences for prospective advertisements.
Build a giveaway or contest strategy
Use giveaways or competitions to effectively use Facebook to further your marketing objectives. Remember to have a plan before launching these giveaways or competitions. Respond to inquiries like:
What items are you able to give away?
What role will the audience play?
Make sure your choice aligns with what your potential clients or audience expects from you by carefully considering these factors.
Facebook tricks for publishing
Schedule your posts
Preparing or writing numerous posts at once and scheduling them in advance is one of the best Facebook hacks.
You may schedule posts for Facebook and Instagram using the built-in tools provided by Facebook, such as Creator Studio or Meta Business Suite. Nevertheless, if you also publish on other social networks, you may require a third-party social media management service.
Use Facebook Page Insights to analyze the performance
Creating very good content is the first step to success. You must keep an eye on your stats to spot engagement trends.
Keep an eye on your Facebook Page Insights carefully to determine what engages your audience.
The Page Insights dashboard allows you to get a summary of your Page's performance over the previous seven days, which includes:
- Page Likes
- Engagement
- Facebook visit
- Post Reach
Use Audience Insights to learn about audience behavior
You need to learn more about the preferences and actions of your audience and to do that, check out Facebook's Audience Insights. This tool provides you with comprehensive data about your target audiences.
You receive demographic breakdowns on:
- Age
- Location
- Relationship status
- Gender
- Job descriptions
- Education levels
Facebook Messenger tricks
This is a tool for interacting with customers, brands, friends, and even families.
Here are Facebook messenger tricks you should try:
Use a chatbot
Using the AI-powered chatbot will help reduce those Messenger response times. Chatbots can respond to basic FAQ-style questions for you in place of your customer care employees. Chatbots can then direct these more complicated or delicate questions to your team if clients require additional support.
Moreover, chatbots can cross-sell or upsell items to your clients to enhance their purchasing experience.
Make Voice and Video Calls
Facebook Messenger isn't meant for texting alone, you can use voice messages or video calls to connect with customers. When they aren't online you can easily leave a voice message.
Use Facebook Messenger as a Boarding Pass
Several airlines provide customers the choice to receive Facebook Messenger notifications for check-in and flight status. Also, you can use Facebook Messenger as your boarding pass after you get to the airport.
Even better, Messenger may be used to rebook your flight if necessary.
Send Money Through Facebook Messenger
Do you have a debt to an acquaintance? Then simply log into Messenger and give them a straight payment.
Choose Payments by clicking on the four dots. You must initially link a debit card to your account before proceeding.
Start a Group Chat
Start a group chat with all the necessary individuals so you may resolve issues all at once rather than having your chats repeated amongst pals. No one is left out of any updates, and everyone receives them.
If you have a lengthy group conversation going on with your family or your bowling buddies, you can keep it organized and simple to find by giving your group's names and pinning them to the top.
Earn the Very Responsive badge
A "very responsive badge" is a badge that appears on your profile, and it can be earned by responding fast to the majority of Facebook messengers.
To obtain the badge, you must have responded within 15 minutes with a 90% response rate over the previous seven days.
Facebook tricks for advertising
Knowing some Facebook ad tricks will help you reach your target audience.
Choose the right campaign objective
When you want to create a Facebook ad campaign, you would be asked to choose a campaign objective. Most people ignore this and move over to the next thing. However, the objective you choose is very important, but many sellers don't realize this.
Your chosen objective informs or tells Facebook the purpose of your campaign so that its algorithm can display your ad to a more relevant audience.
If you don't select the ideal target, this auto-optimization of your advertising won't be effective and will likely end up costing you significantly more in terms of cost per click (CPC).
Focus your ad around the right location for your business
When it comes to Facebook advertising, your geographic targeting is just as important as demographic targeting. You can direct your campaigns to the precise locations where your clients are found by choosing the right location.
Avoiding wasting too much of your advertising budget on consumers from regions where they are unlikely to ever make a purchase, can also help you save money. If you simply want to advertise, advertise locally, or within a specific city, state, or nation.
Right targeting
Targeting for Facebook ads may seem like a straightforward component of an advertising strategy, but some sellers still overlook it.
Although Facebook's algorithm will aid you in your endeavors, you should make every attempt to accurately describe to the platform the audience you are trying to attract with your campaign.
Avoid ad duplication
Don't duplicate your ads as most sellers do, thinking is a better alternative to creating a new one. This is improper behavior, the goal here is to keep your audience engaged. How would you do that when you keep duplicating your ads?
To avoid this when generating your ad, choose "use existing post".
Install the Meta pixel
Meta Pixel helps you to remarket to website visitors and track conversions from your Facebook advertising.
It works by setting and activating cookies to track customers' interactions with your company.
For instance, I saw a sweater from The AliExpress on my Instagram feed that I wanted to purchase. I was about to put it in my cart when I clicked through to look at the details, but I got distracted. The next time I open Instagram, the ad for that sweater will pop up. This is what I call retargeting. This is a fantastic technique to re-engage clients who have previously shown interest in your items. Adding the Meta Pixel might assist you in retargeting potential customers.
Promote your best organic social content
It might be difficult to stand out on Facebook. Also, the current organic reach is only 5.2%. To get your organic content in front of everyone you want to reach, you can't only rely on the Facebook algorithm.
You can increase the number of people who see your Facebook content by using the Facebook Boost button. You may reach the people who are most likely to be interested in your content using the built-in targeting options.
Optimize your ad schedule
Using /7 campaigning may get expensive. Because of this, you should review your data and make an effort to center your advertising on the hours and days when they are most effective. Because Facebook Ad Management lets you get a breakdown of all of your advertising by day, doing this is fortunately simple. Even better, you can cross-compare your efforts to give yourself a bigger pool of data to work with.
Analyze your ad performance
Analyzing your paid ads requires careful analysis of your ad performance. Facebook Ads Manager not only enables you to design campaigns but also allows you to view the outcomes.
Using the toolset, you may apply breakdowns to see detailed analytics or receive a comprehensive overview of the performance of your ad account.
Customize columns to Access metrics like social impressions or website conversions.
Use suggested columns to view more about your ads based on your objective.
View breakdowns to see the age of your audience, their location, and what devices they’re using.
Use the insights side pane to see a visual representation of your ad performance.
Conclusion
Facebook is one of the most popular social networks worldwide. Hence, creating a Facebook business page is worth the time if you want to grow your brand online.
And keep in mind that you must have content available for clients and prospects to enjoy before you begin promoting your Facebook business page to them.
FAQs
Does a Facebook business page have to be linked to a personal account?
Yes, Facebook requires every business page to be linked to a personal Facebook profile, but all the information, posts, comments, photos, and updates, on your page, are separate. The information on your profile will not appear on your business page unless you manually share them.
Can I separate my business page from my personal account on Facebook?
Yes, you should know that your personal Facebook account and Facebook Business Page aren't connected on Facebook, and won't be publicly listed on each other.
How do I hide my name on my Facebook business page?
Go to your Page, then click Settings in the left menu. Click Page Transparency in the bottom left menu. Then Click next to Show Confirmed Page Owner to turn it off. Finally, Click next to Show Names of Confirmed Page Partners to turn it on or off.
What happens if I change my Facebook business page name?
Keep in mind that changing your Page's name won't affect its username. If you have Facebook access to a Page, you can switch to your Page and request a change to your Page's name on Facebook.
Should my Facebook username be the same as my business name?
Your username doesn't have to be the same as your Page name, but it's also recommended by Facebook. Because it'll be easier for people to find you. People can easily type in your username when they want to go directly to your Facebook Page.
Kenneth is a freelance tech writer who's been in the sector for three years. He loves writing about new technology, focusing on web hosting, streaming, cybersecurity, and how it can benefit people's lives.
